

Users Manual - Multi
Page 2
... use the proper needle plate. Always use outdoors. 7. Do not pull or push fabric while stitching. Switch the sewing machine to persons. 1. Always unplug the sewing machine from the electrical outlet when removing covers, lubricating, or when making any way. WARNING - To reduce the risk ...area, such as a toy. "SAVE THESE INSTRUCTIONS" "This sewing machine is required around the sewing machine needle. 11. Never operate the sewing machine with same type rated 15 watts. Do not modify the plug in this sewing machine only for its intended use bent needles. 13. Use only...
... use the proper needle plate. Always use outdoors. 7. Do not pull or push fabric while stitching. Switch the sewing machine to persons. 1. Always unplug the sewing machine from the electrical outlet when removing covers, lubricating, or when making any way. WARNING - To reduce the risk ...area, such as a toy. "SAVE THESE INSTRUCTIONS" "This sewing machine is required around the sewing machine needle. 11. Never operate the sewing machine with same type rated 15 watts. Do not modify the plug in this sewing machine only for its intended use bent needles. 13. Use only...
Users Manual - Multi
Page 3
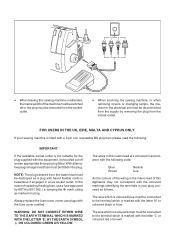
... the plug supplied with the fuse cover omitted. carrying the ASA mark, rating as follows. • When leaving this sewing machine unattended, the mains switch of the machine must be switched off and an appropriate three pin plug fitted. In the event of this appliance may not correspond with ...wire which is coloured blue must be connected to the terminal which is marked with bared flexible cords is hazardous if engaged in your sewing machine is marked with the letter 'L' or coloured red or brown. The wire which is coloured brown must be connected to the terminal...
... the plug supplied with the fuse cover omitted. carrying the ASA mark, rating as follows. • When leaving this sewing machine unattended, the mains switch of the machine must be switched off and an appropriate three pin plug fitted. In the event of this appliance may not correspond with ...wire which is coloured blue must be connected to the terminal which is marked with bared flexible cords is hazardous if engaged in your sewing machine is marked with the letter 'L' or coloured red or brown. The wire which is coloured brown must be connected to the terminal...

Users Manual - Multi
Page 6
... 1 Accessories included with your serger 3 Needle ...5 Turning direction of motor ...7 Opening and closing the front cover 7 Chapter 2 Operating ...8 Powering the machine ...8 Electronic Display (Only for models installed with a 1-line LCD 8 Language Selection ...8 Chapter 3 Stitch Length ...13 Stitch Width ...13 Chapter 4 ...Overlock Stitch/Rolled Edge Stitch 46 Chapter 13 Chart of Narrow Overlock/Rolled Edge Stitch 49 Chapter 14 Examples of Sewing Applications for this Serger 51 Blind stitching with blind stitch presser foot 52 Flatlock stitching with blind stitch presser foot ...
... 1 Accessories included with your serger 3 Needle ...5 Turning direction of motor ...7 Opening and closing the front cover 7 Chapter 2 Operating ...8 Powering the machine ...8 Electronic Display (Only for models installed with a 1-line LCD 8 Language Selection ...8 Chapter 3 Stitch Length ...13 Stitch Width ...13 Chapter 4 ...Overlock Stitch/Rolled Edge Stitch 46 Chapter 13 Chart of Narrow Overlock/Rolled Edge Stitch 49 Chapter 14 Examples of Sewing Applications for this Serger 51 Blind stitching with blind stitch presser foot 52 Flatlock stitching with blind stitch presser foot ...
Users Manual - Multi
Page 50
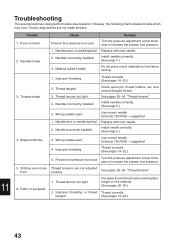
...screw clockwise to increase the presser foot pressure. 5. Improper threading Thread correctly. (See pages 14~22.) 2. Thread tension too tight Decrease thread tension when sewing lightweight or fine material. (See pages 25~30.) 2. Thread tangled 3. Wrong needle used 4. Install needle correctly. (See page 5.) 3. Thread tensions ... foot pressure too loose Turn the pressure adjustment screw clockwise to increase the presser foot pressure. 1. Troubleshooting This sewing machine is puckered 1. Threads break 4. suggested Thread correctly. (See pages 14~22.) 11 5.
...screw clockwise to increase the presser foot pressure. 5. Improper threading Thread correctly. (See pages 14~22.) 2. Thread tension too tight Decrease thread tension when sewing lightweight or fine material. (See pages 25~30.) 2. Thread tangled 3. Wrong needle used 4. Install needle correctly. (See page 5.) 3. Thread tensions ... foot pressure too loose Turn the pressure adjustment screw clockwise to increase the presser foot pressure. 1. Troubleshooting This sewing machine is puckered 1. Threads break 4. suggested Thread correctly. (See pages 14~22.) 11 5.
Users Manual - Multi
Page 52
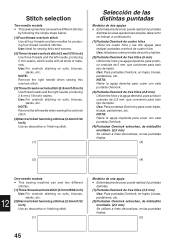
...aguja derecha, para producir costuras de 2,8 mm, que convienen para todo tipo de tejido. Stitch selection Two-needle models • This sewing machine can sew two different stitches. (1) Three-thread overlock stitch (3.5 mm/9/64 inch) Use: For overlock stitching on suits, blouses, slacks, etc... enrollado. (2,0 mm) Se utilizan a fines decorativas, en las puntadas finales. (3) (2) (4) 12 One-needle models • This sewing machine can sew five different stitches by following the simple steps below: (1) Four-thread overlock stitch Use all kinds of materials. NOTE: Remove the right...
...aguja derecha, para producir costuras de 2,8 mm, que convienen para todo tipo de tejido. Stitch selection Two-needle models • This sewing machine can sew two different stitches. (1) Three-thread overlock stitch (3.5 mm/9/64 inch) Use: For overlock stitching on suits, blouses, slacks, etc... enrollado. (2,0 mm) Se utilizan a fines decorativas, en las puntadas finales. (3) (2) (4) 12 One-needle models • This sewing machine can sew five different stitches by following the simple steps below: (1) Four-thread overlock stitch Use all kinds of materials. NOTE: Remove the right...


