Users Manual - English
Page 17
... the waste toner pack 5-9 OPC belt cartridge ...5-10 Replace OPC belt cartridge message 5-10 ...5-10 Replacing the OPC belt cartridge 5-10 Fusing unit ...5-13 Replace fusing unit message 5-13 Replacing the fusing unit 5-14 120K kit ...5-16 Replacing the transfer belt cleaner 5-16 Replacing the transfer roller 5-18 Cleaning ...5-21 Cleaning the outside of the printer 5-22 Cleaning the inside of...
... the waste toner pack 5-9 OPC belt cartridge ...5-10 Replace OPC belt cartridge message 5-10 ...5-10 Replacing the OPC belt cartridge 5-10 Fusing unit ...5-13 Replace fusing unit message 5-13 Replacing the fusing unit 5-14 120K kit ...5-16 Replacing the transfer belt cleaner 5-16 Replacing the transfer roller 5-18 Cleaning ...5-21 Cleaning the outside of the printer 5-22 Cleaning the inside of...

Users Manual - English
Page 19
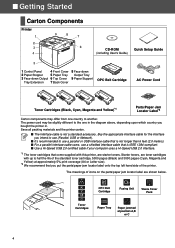
... all of the following parts: 1 9 8 2 7 6 5 3 4 Figure 1-1 1 Printer 2 Standard Paper Tray (pre-installed) 3 Quick Setup Guide*2 4 CD-ROM*2 5 Toner Cartridges*1 (pre-installed) (Black [TN04BK], Cyan [TN04C], Magenta [TN04M], Yellow [TN04Y]) 6 Waste Toner Pack (pre-installed) [WT-4CL] 7 AC Power Cord*2 8 OPC Belt Cartridge [OP-4CL] 9 Repacking kit*3 *1 The toner cartridges that come supplied with up to use...
... all of the following parts: 1 9 8 2 7 6 5 3 4 Figure 1-1 1 Printer 2 Standard Paper Tray (pre-installed) 3 Quick Setup Guide*2 4 CD-ROM*2 5 Toner Cartridges*1 (pre-installed) (Black [TN04BK], Cyan [TN04C], Magenta [TN04M], Yellow [TN04Y]) 6 Waste Toner Pack (pre-installed) [WT-4CL] 7 AC Power Cord*2 8 OPC Belt Cartridge [OP-4CL] 9 Repacking kit*3 *1 The toner cartridges that come supplied with up to use...
Users Manual - English
Page 20
... the USB connector of the following consumable items at all times. The OPC belt cartridge is not a standard accessory. ■ Some computers have additional parts not listed above. Depending on the country you live in and the HL-2700CN series model bought the printer, the power cord may differ slightly from the one shown in the...
... the USB connector of the following consumable items at all times. The OPC belt cartridge is not a standard accessory. ■ Some computers have additional parts not listed above. Depending on the country you live in and the HL-2700CN series model bought the printer, the power cord may differ slightly from the one shown in the...
Users Manual - English
Page 107
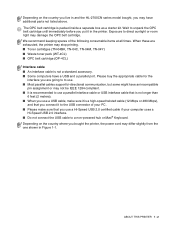
...K C M Y If the Cyan and Magenta toner cartridges are empty, the indicator will need to replace See 5-8 Order No. Starter toners, are toner cartridges with up roller and separator pad. WT-4CL OPC belt cartridge 60,000 images *3 See 5-10 REPLACE OPC BELT (Continuously printed) REPLACE FUSER Fusing unit 60,000 pages... page contains only one color of pages: actual output page number. The toner cartridges that you that come supplied with this printer, are starter toners. Call your dealer or Brother Customer Service for a replacement of the LCD when the printer is in the READY ...
...K C M Y If the Cyan and Magenta toner cartridges are empty, the indicator will need to replace See 5-8 Order No. Starter toners, are toner cartridges with up roller and separator pad. WT-4CL OPC belt cartridge 60,000 images *3 See 5-10 REPLACE OPC BELT (Continuously printed) REPLACE FUSER Fusing unit 60,000 pages... page contains only one color of pages: actual output page number. The toner cartridges that you that come supplied with this printer, are starter toners. Call your dealer or Brother Customer Service for a replacement of the LCD when the printer is in the READY ...
Users Manual - English
Page 115
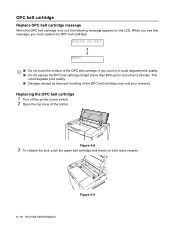
... release the lock, push the green belt cartridge lock levers on the LCD. Replacing the OPC belt cartridge 1 Turn off the printer power switch. 2 Open the top cover of the OPC belt cartridge may void your warranty. If you must replace the OPC belt cartridge: REPLACE OPC BELT READY ■ Do not touch the surface of the OPC belt cartridge. When you see this message, you touch...
... release the lock, push the green belt cartridge lock levers on the LCD. Replacing the OPC belt cartridge 1 Turn off the printer power switch. 2 Open the top cover of the OPC belt cartridge may void your warranty. If you must replace the OPC belt cartridge: REPLACE OPC BELT READY ■ Do not touch the surface of the OPC belt cartridge. When you see this message, you touch...
Users Manual - English
Page 116
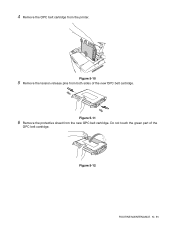
Figure 5-11 6 Remove the protective sheet from the printer. Figure 5-10 5 Remove the tension release pins from both sides of the OPC belt cartridge. 4 Remove the OPC belt cartridge from the new OPC belt cartridge. Do not touch the green part of the new OPC belt cartridge. Figure 5-12 ROUTINE MAINTENANCE 5 - 11
Figure 5-11 6 Remove the protective sheet from the printer. Figure 5-10 5 Remove the tension release pins from both sides of the OPC belt cartridge. 4 Remove the OPC belt cartridge from the new OPC belt cartridge. Do not touch the green part of the new OPC belt cartridge. Figure 5-12 ROUTINE MAINTENANCE 5 - 11
Users Manual - English
Page 117
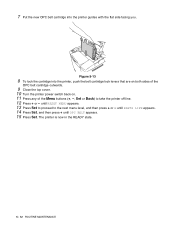
7 Put the new OPC belt cartridge into the printer, push the belt cartridge lock levers that are on both sides of the OPC belt cartridge outwards. 9 Close the top cover. 10 Turn the printer power switch back on. 11 Press any of the Menu buttons (+, -, Set or Back) to the next menu level, and then ... RESET MENU appears. 13 Press Set to proceed to take the printer off line. 12 Press + or - until OPC BELT appears. 15 Press Set. The printer is now in the READY state. 5 - 12 ROUTINE MAINTENANCE Figure 5-13 8 To lock the cartridge into the printer guides with the flat side facing you.
7 Put the new OPC belt cartridge into the printer, push the belt cartridge lock levers that are on both sides of the OPC belt cartridge outwards. 9 Close the top cover. 10 Turn the printer power switch back on. 11 Press any of the Menu buttons (+, -, Set or Back) to the next menu level, and then ... RESET MENU appears. 13 Press Set to proceed to take the printer off line. 12 Press + or - until OPC BELT appears. 15 Press Set. The printer is now in the READY state. 5 - 12 ROUTINE MAINTENANCE Figure 5-13 8 To lock the cartridge into the printer guides with the flat side facing you.
Users Manual - English
Page 130
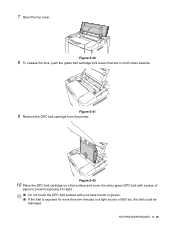
Figure 5-41 9 Remove the OPC belt cartridge from the printer. Figure 5-42 10 Place the OPC belt cartridge on both sides inwards. ROUTINE MAINTENANCE 5 - 25 Figure 5-40 8 To release the lock, push the green belt cartridge lock levers that are on a flat surface and cover the shiny green OPC belt with a piece of paper to prevent exposing it to light. ■ Do not touch the OPC belt surface with your bare hands or gloves. ■ If the belt is exposed for more than two minutes to a light source of 800 lux, the belt could be damaged. 7 Open the top cover.
Figure 5-41 9 Remove the OPC belt cartridge from the printer. Figure 5-42 10 Place the OPC belt cartridge on both sides inwards. ROUTINE MAINTENANCE 5 - 25 Figure 5-40 8 To release the lock, push the green belt cartridge lock levers that are on a flat surface and cover the shiny green OPC belt with a piece of paper to prevent exposing it to light. ■ Do not touch the OPC belt surface with your bare hands or gloves. ■ If the belt is exposed for more than two minutes to a light source of 800 lux, the belt could be damaged. 7 Open the top cover.
Users Manual - English
Page 132
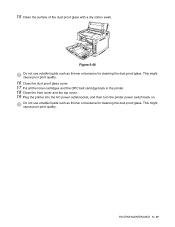
.... 16 Close the dust proof glass cover. 17 Put all the toner cartridges and the OPC belt cartridge back in the printer. 18 Close the front cover and the top cover. 19 Plug the printer into the AC power outlet/socket, and then turn the printer power switch back on. Figure 5-46 Do not use volatile liquids...
.... 16 Close the dust proof glass cover. 17 Put all the toner cartridges and the OPC belt cartridge back in the printer. 18 Close the front cover and the top cover. 19 Plug the printer into the AC power outlet/socket, and then turn the printer power switch back on. Figure 5-46 Do not use volatile liquids...
Users Manual - English
Page 134
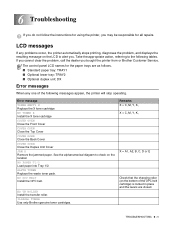
... 1/2. LCD messages If any one of the OPC belt cartridge) is locked in place and the levers are closed. 6 Troubleshooting If you do not follow the instructions for using the printer, you bought the printer from or Brother Customer Service. . NO OPC BELT Install the OPC belt. TROUBLESHOOTING 6 - 1 ILLEGAL TONER Use only Brother genuine toner cartridges. See the alphanumerical diagram to alert...
... 1/2. LCD messages If any one of the OPC belt cartridge) is locked in place and the levers are closed. 6 Troubleshooting If you do not follow the instructions for using the printer, you bought the printer from or Brother Customer Service. . NO OPC BELT Install the OPC belt. TROUBLESHOOTING 6 - 1 ILLEGAL TONER Use only Brother genuine toner cartridges. See the alphanumerical diagram to alert...
Users Manual - English
Page 136
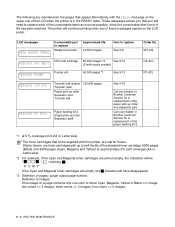
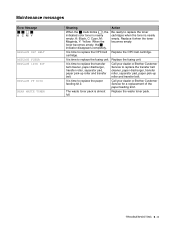
...your dealer or Brother Customer Service to replace the fusing unit. TROUBLESHOOTING 6 - 3 Be ready to replace the paper feeding kit 2. It is time to replace the toner cartridges when the toner is time to replace the OPC belt Replace the OPC belt cartridge. It is nearly... empty. Replace the fusing unit. cartridge. The waste toner pack is nearly empty. Maintenance messages Error Message K C M Y REPLACE OPC BELT REPLACE FUSER REPLACE 120K KIT REPLACE PF KIT2 NEAR WASTE TONER Meaning Action When the mark blinks ( ), the indicated color toner is almost full. K: Black...
...your dealer or Brother Customer Service to replace the fusing unit. TROUBLESHOOTING 6 - 3 Be ready to replace the paper feeding kit 2. It is time to replace the toner cartridges when the toner is time to replace the OPC belt Replace the OPC belt cartridge. It is nearly... empty. Replace the fusing unit. cartridge. The waste toner pack is nearly empty. Maintenance messages Error Message K C M Y REPLACE OPC BELT REPLACE FUSER REPLACE 120K KIT REPLACE PF KIT2 NEAR WASTE TONER Meaning Action When the mark blinks ( ), the indicated color toner is almost full. K: Black...
Users Manual - English
Page 150
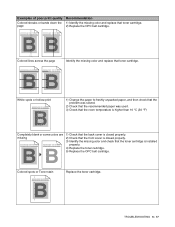
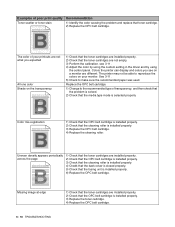
.... 0123456789. ABCDEFGHIJKLMNOPQRSTUVWXYZ. 0123456789. TROUBLESHOOTING 6 - 17 Examples of poor print quality Recommendation Colored streaks or bands down the 1) Identify the missing color and replace that the toner cartridge is installed properly. 4) Replace the toner cartridge. 5) Replace the OPC belt cartridge. abcdefghijklmnopqrstuvwxyz. abcdefghijklmnopqrstuvwxyz. abcdefghijklmnopqrstuvwxyz. ABCDEFGHIJKLMNOPQRSTUVWXYZ. 0123456789. ABCDEFGHIJKLMNOPQRSTUVWXYZ. 0123456789. ABCDEFGHIJKLMNOPQRSTUVWXYZ. 0123456789. abcdefghijklmnopqrstuvwxyz...
.... 0123456789. ABCDEFGHIJKLMNOPQRSTUVWXYZ. 0123456789. TROUBLESHOOTING 6 - 17 Examples of poor print quality Recommendation Colored streaks or bands down the 1) Identify the missing color and replace that the toner cartridge is installed properly. 4) Replace the toner cartridge. 5) Replace the OPC belt cartridge. abcdefghijklmnopqrstuvwxyz. abcdefghijklmnopqrstuvwxyz. abcdefghijklmnopqrstuvwxyz. ABCDEFGHIJKLMNOPQRSTUVWXYZ. 0123456789. ABCDEFGHIJKLMNOPQRSTUVWXYZ. 0123456789. ABCDEFGHIJKLMNOPQRSTUVWXYZ. 0123456789. abcdefghijklmnopqrstuvwxyz...
Users Manual - English
Page 151
... Toner scatter or toner stain ABCDEFGHIJKLMNOPQRSTUVWXYZ. 0123456789. ABCDEFGHIJKLMNOPQRSTUVWXYZ. 0123456789. Colors the printer can display and colors you expected All one color Shade on a monitor are installed properly. 2) Check that the fusing unit is installed properly. 3) Replace the toner cartridge. 4) Replace the OPC belt cartridge. abcdefghijklmnopqrstuvwxyz. abcdefghijklmnopqrstuvwxyz. ABCDEFGHIJKLMNOPQRSTUVWXYZ. 0123456789. Replace the OPC belt cartridge. 1) Change to the recommended type of transparency, and...
... Toner scatter or toner stain ABCDEFGHIJKLMNOPQRSTUVWXYZ. 0123456789. ABCDEFGHIJKLMNOPQRSTUVWXYZ. 0123456789. Colors the printer can display and colors you expected All one color Shade on a monitor are installed properly. 2) Check that the fusing unit is installed properly. 3) Replace the toner cartridge. 4) Replace the OPC belt cartridge. abcdefghijklmnopqrstuvwxyz. abcdefghijklmnopqrstuvwxyz. ABCDEFGHIJKLMNOPQRSTUVWXYZ. 0123456789. Replace the OPC belt cartridge. 1) Change to the recommended type of transparency, and...
Quick Setup Guide - English
Page 3
...Carton Components ...4 Control Panel ...5 Supplied CD-ROM ...6 Step 1 Setting Up Your Printer Install the Toner Cartridges ...7 Remove the tension release pins of the Fusing Unit 8 Install the OPC Belt Cartridge ...9 Load Paper in the Paper Tray ...10 Print a Test Page ...11 ...Setting Your Language on the Control Panel 12 Step 2 Installing the Driver For USB Interface Cable Users ...14 For Parallel Interface Cable Users ...16 For Network Interface Cable Users ...18 For Brother Peer-to-Peer Network Printer...
...Carton Components ...4 Control Panel ...5 Supplied CD-ROM ...6 Step 1 Setting Up Your Printer Install the Toner Cartridges ...7 Remove the tension release pins of the Fusing Unit 8 Install the OPC Belt Cartridge ...9 Load Paper in the Paper Tray ...10 Print a Test Page ...11 ...Setting Your Language on the Control Panel 12 Step 2 Installing the Driver For USB Interface Cable Users ...14 For Parallel Interface Cable Users ...16 For Network Interface Cable Users ...18 For Brother Peer-to-Peer Network Printer...
Quick Setup Guide - English
Page 6
... you put the parts/paper jam locator label onto the top left hand side of the printer. OPC Belt Cartridge Fusing Unit Waste Toner Pack Toner Cartridges Paper Tray Paper jammed at approximately 5% print coverage (A4 or Letter size). *2 We recommend that come supplied with up to use a parallel or USB interface ...
... you put the parts/paper jam locator label onto the top left hand side of the printer. OPC Belt Cartridge Fusing Unit Waste Toner Pack Toner Cartridges Paper Tray Paper jammed at approximately 5% print coverage (A4 or Letter size). *2 We recommend that come supplied with up to use a parallel or USB interface ...
Quick Setup Guide - English
Page 9
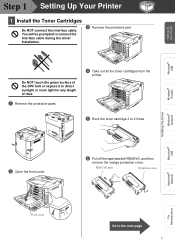
... page 7 Do NOT touch the green surface of the OPC belt or expose it to direct sunlight or room light for any length of time. 1 Remove the protective parts. 4 Take out all the toner cartridges from the printer. 5 Rock the toner cartridge 3 to 4 times. 2 Open the front cover. ...6 Pull off the tape labeled REMOVE, and then remove the orange protective cover. Setting Up Your Printer Windows® USB Windows® Parallel Step 1 Setting...
... page 7 Do NOT touch the green surface of the OPC belt or expose it to direct sunlight or room light for any length of time. 1 Remove the protective parts. 4 Take out all the toner cartridges from the printer. 5 Rock the toner cartridge 3 to 4 times. 2 Open the front cover. ...6 Pull off the tape labeled REMOVE, and then remove the orange protective cover. Setting Up Your Printer Windows® USB Windows® Parallel Step 1 Setting...
Quick Setup Guide - English
Page 11
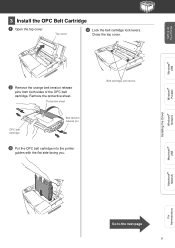
... the belt cartridge lock levers. Setting Up Your Printer Windows® USB 3 Install the OPC Belt Cartridge 1 Open the top cover. Remove the protective sheet. Protective sheet OPC belt cartridge Belt tension release pin 3 Put the OPC belt cartridge into the printer guides with the flat side facing you. Close the top cover. 2 Remove the orange belt tension release pins from both sides of the OPC belt cartridge. Belt cartridge...
... the belt cartridge lock levers. Setting Up Your Printer Windows® USB 3 Install the OPC Belt Cartridge 1 Open the top cover. Remove the protective sheet. Protective sheet OPC belt cartridge Belt tension release pin 3 Put the OPC belt cartridge into the printer guides with the flat side facing you. Close the top cover. 2 Remove the orange belt tension release pins from both sides of the OPC belt cartridge. Belt cartridge...

