Users Manual - English
Page 9
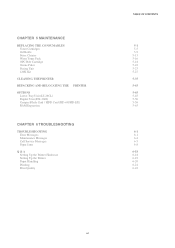
CHAPTER 5 MAINTENANCE REPLACING THE CONSUMABLES Toner Cartridges Oil Bottle Fuser Cleaner Waste Toner Pack OPC Belt Cartridge Ozone Filter Fusing Unit 120K Kit CLEANING THE PRINTER REPACKING AND RELOCATING THE PRINTER OPTIONS Lower Tray Unit (LT-26CL) Duplex Unit (DX-2600) CompactFlash Card / HDD Card (HD-6G/HD-EX) RAM Expansion CHAPTER 6 TROUBLESHOOTING TROUBLESHOOTING Error Messages ...
CHAPTER 5 MAINTENANCE REPLACING THE CONSUMABLES Toner Cartridges Oil Bottle Fuser Cleaner Waste Toner Pack OPC Belt Cartridge Ozone Filter Fusing Unit 120K Kit CLEANING THE PRINTER REPACKING AND RELOCATING THE PRINTER OPTIONS Lower Tray Unit (LT-26CL) Duplex Unit (DX-2600) CompactFlash Card / HDD Card (HD-6G/HD-EX) RAM Expansion CHAPTER 6 TROUBLESHOOTING TROUBLESHOOTING Error Messages ...
Users Manual - English
Page 20
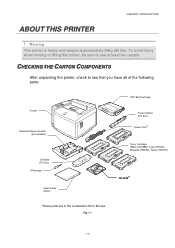
... sure to see that you have all of the following parts: Printer Standard Paper Cassette (pre-installed) Oil Bottle (FO-2CL) Oil Syringe Quick Setup Guide* OPC Belt Cartridge Fuser Cleaner (CR-3CL) * Power Cord Toner Cartridge (Black (TN03BK), Cyan (TN03C), Magenta (TN03M), Yellow (TN03Y)) CD-ROM* *These parts are in the Localization Kit in...
... sure to see that you have all of the following parts: Printer Standard Paper Cassette (pre-installed) Oil Bottle (FO-2CL) Oil Syringe Quick Setup Guide* OPC Belt Cartridge Fuser Cleaner (CR-3CL) * Power Cord Toner Cartridge (Black (TN03BK), Cyan (TN03C), Magenta (TN03M), Yellow (TN03Y)) CD-ROM* *These parts are in the Localization Kit in...
Users Manual - English
Page 21
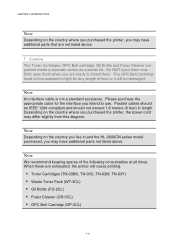
... where you are ready to use. When these are exhausted, the printer will be IEEE 1284 compliant and should not exceed 1.8 meters (6 feet) in and the HL-2600CN series model purchased, you may have additional parts not listed above . ! Caution The Toner Cartridges, OPC Belt cartridge, Oil Bottle and Fuser Cleaner are packed inside a separate carton as...
... where you are ready to use. When these are exhausted, the printer will be IEEE 1284 compliant and should not exceed 1.8 meters (6 feet) in and the HL-2600CN series model purchased, you may have additional parts not listed above . ! Caution The Toner Cartridges, OPC Belt cartridge, Oil Bottle and Fuser Cleaner are packed inside a separate carton as...
Users Manual - English
Page 115
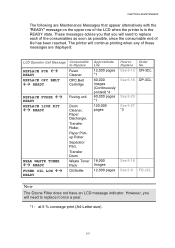
... The Ozone Filter does not have an LCD message indicator. CHAPTER 5 MAINTENANCE The following are displayed: LCD Operator Call Message REPLACE FCR !" The printer will need to replace each of the consumables as soon as possible, since the consumable end of the LCD when the...000 pages *1 60,000 images (Continuously printed) *4 60,000 pages *1 120,000 pages 18,000 Images 12,000 pages How to Replace Fuser Cleaner OPC Belt Cartridge REPLACE FUSER !" However, you that appear alternatively with the "READY" message on the upper row of life has been reached. These messages advise you ...
... The Ozone Filter does not have an LCD message indicator. CHAPTER 5 MAINTENANCE The following are displayed: LCD Operator Call Message REPLACE FCR !" The printer will need to replace each of the consumables as soon as possible, since the consumable end of the LCD when the...000 pages *1 60,000 images (Continuously printed) *4 60,000 pages *1 120,000 pages 18,000 Images 12,000 pages How to Replace Fuser Cleaner OPC Belt Cartridge REPLACE FUSER !" However, you that appear alternatively with the "READY" message on the upper row of life has been reached. These messages advise you ...
Users Manual - English
Page 130
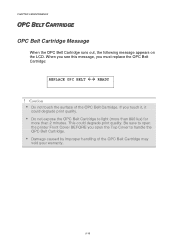
.... If you open the printer Front Cover BEFORE you touch it, it could degrade print quality. Caution • Do not touch the surface of the OPC Belt Cartridge may void your warranty. 5-18 When you see this message, you must replace the OPC Belt Cartridge: REPLACE OPC BELT !" READY ! CHAPTER 5 MAINTENANCE OPC BEELLTT CAARRTTRRIIDDGGEE OPC Belt Cartridge Message When the OPC Belt Cartridge runs out, the...
.... If you open the printer Front Cover BEFORE you touch it, it could degrade print quality. Caution • Do not touch the surface of the OPC Belt Cartridge may void your warranty. 5-18 When you see this message, you must replace the OPC Belt Cartridge: REPLACE OPC BELT !" READY ! CHAPTER 5 MAINTENANCE OPC BEELLTT CAARRTTRRIIDDGGEE OPC Belt Cartridge Message When the OPC Belt Cartridge runs out, the...
Users Manual - English
Page 131
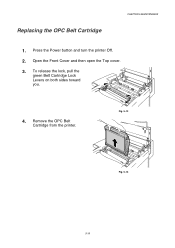
Press the Power button and turn the printer Off. 2. Fig. 5-13 Fig. 5-14 5-19 To release the lock, pull the green Belt Cartridge Lock Levers on both sides toward you. 4. Remove the OPC Belt Cartridge from the printer. Open the Front Cover and then open the Top cover. 3. Replacing the OPC Belt Cartridge CHAPTER 5 MAINTENANCE 1.
Press the Power button and turn the printer Off. 2. Fig. 5-13 Fig. 5-14 5-19 To release the lock, pull the green Belt Cartridge Lock Levers on both sides toward you. 4. Remove the OPC Belt Cartridge from the printer. Open the Front Cover and then open the Top cover. 3. Replacing the OPC Belt Cartridge CHAPTER 5 MAINTENANCE 1.
Users Manual - English
Page 132
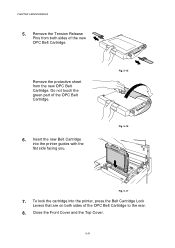
Do not touch the green part of the OPC Belt Cartridge to the rear. 8. To lock the cartridge into the printer guides with the flat side facing you. Close the Front Cover and the Top Cover. 5-20 Remove the Tension Release Pins from the new OPC Belt Cartridge. Fig. 5-15 Fig. 5-16 Fig. 5-17 7. CHAPTER 5 MAINTENANCE 5. Insert the new Belt Cartridge into the printer, press the Belt Cartridge Lock Levers that are on both sides of the new OPC Belt Cartridge. Remove the protective sheet from both sides of the OPC Belt Cartridge. 6.
Do not touch the green part of the OPC Belt Cartridge to the rear. 8. To lock the cartridge into the printer guides with the flat side facing you. Close the Front Cover and the Top Cover. 5-20 Remove the Tension Release Pins from the new OPC Belt Cartridge. Fig. 5-15 Fig. 5-16 Fig. 5-17 7. CHAPTER 5 MAINTENANCE 5. Insert the new Belt Cartridge into the printer, press the Belt Cartridge Lock Levers that are on both sides of the new OPC Belt Cartridge. Remove the protective sheet from both sides of the OPC Belt Cartridge. 6.
Users Manual - English
Page 151
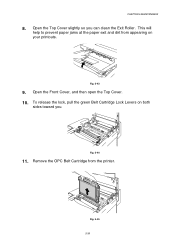
To release the lock, pull the green Belt Cartridge Lock Levers on your printouts. Remove the OPC Belt Cartridge from appearing on both sides toward you can clean the Exit Roller. Fig. 5-44 11. Open the Top Cover slightly so you . This will help to prevent paper jams at the paper exit and dirt from the printer. Open the Front Cover, and then open the Top Cover. 10. Fig. 5-45 5-39 Fig. 5-43 9. CHAPTER 5 MAINTENANCE 8.
To release the lock, pull the green Belt Cartridge Lock Levers on your printouts. Remove the OPC Belt Cartridge from appearing on both sides toward you can clean the Exit Roller. Fig. 5-44 11. Open the Top Cover slightly so you . This will help to prevent paper jams at the paper exit and dirt from the printer. Open the Front Cover, and then open the Top Cover. 10. Fig. 5-45 5-39 Fig. 5-43 9. CHAPTER 5 MAINTENANCE 8.
Users Manual - English
Page 152
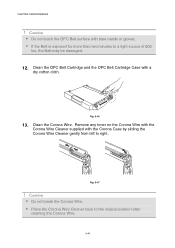
... • Do not break the Corona Wire. • Place the Corona Wire Cleaner back to a light source of 800 lux, the Belt may be damaged. 12. Clean the OPC Belt Cartridge and the OPC Belt Cartridge Case with the Corona Case by sliding the Corona Wire Cleaner gently from left to right. Clean the Corona Wire. Remove...
... • Do not break the Corona Wire. • Place the Corona Wire Cleaner back to a light source of 800 lux, the Belt may be damaged. 12. Clean the OPC Belt Cartridge and the OPC Belt Cartridge Case with the Corona Case by sliding the Corona Wire Cleaner gently from left to right. Clean the Corona Wire. Remove...
Users Manual - English
Page 154
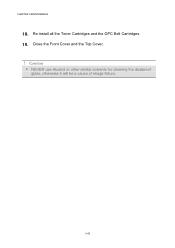
Caution • NEVER use Alcohol or other similar solvents for cleaning the dustproof glass, otherwise it will be a cause of image failure. 5-42 CHAPTER 5 MAINTENANCE 18. Re-install all the Toner Cartridges and the OPC Belt Cartridges. 19. Close the Front Cover and the Top Cover. !
Caution • NEVER use Alcohol or other similar solvents for cleaning the dustproof glass, otherwise it will be a cause of image failure. 5-42 CHAPTER 5 MAINTENANCE 18. Re-install all the Toner Cartridges and the OPC Belt Cartridges. 19. Close the Front Cover and the Top Cover. !
Users Manual - English
Page 155
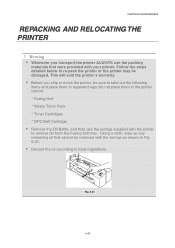
... Discard the oil according to re-pack the printer or the printer may be sure to take out the following items and place them in separate bags (do not place them in the printer carton): * Fusing Unit * Waste Toner Pack * Toner Cartridges * OPC Belt Cartridge • Remove the Oil Bottle, and then... use the packing materials that cannot be removed with the printer to remove Oil from the Fusing Unit tray. Fig. 5-...
... Discard the oil according to re-pack the printer or the printer may be sure to take out the following items and place them in separate bags (do not place them in the printer carton): * Fusing Unit * Waste Toner Pack * Toner Cartridges * OPC Belt Cartridge • Remove the Oil Bottle, and then... use the packing materials that cannot be removed with the printer to remove Oil from the Fusing Unit tray. Fig. 5-...
Users Manual - English
Page 156
Close the carton and tape it securely. 5-44 Place them together with the printer in the printer carton. 3. Place the printer in its original packing material and in their original packaging. CHAPTER 5 MAINTENANCE How to turn the printer off. Remove the Waste Toner Pack, Toner Cartridges, Fusing Unit and OPC Belt Cartridge from the printer. Unplug the printer. 2. Do not place them in the original carton. 4. Press the Power button to Repack the Printer 1.
Close the carton and tape it securely. 5-44 Place them together with the printer in the printer carton. 3. Place the printer in its original packing material and in their original packaging. CHAPTER 5 MAINTENANCE How to turn the printer off. Remove the Waste Toner Pack, Toner Cartridges, Fusing Unit and OPC Belt Cartridge from the printer. Unplug the printer. 2. Do not place them in the original carton. 4. Press the Power button to Repack the Printer 1.

Users Manual - English
Page 180
...MEDIA MISMATCH Media mismatch between the Printer and the Printer Driver setting. Please install one. NO OPC BELT Install the OPC belt. NO FC ROLLER Install the cleaning roller. STACKER FULL Remove the paper from the output tray. ILLEGAL TONER Use only Brother genuine toner cartridge. Specify the correct paper size... installed. Remarks When the Duplex Unit is formatted and not in the sizes specified. SIZE MISMATCH Paper mismatch between the Printer and the Printer Driver setting. NO TRAY 1/2 The indicated paper tray was not detected. SIZE ERROR DX The duplex unit can print ...
...MEDIA MISMATCH Media mismatch between the Printer and the Printer Driver setting. Please install one. NO OPC BELT Install the OPC belt. NO FC ROLLER Install the cleaning roller. STACKER FULL Remove the paper from the output tray. ILLEGAL TONER Use only Brother genuine toner cartridge. Specify the correct paper size... installed. Remarks When the Duplex Unit is formatted and not in the sizes specified. SIZE MISMATCH Paper mismatch between the Printer and the Printer Driver setting. NO TRAY 1/2 The indicated paper tray was not detected. SIZE ERROR DX The duplex unit can print ...
Users Manual - English
Page 182
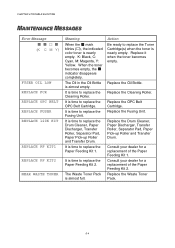
...KIT2 NEAR WASTE TONER Meaning When the ! indicator disappears completely. It is time to replace the OPC Belt Cartridge. The Waste Toner Pack is nearly empty. Replace the Oil Bottle. Replace the OPC Belt Cartridge. Consult your dealer for a replacement of the Paper Feeding Kit 2. It is time to replace..., Paper Pick-up Roller and Transfer Drum. Consult your dealer for a replacement of the Paper Feeding Kit 1. mark blinks ("), the indicated color toner is almost full. Replace the Waste Toner Pack. 6-4 The Oil in the Oil Bottle is time to replace the Fusing Unit. Replace...
...KIT2 NEAR WASTE TONER Meaning When the ! indicator disappears completely. It is time to replace the OPC Belt Cartridge. The Waste Toner Pack is nearly empty. Replace the Oil Bottle. Replace the OPC Belt Cartridge. Consult your dealer for a replacement of the Paper Feeding Kit 2. It is time to replace..., Paper Pick-up Roller and Transfer Drum. Consult your dealer for a replacement of the Paper Feeding Kit 1. mark blinks ("), the indicated color toner is almost full. Replace the Waste Toner Pack. 6-4 The Oil in the Oil Bottle is time to replace the Fusing Unit. Replace...
Users Manual - English
Page 201
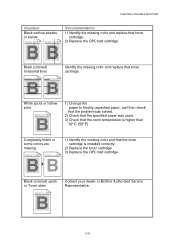
.... 0123456789. abcdefghijklmnopqrstuvwxyz. ABCDEFGHIJKLMNOPQRSTUVWXYZ. 0123456789. abcdefghijklmnopqrstuvwxyz. abcdefghijklmnopqrstuvwxyz. ABCDEFGHIJKLMNOPQRSTUVWXYZ. 0123456789. abcdefghijklmnopqrstuvwxyz. 1) Identify the missing color and that the room temperature is installed correctly. 2) Replace the toner cartridge 3) Replace the OPC belt cartridge Black (colored) spots or Toner stain ABCDEFGHIJKLMNOPQRSTUVWXYZ. 0123456789. ABCDEFGHIJKLMNOPQRSTUVWXYZ. 0123456789. ABCDEFGHIJKLMNOPQRSTUVWXYZ. 0123456789. ABCDEFGHIJKLMNOPQRSTUVWXYZ. 0123456789. abcdefghijklmnopqrstuvwxyz...
.... 0123456789. abcdefghijklmnopqrstuvwxyz. ABCDEFGHIJKLMNOPQRSTUVWXYZ. 0123456789. abcdefghijklmnopqrstuvwxyz. abcdefghijklmnopqrstuvwxyz. ABCDEFGHIJKLMNOPQRSTUVWXYZ. 0123456789. abcdefghijklmnopqrstuvwxyz. 1) Identify the missing color and that the room temperature is installed correctly. 2) Replace the toner cartridge 3) Replace the OPC belt cartridge Black (colored) spots or Toner stain ABCDEFGHIJKLMNOPQRSTUVWXYZ. 0123456789. ABCDEFGHIJKLMNOPQRSTUVWXYZ. 0123456789. ABCDEFGHIJKLMNOPQRSTUVWXYZ. 0123456789. ABCDEFGHIJKLMNOPQRSTUVWXYZ. 0123456789. abcdefghijklmnopqrstuvwxyz...
Users Manual - English
Page 202
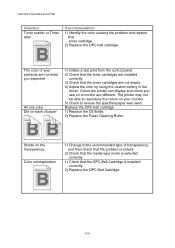
... print from the control panel. 2) Check that the toner cartridges are different. Shade on a monitor are installed correctly. 3) Check that toner cartridge. 2) Replace the OPC belt cartridge. abcdefghijklmnopqrstuvwxyz. 1) Change to ensure the specified paper was used. abcdefghijklmnopqrstuvwxyz. The printer may not be able to reproduce the colors on your monitor. 5) Check to the recommended type of your...
... print from the control panel. 2) Check that the toner cartridges are different. Shade on a monitor are installed correctly. 3) Check that toner cartridge. 2) Replace the OPC belt cartridge. abcdefghijklmnopqrstuvwxyz. 1) Change to ensure the specified paper was used. abcdefghijklmnopqrstuvwxyz. The printer may not be able to reproduce the colors on your monitor. 5) Check to the recommended type of your...

Users Manual - English
Page 203
.... ABCDEFGHIJKLMNOPQRSTUVWXYZ. 0123456789. ABCDEFGHIJKLMNOPQRSTUVWXYZ. 0123456789. abcdefghijklmnopqrstuvwxyz. ABCDEFGHIJKLMNOPQRSTUVWXYZ. 0123456789. ABCDEFGHIJKLMNOPQRSTUVWXYZ. 0123456789. Mixed color image ABCDEFGHIJKLMNOPQRSTUVWXYZ. 0123456789. abcdefghijklmnopqrstuvwxyz. ABCDEFGHIJKLMNOPQRSTUVWXYZ. 0123456789. ABCDEFGHIJKLMNOPQRSTUVWXYZ. 0123456789. abcdefghijklmnopqrstuvwxyz. Recommendation 1) Check that the OPC Belt Cartridge is installed correctly. ABCDEFGHIJKLMNOPQRSTUVWXYZ. 0123456789. CHAPTER 6 TROUBLE SHOOTING Question Uneven density appears...
.... ABCDEFGHIJKLMNOPQRSTUVWXYZ. 0123456789. ABCDEFGHIJKLMNOPQRSTUVWXYZ. 0123456789. abcdefghijklmnopqrstuvwxyz. ABCDEFGHIJKLMNOPQRSTUVWXYZ. 0123456789. ABCDEFGHIJKLMNOPQRSTUVWXYZ. 0123456789. Mixed color image ABCDEFGHIJKLMNOPQRSTUVWXYZ. 0123456789. abcdefghijklmnopqrstuvwxyz. ABCDEFGHIJKLMNOPQRSTUVWXYZ. 0123456789. ABCDEFGHIJKLMNOPQRSTUVWXYZ. 0123456789. abcdefghijklmnopqrstuvwxyz. Recommendation 1) Check that the OPC Belt Cartridge is installed correctly. ABCDEFGHIJKLMNOPQRSTUVWXYZ. 0123456789. CHAPTER 6 TROUBLE SHOOTING Question Uneven density appears...
Users Manual - English
Page 225
... 1-2 INDEX (OPC) Belt Cartridge Operator Call Message Operator Call Messages Opetator Call Message Option Optional Fonts Optional Legal Cassette Options Ozone Filter P panel setting paper Paper Discharger Paper Jam paper mode Paper Size parallel interface PCL5C mode PCL6 Power Save Mode PPD print menu print menu mode print quality printable area printer driver printer status...
... 1-2 INDEX (OPC) Belt Cartridge Operator Call Message Operator Call Messages Opetator Call Message Option Optional Fonts Optional Legal Cassette Options Ozone Filter P panel setting paper Paper Discharger Paper Jam paper mode Paper Size parallel interface PCL5C mode PCL6 Power Save Mode PPD print menu print menu mode print quality printable area printer driver printer status...

Quick Setup Guide - English
Page 1
...all packing materials and the printer carton. Macintosh® Brother Solutions Center The Brother Solutions Center (http://solutions.brother.com) is Included on the CD-ROM You can use (Parallel, USB or Network). Remove the protective sheet. 4 Insert the OPC belt cartridge into the correct guide....sure the printer power button is printed correctly. Color Laser Printer HL-2600CN series Quick Setup Guide Read the "Safety Sheet" first to ensure that the test page is off the tape labeled 'REMOVE,' and then remove the orange protective cover. 3 Install the toner cartridge by Install ...
...all packing materials and the printer carton. Macintosh® Brother Solutions Center The Brother Solutions Center (http://solutions.brother.com) is Included on the CD-ROM You can use (Parallel, USB or Network). Remove the protective sheet. 4 Insert the OPC belt cartridge into the correct guide....sure the printer power button is printed correctly. Color Laser Printer HL-2600CN series Quick Setup Guide Read the "Safety Sheet" first to ensure that the test page is off the tape labeled 'REMOVE,' and then remove the orange protective cover. 3 Install the toner cartridge by Install ...

