
Quick Setup Guide - English
Page 3
Getting Started 1 Carton components Carton components may vary from one country to another. Quick Setup Guide User's Guide Test Sheet (USA only) Accessory Order Form Telephone Line Cord Side Cover Telephone Handset (FAX-2480C only) One Touch Labels (FAX-2480C only) One Touch Labels (FAX-2580C only) Cordless Handset (FAX-2580C only) Battery and Battery Cover (FAX-2580C only) Black (LC51BK) Yellow (LC51Y) Cyan (LC51C) Ink Cartridges Magenta (LC51M) 1 Save all packing materials and the carton in case for any reason you must ship your machine.
Getting Started 1 Carton components Carton components may vary from one country to another. Quick Setup Guide User's Guide Test Sheet (USA only) Accessory Order Form Telephone Line Cord Side Cover Telephone Handset (FAX-2480C only) One Touch Labels (FAX-2480C only) One Touch Labels (FAX-2580C only) Cordless Handset (FAX-2580C only) Battery and Battery Cover (FAX-2580C only) Black (LC51BK) Yellow (LC51Y) Cyan (LC51C) Ink Cartridges Magenta (LC51M) 1 Save all packing materials and the carton in case for any reason you must ship your machine.

Quick Setup Guide - English
Page 6
... Up the Machine 1 1 Removing the protective parts 1 Remove the protective tape and film covering the scanner glass. 2 Remove the foam bag containing the ink cartridges from the AC adapter. 2 Unpack a battery, battery cover and cordless handset. 3 Insert the connector (1) of the battery (2) in the direction shown ...below. 2 2 Route the AC power cord through the guide on 1 the side of the paper tray. 2 Connecting the handset (FAX-2480C only) 1 Connect the curled handset cord to Loading paper on page 6. 4 Installing the battery (FAX-2580C only) 1 Make sure you remove the ...
... Up the Machine 1 1 Removing the protective parts 1 Remove the protective tape and film covering the scanner glass. 2 Remove the foam bag containing the ink cartridges from the AC adapter. 2 Unpack a battery, battery cover and cordless handset. 3 Insert the connector (1) of the battery (2) in the direction shown ...below. 2 2 Route the AC power cord through the guide on 1 the side of the paper tray. 2 Connecting the handset (FAX-2480C only) 1 Connect the curled handset cord to Loading paper on page 6. 4 Installing the battery (FAX-2580C only) 1 Make sure you remove the ...

Quick Setup Guide - English
Page 11
... (1). 1 Note Do not throw away the yellow protective part. You will need it if you transport the machine. 4 Take out the ink cartridge. 1 5 Carefully remove the protective yellow cap (1). 1 9 Setting Up the Machine 10 Connecting the power cord 1 Connect the power cord. 3 Pull all the lock ...release levers down and remove the yellow protective part (1). 11 Installing the ink cartridges Warning If ink gets in your eyes, wash them out with water at once, and if irritation occurs consult a doctor. 1 Make sure that the power is ...
... (1). 1 Note Do not throw away the yellow protective part. You will need it if you transport the machine. 4 Take out the ink cartridge. 1 5 Carefully remove the protective yellow cap (1). 1 9 Setting Up the Machine 10 Connecting the power cord 1 Connect the power cord. 3 Pull all the lock ...release levers down and remove the yellow protective part (1). 11 Installing the ink cartridges Warning If ink gets in your eyes, wash them out with water at once, and if irritation occurs consult a doctor. 1 Make sure that the power is ...

Quick Setup Guide - English
Page 12
...Setup DO NOT touch the area shown in the illustration below. 7 Lift each ink cartridge in the direction of the lock release lever (1) with the cartridge color (2), as shown in the diagram below. 2 1 M brother XXXX Note If the LCD shows Install Black, Install Yellow, Install Cyan or Install... Magenta after you open the bag, the cartridge will occur only once, the first time ink cartridges are installed properly. Take ...
...Setup DO NOT touch the area shown in the illustration below. 7 Lift each ink cartridge in the direction of the lock release lever (1) with the cartridge color (2), as shown in the diagram below. 2 1 M brother XXXX Note If the LCD shows Install Black, Install Yellow, Install Cyan or Install... Magenta after you open the bag, the cartridge will occur only once, the first time ink cartridges are installed properly. Take ...
Quick Setup Guide - English
Page 13
... quantity of installation. If you do so, ink may seep out of the cartridge. • If you mix the colors by the use it up within six months of ink left in the cartridge. • DO NOT shake the ink cartridges. Using or attempting to use only Genuine Brother Brand replacement ink cartridges. Setting Up the Machine Caution • DO...
... quantity of installation. If you do so, ink may seep out of the cartridge. • If you mix the colors by the use it up within six months of ink left in the cartridge. • DO NOT shake the ink cartridges. Using or attempting to use only Genuine Brother Brand replacement ink cartridges. Setting Up the Machine Caution • DO...

Quick Setup Guide - English
Page 20
Ink cartridge Black LC51BK Yellow LC51Y Cyan LC51C Magenta LC51M 18 For more information about the ink cartridges for your machine, visit http://solutions.brother.com or contact your local Brother re-seller. Consumables 1 Replacement consumables When the time comes to replace ink cartridges, an error message will be indicated on the LCD.
Ink cartridge Black LC51BK Yellow LC51Y Cyan LC51C Magenta LC51M 18 For more information about the ink cartridges for your machine, visit http://solutions.brother.com or contact your local Brother re-seller. Consumables 1 Replacement consumables When the time comes to replace ink cartridges, an error message will be indicated on the LCD.

Software Users Guide
Page 8
...'s Guide.) The printer driver supports N in 1, Watermark printing, Colour Enhancement technology and many features you will find in a high quality ink jet printer. 1 Printing 1 1 Note • The screens in this section are from your machine communicate with other features. This feature...fast communication with your machine communicate with multiple PCs connected on glossy paper to replace the empty cartridge. You can be understood by the printer/multi-function device. Using the Brother printer driver 1 A printer driver translates the data from Windows® XP. Wireless LAN ...
...'s Guide.) The printer driver supports N in 1, Watermark printing, Colour Enhancement technology and many features you will find in a high quality ink jet printer. 1 Printing 1 1 Note • The screens in this section are from your machine communicate with other features. This feature...fast communication with your machine communicate with multiple PCs connected on glossy paper to replace the empty cartridge. You can be understood by the printer/multi-function device. Using the Brother printer driver 1 A printer driver translates the data from Windows® XP. Wireless LAN ...

Software Users Guide
Page 73
You can then easily register or change the Quick-Dial numbers from your PC. 3 Ink Level 3 The Ink Level button opens the Status Monitor window, which displays the ink level for DCP models and MFC-240C) 3 The Quick-Dial button lets you view the Software User's Guide and the Network User's Guide in the Remote Setup Program. ControlCenter3 Quick-Dial (Not available for each cartridge. User's Guide 3 The User's Guide button lets you open the Set Quick-Dial window in HTML format. 67
You can then easily register or change the Quick-Dial numbers from your PC. 3 Ink Level 3 The Ink Level button opens the Status Monitor window, which displays the ink level for DCP models and MFC-240C) 3 The Quick-Dial button lets you view the Software User's Guide and the Network User's Guide in the Remote Setup Program. ControlCenter3 Quick-Dial (Not available for each cartridge. User's Guide 3 The User's Guide button lets you open the Set Quick-Dial window in HTML format. 67
Software Users Guide
Page 130
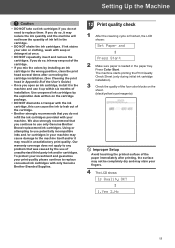
... Quick-Dial window of the SCAN buttons. To configure the Software button in ControlCenter2 choose the Software Button tab in the configuration menu for each cartridge. 124 You can scan a page on the machine and print the copies using any printer driver for each of the Remote Setup. (Remote Setup (Not.... DEVICE SETTINGS 10 You can direct the copy output to configure the hardware Scan key on page 143.) „ Quick-Dial Lets you open the Brother Status Monitor, which displays the ink level for each scan feature. Lets you use your Macintosh® including network printers.
... Quick-Dial window of the SCAN buttons. To configure the Software button in ControlCenter2 choose the Software Button tab in the configuration menu for each cartridge. 124 You can scan a page on the machine and print the copies using any printer driver for each of the Remote Setup. (Remote Setup (Not.... DEVICE SETTINGS 10 You can direct the copy output to configure the hardware Scan key on page 143.) „ Quick-Dial Lets you open the Brother Status Monitor, which displays the ink level for each scan feature. Lets you use your Macintosh® including network printers.

Software Users Guide
Page 143
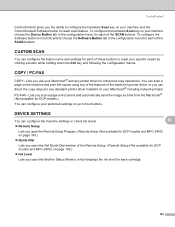
ControlCenter2 Quick-Dial (Not available for each cartridge. 10 10 Note The Brother Status Monitor application is located in the Remote Setup Program, so you open the Set Quick-Dial window in Macintosh HD/Library/Printers/Brother/Utilities. 137 Ink Level The Ink Level button opens the Brother Status Monitor window, which displays the ink level for DCP models and MFC-240C) 10 The Quick-Dial button lets you can easily register or change the dial numbers on your Macintosh®.
ControlCenter2 Quick-Dial (Not available for each cartridge. 10 10 Note The Brother Status Monitor application is located in the Remote Setup Program, so you open the Set Quick-Dial window in Macintosh HD/Library/Printers/Brother/Utilities. 137 Ink Level The Ink Level button opens the Brother Status Monitor window, which displays the ink level for DCP models and MFC-240C) 10 The Quick-Dial button lets you can easily register or change the dial numbers on your Macintosh®.


