
Quick Setup Guide - English
Page 1
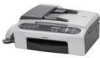
Quick Setup Guide FAX-2480C FAX-2580C Before you can use the machine, you must set up the hardware. Keep this Quick Setup Guide for quick and easy reference at all times. Please read this Quick Setup Guide and the User's Guide in a convenient place for the correct setup procedure. Setting Up the Machine Setup is Complete!
Quick Setup Guide FAX-2480C FAX-2580C Before you can use the machine, you must set up the hardware. Keep this Quick Setup Guide for quick and easy reference at all times. Please read this Quick Setup Guide and the User's Guide in a convenient place for the correct setup procedure. Setting Up the Machine Setup is Complete!

Quick Setup Guide - English
Page 3
Quick Setup Guide User's Guide Test Sheet (USA only) Accessory Order Form Telephone Line Cord Side Cover Telephone Handset (FAX-2480C only) One Touch Labels (FAX-2480C only) One Touch Labels (FAX-2580C only) Cordless Handset (FAX-2580C only) Battery and Battery Cover (FAX-2580C only) Black (LC51BK) Yellow (LC51Y) Cyan (LC51C) Ink Cartridges Magenta (LC51M) 1 Getting Started 1 Carton components Carton components may vary from one country to another. Save all packing materials and the carton in case for any reason you must ship your machine.
Quick Setup Guide User's Guide Test Sheet (USA only) Accessory Order Form Telephone Line Cord Side Cover Telephone Handset (FAX-2480C only) One Touch Labels (FAX-2480C only) One Touch Labels (FAX-2580C only) Cordless Handset (FAX-2580C only) Battery and Battery Cover (FAX-2580C only) Black (LC51BK) Yellow (LC51Y) Cyan (LC51C) Ink Cartridges Magenta (LC51M) 1 Getting Started 1 Carton components Carton components may vary from one country to another. Save all packing materials and the carton in case for any reason you must ship your machine.

Quick Setup Guide - English
Page 5
For the details of the control panel, see Control panel overview in this Quick Setup Guide are based on FAX-2480C. 3 Illustrations in Chapter 1 of the User's Guide. The default display shows the date, time, and the current receive mode. Getting Started Note Date Time Receive mode 01/01 13:00 Fax When the machine is idle (not being used) it will return to the default display shown above.
For the details of the control panel, see Control panel overview in this Quick Setup Guide are based on FAX-2480C. 3 Illustrations in Chapter 1 of the User's Guide. The default display shows the date, time, and the current receive mode. Getting Started Note Date Time Receive mode 01/01 13:00 Fax When the machine is idle (not being used) it will return to the default display shown above.

Quick Setup Guide - English
Page 6
...the battery (2) in the direction shown below. 2 2 Route the AC power cord through the guide on top of the machine. Go to Loading paper on page 6. 4 Installing the battery (FAX-2580C only) 1 Make sure you remove the battery, battery cover and cordless handset from the carton. 3 Connecting the ...cradle power cord (FAX-2580C only) 1 Remove tape and plastic bag from on 1 the side of the paper tray. 2 Connecting the handset (FAX-2480C only) 1 Connect the curled handset cord to the handset. Then, plug the adapter ...
...the battery (2) in the direction shown below. 2 2 Route the AC power cord through the guide on top of the machine. Go to Loading paper on page 6. 4 Installing the battery (FAX-2580C only) 1 Make sure you remove the battery, battery cover and cordless handset from the carton. 3 Connecting the ...cradle power cord (FAX-2580C only) 1 Remove tape and plastic bag from on 1 the side of the paper tray. 2 Connecting the handset (FAX-2480C only) 1 Connect the curled handset cord to the handset. Then, plug the adapter ...

Quick Setup Guide - English
Page 7
... catch the battery connector cord. 6 After installation, charge the battery more than 12 hours before using the cordless handset. 5 Charging the battery (FAX-2580C only) 1 Place the cordless handset on the cradle with the dial pad facing forward. Note • After replacement, you should charge the... battery. Setting Up the Machine 4 Place the battery in the Digital Cordless Handset User's Guide.) • The LCD of the handset will display "Searching for Base Unit" or...
... catch the battery connector cord. 6 After installation, charge the battery more than 12 hours before using the cordless handset. 5 Charging the battery (FAX-2580C only) 1 Place the cordless handset on the cradle with the dial pad facing forward. Note • After replacement, you should charge the... battery. Setting Up the Machine 4 Place the battery in the Digital Cordless Handset User's Guide.) • The LCD of the handset will display "Searching for Base Unit" or...

Quick Setup Guide - English
Page 8
.... 1 Pull the paper tray completely out of 20 lb (80 g/m2) paper. Setting Up the Machine 7 Position the antenna on the base unit (FAX-2580C only) 1 Move the antenna to the up to 100 sheets of the machine and lift the output paper tray cover (1). 1 Note Avoid using in a reinforced concrete building, near...
.... 1 Pull the paper tray completely out of 20 lb (80 g/m2) paper. Setting Up the Machine 7 Position the antenna on the base unit (FAX-2580C only) 1 Move the antenna to the up to 100 sheets of the machine and lift the output paper tray cover (1). 1 Note Avoid using in a reinforced concrete building, near...
Quick Setup Guide - English
Page 10
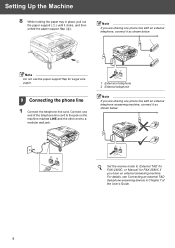
... holding the paper tray in Chapter 7 of the telephone line cord to the jack on the machine marked LINE and the other end to 'External TAD' for FAX-2480C, or 'Manual' for Legal size paper. 9 Connecting the phone line 1 Connect the telephone line cord. Connect one phone line with an ...external telephone answering machine, connect it clicks, and then unfold the paper support flap ( ). Note If you have...
... holding the paper tray in Chapter 7 of the telephone line cord to the jack on the machine marked LINE and the other end to 'External TAD' for FAX-2480C, or 'Manual' for Legal size paper. 9 Connecting the phone line 1 Connect the telephone line cord. Connect one phone line with an ...external telephone answering machine, connect it clicks, and then unfold the paper support flap ( ). Note If you have...

Quick Setup Guide - English
Page 14
...press 2 (No) on the dial pad and go to step 6. q 1.Yes 2.No 7 Press 1 (Yes), the machine will then start cleaning the colors. 8 After cleaning is OK for black and color. If you can adjust the LCD contrast for a sharper and more vivid display. Press 1 (Yes) or 2 (No) ...1.Yes 2.No After pressing 1 (Yes) or 2 (No) for both black and color, the LCD shows: Start Cleaning? q 1.Yes 2.No Color OK? The machine starts printing the Print Quality Check Sheet again and goes back to step 3. 13 Choosing your language (Canada only) (FAX-2480C only) 1 Press Menu. 2 Press 0. 3 Press 0. 4 Press a or ...
...press 2 (No) on the dial pad and go to step 6. q 1.Yes 2.No 7 Press 1 (Yes), the machine will then start cleaning the colors. 8 After cleaning is OK for black and color. If you can adjust the LCD contrast for a sharper and more vivid display. Press 1 (Yes) or 2 (No) ...1.Yes 2.No After pressing 1 (Yes) or 2 (No) for both black and color, the LCD shows: Start Cleaning? q 1.Yes 2.No Color OK? The machine starts printing the Print Quality Check Sheet again and goes back to step 3. 13 Choosing your language (Canada only) (FAX-2480C only) 1 Press Menu. 2 Press 0. 3 Press 0. 4 Press a or ...

Quick Setup Guide - English
Page 15
... Setting the date and time The machine displays the date and time, and if you set up the station ID it ...the User's Guide. 16 Setting your station ID You should store your name and fax number to be printed on all fax pages that is on the dial pad, and then press OK. Fax:_ 5 Enter your name. • If you need to enter a character that... the right. • If you entered a letter incorrectly and want to change it to each fax you send. 1 Press Menu. 2 Press 0. 3 Press 3. 4 Enter your fax number (up to move the cursor under the incorrect character, press Clear/Back. To confirm the...
... Setting the date and time The machine displays the date and time, and if you set up the station ID it ...the User's Guide. 16 Setting your station ID You should store your name and fax number to be printed on all fax pages that is on the dial pad, and then press OK. Fax:_ 5 Enter your name. • If you need to enter a character that... the right. • If you entered a letter incorrectly and want to change it to each fax you send. 1 Press Menu. 2 Press 0. 3 Press 3. 4 Enter your fax number (up to move the cursor under the incorrect character, press Clear/Back. To confirm the...

Quick Setup Guide - English
Page 16
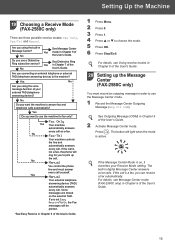
...Press Stop/Exit. No Fax/Tel Your machine controls the line and automatically answers every call . For details, see Setting the date and time on page 13 and Setting your external TAD (telephone answering device)? Press OK. 5 Press Stop/Exit. 14 18 Choosing a Receive Mode (FAX-2480C only) There are stored... on the external TAD. Do you use the machine for fax only? If the call is sent and an identification of the business or other entity or other individual ...
...Press Stop/Exit. No Fax/Tel Your machine controls the line and automatically answers every call . For details, see Setting the date and time on page 13 and Setting your external TAD (telephone answering device)? Press OK. 5 Press Stop/Exit. 14 18 Choosing a Receive Mode (FAX-2480C only) There are stored... on the external TAD. Do you use the machine for fax only? If the call is sent and an identification of the business or other entity or other individual ...
Quick Setup Guide - English
Page 17
...(OGM) in Chapter 6 of the User's Guide. 1 Press Menu. 2 Press 0. 3 Press 1. 4 Press a or b to the machine? If the Message Center Mode is a fax, you connecting an external telephone or external TAD (telephone answering device) to choose the mode. 5 Press OK. 6 Press Stop/Exit. For details... in Chapter 9 of the User's Guide. 15 If the call . Voice messages are three possible receive modes: Fax Only, Fax/Tel and Manual. Fax Only Yes Your machine automatically answers every call is active. Are you to use the Message Center mode. 1 Record the Message Center Outgoing...
...(OGM) in Chapter 6 of the User's Guide. 1 Press Menu. 2 Press 0. 3 Press 1. 4 Press a or b to the machine? If the Message Center Mode is a fax, you connecting an external telephone or external TAD (telephone answering device) to choose the mode. 5 Press OK. 6 Press Stop/Exit. For details... in Chapter 9 of the User's Guide. 15 If the call . Voice messages are three possible receive modes: Fax Only, Fax/Tel and Manual. Fax Only Yes Your machine automatically answers every call is active. Are you to use the Message Center mode. 1 Record the Message Center Outgoing...

Quick Setup Guide - English
Page 18
... have it locks securely into the open position. 3 Make sure (Fax) is also compatible with FAX-2480C and FAX-2580C. however, the maximum data transfer rate will receive a confirmation fax of the machine to your product online using the On-Line Registration link from the Brother Solutions Center for Macintosh®. Note You will be connected to...
... have it locks securely into the open position. 3 Make sure (Fax) is also compatible with FAX-2480C and FAX-2580C. however, the maximum data transfer rate will receive a confirmation fax of the machine to your product online using the On-Line Registration link from the Brother Solutions Center for Macintosh®. Note You will be connected to...
Software Users Guide
Page 2
Table of Contents Section I Windows® 1 Printing Using the Brother printer driver...2 Features ...2 Choosing the right type of paper...3 Simultaneous printing, scanning and faxing 3 Clearing data from the memory ...3 Checking the print quality ...3 Status Monitor...4 Monitoring the machine's status ...4 Turning off the status monitor...5 Printer driver settings...5 Accessing the printer driver settings...5 Basic tab...
Table of Contents Section I Windows® 1 Printing Using the Brother printer driver...2 Features ...2 Choosing the right type of paper...3 Simultaneous printing, scanning and faxing 3 Clearing data from the memory ...3 Checking the print quality ...3 Status Monitor...4 Monitoring the machine's status ...4 Turning off the status monitor...5 Printer driver settings...5 Accessing the printer driver settings...5 Basic tab...

Software Users Guide
Page 4
... OCR ...72 Scan to File...73 5 Remote Setup (Not available for DCP models and MFC-240C) Remote Setup...74 6 Brother PC-FAX Software (MFC models only) PC-FAX sending ...76 Setting up user information...77 Sending setup...78 Setting up a cover page...79 Entering cover page information...79 Address Book...for MFC-240C and MFC-3360C 89 Enabling the PC-FAX Receiving software on your machine 90 Running the PC-FAX Receiving software on your PC 91 Setting up your PC ...91 Configuring the Network PC-FAX Receiving Settings 92 Viewing new PC-FAX messages...93 7 PhotoCapture Center™ (Not available ...
... OCR ...72 Scan to File...73 5 Remote Setup (Not available for DCP models and MFC-240C) Remote Setup...74 6 Brother PC-FAX Software (MFC models only) PC-FAX sending ...76 Setting up user information...77 Sending setup...78 Setting up a cover page...79 Entering cover page information...79 Address Book...for MFC-240C and MFC-3360C 89 Enabling the PC-FAX Receiving software on your machine 90 Running the PC-FAX Receiving software on your PC 91 Setting up your PC ...91 Configuring the Network PC-FAX Receiving Settings 92 Viewing new PC-FAX messages...93 7 PhotoCapture Center™ (Not available ...
Software Users Guide
Page 9
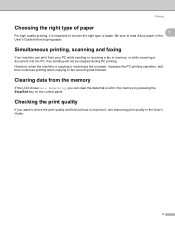
However, when the machine is important to choose the right type of paper 1 1 For high quality printing, it is copying or receiving a fax on the control panel. Printing Choosing the right type of paper. Be sure to improve it pauses the PC printing operation, and then continues printing when copying or fax receiving has... Data Remaining, you want to check the print quality and find out how to read About paper in the User's Guide. 3 Simultaneous printing, scanning and faxing 1 Your machine can clear the data that is left in memory, or while scanning a document into the PC...
However, when the machine is important to choose the right type of paper 1 1 For high quality printing, it is copying or receiving a fax on the control panel. Printing Choosing the right type of paper. Be sure to improve it pauses the PC printing operation, and then continues printing when copying or fax receiving has... Data Remaining, you want to check the print quality and find out how to read About paper in the User's Guide. 3 Simultaneous printing, scanning and faxing 1 Your machine can clear the data that is left in memory, or while scanning a document into the PC...

Software Users Guide
Page 50
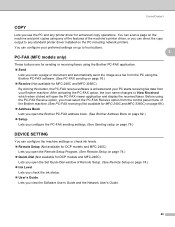
... PhotoCapture Center™. (3) d Access the Copy features available via your PC. (4) e Access the 'PC-FAX' applications available for each function and a link to the Brother Solutions Center by clicking the Configuration button. (8) 44 3 ControlCenter3 3 Note The features available to you in ...down list. (7) h You can also open the configuration window for your device. (5) f Access the settings available to configure your machine. Using ControlCenter3 eliminates the need to the Custom Scan settings. ControlCenter3 has the following operations: a Scan directly to a file, ...
... PhotoCapture Center™. (3) d Access the Copy features available via your PC. (4) e Access the 'PC-FAX' applications available for each function and a link to the Brother Solutions Center by clicking the Configuration button. (8) 44 3 ControlCenter3 3 Note The features available to you in ...down list. (7) h You can also open the configuration window for your device. (5) f Access the settings available to configure your machine. Using ControlCenter3 eliminates the need to the Custom Scan settings. ControlCenter3 has the following operations: a Scan directly to a file, ...
Software Users Guide
Page 54
... Software User's Guide and the Network User's Guide. 48 You can scan a page on the machine and print copies using the PC-FAX Receive option, you must select the PC-FAX Receive option from your Brother machine. Before using any of the features of Remote Setup. (See Remote Setup on page 76.) &#...any printer driver for MFC-240C and MFC-3360C) By clicking this button, the PC-FAX receive software is activated and your PC starts receiving fax data from the control panel menu of the Brother machine. (See PC-FAX receiving (Not available for MFC-240C and MFC-3360C) on page 89.) „ Address...
... Software User's Guide and the Network User's Guide. 48 You can scan a page on the machine and print copies using the PC-FAX Receive option, you must select the PC-FAX Receive option from your Brother machine. Before using any of the features of Remote Setup. (See Remote Setup on page 76.) &#...any printer driver for MFC-240C and MFC-3360C) By clicking this button, the PC-FAX receive software is activated and your PC starts receiving fax data from the control panel menu of the Brother machine. (See PC-FAX receiving (Not available for MFC-240C and MFC-3360C) on page 89.) „ Address...

Software Users Guide
Page 69
ControlCenter3 PC-FAX (MFC models only) 3 The PC-FAX option lets you scan a document and automatically send the image as a fax from the PC using the Brother PC-FAX software. (See PC-FAX sending on page 76.) To change the Resolution, Scan Type, Document Size, Show Scanner Interface, Brightness and Contrast settings. 63 You can also configure the address book and change some general machine settings. 3 Send 3 The Send button lets you send and receive faxes. You can change the Send settings, right-click the Send button and click ControlCenter Configuration.
ControlCenter3 PC-FAX (MFC models only) 3 The PC-FAX option lets you scan a document and automatically send the image as a fax from the PC using the Brother PC-FAX software. (See PC-FAX sending on page 76.) To change the Resolution, Scan Type, Document Size, Show Scanner Interface, Brightness and Contrast settings. 63 You can also configure the address book and change some general machine settings. 3 Send 3 The Send button lets you send and receive faxes. You can change the Send settings, right-click the Send button and click ControlCenter Configuration.

Software Users Guide
Page 70
... 91.) 64 Before you use the PC-FAX Receive function, you must select the PC-FAX Receive 3 option from the start menu. (See Running the PC-FAX Receiving software on your Brother machine. ControlCenter3 Receive/View Received (Not available for MFC-240C and MFC-3360C) 3 The Brother PC-FAX Receiving software option lets you view and store...
... 91.) 64 Before you use the PC-FAX Receive function, you must select the PC-FAX Receive 3 option from the start menu. (See Running the PC-FAX Receiving software on your Brother machine. ControlCenter3 Receive/View Received (Not available for MFC-240C and MFC-3360C) 3 The Brother PC-FAX Receiving software option lets you view and store...

Software Users Guide
Page 81
... setting or function heading (for example, to use Remote Setup, you read the settings from a file. Visit the Brother Solutions Center (http://solutions.brother.com) for your machine. • To save several sets of settings for more information. 75 Note • You can use the Export and... Import buttons to save all fax settings highlight Fax) from the setting list then click Export. • If you are using a different machine to ...
... setting or function heading (for example, to use Remote Setup, you read the settings from a file. Visit the Brother Solutions Center (http://solutions.brother.com) for your machine. • To save several sets of settings for more information. 75 Note • You can use the Export and... Import buttons to save all fax settings highlight Fax) from the setting list then click Export. • If you are using a different machine to ...


