
Owner's guide
Page 2
... the remote control battery away from children. Dispose of used batteries properly, following any part of the correct type and model number. CAUTION RISK OF ELECTRICAL SHOCK DO NOT OPEN CAUTION: TO REDUCE THE RISK OF ELECTRIC SHOCK, DO NOT REMOVE COVER (OR BACK). English SAFETY INFORMATION Please read this owner's guide Please take the time to follow the instructions in this product unless you set...
... the remote control battery away from children. Dispose of used batteries properly, following any part of the correct type and model number. CAUTION RISK OF ELECTRICAL SHOCK DO NOT OPEN CAUTION: TO REDUCE THE RISK OF ELECTRIC SHOCK, DO NOT REMOVE COVER (OR BACK). English SAFETY INFORMATION Please read this owner's guide Please take the time to follow the instructions in this product unless you set...
Owner's guide
Page 3
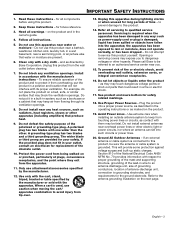
.... Refer all instructions. 5. Use Proper Power Sources - Refer to qualified service personnel. for the ground electrode. Do not defeat the safety purpose of the obsolete outlet. 10. Only use this apparatus near you to avoid injury from the wall outlet before using this product, be fatal. Plug the product into a proper power source, as described in the owner's guide. 4. Do not install external antennas near a swimming...
.... Refer all instructions. 5. Use Proper Power Sources - Refer to qualified service personnel. for the ground electrode. Do not defeat the safety purpose of the obsolete outlet. 10. Only use this apparatus near you to avoid injury from the wall outlet before using this product, be fatal. Plug the product into a proper power source, as described in the owner's guide. 4. Do not install external antennas near a swimming...
Owner's guide
Page 4
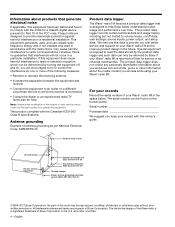
... to Bose for a Class B digital device, pursuant to Part 15 of the receiver or radio remote control could void the user's authority to comply with the limits for service or as per National Electrical Code, ANSI/NFPA 70. Note: Unauthorized modification of the FCC rules. If this work may be found to operate this owner's guide. The serial number can only be determined by Bose if your Wave® radio III...
... to Bose for a Class B digital device, pursuant to Part 15 of the receiver or radio remote control could void the user's authority to comply with the limits for service or as per National Electrical Code, ANSI/NFPA 70. Note: Unauthorized modification of the FCC rules. If this work may be found to operate this owner's guide. The serial number can only be determined by Bose if your Wave® radio III...
Owner's guide
Page 5
... a sounding alarm 12 CONTENTS CONNECTING OTHER EQUIPMENT 13 Rear panel input/outputs 13 Using headphones 13 Using the AUX IN connector 13 Using an external antenna 14 Connecting to a Lifestyle® system 14 PERSONALIZING YOUR WAVE® RADIO III .......... 15 The setup menu 15 Adjusting the snooze time 16 Turning RDS on or off 16 Changing the time format 16 Adjusting the display brightness 16 Setting the room code 17 Turning the touch pad on or off 17 Changing the system standby timeout 18 Performing a system reset...
... a sounding alarm 12 CONTENTS CONNECTING OTHER EQUIPMENT 13 Rear panel input/outputs 13 Using headphones 13 Using the AUX IN connector 13 Using an external antenna 14 Connecting to a Lifestyle® system 14 PERSONALIZING YOUR WAVE® RADIO III .......... 15 The setup menu 15 Adjusting the snooze time 16 Turning RDS on or off 16 Changing the time format 16 Adjusting the display brightness 16 Setting the room code 17 Turning the touch pad on or off 17 Changing the system standby timeout 18 Performing a system reset...
Owner's guide
Page 6
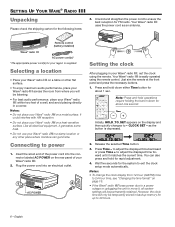
... time. Like all system settings will only be permanently retained. However, the clock time will be temporarily stored in your Wave® radio III. 2. Initially, HOLD_TO_SET appears on a metal surface. Press Time - Your Wave® radio III uses the power cord as the button is supplied. Just aim the remote at the front panel and press the necessary buttons. 1. as an antenna. Wait five seconds for FM radio. Notes: • To change the clock display...
... time. Like all system settings will only be permanently retained. However, the clock time will be temporarily stored in your Wave® radio III. 2. Initially, HOLD_TO_SET appears on a metal surface. Press Time - Your Wave® radio III uses the power cord as the button is supplied. Just aim the remote at the front panel and press the necessary buttons. 1. as an antenna. Wait five seconds for FM radio. Notes: • To change the clock display...
Owner's guide
Page 7
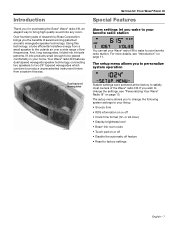
...; Reset to change the following system settings to the outside air over a wide range of low frequencies. And, long waveguides, folded into intricate patterns, fit into any room. SETTING UP YOUR WAVE® RADIO III Special Features Alarm settings let you to personalize system operation Dual tapered waveguides System settings were selected at the factory to satisfy most owners of award-winning patented acoustic waveguide speaker technology. The setup menu...
...; Reset to change the following system settings to the outside air over a wide range of low frequencies. And, long waveguides, folded into intricate patterns, fit into any room. SETTING UP YOUR WAVE® RADIO III Special Features Alarm settings let you to personalize system operation Dual tapered waveguides System settings were selected at the factory to satisfy most owners of award-winning patented acoustic waveguide speaker technology. The setup menu...
Owner's guide
Page 8
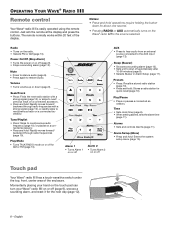
... a sounding alarm, and reset it for quick recall (page 10). Touch pad Your Wave® radio III has a touch-sensitive switch under the top, front, center area of the display. OPERATING YOUR WAVE® RADIO III Remote control Your Wave® radio III is easily operated using the remote control. Just aim the remote at the display and press the buttons. The remote normally works within 20 feet of the enclosure. Notes: • Press-and-hold : Enters the system setup menu...
... a sounding alarm, and reset it for quick recall (page 10). Touch pad Your Wave® radio III has a touch-sensitive switch under the top, front, center area of the display. OPERATING YOUR WAVE® RADIO III Remote control Your Wave® radio III is easily operated using the remote control. Just aim the remote at the display and press the buttons. The remote normally works within 20 feet of the enclosure. Notes: • Press-and-hold : Enters the system setup menu...
Owner's guide
Page 9
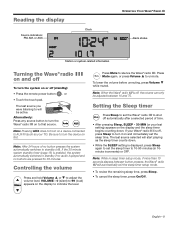
... active. Alternatively: Press any source button to turn the Wave® radio III on the display to indicate the level. Be sure to turn the device on and immediately set the sleep time. English - 9 To lower the volume before unmuting, press Volume while muted. Note: When the Wave® radio III is off ). Reading the display Source indicators: FM, AM, or AUX Clock OPERATING YOUR WAVE® RADIO III Alarm status Station or system-related information Turning the Wave® radio III...
... active. Alternatively: Press any source button to turn the Wave® radio III on the display to indicate the level. Be sure to turn the device on and immediately set the sleep time. English - 9 To lower the volume before unmuting, press Volume while muted. Note: When the Wave® radio III is off ). Reading the display Source indicators: FM, AM, or AUX Clock OPERATING YOUR WAVE® RADIO III Alarm status Station or system-related information Turning the Wave® radio III...
Owner's guide
Page 10
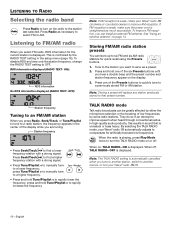
... for artificially boosted low frequencies. Tune to the station you tune to another station, switch to another source, or turn your Wave® radio III automatically adjusts to compensate for the current station is playing, press Play Mode twice to turn the TALK RADIO mode on the radio to the station last selected. They do so in the center of low frequencies by the RADIO TEXT setting in sound that preset number. This is automatically cancelled...
... for artificially boosted low frequencies. Tune to the station you tune to another station, switch to another source, or turn your Wave® radio III automatically adjusts to compensate for the current station is playing, press Play Mode twice to turn the TALK RADIO mode on the radio to the station last selected. They do so in the center of low frequencies by the RADIO TEXT setting in sound that preset number. This is automatically cancelled...
Owner's guide
Page 11
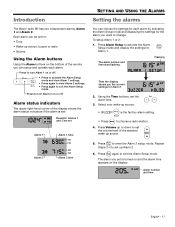
...: Alarms 1 and 2 are set for Alarm 1. Flashing Then the display shows you set the volume level of the remote you can choose the settings for each alarm by activating the Alarm Setup mode and displaying the settings for Alarm 1. 2. Press Volume up or down to change. Repeat Steps 2-4 to turn Alarm 1 on the display: Alarm number and time English - 11 Introduction The Wave® radio III has two independent alarms, Alarm 1 and Alarm 2. Press Alarm Setup to enter the Alarm 2 setup mode. Press to set the alarm time. 3. Using the Time buttons, set...
...: Alarms 1 and 2 are set for Alarm 1. Flashing Then the display shows you set the volume level of the remote you can choose the settings for each alarm by activating the Alarm Setup mode and displaying the settings for Alarm 1. 2. Press Volume up or down to change. Repeat Steps 2-4 to turn Alarm 1 on the display: Alarm number and time English - 11 Introduction The Wave® radio III has two independent alarms, Alarm 1 and Alarm 2. Press Alarm Setup to enter the Alarm 2 setup mode. Press to set the alarm time. 3. Using the Time buttons, set...
Owner's guide
Page 13
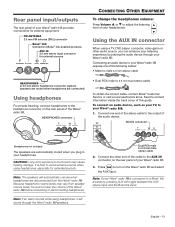
... your Wave® radio III. It is connected to adjust the listening level of the audio device. FM ANTENNA 3.5 mm FM antenna (75) connector Bose® link Connects to Bose® link-enabled products AUX IN 3.5 mm stereo input connector for external sources CONNECTING OTHER EQUIPMENT To change the headphones volume: Press Volume or to a Bose® link accessory, pressing AUX will sound through your headphones. Connect one of the following cables: • Male-to-male 3.5 mm stereo cable HEADPHONES A 3.5 mm stereo headphone connector (system speakers...
... your Wave® radio III. It is connected to adjust the listening level of the audio device. FM ANTENNA 3.5 mm FM antenna (75) connector Bose® link Connects to Bose® link-enabled products AUX IN 3.5 mm stereo input connector for external sources CONNECTING OTHER EQUIPMENT To change the headphones volume: Press Volume or to a Bose® link accessory, pressing AUX will sound through your headphones. Connect one of the following cables: • Male-to-male 3.5 mm stereo cable HEADPHONES A 3.5 mm stereo headphone connector (system speakers...
Owner's guide
Page 14
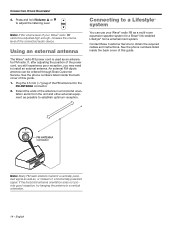
... the antenna in a horizontal orien- If, after adjusting the position of the connected audio device. Contact Bose Customer Service to install an external antenna. An external FM dipole antenna can use your Wave® radio III cannot be ordered through Bose Customer Service. See the phone numbers listed inside the back cover of this guide. 1. English Using an external antenna The Wave® radio III power cord is used as possible to adjust the listening level. Plug the 3.5 mm (1/8") plug of...
... the antenna in a horizontal orien- If, after adjusting the position of the connected audio device. Contact Bose Customer Service to install an external antenna. An external FM dipole antenna can use your Wave® radio III cannot be ordered through Bose Customer Service. See the phone numbers listed inside the back cover of this guide. 1. English Using an external antenna The Wave® radio III power cord is used as possible to adjust the listening level. Plug the 3.5 mm (1/8") plug of...
Owner's guide
Page 15
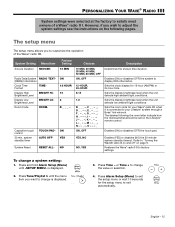
... high ambient light conditions. Restores the Wave® radio III to display RDS information. To change the value or selection. 4. Press Tune/Playlist > until -SETUP MENU- Press Alarm Setup (Menu) to your Wave® radio III when it is displayed. 3. Press Time - Sets the room code for your Lifestyle® system through a Bose® link network. System Reset RESET ALL- is displayed. 2. Capacitive touch control 30 min. The setup menu The setup menu allows you want to change is connected to exit the setup menu or wait...
... high ambient light conditions. Restores the Wave® radio III to display RDS information. To change the value or selection. 4. Press Tune/Playlist > until -SETUP MENU- Press Alarm Setup (Menu) to your Wave® radio III when it is displayed. 3. Press Time - Sets the room code for your Lifestyle® system through a Bose® link network. System Reset RESET ALL- is displayed. 2. Capacitive touch control 30 min. The setup menu The setup menu allows you want to change is connected to exit the setup menu or wait...
Owner's guide
Page 16
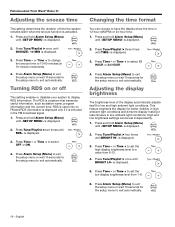
... Alarm Setup (Menu) until -SETUP MENU- Press and hold Alarm Setup (Menu) until SNOOZE- 10 MIN is displayed. 3. is activated. 1. Press Alarm Setup (Menu) to exit the setup menu or wait 10 seconds for the setup menu to exit automatically. 16 - PERSONALIZING YOUR WAVE® RADIO III Adjusting the snooze time This setting determines the duration of the display automatically adjusts itself for better visibility in high ambient light conditions and dims the display making it is displayed. 3. is displayed...
... Alarm Setup (Menu) until -SETUP MENU- Press and hold Alarm Setup (Menu) until SNOOZE- 10 MIN is displayed. 3. is activated. 1. Press Alarm Setup (Menu) to exit the setup menu or wait 10 seconds for the setup menu to exit automatically. 16 - PERSONALIZING YOUR WAVE® RADIO III Adjusting the snooze time This setting determines the duration of the display automatically adjusts itself for better visibility in high ambient light conditions and dims the display making it is displayed. 3. is displayed...
Owner's guide
Page 17
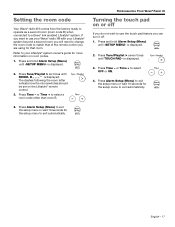
... to change the room code to match that of the remote control you can turn it off If you do not wish to use your Wave® radio III with your Lifestyle® system owner's guide for the setup menu to select a room code other than room B. 4. Press Tune/Playlist > six times until TOUCH PAD- or Time + to exit automatically. PERSONALIZING YOUR WAVE® RADIO III Turning the touch pad on the Lifestyle® remote control. 3. Press Time - Press Alarm Setup (Menu) to...
... to change the room code to match that of the remote control you can turn it off If you do not wish to use your Wave® radio III with your Lifestyle® system owner's guide for the setup menu to select a room code other than room B. 4. Press Tune/Playlist > six times until TOUCH PAD- or Time + to exit automatically. PERSONALIZING YOUR WAVE® RADIO III Turning the touch pad on the Lifestyle® remote control. 3. Press Time - Press Alarm Setup (Menu) to...
Owner's guide
Page 18
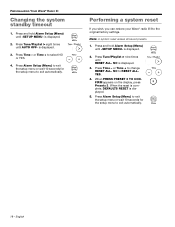
... Wave® radio III to select NO or YES. 4. is displayed. 3. Press Alarm Setup (Menu) to exit the setup menu or wait 10 seconds for the setup menu to change RESET ALL- Press and hold Alarm Setup (Menu) until RESET ALL- NO to exit automatically. 18 - is displayed. 2. PERSONALIZING YOUR WAVE® RADIO III Changing the system standby timeout 1. Press Time - Press and hold Alarm Setup (Menu) until AUTO OFF- Press Time - Press Tune/Playlist > nine times until -SETUP MENU- Press Alarm Setup (Menu) to exit the setup menu...
... Wave® radio III to select NO or YES. 4. is displayed. 3. Press Alarm Setup (Menu) to exit the setup menu or wait 10 seconds for the setup menu to change RESET ALL- Press and hold Alarm Setup (Menu) until RESET ALL- NO to exit automatically. 18 - is displayed. 2. PERSONALIZING YOUR WAVE® RADIO III Changing the system standby timeout 1. Press Time - Press and hold Alarm Setup (Menu) until AUTO OFF- Press Time - Press Tune/Playlist > nine times until -SETUP MENU- Press Alarm Setup (Menu) to exit the setup menu...
Owner's guide
Page 19
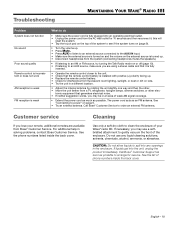
... the list of your remote, additional remotes are using a stereo cable and that it ; Call Bose® Customer Support as soon as an FM antenna. Customer service If you lose your Wave® radio III. this will reset the system. • Tap the touch pad on the top of weak AM signal coverage. • Extend the power cord as much as possible. English - 19 Troubleshooting MAINTAINING YOUR WAVE® RADIO III Problem System...
... the list of your remote, additional remotes are using a stereo cable and that it ; Call Bose® Customer Support as soon as an FM antenna. Customer service If you lose your Wave® radio III. this will reset the system. • Tap the touch pad on the top of weak AM signal coverage. • Extend the power cord as much as possible. English - 19 Troubleshooting MAINTAINING YOUR WAVE® RADIO III Problem System...
Owner's guide
Page 20
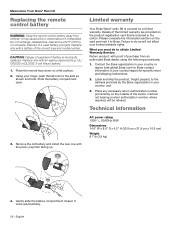
... YOUR WAVE® RADIO III Replacing the remote control battery WARNING: Keep the remote control battery away from an authorized Bose dealer, using the following procedures: 1. Technical information AC power rating 120V 50/60Hz 60W Dimensions 14.6" W x 8.6" D x 4.2" H (36.8 cm x 21.9 cm x 10.6 cm) Weight 8.7 lb (3.9 kg) insbtratutcSetrieyoetnoospfbeorerattuiysnpegeds of a used battery promptly. Using your country or region (visit global.Bose.com for specific return and shipping instructions; 2. Remove the old battery and install...
... YOUR WAVE® RADIO III Replacing the remote control battery WARNING: Keep the remote control battery away from an authorized Bose dealer, using the following procedures: 1. Technical information AC power rating 120V 50/60Hz 60W Dimensions 14.6" W x 8.6" D x 4.2" H (36.8 cm x 21.9 cm x 10.6 cm) Weight 8.7 lb (3.9 kg) insbtratutcSetrieyoetnoospfbeorerattuiysnpegeds of a used battery promptly. Using your country or region (visit global.Bose.com for specific return and shipping instructions; 2. Remove the old battery and install...
Owner's guide
Page 21
... (12-hour) time 6, 15, 16 ambient light conditions 15, 16 audio device, connecting 13 AUX IN connector 13 auxiliary source 9 B backup memory 6 battery replacement 19 Bose® link 13, 14, 15, 17 brightness level 15, 16 C carton 20 cleaning 20 clock display 9 clock setup mode 6 clock time 6 clock time format 6, 16 clock, setting the 6 computer 13 connecting other equipment 13 customer service 19 customizing operation 15 D dimensions 20 dimmer switches 19 dipole antenna 14 display 9 display brightness 15, 16 DVD player 13 E electrical...
... (12-hour) time 6, 15, 16 ambient light conditions 15, 16 audio device, connecting 13 AUX IN connector 13 auxiliary source 9 B backup memory 6 battery replacement 19 Bose® link 13, 14, 15, 17 brightness level 15, 16 C carton 20 cleaning 20 clock display 9 clock setup mode 6 clock time 6 clock time format 6, 16 clock, setting the 6 computer 13 connecting other equipment 13 customer service 19 customizing operation 15 D dimensions 20 dimmer switches 19 dipole antenna 14 display 9 display brightness 15, 16 DVD player 13 E electrical...
Owner's guide
Page 22
... room 17 setting alarm 11 setup menu 15, 16, 17 shipping carton 6 shipping instructions 20 sleep timer setup mode 9 snooze control 12, 15 snooze time 16 sounding alarm 12 station frequency 10 stereo cable 13 stereo headphone connector 13 stereo input connector 13 stopping a sounding alarm 12 storing a radio station 10 system operation 7 system reset 18 system settings 7, 15, 16, 17, 18 system setup mode 18 system standby timeout 15 T talk radio broadcasts 10 TALK RADIO mode 10 tapered waveguide 7 technical information 20 time increment 16 touch pad control 8 troubleshooting 19 tuning the radio...
... room 17 setting alarm 11 setup menu 15, 16, 17 shipping carton 6 shipping instructions 20 sleep timer setup mode 9 snooze control 12, 15 snooze time 16 sounding alarm 12 station frequency 10 stereo cable 13 stereo headphone connector 13 stereo input connector 13 stopping a sounding alarm 12 storing a radio station 10 system operation 7 system reset 18 system settings 7, 15, 16, 17, 18 system setup mode 18 system standby timeout 15 T talk radio broadcasts 10 TALK RADIO mode 10 tapered waveguide 7 technical information 20 time increment 16 touch pad control 8 troubleshooting 19 tuning the radio...


