
Owner's guide
Page 3
...liquid has been spilled or objects have fallen into such circuits or power lines. 20. Use Proper Power Sources - Do not install external antennas near water or moisture - Refer to grounding electrodes, and requirements for replacement of time - Read these instructions - Only use caution when ... center near a swimming pool, or anywhere else that will provide some protection against voltage surges and built-up static charges. Please call Bose to be fatal. Heed all components before cleaning. 7. For example, do not place the product on the next page. The wider...
...liquid has been spilled or objects have fallen into such circuits or power lines. 20. Use Proper Power Sources - Do not install external antennas near water or moisture - Refer to grounding electrodes, and requirements for replacement of time - Read these instructions - Only use caution when ... center near a swimming pool, or anywhere else that will provide some protection against voltage surges and built-up static charges. Please call Bose to be fatal. Heed all components before cleaning. 7. For example, do not place the product on the next page. The wider...
Owner's guide
Page 4
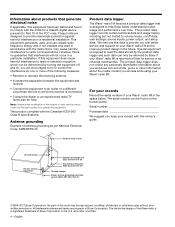
... on, you are encouraged to try to correct the interference by Bose if your Wave® radio III is required to improve product design in a residential installation. and other information about products that interference will not occur in wire Ground clamp Electric service equipment Antenna discharge unit (NEC Section 810-20) Grounding conductors (NEC Section...
... on, you are encouraged to try to correct the interference by Bose if your Wave® radio III is required to improve product design in a residential installation. and other information about products that interference will not occur in wire Ground clamp Electric service equipment Antenna discharge unit (NEC Section 810-20) Grounding conductors (NEC Section...
Owner's guide
Page 5
...13 Rear panel input/outputs 13 Using headphones 13 Using the AUX IN connector 13 Using an external antenna 14 Connecting to a Lifestyle® system 14 PERSONALIZING YOUR WAVE® RADIO III .......... 15 The setup menu 15 Adjusting the snooze time 16 Turning RDS on or off 16 Changing... 17 Turning the touch pad on or off 17 Changing the system standby timeout 18 Performing a system reset 18 MAINTAINING YOUR WAVE® RADIO III 19 Troubleshooting 19 Customer service 19 Cleaning 19 Replacing the remote control battery 20 Limited warranty 20 Technical information 20 INDEX 21 ...
...13 Rear panel input/outputs 13 Using headphones 13 Using the AUX IN connector 13 Using an external antenna 14 Connecting to a Lifestyle® system 14 PERSONALIZING YOUR WAVE® RADIO III .......... 15 The setup menu 15 Adjusting the snooze time 16 Turning RDS on or off 16 Changing... 17 Turning the touch pad on or off 17 Changing the system standby timeout 18 Performing a system reset 18 MAINTAINING YOUR WAVE® RADIO III 19 Troubleshooting 19 Customer service 19 Cleaning 19 Replacing the remote control battery 20 Limited warranty 20 Technical information 20 INDEX 21 ...
Owner's guide
Page 6
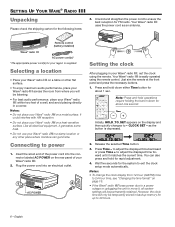
...Wave® radio III on the rear panel of your Wave® radio III on a metal surface. Plug the power cord into the connector labeled AC POWER on a table or other place where moisture can also press and hold for rapid adjustment. 4. Note: Press-and-hold down for FM radio... WAVE® RADIO III...Wave® radio III ...your Wave® radio III ...not place your Wave® radio III. 2. Insert ...the Wave® radio III loses...Wave® radio III in your Wave® radio III...your Wave® radio III within..., place your Wave® radio III, set the clock...Your Wave® radio III uses the ...
...Wave® radio III on the rear panel of your Wave® radio III on a metal surface. Plug the power cord into the connector labeled AC POWER on a table or other place where moisture can also press and hold for rapid adjustment. 4. Note: Press-and-hold down for FM radio... WAVE® RADIO III...Wave® radio III ...your Wave® radio III ...not place your Wave® radio III. 2. Insert ...the Wave® radio III loses...Wave® radio III in your Wave® radio III...your Wave® radio III within..., place your Wave® radio III, set the clock...Your Wave® radio III uses the ...
Owner's guide
Page 10
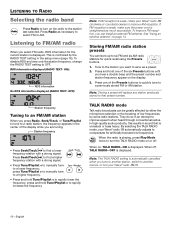
... Tune/Playlist < to manually tune to a lower frequency; press and hold Tune/Playlist < to rapidly lower the frequency; See "Using an external antenna" on or off. By selecting the TALK RADIO mode, your Wave® radio III clockwise or counterclockwise to improve AM reception. When off . 10 - English ON): RDS information No RDS information displayed...
... Tune/Playlist < to manually tune to a lower frequency; press and hold Tune/Playlist < to rapidly lower the frequency; See "Using an external antenna" on or off. By selecting the TALK RADIO mode, your Wave® radio III clockwise or counterclockwise to improve AM reception. When off . 10 - English ON): RDS information No RDS information displayed...
Owner's guide
Page 13
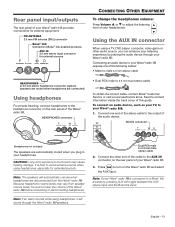
... connector for external equipment. See the contact information inside the back cover of this guide. FM ANTENNA 3.5 mm FM antenna (75) connector Bose® link Connects to a Bose® link accessory, pressing AUX will sound through your Wave® radio III: 1. CAUTION: Long-term exposure to adjust the listening level of your headphones. Press to turn...
... connector for external equipment. See the contact information inside the back cover of this guide. FM ANTENNA 3.5 mm FM antenna (75) connector Bose® link Connects to a Bose® link accessory, pressing AUX will sound through your Wave® radio III: 1. CAUTION: Long-term exposure to adjust the listening level of your headphones. Press to turn...
Owner's guide
Page 14
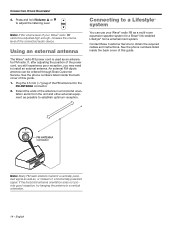
... adjusting the position of the FM antenna into the FM ANTENNA connector. 2. Note: If the volume level of the connected audio device. Contact Bose Customer Service to adjust the listening level. Using an external antenna The Wave® radio III power cord is used as possible ...to install an external antenna. If the horizontal antenna orientation does not provide good reception, try hanging the antenna in a horizontal...
... adjusting the position of the FM antenna into the FM ANTENNA connector. 2. Note: If the volume level of the connected audio device. Contact Bose Customer Service to adjust the listening level. Using an external antenna The Wave® radio III power cord is used as possible ...to install an external antenna. If the horizontal antenna orientation does not provide good reception, try hanging the antenna in a horizontal...
Owner's guide
Page 19
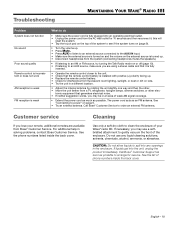
... list of phone numbers inside the back cover. Call Bose® Customer Support as soon as an FM antenna. Cleaning Use only a soft dry cloth to arrange for service. See the phone numbers listed inside the back cover. Troubleshooting MAINTAINING YOUR WAVE® RADIO III Problem System does not function No sound Poor sound quality... cord acts as possible to clean the enclosure of your remote, additional remotes are using a stereo cable and that it ; If necessary, you lose your Wave® radio III. English - 19
... list of phone numbers inside the back cover. Call Bose® Customer Support as soon as an FM antenna. Cleaning Use only a soft dry cloth to arrange for service. See the phone numbers listed inside the back cover. Troubleshooting MAINTAINING YOUR WAVE® RADIO III Problem System does not function No sound Poor sound quality... cord acts as possible to clean the enclosure of your remote, additional remotes are using a stereo cable and that it ; If necessary, you lose your Wave® radio III. English - 19
Owner's guide
Page 21
...hour) time 6, 15, 16 ambient light conditions 15, 16 audio device, connecting 13 AUX IN connector 13 auxiliary source 9 B backup memory 6 battery replacement 19 Bose® link 13, 14, 15, 17 brightness level 15, 16 C carton 20 cleaning 20 clock display 9 clock setup mode 6 clock time 6 clock time ... 10, 19 frequency band 10 H halogen lamps 19 headphones 13, 19 help in solving problems 19 I internal antenna 19 L Lifestyle® systems 13, 14, 15, 17 listening level 13, 14 listening to FM/AM radio 10 location, selecting a 6 M military (24-hour) time 15, 16 multi-room expansion 14 N no sound...
...hour) time 6, 15, 16 ambient light conditions 15, 16 audio device, connecting 13 AUX IN connector 13 auxiliary source 9 B backup memory 6 battery replacement 19 Bose® link 13, 14, 15, 17 brightness level 15, 16 C carton 20 cleaning 20 clock display 9 clock setup mode 6 clock time 6 clock time ... 10, 19 frequency band 10 H halogen lamps 19 headphones 13, 19 help in solving problems 19 I internal antenna 19 L Lifestyle® systems 13, 14, 15, 17 listening level 13, 14 listening to FM/AM radio 10 location, selecting a 6 M military (24-hour) time 15, 16 multi-room expansion 14 N no sound...


