
The Bose® Lifestyle® amplifier - Owner's guide
Page 4
... the antenna grounding illustration on a different circuit than the one to Part 15 of cable entry as is practical. ©2001 Bose Corporation, The Mountain, Framingham, MA 01701-9168 USA 255805 AM Rev.00 JN10494 2b January 10, 2002 AM262840_00_V.pdf These limits...installation. Ground All Outdoor Antennas - However, this is grounded. Refer to radio communications. Antenna grounding Example of the receiver or radio remote control could void the user's authority to this equipment does cause harmful interference to radio or television reception, which the receiver is ...
... the antenna grounding illustration on a different circuit than the one to Part 15 of cable entry as is practical. ©2001 Bose Corporation, The Mountain, Framingham, MA 01701-9168 USA 255805 AM Rev.00 JN10494 2b January 10, 2002 AM262840_00_V.pdf These limits...installation. Ground All Outdoor Antennas - However, this is grounded. Refer to radio communications. Antenna grounding Example of the receiver or radio remote control could void the user's authority to this equipment does cause harmful interference to radio or television reception, which the receiver is ...

The Bose® Lifestyle® amplifier - Owner's guide
Page 5
... you begin 4 Unpacking the carton 4 Selecting a location for your Lifestyle® stereo amplifier 5 Connecting the Lifestyle® stereo amplifier to a multi-room interface 7 Connecting the Lifestyle® stereo amplifier to a Lifestyle® media center 9 Setting up the remote control 10 Setting Zone 2 Protocol 10 Connecting the Lifestyle® stereo amplifier to a Model 20 music center 11...
... you begin 4 Unpacking the carton 4 Selecting a location for your Lifestyle® stereo amplifier 5 Connecting the Lifestyle® stereo amplifier to a multi-room interface 7 Connecting the Lifestyle® stereo amplifier to a Lifestyle® media center 9 Setting up the remote control 10 Setting Zone 2 Protocol 10 Connecting the Lifestyle® stereo amplifier to a Model 20 music center 11...

The Bose® Lifestyle® amplifier - Owner's guide
Page 12
...System Setup (1 of 3) Zone 2 Protocol: Legacy 10 January 4, 2002 AM262840_00_V.pdf Note: Refer to your Lifestyle® system owner's guide for more information on your system in your first remote. 3. On Off Mute All Mute SOURCE / INPUT CD/DVD Changer FM/AM TV VCR AUX MENU / ... ( ) System Setup Enter System Setup (3 of 3). Make sure that the Zone 2 Protocol is Zone 2 Protocol. 4. While your Lifestyle® DVD system is on, press the Settings button on operating your remote control. Make sure switches 5, 7, and 8 are down to "more than one room. Setting Up Your...
...System Setup (1 of 3) Zone 2 Protocol: Legacy 10 January 4, 2002 AM262840_00_V.pdf Note: Refer to your Lifestyle® system owner's guide for more information on your system in your first remote. 3. On Off Mute All Mute SOURCE / INPUT CD/DVD Changer FM/AM TV VCR AUX MENU / ... ( ) System Setup Enter System Setup (3 of 3). Make sure that the Zone 2 Protocol is Zone 2 Protocol. 4. While your Lifestyle® DVD system is on, press the Settings button on operating your remote control. Make sure switches 5, 7, and 8 are down to "more than one room. Setting Up Your...

The Bose® Lifestyle® amplifier - Owner's guide
Page 14
... switch 5 down (off), and switches 6 and 8 up a second RC-20 remote control to set up (on). ON K40 l 2345678 12 January 4, 2002 AM262840_00_V.pdf Setting Up Your Lifestyle® Stereo Amplifier Figure 11 Setting up a Zone 2 remote control Setting up the RC-20 remote control for more than one room. Make sure that the house...
... switch 5 down (off), and switches 6 and 8 up a second RC-20 remote control to set up (on). ON K40 l 2345678 12 January 4, 2002 AM262840_00_V.pdf Setting Up Your Lifestyle® Stereo Amplifier Figure 11 Setting up a Zone 2 remote control Setting up the RC-20 remote control for more than one room. Make sure that the house...

The Bose® Lifestyle® amplifier - Owner's guide
Page 16
... terminals (Figure 14). Speaker cable consists of any make or model, nor to any amplified music sources. Note: Refer to your Lifestyle® system owner's guide for more than one room. The plain wire should be connected to the negative (- Insert the wire coming from ...the listening area (as you need to set up a second RC-5 remote control to operate your Lifestyle® stereo amplifier. 1. Setting Up Your Lifestyle® Stereo Amplifier ® Figure 13 RC-5 remote switch settings Setting up the RC-5 remote control If your system uses a Model 5 music center, you face it...
... terminals (Figure 14). Speaker cable consists of any make or model, nor to any amplified music sources. Note: Refer to your Lifestyle® system owner's guide for more than one room. The plain wire should be connected to the negative (- Insert the wire coming from ...the listening area (as you need to set up a second RC-5 remote control to operate your Lifestyle® stereo amplifier. 1. Setting Up Your Lifestyle® Stereo Amplifier ® Figure 13 RC-5 remote switch settings Setting up the RC-5 remote control If your system uses a Model 5 music center, you face it...

The Bose® Lifestyle® amplifier - Owner's guide
Page 17
...mains) outlet. 3. Using the power cord included with your Personal® music center or your Lifestyle® stereo amplifier, firmly insert the small connector on the rear panel of the Lifestyle® stereo amplifier and your liking. Move this switch. • This switch is...) outlet until all other connections are complete. 1. 115 V Setting Up Your Lifestyle® Stereo Amplifier Checking to see if your unit has this switch to the ON position. 4. Select a music source with your new remote control and adjust the vol- If you own a 230V version, there is ...
...mains) outlet. 3. Using the power cord included with your Personal® music center or your Lifestyle® stereo amplifier, firmly insert the small connector on the rear panel of the Lifestyle® stereo amplifier and your liking. Move this switch. • This switch is...) outlet until all other connections are complete. 1. 115 V Setting Up Your Lifestyle® Stereo Amplifier Checking to see if your unit has this switch to the ON position. 4. Select a music source with your new remote control and adjust the vol- If you own a 230V version, there is ...

The Bose® Lifestyle® amplifier - Owner's guide
Page 18
Do not use any openings. It is designed only for home theater (Lifestyle® 12 or Lifestyle® 8 systems), make sure the audio input cable is inserted into .... • Make sure the wires are in the product packaging for service, or contact Bose Customer Service. Maintaining Your Lifestyle® Stereo Amplifier Cleaning the amplifier The amplifier, which is commonly... sprays near the amplifier. Do not use any headphones. • Make sure the remote control switch settings are connected and the knobs tightened down. If CD or AUX is selected, ...
Do not use any openings. It is designed only for home theater (Lifestyle® 12 or Lifestyle® 8 systems), make sure the audio input cable is inserted into .... • Make sure the wires are in the product packaging for service, or contact Bose Customer Service. Maintaining Your Lifestyle® Stereo Amplifier Cleaning the amplifier The amplifier, which is commonly... sprays near the amplifier. Do not use any headphones. • Make sure the remote control switch settings are connected and the knobs tightened down. If CD or AUX is selected, ...

The Bose® Lifestyle® amplifier - Owner's guide
Page 19
...64257;er. Refer to the address list enclosed in solving problems, contact Bose® Customer Service. Connect it to Bose. If so, the sudden loss of volume was connected to that speaker. For more informa- Remote does not adjust the volume • Be sure the 1/8" mini-...• See "Connecting speakers to + and weak - Details of the speaker and on the back of the coverage are connected + to your Lifestyle® DVD system's owners guide. If the speaker now plays, continue checking for correct phone numbers. Interference • Make sure the speaker wires...
...64257;er. Refer to the address list enclosed in solving problems, contact Bose® Customer Service. Connect it to Bose. If so, the sudden loss of volume was connected to that speaker. For more informa- Remote does not adjust the volume • Be sure the 1/8" mini-...• See "Connecting speakers to + and weak - Details of the speaker and on the back of the coverage are connected + to your Lifestyle® DVD system's owners guide. If the speaker now plays, continue checking for correct phone numbers. Interference • Make sure the speaker wires...

Owner's guide
Page 3
Do not use attachments/accessories specified by the manufacturer. 12. Clean only with the manufacturer's instructions - Install in a position and location that water or moisture are encouraged to try to correct the interference by Bose® Corporation. Do not put the product in accordance with ... cart is connected. • Consult the dealer or an experienced radio/TV technician for long periods of the receiver or radio remote control could result in accordance with the Canadian ICES-003 Class B specifications. Unplug this product. 14. the apparatus has been ...
Do not use attachments/accessories specified by the manufacturer. 12. Clean only with the manufacturer's instructions - Install in a position and location that water or moisture are encouraged to try to correct the interference by Bose® Corporation. Do not put the product in accordance with ... cart is connected. • Consult the dealer or an experienced radio/TV technician for long periods of the receiver or radio remote control could result in accordance with the Canadian ICES-003 Class B specifications. Unplug this product. 14. the apparatus has been ...
Owner's guide
Page 5
... Select the locations for your Lifestyle® 12 system 6 Connect the speakers and Lifestyle® music center 9 Connecting your home theater components to the Lifestyle® 12 system 12 Connect the antennas 16 Attach the wire cover 16 Set up the remote control 17 Set radio channel spacing......26 Warranty period ...27 Customer service ...27 Cleaning the Lifestyle® 12 system 28 Product Information Technical information 29 Accessories ...29 Index ...30 Bose® Corporation inside back cover For your Lifestyle® 12 system 20 Listening to video sound 20 Listening to the ...
... Select the locations for your Lifestyle® 12 system 6 Connect the speakers and Lifestyle® music center 9 Connecting your home theater components to the Lifestyle® 12 system 12 Connect the antennas 16 Attach the wire cover 16 Set up the remote control 17 Set radio channel spacing......26 Warranty period ...27 Customer service ...27 Cleaning the Lifestyle® 12 system 28 Product Information Technical information 29 Accessories ...29 Index ...30 Bose® Corporation inside back cover For your Lifestyle® 12 system 20 Listening to video sound 20 Listening to the ...

Owner's guide
Page 6
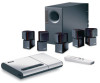
...8226; Powered Acoustimass® speakers with a hide-away Acoustimass module • An easy-to-use remote control Bose Videostage® decoder technology enables the Lifestyle® 12 system to left or right front speakers. This complete audio home entertainment system offers superb sound, elegance..., technology, and simplicity for purchasing the Bose® Lifestyle® 12 system. When a movie soundtrack or CD is produced in a surround sound format, specially encoded sound is recorded...
...8226; Powered Acoustimass® speakers with a hide-away Acoustimass module • An easy-to-use remote control Bose Videostage® decoder technology enables the Lifestyle® 12 system to left or right front speakers. This complete audio home entertainment system offers superb sound, elegance..., technology, and simplicity for purchasing the Bose® Lifestyle® 12 system. When a movie soundtrack or CD is produced in a surround sound format, specially encoded sound is recorded...
Owner's guide
Page 7
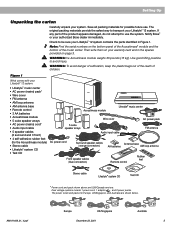
...not attempt to avoid injury. Use good lifting practice to use . AM191409_01_V.pdf Europe UK/Singapore December 20, 2001 Australia 5 Notify Bose® or your system. WARNING: he Acoustimass module weighs 33 pounds (15 kg). Figure 1 What comes with your warranty card and...Singapore, and Australia are USA/Canada versions. The original packing materials provide the safest way to be sure your Lifestyle® 12 system. Remote control Rubber feet Stereo cable Lifestyle® system CD Test CD * Power cord and pack shown above are shown below. Dual voltage systems include...
...not attempt to avoid injury. Use good lifting practice to use . AM191409_01_V.pdf Europe UK/Singapore December 20, 2001 Australia 5 Notify Bose® or your system. WARNING: he Acoustimass module weighs 33 pounds (15 kg). Figure 1 What comes with your warranty card and...Singapore, and Australia are USA/Canada versions. The original packing materials provide the safest way to be sure your Lifestyle® 12 system. Remote control Rubber feet Stereo cable Lifestyle® system CD Test CD * Power cord and pack shown above are shown below. Dual voltage systems include...
Owner's guide
Page 12
...inserted fully into SYSTEM CONTROL 1 ® LIFESTYLE ® MODEL 5 MUSIC CENTER B Z G642 950 D S T BOSE Corporation UL LISTED 917D AUDIO ® EQUIPMENT MANUFACTURED: TÜV Rheinland BOSE CORPORATION, FRAMINGHAM, MA 01701-9168 MADE IN ... no sound. Insert the three connectors at the angle shown in your Lifestyle® 12 system are fully inserted into each of the audio input cable into the...Extend the audio input cable as much as possible, since it includes an antenna for the remote control. Note: Do not connect the audio input cable to work properly with the audio input...
...inserted fully into SYSTEM CONTROL 1 ® LIFESTYLE ® MODEL 5 MUSIC CENTER B Z G642 950 D S T BOSE Corporation UL LISTED 917D AUDIO ® EQUIPMENT MANUFACTURED: TÜV Rheinland BOSE CORPORATION, FRAMINGHAM, MA 01701-9168 MADE IN ... no sound. Insert the three connectors at the angle shown in your Lifestyle® 12 system are fully inserted into each of the audio input cable into the...Extend the audio input cable as much as possible, since it includes an antenna for the remote control. Note: Do not connect the audio input cable to work properly with the audio input...
Owner's guide
Page 14
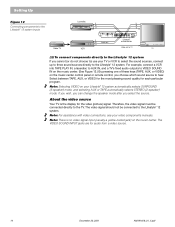
...nearly all laserdisc players are color coded. Figure 9 Music center connectors ® LIFESTYLE ® MODEL 5 MUSIC CENTER B Z T G642 950 D S BOSE Corporation UL LISTED 917D AUDIO ® EQUIPMENT MANUFACTURED: TÜV Rheinland BOSE CORPORATION, FRAMINGHAM, MA 01701-9168 MADE IN USA geprüdfte Sicherheit SPEAKERS L... inputs. Match red connectors to right (R) jacks and black or white connectors to left (L) audio outputs from the Lifestyle® 12 remote or control panel. A basic home theater system might include a stereo or mono TV and stereo VCR with your components...
...nearly all laserdisc players are color coded. Figure 9 Music center connectors ® LIFESTYLE ® MODEL 5 MUSIC CENTER B Z T G642 950 D S BOSE Corporation UL LISTED 917D AUDIO ® EQUIPMENT MANUFACTURED: TÜV Rheinland BOSE CORPORATION, FRAMINGHAM, MA 01701-9168 MADE IN USA geprüdfte Sicherheit SPEAKERS L... inputs. Match red connectors to right (R) jacks and black or white connectors to left (L) audio outputs from the Lifestyle® 12 remote or control panel. A basic home theater system might include a stereo or mono TV and stereo VCR with your components...
Owner's guide
Page 16
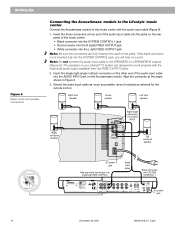
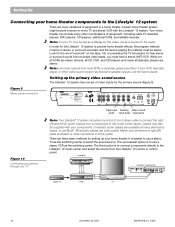
... (usually a yellow-coded jack) on the music center control panel or remote control, you choose which sound source to hear. Setting Up Figure 12 Connecting components to the Lifestyle® 12 system inputs Cable TV Laserdisc VCR L L R R V V L R V ® LIFESTYLE ® MODEL 5 MUSIC CENTER B Z T G642 950 D S BOSE Corporation UL LISTED 917D AUDIO ® EQUIPMENT MANUFACTURED: TÜV Rheinland...
... (usually a yellow-coded jack) on the music center control panel or remote control, you choose which sound source to hear. Setting Up Figure 12 Connecting components to the Lifestyle® 12 system inputs Cable TV Laserdisc VCR L L R R V V L R V ® LIFESTYLE ® MODEL 5 MUSIC CENTER B Z T G642 950 D S BOSE Corporation UL LISTED 917D AUDIO ® EQUIPMENT MANUFACTURED: TÜV Rheinland...
Owner's guide
Page 19
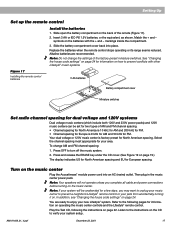
...code settings" on page 24 for information on how to prevent a neighbor's Lifestyle® remote control or your pets from accidentally turning it on operating the music center controls and the Lifestyle® remote control. Note: Your speakers will be set for two types of AM and...into place. Note: Do not change AM and FM channel spacing: 1. Turn on the batteries with other Lifestyle® music systems. Figure 17 Installing the remote control batteries 3 AA batteries Battery compartment cover Miniature switches Set radio channel spacing for dual voltage and 120V systems...
...code settings" on page 24 for information on how to prevent a neighbor's Lifestyle® remote control or your pets from accidentally turning it on operating the music center controls and the Lifestyle® remote control. Note: Your speakers will be set for two types of AM and...into place. Note: Do not change AM and FM channel spacing: 1. Turn on the batteries with other Lifestyle® music systems. Figure 17 Installing the remote control batteries 3 AA batteries Battery compartment cover Miniature switches Set radio channel spacing for dual voltage and 120V systems...
Owner's guide
Page 20
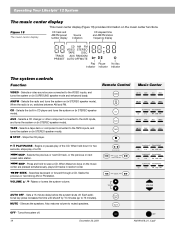
...the system shuts off . 18 OFF December 20, 2001 AM191409_01_V.pdf Silences the speakers. Also restores volume to 75 minutes). Operating Your Lifestyle® 12 System The music center display This music center display (Figure 18) provides information on (in STEREO speaker mode). AUX - PLAY/PAUSE -...display CD AM FM VIDEO STEREO TAPE DISC TRACK AUX RANDOM PRESET AUTO OFFMUTE Play indicator Pause indicator No disc indicator The system controls Function Remote Control VIDEO - s STOP - Each addi- Turns the system off . Stops the CD player. SKIP - Seeks the previous or next ...
...the system shuts off . 18 OFF December 20, 2001 AM191409_01_V.pdf Silences the speakers. Also restores volume to 75 minutes). Operating Your Lifestyle® 12 System The music center display This music center display (Figure 18) provides information on (in STEREO speaker mode). AUX - PLAY/PAUSE -...display CD AM FM VIDEO STEREO TAPE DISC TRACK AUX RANDOM PRESET AUTO OFFMUTE Play indicator Pause indicator No disc indicator The system controls Function Remote Control VIDEO - s STOP - Each addi- Turns the system off . Stops the CD player. SKIP - Seeks the previous or next ...
Owner's guide
Page 21
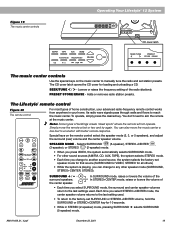
... 19 The music center controls Operating Your Lifestyle® 12 System AM/FM TAPE AUX VIDEO PLAY/PAUSE TRACK/PRESET VOLUME CD / ll SKIP OFF SEEK/TUNE CD cover latch SEEK/TUNE PRESET STORE ERASE The music center controls Use the special keys on the remote control select the speaker mode (2, 3, or 5 speakers...
... 19 The music center controls Operating Your Lifestyle® 12 System AM/FM TAPE AUX VIDEO PLAY/PAUSE TRACK/PRESET VOLUME CD / ll SKIP OFF SEEK/TUNE CD cover latch SEEK/TUNE PRESET STORE ERASE The music center controls Use the special keys on the remote control select the speaker mode (2, 3, or 5 speakers...
Owner's guide
Page 22
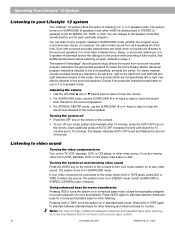
...15 minutes, press the AUTO OFF key on the remote. Even with surround-encoded material there are times when no sounds are viewing video from a VCR, laserdisc, DVD, or CDI player, load a tape or disc. Operating Your Lifestyle® 12 System Listening to your music system on to play video... the system off • Press the OFF key on in standard bass mode. The system turns on the remote or the console. • To turn your Lifestyle® 12 system Your Lifestyle® 12 system offers the option of listening in 3 or 5-speaker mode. Press AUX or TAPE again to create the...
...15 minutes, press the AUTO OFF key on the remote. Even with surround-encoded material there are times when no sounds are viewing video from a VCR, laserdisc, DVD, or CDI player, load a tape or disc. Operating Your Lifestyle® 12 System Listening to your music system on to play video... the system off • Press the OFF key on in standard bass mode. The system turns on the remote or the console. • To turn your Lifestyle® 12 system Your Lifestyle® 12 system offers the option of listening in 3 or 5-speaker mode. Press AUX or TAPE again to create the...
Owner's guide
Page 23
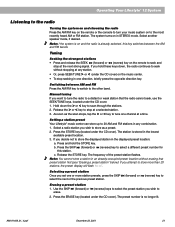
...the scan stops, tap the > or < key to store as a preset. 2. Switching between the AM and FM bands. Setting a station preset Your Lifestyle® music center can store up to the other band. Select a radio station you wish to tune one channel at the next strong signal. The ...an already-occupied preset location without stopping at a selected station. 3. Operating Your Lifestyle® 12 System Listening to the radio Turning the system on and choosing the radio Press the AM/FM key on the remote or the console to turn your music system on to seek without erasing that the...
...the scan stops, tap the > or < key to store as a preset. 2. Switching between the AM and FM bands. Setting a station preset Your Lifestyle® music center can store up to the other band. Select a radio station you wish to tune one channel at the next strong signal. The ...an already-occupied preset location without stopping at a selected station. 3. Operating Your Lifestyle® 12 System Listening to the radio Turning the system on and choosing the radio Press the AM/FM key on the remote or the console to turn your music system on to seek without erasing that the...


