
The Bose® Lifestyle® amplifier - Owner's guide
Page 5
... control 10 Setting Zone 2 Protocol 10 Connecting the Lifestyle® stereo amplifier to a Model 20 music center 11 Connecting the Lifestyle® stereo amplifier to a Model 5 music center 13 Connecting speakers to your Lifestyle® stereo amplifier 14 Checking to a Lifestyle® media center 9 Setting up your system 15 Maintaining Your Lifestyle® Stereo Amplifier Cleaning the amplifier 16 Protecting...
... control 10 Setting Zone 2 Protocol 10 Connecting the Lifestyle® stereo amplifier to a Model 20 music center 11 Connecting the Lifestyle® stereo amplifier to a Model 5 music center 13 Connecting speakers to your Lifestyle® stereo amplifier 14 Checking to a Lifestyle® media center 9 Setting up your system 15 Maintaining Your Lifestyle® Stereo Amplifier Cleaning the amplifier 16 Protecting...

The Bose® Lifestyle® amplifier - Owner's guide
Page 9
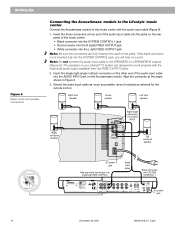
... INPUT jack of the multi-room interface (Figure 6). 2. Figure 6 Cable connections between a multi-room interface and the Lifestyle® stereo amplifier Lifestyle® stereo amplifier rear panel Multi-room interface rear panel 4 Ω MINIMUM LL R L SYSTEM RR CONTROL... L R +- Setting Up Your Lifestyle® Stereo Amplifier Connecting the Lifestyle® stereo amplifier to a multi-room interface CAUTION: Before making any connections, turn the Lifestyle® system off and disconnect the music center from the AC (mains) power outlet. DO...
... INPUT jack of the multi-room interface (Figure 6). 2. Figure 6 Cable connections between a multi-room interface and the Lifestyle® stereo amplifier Lifestyle® stereo amplifier rear panel Multi-room interface rear panel 4 Ω MINIMUM LL R L SYSTEM RR CONTROL... L R +- Setting Up Your Lifestyle® Stereo Amplifier Connecting the Lifestyle® stereo amplifier to a multi-room interface CAUTION: Before making any connections, turn the Lifestyle® system off and disconnect the music center from the AC (mains) power outlet. DO...

The Bose® Lifestyle® amplifier - Owner's guide
Page 10
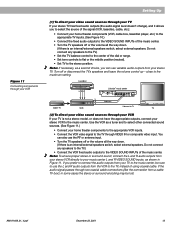
..., if you purchase a second Personal music center, you to your system in more than one room of Bose® powered speakers placed in individual rooms. These rooms are connected to control more than one room. Figure 7 shows an example display for the first time. Setting Up Your Lifestyle® Stereo Amplifier Figure 7 Sample...
..., if you purchase a second Personal music center, you to your system in more than one room of Bose® powered speakers placed in individual rooms. These rooms are connected to control more than one room. Figure 7 shows an example display for the first time. Setting Up Your Lifestyle® Stereo Amplifier Figure 7 Sample...

The Bose® Lifestyle® amplifier - Owner's guide
Page 13
... panel 30-ft audio input cable (supplied) AM262840_00_V.pdf January 4, 2002 11 Setting Up Your Lifestyle® Stereo Amplifier Connecting the Lifestyle® stereo amplifier to a Model 20 music center ® Figure 10 Cable connections between the Model 20 music center and the Lifestyle® stereo amplifier CAUTION: Before making connections, turn the...
... panel 30-ft audio input cable (supplied) AM262840_00_V.pdf January 4, 2002 11 Setting Up Your Lifestyle® Stereo Amplifier Connecting the Lifestyle® stereo amplifier to a Model 20 music center ® Figure 10 Cable connections between the Model 20 music center and the Lifestyle® stereo amplifier CAUTION: Before making connections, turn the...

The Bose® Lifestyle® amplifier - Owner's guide
Page 14
...Slide switch 5 down (off), and switches 6 and 8 up a second RC-20 remote control to your Lifestyle® system owner's guide for Zone 2 If your system uses a Model 20 music center, you need to set up (on operating your system in your first remote. 3. Remove the ...remote control battery cover and locate the miniature switches (Figure 11). 2. Note: Refer to operate the ZONE 2 outputs. 1. ON K40 l 2345678 12 January 4, 2002 AM262840_00_V.pdf Setting Up Your Lifestyle&#...
...Slide switch 5 down (off), and switches 6 and 8 up a second RC-20 remote control to your Lifestyle® system owner's guide for Zone 2 If your system uses a Model 20 music center, you need to set up (on operating your system in your first remote. 3. Remove the ...remote control battery cover and locate the miniature switches (Figure 11). 2. Note: Refer to operate the ZONE 2 outputs. 1. ON K40 l 2345678 12 January 4, 2002 AM262840_00_V.pdf Setting Up Your Lifestyle&#...

The Bose® Lifestyle® amplifier - Owner's guide
Page 15
... connector of the supplied cable into the L (left) FIXED OUTPUT jack. 5. Figure 12 Cable connections between the Model 5 music center and the Lifestyle® stereo amplifier Model 5 music center rear panel Lifestyle® stereo amplifier rear panel 4 Ω MINIMUM LL LL SYSTEM RR ...the amplifier into the white piggyback jack. Setting Up Your Lifestyle® Stereo Amplifier Connecting the Lifestyle® stereo amplifier to a Model 5 music center In systems using a Model 5 music center, home theater speakers are connected to the FIXED OUTPUT jacks on the...
... connector of the supplied cable into the L (left) FIXED OUTPUT jack. 5. Figure 12 Cable connections between the Model 5 music center and the Lifestyle® stereo amplifier Model 5 music center rear panel Lifestyle® stereo amplifier rear panel 4 Ω MINIMUM LL LL SYSTEM RR ...the amplifier into the white piggyback jack. Setting Up Your Lifestyle® Stereo Amplifier Connecting the Lifestyle® stereo amplifier to a Model 5 music center In systems using a Model 5 music center, home theater speakers are connected to the FIXED OUTPUT jacks on the...

The Bose® Lifestyle® amplifier - Owner's guide
Page 16
... terminal tab. Remove the remote control battery cover and locate the miniature switches (Figure 13). 2. ON K40 l 2345678 Connecting speakers to your Lifestyle® stereo amplifier CAUTION: DO NOT connect the amplifier to the R (right) output on page 18. • Connect... control to the SPEAKER OUTPUT R terminals (Figure 14). Setting Up Your Lifestyle® Stereo Amplifier ® Figure 13 RC-5 remote switch settings Setting up the RC-5 remote control If your system uses a Model 5 music center, you face it should always be connected to any make or model, nor...
... terminal tab. Remove the remote control battery cover and locate the miniature switches (Figure 13). 2. ON K40 l 2345678 Connecting speakers to your Lifestyle® stereo amplifier CAUTION: DO NOT connect the amplifier to the R (right) output on page 18. • Connect... control to the SPEAKER OUTPUT R terminals (Figure 14). Setting Up Your Lifestyle® Stereo Amplifier ® Figure 13 RC-5 remote switch settings Setting up the RC-5 remote control If your system uses a Model 5 music center, you face it should always be connected to any make or model, nor...

The Bose® Lifestyle® amplifier - Owner's guide
Page 17
...with your Personal® music center or your new remote control and adjust the vol- Move this switch to an AC (mains) outlet. 3. Figure 16 Power cord connection on the amplifier AM262840_00_V.pdf January 4, 2002 15 Check to see if you have a dual voltage Lifestyle® amplifier ...selection switch on the rear panel (Figure 15). If you own a 230V version, there is preset at the factory to 230V. Select a music source with your Lifestyle® stereo amplifier, firmly insert the small connector on one end of the power cord into an AC (mains) outlet ...
...with your Personal® music center or your new remote control and adjust the vol- Move this switch to an AC (mains) outlet. 3. Figure 16 Power cord connection on the amplifier AM262840_00_V.pdf January 4, 2002 15 Check to see if you have a dual voltage Lifestyle® amplifier ...selection switch on the rear panel (Figure 15). If you own a 230V version, there is preset at the factory to 230V. Select a music source with your Lifestyle® stereo amplifier, firmly insert the small connector on one end of the power cord into an AC (mains) outlet ...

The Bose® Lifestyle® amplifier - Owner's guide
Page 18
...;er, follow the guidelines below. Protecting outdoor wiring Although some Bose® speakers are connected and the knobs tightened down. If you have a problem operating your Lifestyle® stereo amplifier" on the music center. (Then the speaker output cable to the Acoustimass® module...condition and are in your Bose dealer to the address list enclosed in the product packaging for home theater (Lifestyle® 12 or Lifestyle® 8 systems), make sure the audio input cable is inserted into SPEAKER ZONE 2. • If using a Model 20 music center, make sure the ampli&#...
...;er, follow the guidelines below. Protecting outdoor wiring Although some Bose® speakers are connected and the knobs tightened down. If you have a problem operating your Lifestyle® stereo amplifier" on the music center. (Then the speaker output cable to the Acoustimass® module...condition and are in your Bose dealer to the address list enclosed in the product packaging for home theater (Lifestyle® 12 or Lifestyle® 8 systems), make sure the audio input cable is inserted into SPEAKER ZONE 2. • If using a Model 20 music center, make sure the ampli&#...

Owner's guide
Page 2
.... 2 December 20, 2001 AM191409_01_V.pdf These CAUTION marks are located on the system, is classified as marked on the back panel and bottom of your Lifestyle® music center and the bottom panel of the unit. Class B emissions limits This Class B digital apparatus meets all of used batteries properly, following any local regulations...
.... 2 December 20, 2001 AM191409_01_V.pdf These CAUTION marks are located on the system, is classified as marked on the back panel and bottom of your Lifestyle® music center and the bottom panel of the unit. Class B emissions limits This Class B digital apparatus meets all of used batteries properly, following any local regulations...
Owner's guide
Page 5
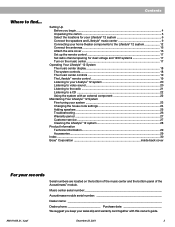
...channel spacing for dual voltage and 120V systems 17 Turn on the music center 17 Operating Your Lifestyle® 12 System The music center display 18 The system controls ...18 The music center controls 19 The Lifestyle® remote control 19 Listening to your records Serial numbers are ... ...26 Warranty period ...27 Customer service ...27 Cleaning the Lifestyle® 12 system 28 Product Information Technical information 29 Accessories ...29 Index ...30 Bose® Corporation inside back cover For your Lifestyle® 12 system 20 Listening to video sound 20 Listening to the radio...
...channel spacing for dual voltage and 120V systems 17 Turn on the music center 17 Operating Your Lifestyle® 12 System The music center display 18 The system controls ...18 The music center controls 19 The Lifestyle® remote control 19 Listening to your records Serial numbers are ... ...26 Warranty period ...27 Customer service ...27 Cleaning the Lifestyle® 12 system 28 Product Information Technical information 29 Accessories ...29 Index ...30 Bose® Corporation inside back cover For your Lifestyle® 12 system 20 Listening to video sound 20 Listening to the radio...

Owner's guide
Page 6
... the center of the TV screen. Your system includes: • A Lifestyle® music center with built-in SURROUND (5-speaker) mode, whether the program is sent to any program material in AM/FM radio and compact disc (CD) player • Inputs for purchasing the Bose® Lifestyle® 12 system.... all five speakers all of movie sound especially for music and home theater. Even with a hide-away Acoustimass module • An easy-to-use remote control Bose Videostage® decoder technology enables the Lifestyle® 12 system to the front speakers. This complete audio home...
... the center of the TV screen. Your system includes: • A Lifestyle® music center with built-in SURROUND (5-speaker) mode, whether the program is sent to any program material in AM/FM radio and compact disc (CD) player • Inputs for purchasing the Bose® Lifestyle® 12 system.... all five speakers all of movie sound especially for music and home theater. Even with a hide-away Acoustimass module • An easy-to-use remote control Bose Videostage® decoder technology enables the Lifestyle® 12 system to the front speakers. This complete audio home...
Owner's guide
Page 7
... panel of the Acoustimass® module and the bottom of the music center. Remote control Rubber feet Stereo cable Lifestyle® system CD Test CD * Power cord and pack shown above are shown below. Notify Bose® or your Lifestyle® 12 system: • Lifestyle® music center • AC power (mains) pack* • Wire cover • FM antenna...
... panel of the Acoustimass® module and the bottom of the music center. Remote control Rubber feet Stereo cable Lifestyle® system CD Test CD * Power cord and pack shown above are shown below. Notify Bose® or your Lifestyle® 12 system: • Lifestyle® music center • AC power (mains) pack* • Wire cover • FM antenna...
Owner's guide
Page 10
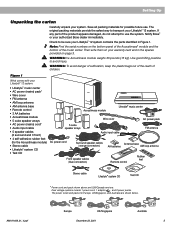
... drapes to open the CD player cover. 2. The rubber feet provide increased stability and protection from the TV. 1. Place the music center within reach of the module. 3. For proper ventilation, place it on the end provide ventilation for cable length. CAUTION: Do ...not cover the ventilation openings of your dealer or call Bose®. 3. Music center Select a location for the Acoustimass module (Figure 4). Select a position for the music center. 1. Allow enough room to block the ventilation openings of the audio input cable, speaker...
... drapes to open the CD player cover. 2. The rubber feet provide increased stability and protection from the TV. 1. Place the music center within reach of the module. 3. For proper ventilation, place it on the end provide ventilation for cable length. CAUTION: Do ...not cover the ventilation openings of your dealer or call Bose®. 3. Music center Select a location for the Acoustimass module (Figure 4). Select a position for the music center. 1. Allow enough room to block the ventilation openings of the audio input cable, speaker...
Owner's guide
Page 11
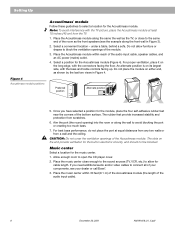
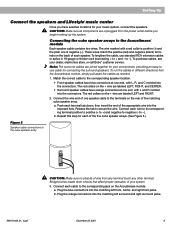
Setting Up Connect the speakers and Lifestyle® music center Once you begin hooking up the system. to negative (- Push each ... the matching left surround and right surround jacks. The red collars on the + wire are labeled LEFT, RIGHT, and CENTER. • Surround speaker cables have orange connectors at one end, with L, R, and C molded into the connectors. ... cube speaker array CAUTION: Make sure no strands of your dealer, electronics store, or call Bose® customer service. Match the correct cable to the corresponding speaker location. • Front speaker cables have selected ...
Setting Up Connect the speakers and Lifestyle® music center Once you begin hooking up the system. to negative (- Push each ... the matching left surround and right surround jacks. The red collars on the + wire are labeled LEFT, RIGHT, and CENTER. • Surround speaker cables have orange connectors at one end, with L, R, and C molded into the connectors. ... cube speaker array CAUTION: Make sure no strands of your dealer, electronics store, or call Bose® customer service. Match the correct cable to the corresponding speaker location. • Front speaker cables have selected ...
Owner's guide
Page 12
If the black connector is not inserted fully into SYSTEM CONTROL 1 ® LIFESTYLE ® MODEL 5 MUSIC CENTER B Z G642 950 D S T BOSE Corporation UL LISTED 917D AUDIO ® EQUIPMENT MANUFACTURED: TÜV Rheinland BOSE CORPORATION, FRAMINGHAM, MA 01701-9168 MADE IN USA geprüdfte Sicherheit SPEAKERS L FIXED R 93 A B OUTPUT...possible, since it includes an antenna for the remote control. Insert the three connectors at the angle shown in your Lifestyle® 12 system are fully inserted into each of the audio input cable into the L (left) FIXED OUTPUT jack Note: ...
If the black connector is not inserted fully into SYSTEM CONTROL 1 ® LIFESTYLE ® MODEL 5 MUSIC CENTER B Z G642 950 D S T BOSE Corporation UL LISTED 917D AUDIO ® EQUIPMENT MANUFACTURED: TÜV Rheinland BOSE CORPORATION, FRAMINGHAM, MA 01701-9168 MADE IN USA geprüdfte Sicherheit SPEAKERS L FIXED R 93 A B OUTPUT...possible, since it includes an antenna for the remote control. Insert the three connectors at the angle shown in your Lifestyle® 12 system are fully inserted into each of the audio input cable into the L (left) FIXED OUTPUT jack Note: ...
Owner's guide
Page 13
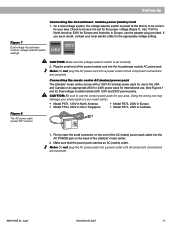
...the proper voltage (Figure 7). Plug the small end of the power (mains) cord into the AC POWER jack on the end of the Lifestyle® music center. 2. Firmly insert the small connector on the back of the AC (mains) power pack cable into the Acoustimass module AC power jack....See Figures 1 and 8.) Dual voltage models include both 120V and 230V power packs. In Europe, use in Australia 1. Connecting the music center AC (mains) power pack The Lifestyle® music center comes with a 120V AC (mains) power pack for use the adapter plug provided. Make sure that the power pack reaches an...
...the proper voltage (Figure 7). Plug the small end of the power (mains) cord into the AC POWER jack on the end of the Lifestyle® music center. 2. Firmly insert the small connector on the back of the AC (mains) power pack cable into the Acoustimass module AC power jack....See Figures 1 and 8.) Dual voltage models include both 120V and 230V power packs. In Europe, use in Australia 1. Connecting the music center AC (mains) power pack The Lifestyle® music center comes with a 120V AC (mains) power pack for use the adapter plug provided. Make sure that the power pack reaches an...
Owner's guide
Page 14
... as the switching center to the Lifestyle® 12 music center, and select the source from encoded video tapes, you must have a stereo (HiFi) VCR. In order for the Lifestyle® 12 system to the music center inputs. Look for the primary source (Figure 9). If needed, audio cables are fixed. Figure 9 Music center connectors ® LIFESTYLE ® MODEL 5 MUSIC CENTER B Z T G642 950 D S BOSE Corporation UL...
... as the switching center to the Lifestyle® 12 music center, and select the source from encoded video tapes, you must have a stereo (HiFi) VCR. In order for the Lifestyle® 12 system to the music center inputs. Look for the primary source (Figure 9). If needed, audio cables are fixed. Figure 9 Music center connectors ® LIFESTYLE ® MODEL 5 MUSIC CENTER B Z T G642 950 D S BOSE Corporation UL...
Owner's guide
Page 15
...TV balance control to the center of the music center. AM191409_01_V.pdf December 20, 2001 13 Laserdisc Cable TV LRV VCR L R V Lifestyle® music center ® LIFESTYLE ® MODEL 5 MUSIC CENTER B Z T G642 950 D S BOSE Corporation UL LISTED 917D AUDIO ® EQUIPMENT MANUFACTURED: TÜV Rheinland BOSE CORPORATION, FRAMINGHAM, MA 01701-...Note: To ensure proper stereo or surround sound, connect the L and R audio outputs from your TV to the music center, be sure to the TV, instead of using coaxial cable. If the audio signal passes through two coaxial cable ...
...TV balance control to the center of the music center. AM191409_01_V.pdf December 20, 2001 13 Laserdisc Cable TV LRV VCR L R V Lifestyle® music center ® LIFESTYLE ® MODEL 5 MUSIC CENTER B Z T G642 950 D S BOSE Corporation UL LISTED 917D AUDIO ® EQUIPMENT MANUFACTURED: TÜV Rheinland BOSE CORPORATION, FRAMINGHAM, MA 01701-...Note: To ensure proper stereo or surround sound, connect the L and R audio outputs from your TV to the music center, be sure to the TV, instead of using coaxial cable. If the audio signal passes through two coaxial cable ...
Owner's guide
Page 16
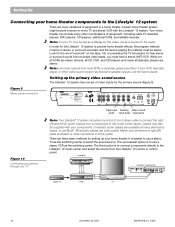
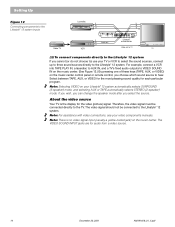
..., the video signal must be connected to the TV. Setting Up Figure 12 Connecting components to the Lifestyle® 12 system inputs Cable TV Laserdisc VCR L L R R V V L R V ® LIFESTYLE ® MODEL 5 MUSIC CENTER B Z T G642 950 D S BOSE Corporation UL LISTED 917D AUDIO ® EQUIPMENT MANUFACTURED: TÜV Rheinland BOSE CORPORATION, FRAMINGHAM, MA 01701-9168 MADE IN USA geprüdfte Sicherheit...
..., the video signal must be connected to the TV. Setting Up Figure 12 Connecting components to the Lifestyle® 12 system inputs Cable TV Laserdisc VCR L L R R V V L R V ® LIFESTYLE ® MODEL 5 MUSIC CENTER B Z T G642 950 D S BOSE Corporation UL LISTED 917D AUDIO ® EQUIPMENT MANUFACTURED: TÜV Rheinland BOSE CORPORATION, FRAMINGHAM, MA 01701-9168 MADE IN USA geprüdfte Sicherheit...


