
The Bose® Lifestyle® amplifier - Owner's guide
Page 10
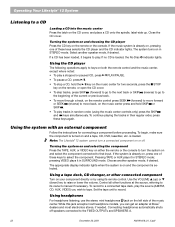
... a tworoom system Operating speakers in individual rooms. These rooms are referred to control more than one -room system). Setting Up Your Lifestyle® Stereo Amplifier Figure 7 Sample display for a two-room system. Press the ROOM button to control a single room or two or more rooms that share a source ..., you must follow the procedure for setting up to four sets of Bose® powered speakers placed in other rooms with room A being the primary room (the one used for a one room. Note: Refer to your Lifestyle® system owner's guide for the first time. The Personal...
... a tworoom system Operating speakers in individual rooms. These rooms are referred to control more than one -room system). Setting Up Your Lifestyle® Stereo Amplifier Figure 7 Sample display for a two-room system. Press the ROOM button to control a single room or two or more rooms that share a source ..., you must follow the procedure for setting up to four sets of Bose® powered speakers placed in other rooms with room A being the primary room (the one used for a one room. Note: Refer to your Lifestyle® system owner's guide for the first time. The Personal...

The Bose® Lifestyle® amplifier - Owner's guide
Page 12
... Volume 1 2 3 4 5 6 7 8 9 0 PLAYBACK Stop Pause Play Shuffle Repeat Settings Settings ( ) System Setup Enter System Setup (3 of 3). While your Lifestyle® DVD system is on, press the Settings button on System Setup (3 of 3). Scroll down through (2 or 3) to (3 of 3) Zone 2 Protocol: Legacy 10...more than one room. this ensures that the house code settings (switches 1, 2, 3, and 4) match those in more information on -screen display. 2. Make sure that the Zone 2 Protocol is Zone 2 Protocol. 4. Use the right-arrow button to change the protocol from Normal ...
... Volume 1 2 3 4 5 6 7 8 9 0 PLAYBACK Stop Pause Play Shuffle Repeat Settings Settings ( ) System Setup Enter System Setup (3 of 3). While your Lifestyle® DVD system is on, press the Settings button on System Setup (3 of 3). Scroll down through (2 or 3) to (3 of 3) Zone 2 Protocol: Legacy 10...more than one room. this ensures that the house code settings (switches 1, 2, 3, and 4) match those in more information on -screen display. 2. Make sure that the Zone 2 Protocol is Zone 2 Protocol. 4. Use the right-arrow button to change the protocol from Normal ...
Owner's guide
Page 5
...Troubleshooting ...26 Warranty period ...27 Customer service ...27 Cleaning the Lifestyle® 12 system 28 Product Information Technical information 29 Accessories ...29 Index ...30 Bose® Corporation inside back cover For your Lifestyle® 12 system 20 Listening to video sound 20 Listening to the radio ...voltage and 120V systems 17 Turn on the music center 17 Operating Your Lifestyle® 12 System The music center display 18 The system controls ...18 The music center controls 19 The Lifestyle® remote control 19 Listening to your records Serial numbers are located ...
...Troubleshooting ...26 Warranty period ...27 Customer service ...27 Cleaning the Lifestyle® 12 system 28 Product Information Technical information 29 Accessories ...29 Index ...30 Bose® Corporation inside back cover For your Lifestyle® 12 system 20 Listening to video sound 20 Listening to the radio ...voltage and 120V systems 17 Turn on the music center 17 Operating Your Lifestyle® 12 System The music center display 18 The system controls ...18 The music center controls 19 The Lifestyle® remote control 19 Listening to your records Serial numbers are located ...
Owner's guide
Page 14
...level outputs from most VCRs or laserdisc players are available at many electronics stores, or call Bose®. Cables may also be stereo. Most audio cables are three basic methods for the Lifestyle® 12 system to provide home theater effects, the program material must be in a home theater. Match...; 12 system There are stereo. Your home theater can include many variations of equipment in stereo or surround-encoded, and the device playing the material must have a stereo (HiFi) VCR. Note: A mono TV only serves as a display for the audio. While not all VCRs are stereo devices, all ...
...level outputs from most VCRs or laserdisc players are available at many electronics stores, or call Bose®. Cables may also be stereo. Most audio cables are three basic methods for the Lifestyle® 12 system to provide home theater effects, the program material must be in a home theater. Match...; 12 system There are stereo. Your home theater can include many variations of equipment in stereo or surround-encoded, and the device playing the material must have a stereo (HiFi) VCR. Note: A mono TV only serves as a display for the audio. While not all VCRs are stereo devices, all ...
Owner's guide
Page 16
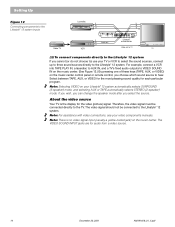
Therefore, the video signal must be connected to the Lifestyle® 12 system. Note: There is the display for audio from a video source. 14 December 20, 2001 AM191409_01_V.pdf For example, connect a VCR into TAPE PLAY ...STEREO (2-speaker) mode. Setting Up Figure 12 Connecting components to the Lifestyle® 12 system inputs Cable TV Laserdisc VCR L L R R V V L R V ® LIFESTYLE ® MODEL 5 MUSIC CENTER B Z T G642 950 D S BOSE Corporation UL LISTED 917D AUDIO ® EQUIPMENT MANUFACTURED: TÜV Rheinland BOSE CORPORATION, FRAMINGHAM, MA 01701-9168 MADE ...
Therefore, the video signal must be connected to the Lifestyle® 12 system. Note: There is the display for audio from a video source. 14 December 20, 2001 AM191409_01_V.pdf For example, connect a VCR into TAPE PLAY ...STEREO (2-speaker) mode. Setting Up Figure 12 Connecting components to the Lifestyle® 12 system inputs Cable TV Laserdisc VCR L L R R V V L R V ® LIFESTYLE ® MODEL 5 MUSIC CENTER B Z T G642 950 D S BOSE Corporation UL LISTED 917D AUDIO ® EQUIPMENT MANUFACTURED: TÜV Rheinland BOSE CORPORATION, FRAMINGHAM, MA 01701-9168 MADE ...
Owner's guide
Page 19
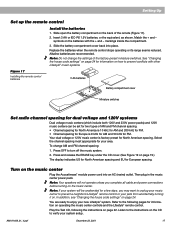
... all cable and power connections before turning on page 22. Turn on how to enjoy your system setup. symbols on page 19.) The display indicates US for North American spacing and EU for North American spacing. Press and release the ERASE key under the CD cover. (See Figure... 19 on the batteries with other Lifestyle® music systems. Figure 17 Installing the remote control batteries 3 AA batteries Battery compartment cover Miniature switches Set radio channel spacing for dual ...
... all cable and power connections before turning on page 22. Turn on how to enjoy your system setup. symbols on page 19.) The display indicates US for North American spacing and EU for North American spacing. Press and release the ERASE key under the CD cover. (See Figure... 19 on the batteries with other Lifestyle® music systems. Figure 17 Installing the remote control batteries 3 AA batteries Battery compartment cover Miniature switches Set radio channel spacing for dual ...
Owner's guide
Page 20
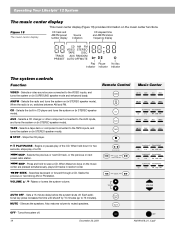
... on (in STEREO speaker mode). Searches backward or forward through a CD. Raises or lowers the system volume. Operating Your Lifestyle® 12 System The music center display This music center display (Figure 18) provides information on (in STEREO speaker mode). Selects a video sound source connected to scan a CD. CD...system on (in STEREO speaker mode). Each addi- Figure 18 The music center display CD track and AM/FM preset number display Source indicators CD elapsed time and AM/FM station frequency display CD AM FM VIDEO STEREO TAPE DISC TRACK AUX RANDOM PRESET AUTO OFFMUTE Play ...
... on (in STEREO speaker mode). Searches backward or forward through a CD. Raises or lowers the system volume. Operating Your Lifestyle® 12 System The music center display This music center display (Figure 18) provides information on (in STEREO speaker mode). Selects a video sound source connected to scan a CD. CD...system on (in STEREO speaker mode). Each addi- Figure 18 The music center display CD track and AM/FM preset number display Source indicators CD elapsed time and AM/FM station frequency display CD AM FM VIDEO STEREO TAPE DISC TRACK AUX RANDOM PRESET AUTO OFFMUTE Play ...
Owner's guide
Page 22
... the volume. • For SURROUND mode, use the SURROUND + or - Turning the system off your Lifestyle® 12 system Your Lifestyle® 12 system offers the option of the time. Listening to video sound Turning the video components on Turn on page... 4. Operating Your Lifestyle® 12 System Listening to your music system automatically after 15 minutes, press the AUTO OFF key..., whether the program is surround-encoded, stereo, or monaural. The display indicates AUTO OFF is directed to the center speaker.
... the volume. • For SURROUND mode, use the SURROUND + or - Turning the system off your Lifestyle® 12 system Your Lifestyle® 12 system offers the option of the time. Listening to video sound Turning the video components on Turn on page... 4. Operating Your Lifestyle® 12 System Listening to your music system automatically after 15 minutes, press the AUTO OFF key..., whether the program is surround-encoded, stereo, or monaural. The display indicates AUTO OFF is directed to the center speaker.
Owner's guide
Page 23
...store as the scan stops, tap the > or < key to 20 AM and FM stations in the displayed preset location: a. AM191409_01_V.pdf December 20, 2001 21 Setting a station preset Your Lifestyle® music center can store up to tune one direction, briefly press the opposite direction key. b. ... '- -'. Press and hold these keys down the > or < key to store the displayed station in any station. • Or, press SEEK/TUNE > or < (under the CD cover. 1. Operating Your Lifestyle® 12 System Listening to the radio Turning the system on and choosing the radio Press the AM...
...store as the scan stops, tap the > or < key to 20 AM and FM stations in the displayed preset location: a. AM191409_01_V.pdf December 20, 2001 21 Setting a station preset Your Lifestyle® music center can store up to tune one direction, briefly press the opposite direction key. b. ... '- -'. Press and hold these keys down the > or < key to store the displayed station in any station. • Or, press SEEK/TUNE > or < (under the CD cover. 1. Operating Your Lifestyle® 12 System Listening to the radio Turning the system on and choosing the radio Press the AM...
Owner's guide
Page 24
...another speaker mode, if desired. Using a tape deck, CD changer, or other functions at Bose® dealers and most headphone models, you wish to its remote control. To record to...reverse) to go to the beginning of these keys again. Operating Your Lifestyle® 12 System Listening to record. Note: The Lifestyle® 12 system cannot turn the system on the CD cover, and place a CD...the component is loaded. is selected. Use the VOLUME v (up . The appropriate display indicator lights when the system is on the music center for connecting a component before proceeding....
...another speaker mode, if desired. Using a tape deck, CD changer, or other functions at Bose® dealers and most headphone models, you wish to its remote control. To record to...reverse) to go to the beginning of these keys again. Operating Your Lifestyle® 12 System Listening to record. Note: The Lifestyle® 12 system cannot turn the system on the CD cover, and place a CD...the component is loaded. is selected. Use the VOLUME v (up . The appropriate display indicator lights when the system is on the music center for connecting a component before proceeding....
Owner's guide
Page 26
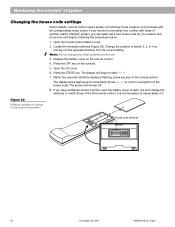
... its current setting. Locate the miniature switches (Figure 22). Press the OFF key on the remote control. 4. The display will remain off. 8. Maintaining Your Lifestyle® 12 System Changing the house code settings Each Lifestyle® remote control uses a system of matching house codes to communicate with those of the first remote control. Open...
... its current setting. Locate the miniature switches (Figure 22). Press the OFF key on the remote control. 4. The display will remain off. 8. Maintaining Your Lifestyle® 12 System Changing the house code settings Each Lifestyle® remote control uses a system of matching house codes to communicate with those of the first remote control. Open...

Owner's guide
Page 28
...sure the video sound source is stereo and surround-encoded, and the component used (TV, VCR, DVD or laserdisc player) is lit in the display. Make sure to select the correct source for the desired input. • Check the speaker connections. • Be sure the CD is ...Be sure to select a source (CD, AM/FM, etc.). • Unplug the music center power pack for a minute, then reconnect it. Maintaining Your Lifestyle® 12 System Troubleshooting Problem System does not function at both ends. • Select STEREO+CENTER (3-speaker) or SURROUND (5-speaker) mode. • In STEREO+CENTER mode...
...sure the video sound source is stereo and surround-encoded, and the component used (TV, VCR, DVD or laserdisc player) is lit in the display. Make sure to select the correct source for the desired input. • Check the speaker connections. • Be sure the CD is ...Be sure to select a source (CD, AM/FM, etc.). • Unplug the music center power pack for a minute, then reconnect it. Maintaining Your Lifestyle® 12 System Troubleshooting Problem System does not function at both ends. • Select STEREO+CENTER (3-speaker) or SURROUND (5-speaker) mode. • In STEREO+CENTER mode...
Owner's guide
Page 29
... or on the warranty card that came with your system. Do not touch the laser pickup. • The music center cannot play symbol in the display is lit. • After pressing the CD key, wait a few seconds before pressing PLAY. • Check to see if there is a disc ...in the player, label-side up. • The disc may be in solving problems, contact Bose customer service. Please fill out the information section on the card and mail it to Bose. Warranty period The Bose® Lifestyle® 12 system is covered by a limited 1-year transferable warranty. See the inside back cover for...
... or on the warranty card that came with your system. Do not touch the laser pickup. • The music center cannot play symbol in the display is lit. • After pressing the CD key, wait a few seconds before pressing PLAY. • Check to see if there is a disc ...in the player, label-side up. • The disc may be in solving problems, contact Bose customer service. Please fill out the information section on the card and mail it to Bose. Warranty period The Bose® Lifestyle® 12 system is covered by a limited 1-year transferable warranty. See the inside back cover for...
Owner's guide
Page 32
... 9-11, 14-16, 25-27 controls 2, 8, 13, 18, 19, 23, 24, 29 cube speakers 6, 29 customer service 6, 9, 27 D display 12, 14, 18, 20-22, 24, 27 DVD 12, 15, 20, 22, 27 E enhanced bass 20, 23 external antenna 16 F FM 75Ω EXTERNAL antenna connector 16 FM antenna 5, 16, 29... 19, 22, 24-29 room compensation controls 23 S safety Information 2 serial numbers 5 signal splitter 16 speaker cable 5-9, 27 SURROUND 4, 14, 19, 20, 26 surround 4-7, 9, 10, 12, 19, 20, 26 surround (rear) speakers 7 surround cables 9 surround speakers 4, 7, 9, 20, 26 switches 17, 18, 21, 24, 25 T TAPE jack 14, 15, 18,...
... 9-11, 14-16, 25-27 controls 2, 8, 13, 18, 19, 23, 24, 29 cube speakers 6, 29 customer service 6, 9, 27 D display 12, 14, 18, 20-22, 24, 27 DVD 12, 15, 20, 22, 27 E enhanced bass 20, 23 external antenna 16 F FM 75Ω EXTERNAL antenna connector 16 FM antenna 5, 16, 29... 19, 22, 24-29 room compensation controls 23 S safety Information 2 serial numbers 5 signal splitter 16 speaker cable 5-9, 27 SURROUND 4, 14, 19, 20, 26 surround 4-7, 9, 10, 12, 19, 20, 26 surround (rear) speakers 7 surround cables 9 surround speakers 4, 7, 9, 20, 26 switches 17, 18, 21, 24, 25 T TAPE jack 14, 15, 18,...


