Owner's guide
Page 3
... the connections 7 Connecting speakers to the Acoustimass module 7 Connecting the Acoustimass module to the receiver 9 Checking the connections 10 USING YOUR SYSTEM 11 Getting the most from your home theater speakers 11 Adjusting the bass/room compensation 11 Adjusting the LFE level 11 Setting your digital surround sound receiver 12 Receiving a digital audio signal 12...
... the connections 7 Connecting speakers to the Acoustimass module 7 Connecting the Acoustimass module to the receiver 9 Checking the connections 10 USING YOUR SYSTEM 11 Getting the most from your home theater speakers 11 Adjusting the bass/room compensation 11 Adjusting the LFE level 11 Setting your digital surround sound receiver 12 Receiving a digital audio signal 12...
Owner's guide
Page 6
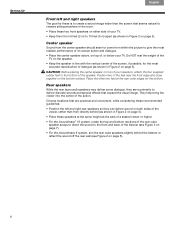
... rubber feet to ! CAUTION: Before placing the center speaker on top of your TV. Rear speakers While the rear (surround) speakers may deliver some dialogue, they can deliver sound on both sides of the viewer, rather than the screen that seems natural to viewers sitting anywhere in the room. &#...two feet at the same height as the ears of a seated viewer or higher. • For the Acoustimass® 10 system, rotate the top and bottom sections of the rear cube speaker arrays to direct the sound to 15 feet (5 m) apart (as shown in Figure 2 on page 5). Choose locations that expand ...
... rubber feet to ! CAUTION: Before placing the center speaker on top of your TV. Rear speakers While the rear (surround) speakers may deliver some dialogue, they can deliver sound on both sides of the viewer, rather than the screen that seems natural to viewers sitting anywhere in the room. &#...two feet at the same height as the ears of a seated viewer or higher. • For the Acoustimass® 10 system, rotate the top and bottom sections of the rear cube speaker arrays to direct the sound to 15 feet (5 m) apart (as shown in Figure 2 on page 5). Choose locations that expand ...

Owner's guide
Page 11
...! The setting made at these levels is now ready for that your other speaker channels. Use it to suit your digital surround sound receiver. surround receiver. 11 CAUTION: This system provides an automatic protection circuit to increase the low-frequency output of your system is "boomy... high volume levels, the circuit activates to reduce the low-frequency output of this feature, refer to familiarize yourself with your Acoustimass® system is not recommended. You may exceed safe levels. preferences. English Español Français USING YOUR SYSTEM...
...! The setting made at these levels is now ready for that your other speaker channels. Use it to suit your digital surround sound receiver. surround receiver. 11 CAUTION: This system provides an automatic protection circuit to increase the low-frequency output of your system is "boomy... high volume levels, the circuit activates to reduce the low-frequency output of this feature, refer to familiarize yourself with your Acoustimass® system is not recommended. You may exceed safe levels. preferences. English Español Français USING YOUR SYSTEM...
Owner's guide
Page 12
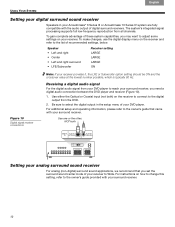
...receiver (Figure 10). 1. Speaker • Left and right • Center • Left and right surround • LFE/Subwoofer Receiver setting LARGE LARGE LARGE ON Figure 10 Digital signal receiver connections Note: If your Acoustimass® 6 Series III or Acoustimass 10 Series IV system are ...your analog surround sound receiver For analog (non-digital) surround sound applications, we recommend that came with your surround receiver. For additional setup and operating information, please refer to the owner's guide provided with your surround receiver. 12 surround sound center mode...
...receiver (Figure 10). 1. Speaker • Left and right • Center • Left and right surround • LFE/Subwoofer Receiver setting LARGE LARGE LARGE ON Figure 10 Digital signal receiver connections Note: If your Acoustimass® 6 Series III or Acoustimass 10 Series IV system are ...your analog surround sound receiver For analog (non-digital) surround sound applications, we recommend that came with your surround receiver. For additional setup and operating information, please refer to the owner's guide provided with your surround receiver. 12 surround sound center mode...
Owner's guide
Page 13
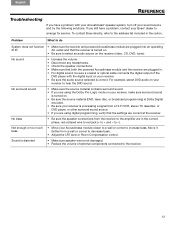
...8226; Make sure the receiver and powered Acoustimass module are plugged into an operating at all AC outlet and that the settings are using digital programming, verify that the receiver is correct. No surround sound • Make sure the source material contains surround sound. • If you are using the ...you are correct at the receiver. Not enough or too much bass • Move your receiver to hear the DVD sound. If you have a problem, contact your Bose® dealer to arrange for service. Move it farther from the receiver to the amplifier are plugged in the carton. ...
...8226; Make sure the receiver and powered Acoustimass module are plugged into an operating at all AC outlet and that the settings are using digital programming, verify that the receiver is correct. No surround sound • Make sure the source material contains surround sound. • If you are using the ...you are correct at the receiver. Not enough or too much bass • Move your receiver to hear the DVD sound. If you have a problem, contact your Bose® dealer to arrange for service. Move it farther from the receiver to the amplifier are plugged in the carton. ...


