Owner's guide
Page 2
It will help you set up and operate your owner's guide for future reference. WARNING: No naked... under license from Dolby Laboratories. Additional safety information See the additional safety information on the rear of the Acoustimass module: The lightning flash with arrowhead symbol within an equilateral triangle is located on the rear of uninsulated,...all of Conformity can be placed on www.bose.com/static/compliance/index.html. For your records The system serial number is intended to alert the user to the presence of the Acoustimass module. These CAUTION marks are trademarks of...
It will help you set up and operate your owner's guide for future reference. WARNING: No naked... under license from Dolby Laboratories. Additional safety information See the additional safety information on the rear of the Acoustimass module: The lightning flash with arrowhead symbol within an equilateral triangle is located on the rear of uninsulated,...all of Conformity can be placed on www.bose.com/static/compliance/index.html. For your records The system serial number is intended to alert the user to the presence of the Acoustimass module. These CAUTION marks are trademarks of...
Owner's guide
Page 3
...; module 7 Making the connections 7 Connecting speakers to the Acoustimass module 7 Connecting the Acoustimass module to the receiver 9 Checking the connections 10 USING YOUR SYSTEM 11 Getting the most from your home theater speakers 11 Adjusting the bass/room compensation 11 Adjusting the LFE level 11 Setting your digital surround sound receiver 12 Receiving a digital...
...; module 7 Making the connections 7 Connecting speakers to the Acoustimass module 7 Connecting the Acoustimass module to the receiver 9 Checking the connections 10 USING YOUR SYSTEM 11 Getting the most from your home theater speakers 11 Adjusting the bass/room compensation 11 Adjusting the LFE level 11 Setting your digital surround sound receiver 12 Receiving a digital...
Owner's guide
Page 4
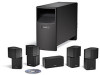
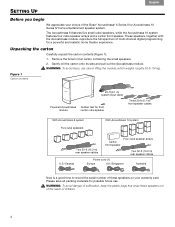
... (1) Europe U.K./Singapore Australia Now is a good time to record the serial number of these speakers out of the reach of the Bose® Acoustimass® 6 Series III or Acoustimass 10 Series IV home entertainment speaker system. Unpacking the carton Carefully unpack the carton contents (Figure 1): 1. WARNING: To avoid danger of suffocation, keep...roughly 30 lb (14 kg). Remove the brown inner carton containing the small speakers. 2. Français Español English SETTING UP Before you begin We appreciate your warranty card. Gently roll the carton onto its side and pull out the...
... (1) Europe U.K./Singapore Australia Now is a good time to record the serial number of these speakers out of the reach of the Bose® Acoustimass® 6 Series III or Acoustimass 10 Series IV home entertainment speaker system. Unpacking the carton Carefully unpack the carton contents (Figure 1): 1. WARNING: To avoid danger of suffocation, keep...roughly 30 lb (14 kg). Remove the brown inner carton containing the small speakers. 2. Français Español English SETTING UP Before you begin We appreciate your warranty card. Gently roll the carton onto its side and pull out the...
Owner's guide
Page 5
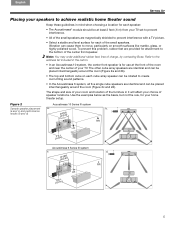
...performance results (b and d) Acoustimass 6 Series III system c. Figure 2 Acoustimass 10 Series IV system Sample speaker placement a. d. 5 Use the examples below as the basis, but not the rule, for attachment to the bottom of charge, by contacting Bose. English Español Français SETTING UP Placing your speakers to ...your room and location of the furniture in the carton. • In an Acoustimass 10 system, the center front speaker is for use at least 2 feet (.6 m) from your TV set to prevent interference. • All of speaker locations. Refer to move, particularly...
...performance results (b and d) Acoustimass 6 Series III system c. Figure 2 Acoustimass 10 Series IV system Sample speaker placement a. d. 5 Use the examples below as the basis, but not the rule, for attachment to the bottom of charge, by contacting Bose. English Español Français SETTING UP Placing your speakers to ...your room and location of the furniture in the carton. • In an Acoustimass 10 system, the center front speaker is for use at least 2 feet (.6 m) from your TV set to prevent interference. • All of speaker locations. Refer to move, particularly...
Owner's guide
Page 6
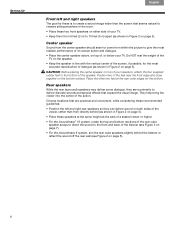
... them from within the picture to give the most accurate reproduction of dialogue (as the ears of a seated viewer or higher. • For the Acoustimass® 10 system, rotate the top and bottom sections of the rear cube speaker arrays to direct the sound to the front and back of the listener... (see Figure 2 on page 5). 6 SETTING UP Français Español English Front left and right rear speakers so they serve primarily to ! Center speaker...
... them from within the picture to give the most accurate reproduction of dialogue (as the ears of a seated viewer or higher. • For the Acoustimass® 10 system, rotate the top and bottom sections of the rear cube speaker arrays to direct the sound to the front and back of the listener... (see Figure 2 on page 5). 6 SETTING UP Français Español English Front left and right rear speakers so they serve primarily to ! Center speaker...
Owner's guide
Page 7
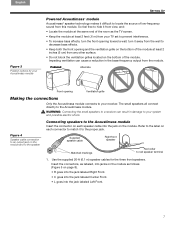
... Insert the connector on the module. Supplied speaker cable Right front speaker Matched markings Red collar to your Acoustimass module SETTING UP Powered Acoustimass® module Acoustimass® speaker technology makes it to locate the source of low-frequency sound from your receiver. Use the ... 3 Position options for the three front speakers. So feel free to your TV set to prevent interference. • To increase bass effects, turn the front opening Ventilation grille Making the connections Only the Acoustimass module connects to hide it away from the module.
... Insert the connector on the module. Supplied speaker cable Right front speaker Matched markings Red collar to your Acoustimass module SETTING UP Powered Acoustimass® module Acoustimass® speaker technology makes it to locate the source of low-frequency sound from your receiver. Use the ... 3 Position options for the three front speakers. So feel free to your TV set to prevent interference. • To increase bass effects, turn the front opening Ventilation grille Making the connections Only the Acoustimass module connects to hide it away from the module.
Owner's guide
Page 8
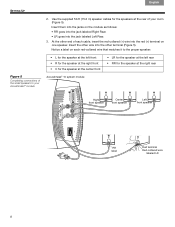
...your room (Figure 5). At the other terminal (Figure 5). Français Español English SETTING UP 2. Insert them into the jacks on the module as follows: • RR goes into the...-collared wire that matches it to the proper speaker: Figure 5 Completing connections of the small speakers to your Acoustimass® module • L for the speaker at the left front • R for the speaker at... the right front • C for the speaker at the center front Acoustimass® 10 system module • LR for the speaker at the left rear • RR for the speakers at...
...your room (Figure 5). At the other terminal (Figure 5). Français Español English SETTING UP 2. Insert them into the jacks on the module as follows: • RR goes into the...-collared wire that matches it to the proper speaker: Figure 5 Completing connections of the small speakers to your Acoustimass® module • L for the speaker at the left front • R for the speaker at... the right front • C for the speaker at the center front Acoustimass® 10 system module • LR for the speaker at the left rear • RR for the speakers at...
Owner's guide
Page 9
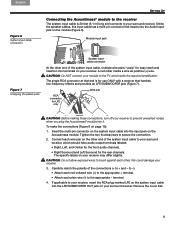
...reach and insertion into it. Tighten the two thumbscrews to + and - low-frequency effects and provides an LFE/SUBWOOFER jack (Figure 7). Acoustimass module. The specific labels on your receiver. If applicable to your receiver, insert the RCA plug marked LFE on the system input cable ...and Left Surround for use ONLY with a receiver that inserts into the input jack on page 10): 1. English Español Français SETTING UP Figure 6 System input cable connection Connecting the Acoustimass® module to the receiver The system input cable is for the rear channels. ! A...
...reach and insertion into it. Tighten the two thumbscrews to + and - low-frequency effects and provides an LFE/SUBWOOFER jack (Figure 7). Acoustimass module. The specific labels on your receiver. If applicable to your receiver, insert the RCA plug marked LFE on the system input cable ...and Left Surround for use ONLY with a receiver that inserts into the input jack on page 10): 1. English Español Français SETTING UP Figure 6 System input cable connection Connecting the Acoustimass® module to the receiver The system input cable is for the rear channels. ! A...
Owner's guide
Page 10
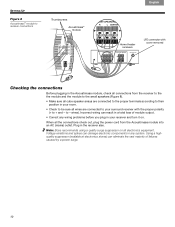
... suppressor (available at electronics stores) can eliminate the vast majority of module output. • Correct any system. Note: Bose recommends using a quality surge suppressor on all the connections check out, plug the power cord from the receiver to the ... variations and spikes can result in a total loss of failures caused by a power surge. 10 When all electronics equipment. SETTING UP Figure 8 Acoustimass® module to receiver connections Thumbscrews Acoustimass® module Français Español English Home theater receivers LFE connector with the proper...
... suppressor (available at electronics stores) can eliminate the vast majority of module output. • Correct any system. Note: Bose recommends using a quality surge suppressor on all the connections check out, plug the power cord from the receiver to the ... variations and spikes can result in a total loss of failures caused by a power surge. 10 When all electronics equipment. SETTING UP Figure 8 Acoustimass® module to receiver connections Thumbscrews Acoustimass® module Français Español English Home theater receivers LFE connector with the proper...

Owner's guide
Page 11
...use . location. For example: • If the system performance is "thin" or lacks bass, turn the knob counter-clockwise ! The setting made at these levels is "boomy" or overemphasizes bass, turn the BASS control (shown above ) is now ready for that your particular ...This volume reduction also indicates that provide an LFE/SUBWOOFER channel. Figure 9 Audio adjustment knobs Adjusting the bass/room compensation After placing the Acoustimass module where you notice this system (Figure 9). You can adjust the relative level of your ! At high volume levels, the circuit...
...use . location. For example: • If the system performance is "thin" or lacks bass, turn the knob counter-clockwise ! The setting made at these levels is "boomy" or overemphasizes bass, turn the BASS control (shown above ) is now ready for that your particular ...This volume reduction also indicates that provide an LFE/SUBWOOFER channel. Figure 9 Audio adjustment knobs Adjusting the bass/room compensation After placing the Acoustimass module where you notice this system (Figure 9). You can adjust the relative level of your ! At high volume levels, the circuit...
Owner's guide
Page 12
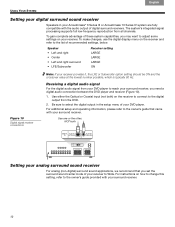
For additional setup and operating information, please refer to the owner's guide that you set the ! For instructions on the receiver to connect to select the digital output in your Acoustimass® 6 Series III or Acoustimass 10 Series IV system are fully ! To gain complete advantage of these system capabilities, you need a digital audio connection between the DVD...
For additional setup and operating information, please refer to the owner's guide that you set the ! For instructions on the receiver to connect to select the digital output in your Acoustimass® 6 Series III or Acoustimass 10 Series IV system are fully ! To gain complete advantage of these system capabilities, you need a digital audio connection between the DVD...
Owner's guide
Page 13
... • Disconnect any headphones. • Check the speaker connections. • Make sure that both the powered Acoustimass module and the receiver are correct at all AC outlet and that the settings are plugged in. • For digital sound, be sure a coaxial or optical cable connects the digital output ... surround sound • Make sure the source material contains surround sound. • If you are using the Dolby Pro-Logic mode on your Bose® dealer to arrange for service. No bass • Be sure the speaker connections from a wall or corner to the receiver. 13 to...
... • Disconnect any headphones. • Check the speaker connections. • Make sure that both the powered Acoustimass module and the receiver are correct at all AC outlet and that the settings are plugged in. • For digital sound, be sure a coaxial or optical cable connects the digital output ... surround sound • Make sure the source material contains surround sound. • If you are using the Dolby Pro-Logic mode on your Bose® dealer to arrange for service. No bass • Be sure the speaker connections from a wall or corner to the receiver. 13 to...


