Quick setup guide
Page 1
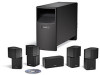
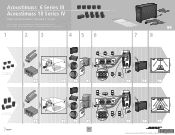
Acoustimass® 6 Series III Acoustimass 10 Series IV HOME ENTERTAINMENT SPEAKER SYSTEMS Quick setup guide • Hurtig opstillingsvejledning • Kurzanleitung • Guía rápida de instalación • Noticede montage • Guida di installazione rapida • Snelle opstellingsgids • Vägledning för snabb montering 1 2 3 4 5 6 �� � � � �� Acoustimass 6 Series III system � �� � � �� 4 �...
Acoustimass® 6 Series III Acoustimass 10 Series IV HOME ENTERTAINMENT SPEAKER SYSTEMS Quick setup guide • Hurtig opstillingsvejledning • Kurzanleitung • Guía rápida de instalación • Noticede montage • Guida di installazione rapida • Snelle opstellingsgids • Vägledning för snabb montering 1 2 3 4 5 6 �� � � � �� Acoustimass 6 Series III system � �� � � �� 4 �...
Owner's guide
Page 2
...the rear of the Acoustimass module. Manufactured under license from Dolby Laboratories. CAUTION: To prevent electric shock, match the wide blade of the line cord plug to the presence of uninsulated, dangerous voltage within an equilateral triangle, as lighted candles...Directive 89/336/EEC and to follow this owner's guide carefully. Serial number Dealer name Dealer phone Purchase date Please keep your speaker system. No part of Conformity can be placed on www.bose.com/static/compliance/index.html. It will help you set up and operate your owner's guide for future reference. "Dolby...
...the rear of the Acoustimass module. Manufactured under license from Dolby Laboratories. CAUTION: To prevent electric shock, match the wide blade of the line cord plug to the presence of uninsulated, dangerous voltage within an equilateral triangle, as lighted candles...Directive 89/336/EEC and to follow this owner's guide carefully. Serial number Dealer name Dealer phone Purchase date Please keep your speaker system. No part of Conformity can be placed on www.bose.com/static/compliance/index.html. It will help you set up and operate your owner's guide for future reference. "Dolby...
Owner's guide
Page 3
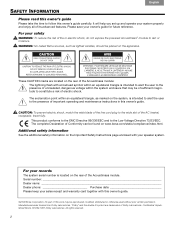
... speakers 6 Center speaker 6 Rear speakers 6 Powered Acoustimass® module 7 Making the connections 7 Connecting speakers to the Acoustimass module 7 Connecting the Acoustimass module to the receiver 9 Checking the connections 10 USING YOUR SYSTEM 11 Getting the most from your home theater speakers 11 Adjusting the bass/room compensation 11 Adjusting the LFE level 11 Setting your digital surround sound receiver 12 Receiving a digital audio signal 12 Setting your analog surround sound receiver 12 REFERENCE 13 Troubleshooting 13 Customer service 14 Cleaning the speakers...
... speakers 6 Center speaker 6 Rear speakers 6 Powered Acoustimass® module 7 Making the connections 7 Connecting speakers to the Acoustimass module 7 Connecting the Acoustimass module to the receiver 9 Checking the connections 10 USING YOUR SYSTEM 11 Getting the most from your home theater speakers 11 Adjusting the bass/room compensation 11 Adjusting the LFE level 11 Setting your digital surround sound receiver 12 Receiving a digital audio signal 12 Setting your analog surround sound receiver 12 REFERENCE 13 Troubleshooting 13 Customer service 14 Cleaning the speakers...
Owner's guide
Page 4
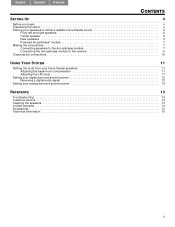
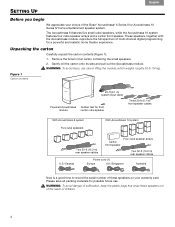
... multi-channel digital programming for front module center cube speaker Three 20-ft (6.1 m) front speaker cables With Acoustimass 6 system Five cube speakers With Acoustimass 10 system Two 50-ft (15.2 m) rear speaker cables Four cube speaker arrays Center front speaker Two 50-ft (15.2 m) rear speaker cables U.S./Canada Power cord (1) Europe U.K./Singapore Australia Now is a good time to record the serial number of these speakers out of the reach of the Bose® Acoustimass® 6 Series III or Acoustimass 10 Series IV home...
... multi-channel digital programming for front module center cube speaker Three 20-ft (6.1 m) front speaker cables With Acoustimass 6 system Five cube speakers With Acoustimass 10 system Two 50-ft (15.2 m) rear speaker cables Four cube speaker arrays Center front speaker Two 50-ft (15.2 m) rear speaker cables U.S./Canada Power cord (1) Europe U.K./Singapore Australia Now is a good time to record the serial number of these speakers out of the reach of the Bose® Acoustimass® 6 Series III or Acoustimass 10 Series IV home...
Owner's guide
Page 5
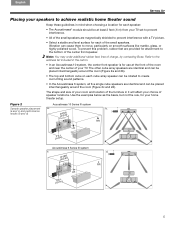
... with a TV picture. • Select a stable and level surface for your home theater setup. Refer to the address list included in it will affect your choice of speaker locations. The other cube array speakers are identical and can be at the front of the room and near the center of charge, by contacting Bose. Figure 2 Acoustimass 10 Series IV system Sample speaker placement a. d. 5 Use the examples...
... with a TV picture. • Select a stable and level surface for your home theater setup. Refer to the address list included in it will affect your choice of speaker locations. The other cube array speakers are identical and can be at the front of the room and near the center of charge, by contacting Bose. Figure 2 Acoustimass 10 Series IV system Sample speaker placement a. d. 5 Use the examples...
Owner's guide
Page 6
... the weight of the TV on the speaker. • Keep the speaker in line with the vertical center of the screen, if possible, for these is to create a sound image wider than from within the picture to give the most accurate reproduction of ...help bring the viewer into the center of the speaker. CAUTION: Before placing the center speaker on top of your TV. • Keep them from 6 feet (2 m) to 15 feet (5 m) apart (as the ears of a seated viewer or higher. • For the Acoustimass® 10 system, rotate the top and bottom sections of the rear cube speaker arrays to direct the sound...
... the weight of the TV on the speaker. • Keep the speaker in line with the vertical center of the screen, if possible, for these is to create a sound image wider than from within the picture to give the most accurate reproduction of ...help bring the viewer into the center of the speaker. CAUTION: Before placing the center speaker on top of your TV. • Keep them from 6 feet (2 m) to 15 feet (5 m) apart (as the ears of a seated viewer or higher. • For the Acoustimass® 10 system, rotate the top and bottom sections of the rear cube speaker arrays to direct the sound...
Owner's guide
Page 7
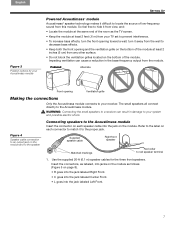
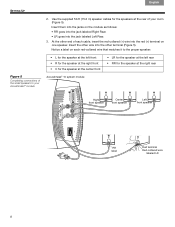
... speakers. turn it from view, and: • Locate the module at the same end of low-frequency sound from your TV set to the label on the bottom of the module.! Preferred Alternate Front opening and the ventilation grille on each speaker cable into the jack labeled Left Front. 7 Use the supplied 20-ft (6.1 m) speaker cables for your Acoustimass module SETTING UP Powered Acoustimass® module Acoustimass® speaker technology makes...
... speakers. turn it from view, and: • Locate the module at the same end of low-frequency sound from your TV set to the label on the bottom of the module.! Preferred Alternate Front opening and the ventilation grille on each speaker cable into the jack labeled Left Front. 7 Use the supplied 20-ft (6.1 m) speaker cables for your Acoustimass module SETTING UP Powered Acoustimass® module Acoustimass® speaker technology makes...
Owner's guide
Page 8
... red-collared wire that matches it to the proper speaker: Figure 5 Completing connections of your room (Figure 5). Use the supplied 50-ft (15.2 m) speaker cables for the speaker at the rear of the small speakers to your Acoustimass® module • L for the speaker at the left front • R for the speaker at the right front • C for the speaker at the center front Acoustimass® 10...
... red-collared wire that matches it to the proper speaker: Figure 5 Completing connections of your room (Figure 5). Use the supplied 50-ft (15.2 m) speaker cables for the speaker at the rear of the small speakers to your Acoustimass® module • L for the speaker at the left front • R for the speaker at the right front • C for the speaker at the center front Acoustimass® 10...
Owner's guide
Page 9
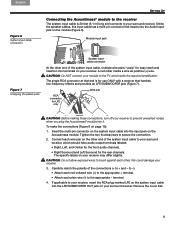
... the multi-pin connector on the system input cable into the LFE/SUBWOOFER OUT jack on the ! this input cable has a multi-pin connector that handles ! Acoustimass module. If applicable to your surround receiver, which lacks the required amplification. low-frequency effects and provides an LFE/SUBWOOFER jack (Figure 7). Module input jack Figure 7 Unzipping the paired wires System input cable connector At the other ; The specific labels on page 10): 1. to -). • Attach each red-collared wire...
... the multi-pin connector on the system input cable into the LFE/SUBWOOFER OUT jack on the ! this input cable has a multi-pin connector that handles ! Acoustimass module. If applicable to your surround receiver, which lacks the required amplification. low-frequency effects and provides an LFE/SUBWOOFER jack (Figure 7). Module input jack Figure 7 Unzipping the paired wires System input cable connector At the other ; The specific labels on page 10): 1. to -). • Attach each red-collared wire...
Owner's guide
Page 10
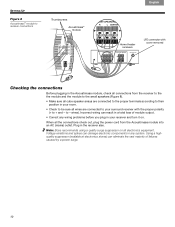
... output. • Correct any system. Note: Bose recommends using a quality surge suppressor on . Plug in a total loss of failures caused by a power surge. 10 Incorrect wiring can damage electronic components in any wiring problems before you plug in your surround receiver with cover removed Checking the connections Before plugging in the Acoustimass module, check all connections from the receiver to the the module and the module to the small speakers...
... output. • Correct any system. Note: Bose recommends using a quality surge suppressor on . Plug in a total loss of failures caused by a power surge. 10 Incorrect wiring can damage electronic components in any wiring problems before you plug in your surround receiver with cover removed Checking the connections Before plugging in the Acoustimass module, check all connections from the receiver to the the module and the module to the small speakers...

Owner's guide
Page 11
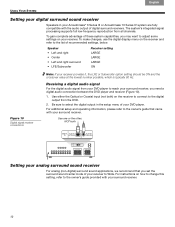
... the factory is meant for use in the most from your home theater speakers With system connections completed and the module plugged in protections that provide an LFE/SUBWOOFER channel. By turning the knob, you can fine-tune it to help guard against damage from movie soundtracks. surround receiver. 11 At high volume levels, the circuit activates to the owner's guide provided with receivers that adjust ! Adjusting the LFE level The LFE level control (shown...
... the factory is meant for use in the most from your home theater speakers With system connections completed and the module plugged in protections that provide an LFE/SUBWOOFER channel. By turning the knob, you can fine-tune it to help guard against damage from movie soundtracks. surround receiver. 11 At high volume levels, the circuit activates to the owner's guide provided with receivers that adjust ! Adjusting the LFE level The LFE level control (shown...
Owner's guide
Page 12
...USING YOUR SYSTEM Setting your digital surround sound receiver Speakers in the setup menu of your DVD player. For additional setup and operating information, please refer to the owner's guide provided with your surround receiver. The system's integrated signal processing supports full low-frequency reproduction from the DVD. 2. To make changes, use the digital display menu on the receiver to connect to Wide. surround sound center mode of digital surround receivers. Use one or the other, NOT both ) on the receiver and refer to adjust some! compatible with the audio output...
...USING YOUR SYSTEM Setting your digital surround sound receiver Speakers in the setup menu of your DVD player. For additional setup and operating information, please refer to the owner's guide provided with your surround receiver. The system's integrated signal processing supports full low-frequency reproduction from the DVD. 2. To make changes, use the digital display menu on the receiver to connect to Wide. surround sound center mode of digital surround receivers. Use one or the other, NOT both ) on the receiver and refer to adjust some! compatible with the audio output...
Owner's guide
Page 13
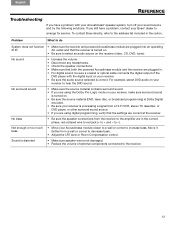
... bass. • Adjust the LFE level or Room Compensation control. No bass • Be sure the speaker connections from a wall or corner to do System does not function • Make sure the receiver and powered Acoustimass module are plugged into an operating at the receiver. Move it farther from the receiver to the amplifier are plugged in. • For digital sound, be sure a coaxial or optical cable connects the digital output of external components connected to -). To contact Bose directly...
... bass. • Adjust the LFE level or Room Compensation control. No bass • Be sure the speaker connections from a wall or corner to do System does not function • Make sure the receiver and powered Acoustimass module are plugged into an operating at the receiver. Move it farther from the receiver to the amplifier are plugged in. • For digital sound, be sure a coaxial or optical cable connects the digital output of external components connected to -). To contact Bose directly...
Owner's guide
Page 14
... are easily damaged if ! Français Español English REFERENCE Customer service For additional help in the carton. Or to contact Bose directly, refer to the receiver. • 20-ft (6.1 m) extension cable for use with in black, white, or silver. Available in -wall wiring from the Acoustimass module to your Acoustimass® speaker system may be carefully vacuumed, if necessary.
... are easily damaged if ! Français Español English REFERENCE Customer service For additional help in the carton. Or to contact Bose directly, refer to the receiver. • 20-ft (6.1 m) extension cable for use with in black, white, or silver. Available in -wall wiring from the Acoustimass module to your Acoustimass® speaker system may be carefully vacuumed, if necessary.
Owner's guide
Page 15
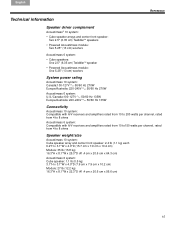
...) TwiddlerTM speaker • Powered Acoustimass module: One 5.25" (13 cm) woofers System power rating Acoustimass 10 system: Canada:100-127V 50/60 Hz 270W Europe/Australia: 220-240V 50/60 Hz 270W Acoustimass 6 system: U.S./Canada:100-127V 50/60 Hz 135W Europe/Australia: 220-240V 50/60 Hz 135W Connectivity Acoustimass 10 system: Compatible with A/V receivers and amplifiers rated from 10 to 200 watts per channel, rated...
...) TwiddlerTM speaker • Powered Acoustimass module: One 5.25" (13 cm) woofers System power rating Acoustimass 10 system: Canada:100-127V 50/60 Hz 270W Europe/Australia: 220-240V 50/60 Hz 270W Acoustimass 6 system: U.S./Canada:100-127V 50/60 Hz 135W Europe/Australia: 220-240V 50/60 Hz 135W Connectivity Acoustimass 10 system: Compatible with A/V receivers and amplifiers rated from 10 to 200 watts per channel, rated...

Owner's guide
Page 44
©2007 Bose Corporation, The Mountain, Framingham, MA 01701-9168 USA AM294330 Rev.03
©2007 Bose Corporation, The Mountain, Framingham, MA 01701-9168 USA AM294330 Rev.03


