Quick setup guide
Page 1
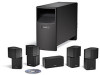
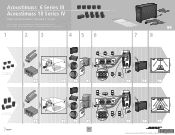
...� � � �� Acoustimass 6 Series III system � �� � � �� 4 �� � �� 6 � � 7 � ��� � 7 Acoustimass 10 Series IV system � 4 5 7 8 � ��� � 5 7 8 9 10 10 5 9 10 10 5 ©2006 Bose Corporation, The Mountain, Framingham, MA 01701-9168...
...� � � �� Acoustimass 6 Series III system � �� � � �� 4 �� � �� 6 � � 7 � ��� � 7 Acoustimass 10 Series IV system � 4 5 7 8 � ��� � 5 7 8 9 10 10 5 9 10 10 5 ©2006 Bose Corporation, The Mountain, Framingham, MA 01701-9168...
Owner's guide
Page 2
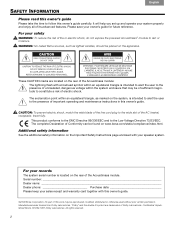
... Español English SAFETY INFORMATION Please read this owner's guide Please take the time to follow this owner's guide. ©2006 Bose Corporation. For your safety WARNING: To reduce the risk of Conformity can be of sufficient magnitude to the presence of important operating and ... Dealer name Dealer phone Purchase date Please keep your sales receipt and warranty card together with your system properly and enjoy all of the Acoustimass module. Manufactured under license from Dolby Laboratories. All rights reserved. 2 It will help you set up and operate your speaker system. ...
... Español English SAFETY INFORMATION Please read this owner's guide Please take the time to follow this owner's guide. ©2006 Bose Corporation. For your safety WARNING: To reduce the risk of Conformity can be of sufficient magnitude to the presence of important operating and ... Dealer name Dealer phone Purchase date Please keep your sales receipt and warranty card together with your system properly and enjoy all of the Acoustimass module. Manufactured under license from Dolby Laboratories. All rights reserved. 2 It will help you set up and operate your speaker system. ...
Owner's guide
Page 3
... achieve realistic home theater sound 5 Front left and right speakers 6 Center speaker 6 Rear speakers 6 Powered Acoustimass® module 7 Making the connections 7 Connecting speakers to the Acoustimass module 7 Connecting the Acoustimass module to the receiver 9 Checking the connections 10 USING YOUR SYSTEM 11 Getting the most from your home theater speakers 11 Adjusting the bass...
... achieve realistic home theater sound 5 Front left and right speakers 6 Center speaker 6 Rear speakers 6 Powered Acoustimass® module 7 Making the connections 7 Connecting speakers to the Acoustimass module 7 Connecting the Acoustimass module to the receiver 9 Checking the connections 10 USING YOUR SYSTEM 11 Getting the most from your home theater speakers 11 Adjusting the bass...
Owner's guide
Page 4
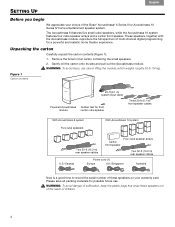
...for front module center cube speaker Three 20-ft (6.1 m) front speaker cables With Acoustimass 6 system Five cube speakers With Acoustimass 10 system Two 50-ft (15.2 m) rear speaker cables Four cube speaker arrays ...Center front speaker Two 50-ft (15.2 m) rear speaker cables U.S./Canada Power cord (1) Europe U.K./Singapore Australia Now is a good time to record the serial number of these speakers out of the reach of the Bose® Acoustimass® 6 Series III or Acoustimass 10 Series IV...
...for front module center cube speaker Three 20-ft (6.1 m) front speaker cables With Acoustimass 6 system Five cube speakers With Acoustimass 10 system Two 50-ft (15.2 m) rear speaker cables Four cube speaker arrays ...Center front speaker Two 50-ft (15.2 m) rear speaker cables U.S./Canada Power cord (1) Europe U.K./Singapore Australia Now is a good time to record the serial number of these speakers out of the reach of the Bose® Acoustimass® 6 Series III or Acoustimass 10 Series IV...
Owner's guide
Page 5
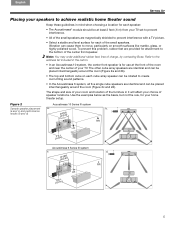
...Note: You may order additional rubber feet, free of charge, by contacting Bose. The shape and size of your room and location of the furniture in the carton. • In an Acoustimass 10 system, the center front speaker is for use at least 2 feet (.6.... Refer to the address list included in it will affect your choice of speaker locations. Figure 2 Acoustimass 10 Series IV system Sample speaker placement a. b. (a and c) and performance results (b and d) Acoustimass 6 Series III system c. The other cube array speakers are provided for attachment to the bottom of the center...
...Note: You may order additional rubber feet, free of charge, by contacting Bose. The shape and size of your room and location of the furniture in the carton. • In an Acoustimass 10 system, the center front speaker is for use at least 2 feet (.6.... Refer to the address list included in it will affect your choice of speaker locations. Figure 2 Acoustimass 10 Series IV system Sample speaker placement a. b. (a and c) and performance results (b and d) Acoustimass 6 Series III system c. The other cube array speakers are provided for attachment to the bottom of the center...
Owner's guide
Page 6
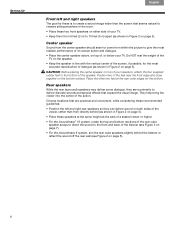
... speaker Sound from the center speaker should seem to come from directly behind (as the ears of a seated viewer or higher. • For the Acoustimass® 10 system, rotate the top and bottom sections of the rear cube speaker arrays to direct the sound to the front and back of the listener... (see Figure 3 on page 7). • For the Acoustimass 6 system, aim the rear cube speakers slightly behind the listener or reflect the sound off the rear wall...
... speaker Sound from the center speaker should seem to come from directly behind (as the ears of a seated viewer or higher. • For the Acoustimass® 10 system, rotate the top and bottom sections of the rear cube speaker arrays to direct the sound to the front and back of the listener... (see Figure 3 on page 7). • For the Acoustimass 6 system, aim the rear cube speakers slightly behind the listener or reflect the sound off the rear wall...
Owner's guide
Page 7
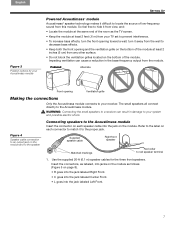
... shock. Supplied speaker cable Right front speaker Matched markings Red collar to the Acoustimass module. Use the supplied 20-ft (6.1 m) speaker cables for your Acoustimass module SETTING UP Powered Acoustimass® module Acoustimass® speaker technology makes it difficult to locate the source of the module.!... front speakers. Figure 4 Speaker cable connection to an output jack on the module and to the speaker Connecting speakers to the Acoustimass module Insert the connector on the bottom of low-frequency sound from any other surface. • Do not block the ventilation ...
... shock. Supplied speaker cable Right front speaker Matched markings Red collar to the Acoustimass module. Use the supplied 20-ft (6.1 m) speaker cables for your Acoustimass module SETTING UP Powered Acoustimass® module Acoustimass® speaker technology makes it difficult to locate the source of the module.!... front speakers. Figure 4 Speaker cable connection to an output jack on the module and to the speaker Connecting speakers to the Acoustimass module Insert the connector on the bottom of low-frequency sound from any other surface. • Do not block the ventilation ...
Owner's guide
Page 8
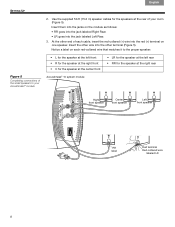
... supplied 50-ft (15.2 m) speaker cables for the speakers at the rear of the small speakers to the proper speaker: Figure 5 Completing connections of your Acoustimass® module • L for the speaker at the left front • R for the speaker at the right front • C for the speaker at the... center front Acoustimass® 10 system module • LR for the speaker at the left rear • RR for the speaker at the right rear Right front speaker Center front...
... supplied 50-ft (15.2 m) speaker cables for the speakers at the rear of the small speakers to the proper speaker: Figure 5 Completing connections of your Acoustimass® module • L for the speaker at the left front • R for the speaker at the right front • C for the speaker at the... center front Acoustimass® 10 system module • LR for the speaker at the left rear • RR for the speaker at the right rear Right front speaker Center front...
Owner's guide
Page 9
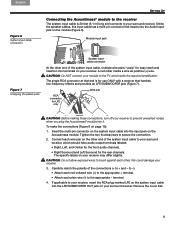
...: Before making these connections, turn off your receiver may differ slightly. If applicable to prevent unwanted noises when you plug the Acoustimass® module into terminals on your surround receiver. The specific labels on your receiver to your receiver, insert the RCA plug ...marked LFE on the system input cable into the input jack on page 10): 1. Remove the cover first. 9 Unlike the speaker cables, this could damage your receiver. Wire pair RCA connector for the rear channels. ! Acoustimass module. to -). • Attach each red-collared wire (+) to the ...
...: Before making these connections, turn off your receiver may differ slightly. If applicable to prevent unwanted noises when you plug the Acoustimass® module into terminals on your surround receiver. The specific labels on your receiver to your receiver, insert the RCA plug ...marked LFE on the system input cable into the input jack on page 10): 1. Remove the cover first. 9 Unlike the speaker cables, this could damage your receiver. Wire pair RCA connector for the rear channels. ! Acoustimass module. to -). • Attach each red-collared wire (+) to the ...
Owner's guide
Page 10
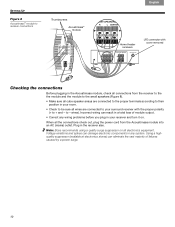
...Bose recommends using a quality surge suppressor on . Using a highquality suppressor (available at electronics stores) can result in a total loss of failures caused by a power surge. 10 Plug in any wiring problems before you plug in your surround receiver with cover removed Checking the connections Before plugging in the Acoustimass... module, check all connections from the Acoustimass module into an AC (...
...Bose recommends using a quality surge suppressor on . Using a highquality suppressor (available at electronics stores) can result in a total loss of failures caused by a power surge. 10 Plug in any wiring problems before you plug in your surround receiver with cover removed Checking the connections Before plugging in the Acoustimass... module, check all connections from the Acoustimass module into an AC (...

Owner's guide
Page 11
... the audio is functioning as necessary. Figure 9 Audio adjustment knobs Adjusting the bass/room compensation After placing the Acoustimass module where you want to familiarize yourself with the controls and built-in , your Acoustimass® system is now ready for use only with your ! location. By turning the knob, you notice this...
... the audio is functioning as necessary. Figure 9 Audio adjustment knobs Adjusting the bass/room compensation After placing the Acoustimass module where you want to familiarize yourself with the controls and built-in , your Acoustimass® system is now ready for use only with your ! location. By turning the knob, you notice this...
Owner's guide
Page 12
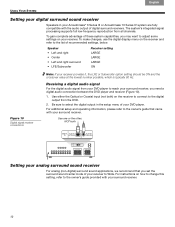
...on the receiver to connect to the owner's guide that you need a digital audio connection between the DVD player and receiver (Figure 10). 1. For additional setup and operating information, please refer to the digital output from the DVD. 2. Receiving a digital audio signal... • Left and right surround • LFE/Subwoofer Receiver setting LARGE LARGE LARGE ON Figure 10 Digital signal receiver connections Note: If your Acoustimass® 6 Series III or Acoustimass 10 Series IV system are fully ! Français Español English USING YOUR SYSTEM Setting your digital ...
...on the receiver to connect to the owner's guide that you need a digital audio connection between the DVD player and receiver (Figure 10). 1. For additional setup and operating information, please refer to the digital output from the DVD. 2. Receiving a digital audio signal... • Left and right surround • LFE/Subwoofer Receiver setting LARGE LARGE LARGE ON Figure 10 Digital signal receiver connections Note: If your Acoustimass® 6 Series III or Acoustimass 10 Series IV system are fully ! Français Español English USING YOUR SYSTEM Setting your digital ...
Owner's guide
Page 13
...input on your receiver. • Be sure the audio source selected is not damaged. • Reduce the volume of the DVD player with your Acoustimass® speaker system, turn off your sound source and try the following solutions. No sound • Increase the volume. • Disconnect any headphones...bass. • Adjust the LFE level or Room Compensation control. Not enough or too much bass • Move your Acoustimass module closer to a wall or corner to -). To contact Bose directly, refer to the address list included in the correct phase, red-collared wire to red jack (+ to + ...
...input on your receiver. • Be sure the audio source selected is not damaged. • Reduce the volume of the DVD player with your Acoustimass® speaker system, turn off your sound source and try the following solutions. No sound • Increase the volume. • Disconnect any headphones...bass. • Adjust the LFE level or Room Compensation control. Not enough or too much bass • Move your Acoustimass module closer to a wall or corner to -). To contact Bose directly, refer to the address list included in the correct phase, red-collared wire to red jack (+ to + ...
Owner's guide
Page 14
... behind the grille cloth and are provided on the card and mail it to your Acoustimass® speaker system may be cleaned only with your system. Details! Or to contact Bose directly, refer to the address list included in the carton. • Input cable ...ais Español English REFERENCE Customer service For additional help in -wall wiring from the Acoustimass module to do so, ! Accessories Bose offers the following accessories in -wall wiring from the Acoustimass module to spill into any solvents, chemicals, or cleaning solutions containing alcohol, ammonia, or abrasives...
... behind the grille cloth and are provided on the card and mail it to your Acoustimass® speaker system may be cleaned only with your system. Details! Or to contact Bose directly, refer to the address list included in the carton. • Input cable ...ais Español English REFERENCE Customer service For additional help in -wall wiring from the Acoustimass module to do so, ! Accessories Bose offers the following accessories in -wall wiring from the Acoustimass module to spill into any solvents, chemicals, or cleaning solutions containing alcohol, ammonia, or abrasives...
Owner's guide
Page 15
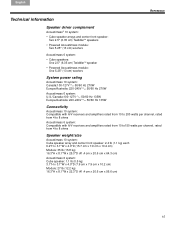
... arrays and center front speaker: Two 2.5" (6.35 cm) TwiddlerTM speakers • Powered Acoustimass module: Two 5.25" (13 cm) woofers Acoustimass 6 system: • Cube speakers: One 2.5" (6.35 cm) TwiddlerTM speaker • Powered Acoustimass module: One 5.25" (13 cm) woofers System power rating Acoustimass 10 system: Canada:100-127V 50/60 Hz 270W Europe/Australia: 220-240V...
... arrays and center front speaker: Two 2.5" (6.35 cm) TwiddlerTM speakers • Powered Acoustimass module: Two 5.25" (13 cm) woofers Acoustimass 6 system: • Cube speakers: One 2.5" (6.35 cm) TwiddlerTM speaker • Powered Acoustimass module: One 5.25" (13 cm) woofers System power rating Acoustimass 10 system: Canada:100-127V 50/60 Hz 270W Europe/Australia: 220-240V...

Owner's guide
Page 44
©2007 Bose Corporation, The Mountain, Framingham, MA 01701-9168 USA AM294330 Rev.03
©2007 Bose Corporation, The Mountain, Framingham, MA 01701-9168 USA AM294330 Rev.03
