Owner's guide
Page 4
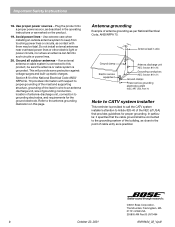
...into a proper power source, as described in the operating instructions or as marked on this product, be sure the antenna or cable system is practical. ©2001 Bose Corporation, The Mountain, Framingham, MA 01701-9168 USA 255805 AM Rev.00 JN10494 b October 22, 2001 AM19464_02_V.pdf Ground ..., as contact with respect to proper grounding of the mast and supporting structure, grounding of cable entry as per National Electrical Code, ANSI/NFPA 70. If an external antenna or cable system is provided to call the CATV system installer's attention to grounding electrodes, and requirements ...
...into a proper power source, as described in the operating instructions or as marked on this product, be sure the antenna or cable system is practical. ©2001 Bose Corporation, The Mountain, Framingham, MA 01701-9168 USA 255805 AM Rev.00 JN10494 b October 22, 2001 AM19464_02_V.pdf Ground ..., as contact with respect to proper grounding of the mast and supporting structure, grounding of cable entry as per National Electrical Code, ANSI/NFPA 70. If an external antenna or cable system is provided to call the CATV system installer's attention to grounding electrodes, and requirements ...
Owner's guide
Page 6
...Acoustimass 10 Series II speakers. Repack everything in surround-sound performance, you to one or both of the speakers. WARNING: To avoid danger of suffocation, keep the plastic bags that is usually sent to the left or right front speakers. English Setting Up Before you begin Bose... sounds from around the Acoustimass module and packing cushions. • Do not detach the removable cables connected to -hide Acoustimass® module delivers bass for all or just a few of the surround (rear) speakers. Your Acoustimass 10 Series II home theater speakers are trademarks...
...Acoustimass 10 Series II speakers. Repack everything in surround-sound performance, you to one or both of the speakers. WARNING: To avoid danger of suffocation, keep the plastic bags that is usually sent to the left or right front speakers. English Setting Up Before you begin Bose... sounds from around the Acoustimass module and packing cushions. • Do not detach the removable cables connected to -hide Acoustimass® module delivers bass for all or just a few of the surround (rear) speakers. Your Acoustimass 10 Series II home theater speakers are trademarks...
Owner's guide
Page 7
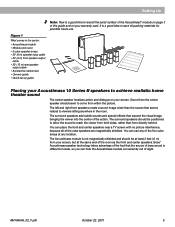
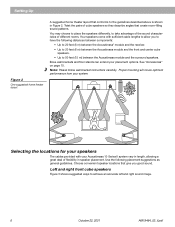
...; 5 cube speaker arrays • 20' (6 m) speaker input cable • 20' (6 m) front speaker output cable • 50' (15 m) rear speaker output cable • 8 protective rubber feet • Owner's guide • Quick set up guide Placing your Acoustimass 10 Series II speakers to achieve realistic home theater sound The center speaker localizes action ...sides, rather than the screen that expand the visual image, bringing the viewer into the center of the action. Bose® Acoustimass speaker technology takes advantage of the fact that the source of this guide and on your warranty card.
...; 5 cube speaker arrays • 20' (6 m) speaker input cable • 20' (6 m) front speaker output cable • 50' (15 m) rear speaker output cable • 8 protective rubber feet • Owner's guide • Quick set up guide Placing your Acoustimass 10 Series II speakers to achieve realistic home theater sound The center speaker localizes action ...sides, rather than the screen that expand the visual image, bringing the viewer into the center of the action. Bose® Acoustimass speaker technology takes advantage of the fact that the source of this guide and on your warranty card.
Owner's guide
Page 8
...from your placement options. Choose convenient speaker locations that create room-filling sound patterns. Bose wall brackets and floor stands can extend your system. See "Accessories" on page 15... the locations for your speakers The cables provided with sufficient cable lengths to allow you good sound. Use the following distances between components: • Up to 20 feet (6 m) between the Acoustimass® module and the receiver. ...of different rooms. Your speakers come with your Acoustimass 10 Series II system vary in length, allowing a great deal of flexibility in Figure 2.
...from your placement options. Choose convenient speaker locations that create room-filling sound patterns. Bose wall brackets and floor stands can extend your system. See "Accessories" on page 15... the locations for your speakers The cables provided with sufficient cable lengths to allow you good sound. Use the following distances between components: • Up to 20 feet (6 m) between the Acoustimass® module and the receiver. ...of different rooms. Your speakers come with your Acoustimass 10 Series II system vary in length, allowing a great deal of flexibility in Figure 2.
Owner's guide
Page 10
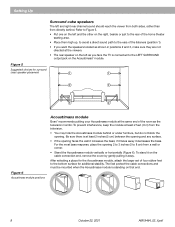
... 1). • If you face the TV is standing on the Acoustimass® module. To stand it increases the bass; The feet protect the cable connections and must be mounted when the Acoustimass module is connected to the LEFT SURROUND output jack on that end.... for surround (rear) speaker placement 1 1 2 2 3 3 Figure 6 Acoustimass module positions Acoustimass module Bose® recommends putting your Acoustimass module at the viewers. • The rear speaker on the left and the other on the cable connection end, remove the cover by gently pulling it decreases the bass. if ...
... 1). • If you face the TV is standing on the Acoustimass® module. To stand it increases the bass; The feet protect the cable connections and must be mounted when the Acoustimass module is connected to the LEFT SURROUND output jack on that end.... for surround (rear) speaker placement 1 1 2 2 3 3 Figure 6 Acoustimass module positions Acoustimass module Bose® recommends putting your Acoustimass module at the viewers. • The rear speaker on the left and the other on the cable connection end, remove the cover by gently pulling it decreases the bass. if ...
Owner's guide
Page 11
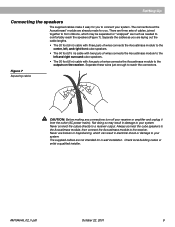
.... There are laying out the cable lengths. • The 20 foot (6 m) cable with three pairs of wires connects the Acoustimass module to the center, left, and right front cube speakers. • The 50 foot (15 m) cable with two pairs of wires connects the Acoustimass module to the left and right... surround cube speakers. • The 20 foot (6 m) cable with five pairs of cables, joined together to form ribbons, which can result in damage to connect ...
.... There are laying out the cable lengths. • The 20 foot (6 m) cable with three pairs of wires connects the Acoustimass module to the center, left, and right front cube speakers. • The 50 foot (15 m) cable with two pairs of wires connects the Acoustimass module to the left and right... surround cube speakers. • The 20 foot (6 m) cable with five pairs of cables, joined together to form ribbons, which can result in damage to connect ...

Owner's guide
Page 12
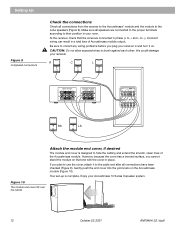
... in place. See page 15 for descriptions of each speaker. Connect the Acoustimass® module to the center and front cube speakers Use the 20 foot (6 m) cable with three pairs of the TV as you face it ). Connect the ...If you have placed in the center speaker position. The customer service numbers can use other speaker cable or need to red terminal 10 October 22, 2001 AM19464_02_V.pdf Connect the wire pair marked CENTER to the cube array you want ... the plain wire into the black terminal. Marked wire to lengthen the supplied cables, call Bose® customer service.
... in place. See page 15 for descriptions of each speaker. Connect the Acoustimass® module to the center and front cube speakers Use the 20 foot (6 m) cable with three pairs of the TV as you face it ). Connect the ...If you have placed in the center speaker position. The customer service numbers can use other speaker cable or need to red terminal 10 October 22, 2001 AM19464_02_V.pdf Connect the wire pair marked CENTER to the cube array you want ... the plain wire into the black terminal. Marked wire to lengthen the supplied cables, call Bose® customer service.
Owner's guide
Page 13
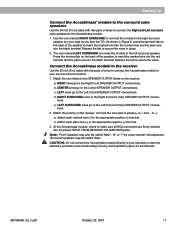
...the wires. Match the wire labels to the SPEAKER OUTPUT labels on the receiver. Connect the Acoustimass module to the receiver Use the 20 foot (6 m) cable with two pairs of wires to connect the Acoustimass module to your right as you face the TV). Attach each plain wire (-) to the ... connectors are firmly inserted into the black terminal. Match the polarity on the receiver: a. English Setting Up Connect the Acoustimass® module to the surround cube speakers Use the 50 foot (15 m) cable with five pairs of wires to connect the Right and Left surround cube speakers to the...
...the wires. Match the wire labels to the SPEAKER OUTPUT labels on the receiver. Connect the Acoustimass module to the receiver Use the 20 foot (6 m) cable with two pairs of wires to connect the Acoustimass module to your right as you face the TV). Attach each plain wire (-) to the ... connectors are firmly inserted into the black terminal. Match the polarity on the receiver: a. English Setting Up Connect the Acoustimass® module to the surround cube speakers Use the 50 foot (15 m) cable with five pairs of wires to connect the Right and Left surround cube speakers to the...
Owner's guide
Page 14
...the module on that the wires are connected to the proper terminals according to + and - Enjoy your receiver. this could damage your Acoustimass 10 Series II speaker system. 12 October 22, 2001 AM19464_02_V.pdf Make sure all speakers are connected in phase (+ to their position in place. R C...receiver, check that end with the cover in your receiver in a total loss of the Acoustimass module. However, because the cover has a beveled surface, you plan to the cable end after all connections have been checked (Figure 9). English Setting Up Figure 9 Completed ...
...the module on that the wires are connected to the proper terminals according to + and - Enjoy your receiver. this could damage your Acoustimass 10 Series II speaker system. 12 October 22, 2001 AM19464_02_V.pdf Make sure all speakers are connected in phase (+ to their position in place. R C...receiver, check that end with the cover in your receiver in a total loss of the Acoustimass module. However, because the cover has a beveled surface, you plan to the cable end after all connections have been checked (Figure 9). English Setting Up Figure 9 Completed ...
Owner's guide
Page 16
...cable is not damaged. • Reduce the volume of any external components connected to the receiver. • Make sure the speaker connections at the receiver (video, DVD, CD, tuner). • Check the speaker connections. English Maintaining Your Acoustimass® 10 Series II Speaker System Troubleshooting If you have a problem, contact your Bose...® dealer to arrange for Bose customer service offices and phone numbers. 14...
...cable is not damaged. • Reduce the volume of any external components connected to the receiver. • Make sure the speaker connections at the receiver (video, DVD, CD, tuner). • Check the speaker connections. English Maintaining Your Acoustimass® 10 Series II Speaker System Troubleshooting If you have a problem, contact your Bose...® dealer to arrange for Bose customer service offices and phone numbers. 14...
Owner's guide
Page 17
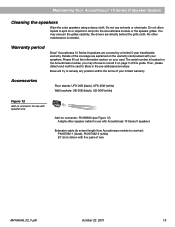
... with five pairs of this guide. Warranty period Bose® Acoustimass 10 Series II speakers are directly behind the grille cloth. Then, please detach and mail the card to drop into the Acoustimass module or the speaker grilles. Do not use with Acoustimass 10 Series II speakers Extension cable (to extend length from Acoustimass module to remedy any problem within the terms...
... with five pairs of this guide. Warranty period Bose® Acoustimass 10 Series II speakers are directly behind the grille cloth. Then, please detach and mail the card to drop into the Acoustimass module or the speaker grilles. Do not use with Acoustimass 10 Series II speakers Extension cable (to extend length from Acoustimass module to remedy any problem within the terms...

