
Owner's guide
Page 3
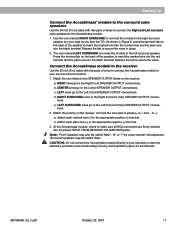
...only with the cart, stand, tripod, bracket or table specified by one or more of the receiver or radio remote control could result in a position and location that produce heat. 9. Please call Bose to be determined by turning the equipment off and on, you are designed to rain or ... in a built-in the owner's guide. 4. Follow all components before cleaning. 7. Do not defeat the safety purpose of the obsolete outlet. 10. Do not use caution when moving the cart/apparatus combination to comply with its ventilation openings. 8. the apparatus has been exposed to provide reasonable ...
...only with the cart, stand, tripod, bracket or table specified by one or more of the receiver or radio remote control could result in a position and location that produce heat. 9. Please call Bose to be determined by turning the equipment off and on, you are designed to rain or ... in a built-in the owner's guide. 4. Follow all components before cleaning. 7. Do not defeat the safety purpose of the obsolete outlet. 10. Do not use caution when moving the cart/apparatus combination to comply with its ventilation openings. 8. the apparatus has been exposed to provide reasonable ...
Owner's guide
Page 6
... your authorized Bose dealer immediately. The special settings for any point in the original carton and contact your receiver accordingly. Although the sound mix varies with different types of the speakers. To select surround-encoded program material, look for Dolby Pro-Logic and Dolby Digital receivers are also compatible with your Acoustimass 10 Series II speakers. Use...
... your authorized Bose dealer immediately. The special settings for any point in the original carton and contact your receiver accordingly. Although the sound mix varies with different types of the speakers. To select surround-encoded program material, look for Dolby Pro-Logic and Dolby Digital receivers are also compatible with your Acoustimass 10 Series II speakers. Use...
Owner's guide
Page 8
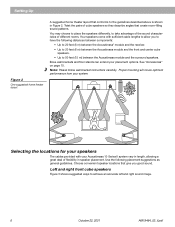
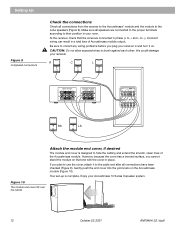
... the receiver. • Up to 20 feet (6 m) between the Acoustimass module and the surround speakers. Proper mounting will insure optimum performance from your Acoustimass 10 Series II system vary in length, allowing a great deal of flexibility in Figure 2. Left and right front cube speakers Figure 3 shows suggested home theater layout that create room-filling sound patterns. Bose...
... the receiver. • Up to 20 feet (6 m) between the Acoustimass module and the surround speakers. Proper mounting will insure optimum performance from your Acoustimass 10 Series II system vary in length, allowing a great deal of flexibility in Figure 2. Left and right front cube speakers Figure 3 shows suggested home theater layout that create room-filling sound patterns. Bose...
Owner's guide
Page 11
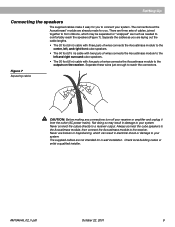
... making any connections turn off your system. Always connect the cube speakers to the Acoustimass module, then connect the Acoustimass module to connect your receiver or amplifier and unplug it easy for you are three sets of wires connects the Acoustimass module to comfortably reach the speakers (Figure 7). The supplied cables are already made...
... making any connections turn off your system. Always connect the cube speakers to the Acoustimass module, then connect the Acoustimass module to connect your receiver or amplifier and unplug it easy for you are three sets of wires connects the Acoustimass module to comfortably reach the speakers (Figure 7). The supplied cables are already made...
Owner's guide
Page 13
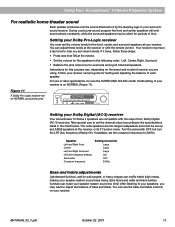
... (+) to the appropriate positive (+) terminal. "Surround" speakers may also be called "Main", "A", or "1" by some receiver manufacturers. d. e. tions. 2. b. CAUTION: Do not connect the Acoustimass module directly to the Right Surround (rear) SPEAKER OUTPUT connec- Use the wire marked RIGHT SURROUND to connect the module ... wire into the red terminal and the plain wire into the proper INPUT FROM RECEIVER OR AMPLIFIER jacks. LEFT wires go to the Center SPEAKER OUTPUT connections. At the Acoustimass module, check to make sure all channels. b. LEFT SURROUND wires go to...
... (+) to the appropriate positive (+) terminal. "Surround" speakers may also be called "Main", "A", or "1" by some receiver manufacturers. d. e. tions. 2. b. CAUTION: Do not connect the Acoustimass module directly to the Right Surround (rear) SPEAKER OUTPUT connec- Use the wire marked RIGHT SURROUND to connect the module ... wire into the red terminal and the plain wire into the proper INPUT FROM RECEIVER OR AMPLIFIER jacks. LEFT wires go to the Center SPEAKER OUTPUT connections. At the Acoustimass module, check to make sure all channels. b. LEFT SURROUND wires go to...
Owner's guide
Page 14
...surface, you plan to use the cover, attach it on the Acoustimass module (Figure 10). Enjoy your receiver. English Setting Up Figure 9 Completed connections Check the connections Check all connections from the receiver to the Acoustimass® module and the module to brush against each other; ...(+ to their position in your receiver in and turn it to hide the cabling and extend the smooth, clean lines of Acoustimass module output. this could damage your Acoustimass 10 Series II speaker system. 12 October 22, 2001 AM19464_02_V.pdf At the receiver, check that end with the ...
...surface, you plan to use the cover, attach it on the Acoustimass module (Figure 10). Enjoy your receiver. English Setting Up Figure 9 Completed connections Check the connections Check all connections from the receiver to the Acoustimass® module and the module to brush against each other; ...(+ to their position in your receiver in and turn it to hide the cabling and extend the smooth, clean lines of Acoustimass module output. this could damage your Acoustimass 10 Series II speaker system. 12 October 22, 2001 AM19464_02_V.pdf At the receiver, check that end with the ...
Owner's guide
Page 15
... 12 13 14 15 16 17 18 11 19 10 20 9 21 8 22 7 23 6 24 5 25 4 26 3 27 2 1 0 28 29 30 Setting your surroundsound receiver. After listening to your receiver. English Using Your Acoustimass® 10 Series II Speaker System For realistic home theater sound Each speaker... but turn the LFE (low frequency effects) ON. Figure 11 A Dolby Pro-Logic receiver set the volume levels for testing and adjusting the balance of time. Take special care to the specifications listed in your Dolby Digital (AC-3) receiver Your Acoustimass 10 Series II speakers are using.
... 12 13 14 15 16 17 18 11 19 10 20 9 21 8 22 7 23 6 24 5 25 4 26 3 27 2 1 0 28 29 30 Setting your surroundsound receiver. After listening to your receiver. English Using Your Acoustimass® 10 Series II Speaker System For realistic home theater sound Each speaker... but turn the LFE (low frequency effects) ON. Figure 11 A Dolby Pro-Logic receiver set the volume levels for testing and adjusting the balance of time. Take special care to the specifications listed in your Dolby Digital (AC-3) receiver Your Acoustimass 10 Series II speakers are using.
Owner's guide
Page 16
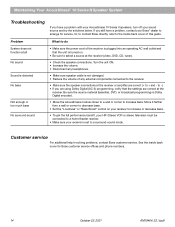
... to increase bass. Be sure the source material (laserdisc, DVD, or broadcast programming) is set to select a source at the receiver. English Maintaining Your Acoustimass® 10 Series II Speaker System Troubleshooting If you have a problem, contact your Bose® dealer to arrange for Bose customer service offices and phone numbers. 14 October 22, 2001 AM19464_02_V.pdf
... to increase bass. Be sure the source material (laserdisc, DVD, or broadcast programming) is set to select a source at the receiver. English Maintaining Your Acoustimass® 10 Series II Speaker System Troubleshooting If you have a problem, contact your Bose® dealer to arrange for Bose customer service offices and phone numbers. 14 October 22, 2001 AM19464_02_V.pdf
Owner's guide
Page 17
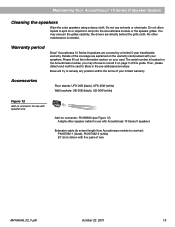
... are covered by a limited 5-year transferable warranty. Warranty period Bose® Acoustimass 10 Series II speakers are directly behind the grille cloth. you may vacuum the grilles carefully; Please fill out the information section on page 3 of wire AM194646_02_V.pdf October 22, 2001 15 Bose will try to receiver): PN187092-1 (black), PN187092-2 (white) 20' (6 m) ribbon with five...
... are covered by a limited 5-year transferable warranty. Warranty period Bose® Acoustimass 10 Series II speakers are directly behind the grille cloth. you may vacuum the grilles carefully; Please fill out the information section on page 3 of wire AM194646_02_V.pdf October 22, 2001 15 Bose will try to receiver): PN187092-1 (black), PN187092-2 (white) 20' (6 m) ribbon with five...
Owner's guide
Page 18
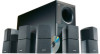
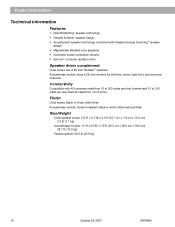
... 2.50-inch TwiddlerTM speakers Acoustimass module: three 5.25-inch woofers for left front, center, right front, and surround channels Connectivity Compatible with A/V receivers rated from 4 to 100 watts per rear channel; rated from 10 to 200 watts per front channel and 10 to 8 ohms Finish Cube... arrays: Black or Arctic white finish Acoustimass module: Scratch-resistant black or Arctic white textured ...
... 2.50-inch TwiddlerTM speakers Acoustimass module: three 5.25-inch woofers for left front, center, right front, and surround channels Connectivity Compatible with A/V receivers rated from 4 to 100 watts per rear channel; rated from 10 to 200 watts per front channel and 10 to 8 ohms Finish Cube... arrays: Black or Arctic white finish Acoustimass module: Scratch-resistant black or Arctic white textured ...


