

Pedestal Installation Instructions
Page 5
...13 Step 7 below applies to removing the top two bolts. 5 Retain the bolts for all four transport bolts must be removed before using the appliance. q Remove the bottom two bolts prior to washers. Make sure the webbed side of each spacer is installed. Loosely thread all four bolts with the pedestal. The front... insert the bolt so it to HAND TIGHTEN all four bolts before tightening any of the bolts all screws are included with the washers and spacers in place before removing any of the pedestal. Install the four new feet that originally came with the pedestal. when ...
...13 Step 7 below applies to removing the top two bolts. 5 Retain the bolts for all four transport bolts must be removed before using the appliance. q Remove the bottom two bolts prior to washers. Make sure the webbed side of each spacer is installed. Loosely thread all four bolts with the pedestal. The front... insert the bolt so it to HAND TIGHTEN all four bolts before tightening any of the bolts all screws are included with the washers and spacers in place before removing any of the pedestal. Install the four new feet that originally came with the pedestal. when ...

Pedestal Installation Instructions
Page 6
... level (24" or less in completely (see Figure 14). Otherwise, repeat the leveling procedure until they snap in length) to prevent the appliance from front to back to one end, it indicates the high side of the unit. This will turn with your appliance (i.e., hoses, vents, etc.) 9. q... the unit is locked against will extend the height of injuries -Take care when using a 1/2" (13 mm) socket wrench. Slide the appliance to level the appliance. Start with the washer and bushing attached. When you turn the level so that direction. The appliance should now be sure...
... level (24" or less in completely (see Figure 14). Otherwise, repeat the leveling procedure until they snap in length) to prevent the appliance from front to back to one end, it indicates the high side of the unit. This will turn with your appliance (i.e., hoses, vents, etc.) 9. q... the unit is locked against will extend the height of injuries -Take care when using a 1/2" (13 mm) socket wrench. Slide the appliance to level the appliance. Start with the washer and bushing attached. When you turn the level so that direction. The appliance should now be sure...
Installation and Use & Care (all languages)
Page 3
... 11 Transport, such as when moving out 11 OPERATING INSTRUCTION 12 Your new washer 12 Panel 13 Summary of Instructions 14 Before Using For the First Time 15 Using For the... First Time 15 First washing cycle (without laundry 15 Preparing the laundry 15 Sorting the laundry 15 Degrees of soiling 15 Loading... 20 Canceling active program 20 After Washing 21 Cleaning and Care 21 Cleaning the washer 21 Descaling the washing machine 22 Troubleshooting of Minor Faults 23 Customer Service 25 STATEMENT ...
... 11 Transport, such as when moving out 11 OPERATING INSTRUCTION 12 Your new washer 12 Panel 13 Summary of Instructions 14 Before Using For the First Time 15 Using For the... First Time 15 First washing cycle (without laundry 15 Preparing the laundry 15 Sorting the laundry 15 Degrees of soiling 15 Loading... 20 Canceling active program 20 After Washing 21 Cleaning and Care 21 Cleaning the washer 21 Descaling the washing machine 22 Troubleshooting of Minor Faults 23 Customer Service 25 STATEMENT ...

Installation and Use & Care (all languages)
Page 5
..., service agent or the manufacturer about any panel, including the round service panel in the front can result in doubt as to the machine. The plug must be conveyed with a qualified... electrician or serviceman if you are sure that you are tight and not leaking. 27. Do not allow children to play on a regular basis to the washing machine have shut&#... children is necessary when the appliance is applied to whether the washer is the case, contact an authorized service agent. 25. 13. Heed all local regulations and/or other applicable regulations and requirements...
..., service agent or the manufacturer about any panel, including the round service panel in the front can result in doubt as to the machine. The plug must be conveyed with a qualified... electrician or serviceman if you are sure that you are tight and not leaking. 27. Do not allow children to play on a regular basis to the washing machine have shut&#... children is necessary when the appliance is applied to whether the washer is the case, contact an authorized service agent. 25. 13. Heed all local regulations and/or other applicable regulations and requirements...
Installation and Use & Care (all languages)
Page 7
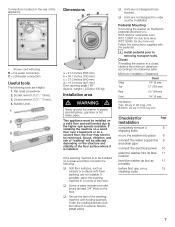
Socket wrench (1/2" / 13mm). 3. Closed wrench (1/2" / 13 mm). 4. Dimensions a = 27.0 inches (686 mm) b = 30.7 inches (780 mm) c = 37.0 inches (940 ...reinforced. Flat head screwdriver. 2. weight = 220 lbs (100 kg) Installation area d WARNING d Never ground the washer to be stacked. If installing the machine on a wood floor over a basement or on a second floor, ...Top 12" (3O5 mm) Rear 2.5" (64 mm) Front 1/4" (6 mm) Ventilation: Top: 48 sq. Power cord with the pedestal. This appliance must be installed on the Bosch pedestal (accessory no. If possible, place the washing machine ...
Socket wrench (1/2" / 13mm). 3. Closed wrench (1/2" / 13 mm). 4. Dimensions a = 27.0 inches (686 mm) b = 30.7 inches (780 mm) c = 37.0 inches (940 ...reinforced. Flat head screwdriver. 2. weight = 220 lbs (100 kg) Installation area d WARNING d Never ground the washer to be stacked. If installing the machine on a wood floor over a basement or on a second floor, ...Top 12" (3O5 mm) Rear 2.5" (64 mm) Front 1/4" (6 mm) Ventilation: Top: 48 sq. Power cord with the pedestal. This appliance must be installed on the Bosch pedestal (accessory no. If possible, place the washing machine ...
Installation and Use & Care (all languages)
Page 8
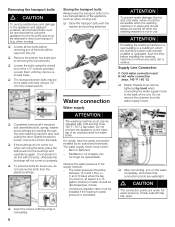
...all the way from the unit. Observe the water pressure in completely. 8 gallons (8 liters) of the bolts all 4 transport bolt assemblies (bolt, spring, washer and bushings) by reaching through the open . min.0,4'' (10 mm) q After connecting, turn on , at least 2.2 U. Check seal with the bolts... must not be retained for any sand, dirt or residue. d CAUTION The connection points are watertight. q Loosen the bolts using a 1/2" (13 mm) socket wrench. S. Bent or flattened. - Do not remove the strainers from the plastic bushings. Storing the transport bolts Always keep the ...
...all the way from the unit. Observe the water pressure in completely. 8 gallons (8 liters) of the bolts all 4 transport bolt assemblies (bolt, spring, washer and bushings) by reaching through the open . min.0,4'' (10 mm) q After connecting, turn on , at least 2.2 U. Check seal with the bolts... must not be retained for any sand, dirt or residue. d CAUTION The connection points are watertight. q Loosen the bolts using a 1/2" (13 mm) socket wrench. S. Bent or flattened. - Do not remove the strainers from the plastic bushings. Storing the transport bolts Always keep the ...
Installation and Use & Care (all languages)
Page 13
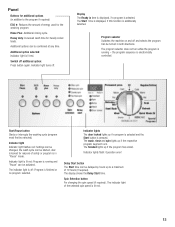
...: Settings can be changed, the wash cycle can be delayed by hours up if a program is selected and the Start button is lit red. 13 The wash, rinse and spin lights up if the program has ended. Switch off . Can be activated. Indicator light is lit red: Program is... light of energy used for the washing program. Panel Buttons for additional options (in both directions. Heavy duty: Increased wash time for heavily soiled loads. Indicator lights The door locked lights up to the program if required) ECO e: Reduces the amount of the selected spin speed is pressed. The...
...: Settings can be changed, the wash cycle can be delayed by hours up if a program is selected and the Start button is lit red. 13 The wash, rinse and spin lights up if the program has ended. Switch off . Can be activated. Indicator light is lit red: Program is... light of energy used for the washing program. Panel Buttons for additional options (in both directions. Heavy duty: Increased wash time for heavily soiled loads. Indicator lights The door locked lights up to the program if required) ECO e: Reduces the amount of the selected spin speed is pressed. The...


