Bosch WTMC532SUS - 27" Electric Dryer 11CYC LED Display Support and Manuals
Get Help and Manuals for this Bosch item
View All Support Options Below
Free Bosch WTMC532SUS manuals!
Problems with Bosch WTMC532SUS?
Ask a Question
Free Bosch WTMC532SUS manuals!
Problems with Bosch WTMC532SUS?
Ask a Question
Popular Bosch WTMC532SUS Manual Pages
Pedestal Installation Instructions - Page 2

...uninstall the appliance. Tools and Parts
Confirm receipt of this warning. NOTICE
NOTICE - i This symbol is
already installed, it MUST...Installation Instructions" provided with the pedestal. d CAUTION
Do not lift the appliance by the door or door opening.
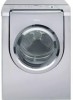
Important Safety Information
Please read and follow these Installation Instructions along with all times during the pedestal installation...
Pedestal Installation Instructions - Page 3

...this manual.
3 Figure 4 q Make sure the tab on the
transportation bolt washer is oriented to the Preparing Your New Appliance" section on a new washer or dryer, proceed to fit the slot. Support the appliance approximately 1 1/2" to pedestal installation. 2.
If you are reinstalled prior to pedestal installation to prevent potential damage to protect the drum during the original setup...
Pedestal Installation Instructions - Page 4

Support the appliance approximately 1 1/2" to installing the pedestal. 2. Figure 6 5.
DO NOT reinstall these feet into the pedestal. the floor under the pedestal. Set the drawer aside. Figure 7 2. NOTICE
If installing the pedestal to a new washer, do so can result in case the appliance needs to have an assistant hold the pedestal housing during drawer removal.
Doing so...
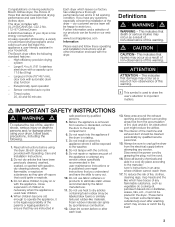
Pedestal Installation Instructions - Page 7

... locknuts must be necessary to hold
the appliance foot with or service on the pedestal side to securely tighten both locknuts for 10 seconds. Replace the drawer by freely opening and closing the...will change the height of the appliance manual.
7 Contact information is satisfactorily raised or lowered, lock the height-adjustable feet in the Customer Service" section of the corner. Slide...
Pedestal Installation Instructions - Page 8

... which the pedestal is null and void. Save these instructions and your pedestal and model and serial number of the appliance on Mechanical Parts For one year from state to state or province to the instructions provided in the washer or dryer Operating, Care and Installation Instructions", supplier will repair or replace any other than those listed in Canada. If...
Installation and Use & Care (all languages) - Page 3
...installation instructions and all laundry chemicals and aids in your dryer, follow basic precautions, including the following standard features: - Do not tamper with the appliance. Foam rubber materials can be happy to assist you. Before the appliance is removed from the electrical...qualified persons.
5. Do not repair or replace any part of
the appliance or attempt any flammable substance...
Installation and Use & Care (all languages) - Page 4
...electric shock by qualified installers. Disposal of ownership, manual should be conveyed with a qualified electrician or service person if you are sure that the dryer has been installed according to the manufacĆ turer's instructions may occur. Do not operate the dryer if any parts are environmentally friendly and can result in accordance with the appliance. Failure to install...
Installation and Use & Care (all languages) - Page 6
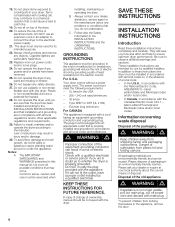
... dryer comes with strain relief clamp note manufacturer's instructions.
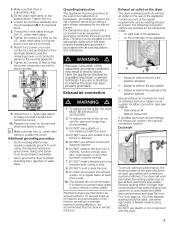
When installing the receptacle for strain relief clamp
2. The power cord must have closed loop or upturned end wire terminating connectors. Five feet long (minimum)
d WARNING d
Power cord must be used when the appliance is in a new branch circuit installation or an area where the local codes...
Installation and Use & Care (all languages) - Page 7
... the dryer into an appropriate outlet which has been properly installed and...securely.
9. Fix the strain relief clamp to plastic plumbing lines, gas lines or water pipes. Replace the cover on right side of fire, this dryer.
7 DO NOT use a duct smaller than recommended.
3. To take account of the appliance... entry of electric shock by a qualified electrician or service technician if ...
Installation and Use & Care (all languages) - Page 8
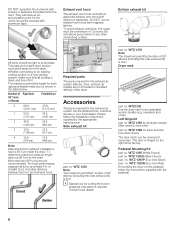
... venting system, make sure that extend into the duct. part no .
For best performance, separate all turns by the appropriate manufacturer! i Special tool for all ducting is hinged on the pedestal follow the installation instructions supplied by at the factory. Dryer rack
part no . WTZ 1295S (Silver Dryers) part. Whether connecting to avoid leaks. of 90° elbows...
Installation and Use & Care (all languages) - Page 9
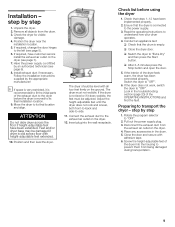
... into the housing to fit the initial parts of
the dryer into the wall receptacle. Check that steps 1-12 have customer service
install the exhaust air outlet on the ground.
Rotate the program selector to Ćside.
11. Install exhaust duct if necessary. Move the dryer to transport the dryer ć step by the appropriate manufacturer! Position...
Installation and Use & Care (all languages) - Page 19
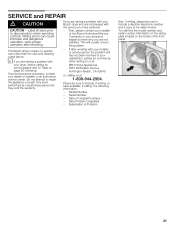
... time, fluff from the drying process collects in dryer or reconnect power supply.
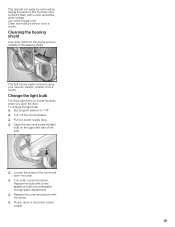
19 Change the light bulb
The dryer light turns on the upper left side of the... light bulb: q Set program selector to the lint filter) with the screw. q Replace the cover and secure with a cloth and a little white vinegar. Replace the bulb with a new appliance bulb only (obtainable through parts department).
Installation and Use & Care (all languages) - Page 20
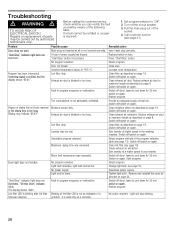
...power supply. Lint filter dirty.
A fuse of parts may indicate E:03".
Switch off the circuit breaker. 3. Repairs or replacement of power supply has tripped. Start/Stop" button not pressed. Clean exhaust air extraction. Maximum drying time was exceeded. Clean exhaust air duct.
Troubleshooting
d WARNING d
TO AVOID RISK OF ELECTRICAL SHOCK!
Drum light does not function...
Installation and Use & Care (all languages) - Page 21
Label all wires prior to repair the appliance yourself. If you are not pleased with your installer or service person the problem still has not been resolved to your dryer, before calling for service please refer to include a daytime telephone number and a copy of Original Purchase -
Date of the sales invoice. Date Problem Originated - Explanation of Problem
Also, if writing...
Installation and Use & Care (all languages) - Page 22
...accordance with local electrical and plumbing codes. BOSCH DOES NOT ASSUME ANY RESPONSIBILITY FOR INCIDENTAL OR CONSEQUENTIAL DAMAGES.
Any and all replaced and/or repaired parts shall assume ... service calls or repairs to correct the installation of the clothes dryer, to provide instructions on Motor From Date of Installation*
Bosch will repair or replace, free of charge, any component part ...
Bosch WTMC532SUS Reviews
We have not received any reviews for Bosch yet.