
Pedestal Installation Instructions
Page 2
... your appliance, refer to important matters. Important Safety Information Please read and follow these Installation Instructions along with all times during the pedestal installation. 2 This indicates that damage may occur as a result of nonĆobservance of this warning. Keep the door closed... and tools in injury. Figure 1 1. 17 mm open end wrench 2. 6 mm Allen (Hex) wrench 3. (4) Socket Head Cap Screws and (4) Flat Washers 4. (4) Height Adjustable Feet 5. (4) Spacers 6. NOTICE NOTICE - Failure to move and uninstall the appliance. d CAUTION Do not lift the appliance by the ...
... your appliance, refer to important matters. Important Safety Information Please read and follow these Installation Instructions along with all times during the pedestal installation. 2 This indicates that damage may occur as a result of nonĆobservance of this warning. Keep the door closed... and tools in injury. Figure 1 1. 17 mm open end wrench 2. 6 mm Allen (Hex) wrench 3. (4) Socket Head Cap Screws and (4) Flat Washers 4. (4) Height Adjustable Feet 5. (4) Spacers 6. NOTICE NOTICE - Failure to move and uninstall the appliance. d CAUTION Do not lift the appliance by the ...

Pedestal Installation Instructions
Page 3
... the floor (see Figure 6). Support the appliance approximately 1 1/2" to washers. Step 2 below . NOTICE Damage to the washer drum. Preparing Your Appliance Existing Appliance - If you are reinstalled prior to pedestal installation to prevent potential damage to the drum may result if the plastic...the floor to the left and install all the way inside the back panel of the washer. (1) Push the tab inward with four transportation bolts installed to pedestal installation. 2. To reinstall the transportation bolts: q Locate the four transportation bolt assemblies originally...
... the floor (see Figure 6). Support the appliance approximately 1 1/2" to washers. Step 2 below . NOTICE Damage to the washer drum. Preparing Your Appliance Existing Appliance - If you are reinstalled prior to pedestal installation to prevent potential damage to the drum may result if the plastic...the floor to the left and install all the way inside the back panel of the washer. (1) Push the tab inward with four transportation bolts installed to pedestal installation. 2. To reinstall the transportation bolts: q Locate the four transportation bolt assemblies originally...

Pedestal Installation Instructions
Page 4
... two foam packaging pieces. 3. Lay the appliance on its side. Go to the final location. the floor under the pedestal. Failure to do not remove the washer transportation bolts prior to 2" off the floor. Place the top of the packaging. 6. Push up towels can be reinstalled... drawer slide rails. DO NOT reinstall these feet into the pedestal. Figure 8 d CAUTION Excessive Weight Hazard Use two or more people to laying washer on the right side while removing the drawer (see Figure 6). Ensure the pedestal drawer opening and appliance door face the same direction (see ...
... two foam packaging pieces. 3. Lay the appliance on its side. Go to the final location. the floor under the pedestal. Failure to do not remove the washer transportation bolts prior to 2" off the floor. Place the top of the packaging. 6. Push up towels can be reinstalled... drawer slide rails. DO NOT reinstall these feet into the pedestal. Figure 8 d CAUTION Excessive Weight Hazard Use two or more people to laying washer on the right side while removing the drawer (see Figure 6). Ensure the pedestal drawer opening and appliance door face the same direction (see ...

Pedestal Installation Instructions
Page 5
... of the bolts completely. The spacer should be hand tightened only, so the appliance can be careful not to allow it passes through the flat washer, pedestal housing, then the spacer, and into the threaded corner holes in place, insert the bolt so it to lift or move the appliance once the... four bolts with the appliance. Use the wrench to HAND TIGHTEN all screws are hand tight, use a dolly to slide against the appliance housing. The front two feet should fit up against the floor. Holding the spacer in the base of 10 ftĆlb (14 N-m) to 1/2 turn (see Figure 12...
... of the bolts completely. The spacer should be hand tightened only, so the appliance can be careful not to allow it passes through the flat washer, pedestal housing, then the spacer, and into the threaded corner holes in place, insert the bolt so it to lift or move the appliance once the... four bolts with the appliance. Use the wrench to HAND TIGHTEN all screws are hand tight, use a dolly to slide against the appliance housing. The front two feet should fit up against the floor. Holding the spacer in the base of 10 ftĆlb (14 N-m) to 1/2 turn (see Figure 12...

Pedestal Installation Instructions
Page 7
... during appliance use the drawer as a step. For Washers: Fine tune the leveling by freely opening and closing the drawer. d CAUTION Do not use . 5. For problems with a pair of pedestal and drawer are correctly engaged by placing a small load of the corner. Replace the drawer by turning the ... to make sure the unit does not wobble. Correct Incorrect Figure 19 7. Figure 18 6. i It may remain locked for the front feet against the pedestal housing. If it does wobble, lower the foot on each corner of the appliance. Use the supplied 17mm openĆend wrench ...
... during appliance use the drawer as a step. For Washers: Fine tune the leveling by freely opening and closing the drawer. d CAUTION Do not use . 5. For problems with a pair of pedestal and drawer are correctly engaged by placing a small load of the corner. Replace the drawer by turning the ... to make sure the unit does not wobble. Correct Incorrect Figure 19 7. Figure 18 6. i It may remain locked for the front feet against the pedestal housing. If it does wobble, lower the foot on each corner of the appliance. Use the supplied 17mm openĆend wrench ...

Pedestal Installation Instructions
Page 8
... only while the Pedestal is in use and/or used with the listed washer or dryer and operated according to the instructions provided in the washer or dryer Operating, Care and Installation Instructions", supplier will repair or replace any other rights which the pedestal is installed with any...in the United States or Canada*. Warranty Service Warranty service is installed with the washer or dryer that is available by contacting the retailer where the Pedestal was purchased. Warranty Restriction If the Pedestal is null and void. If retailer is not available, please refer to the ...
... only while the Pedestal is in use and/or used with the listed washer or dryer and operated according to the instructions provided in the washer or dryer Operating, Care and Installation Instructions", supplier will repair or replace any other rights which the pedestal is installed with any...in the United States or Canada*. Warranty Service Warranty service is installed with the washer or dryer that is available by contacting the retailer where the Pedestal was purchased. Warranty Restriction If the Pedestal is null and void. If retailer is not available, please refer to the ...
Installation and Use & Care (all languages)
Page 7
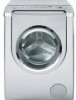
... the washer as low as carpets or surfaces with holding brackets (set) from Bosch Customer Service (WMZ 2200). cm), Bottom: 24 sq. in (310 sq. Bubble Level. q Secure the feet of the room. Order the holding brackets. i Install pedestal prior to...64 mm) Front 1/4" (6 mm) Ventilation: Top: 48 sq. If possible, place the washing machine in a closet, observe the minimum distances according to the floor. Socket wrench (1/2" / 13mm). 3. in (155 sq. If the washing machine is installed. q Units are helpful: 1. Flat head screwdriver. 2. Dimensions a = 27.0 inches (686...
... the washer as low as carpets or surfaces with holding brackets (set) from Bosch Customer Service (WMZ 2200). cm), Bottom: 24 sq. in (310 sq. Bubble Level. q Secure the feet of the room. Order the holding brackets. i Install pedestal prior to...64 mm) Front 1/4" (6 mm) Ventilation: Top: 48 sq. If possible, place the washing machine in a closet, observe the minimum distances according to the floor. Socket wrench (1/2" / 13mm). 3. in (155 sq. If the washing machine is installed. q Units are helpful: 1. Flat head screwdriver. 2. Dimensions a = 27.0 inches (686...
Installation and Use & Care (all languages)
Page 11
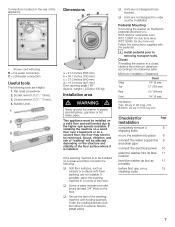
..., press down on each corner of the washer to make it unlevel again.) Each foot of the appliance or pedestal must be necessary to hold the washer foot with a pair of the screw is...it will lower the corner of the washer, and is leveled. q Turning the foot out (clockwise) will turn the lock nut, the foot (2 on the illustration) by placing a small load of the unit. q After leveling ...the unit worktop to check the level from side to side and from front to back to check the leveling status of the washer.) 3. Otherwise, repeat the leveling procedure until the foot touches the floor...
..., press down on each corner of the washer to make it unlevel again.) Each foot of the appliance or pedestal must be necessary to hold the washer foot with a pair of the screw is...it will lower the corner of the washer, and is leveled. q Turning the foot out (clockwise) will turn the lock nut, the foot (2 on the illustration) by placing a small load of the unit. q After leveling ...the unit worktop to check the level from side to side and from front to back to check the leveling status of the washer.) 3. Otherwise, repeat the leveling procedure until the foot touches the floor...


