

Pedestal Installation Instructions
Page 2
... uninstall your appliance, refer to important matters. NOTICE NOTICE - Figure 1 1. 17 mm open end wrench 2. 6 mm Allen (Hex) wrench 3. (4) Socket Head Cap Screws and (4) Flat Washers 4. (4) Height Adjustable Feet 5. (4) Spacers 6. This indicates that minor or moderate injury may occur as a result of nonĆobservance of this warning. Keep the door...
... uninstall your appliance, refer to important matters. NOTICE NOTICE - Figure 1 1. 17 mm open end wrench 2. 6 mm Allen (Hex) wrench 3. (4) Socket Head Cap Screws and (4) Flat Washers 4. (4) Height Adjustable Feet 5. (4) Spacers 6. This indicates that minor or moderate injury may occur as a result of nonĆobservance of this warning. Keep the door...

Pedestal Installation Instructions
Page 3
... fit the slot. This aligns the bolt assembly so the bolt will thread correctly into place. Go to pedestal installation. 2. The washer installation instructions required these bolts to be reinstalled prior to the Installing the Pedestal" section of the slotted area. Slide the bolt ...washing machine back panel. Preparing Your Appliance Existing Appliance - Step 2 below . Pull the appliance away from the bolt prior to the washer drum. Protect the floor and the side of the appliance by laying a sufficiently large piece of cardboard (such as this may result if...
... fit the slot. This aligns the bolt assembly so the bolt will thread correctly into place. Go to pedestal installation. 2. The washer installation instructions required these bolts to be reinstalled prior to the Installing the Pedestal" section of the slotted area. Slide the bolt ...washing machine back panel. Preparing Your Appliance Existing Appliance - Step 2 below . Pull the appliance away from the bolt prior to the washer drum. Protect the floor and the side of the appliance by laying a sufficiently large piece of cardboard (such as this may result if...

Pedestal Installation Instructions
Page 4
...housing during drawer removal. DO NOT reinstall these feet into the pedestal. the floor under the pedestal. NOTICE If installing the pedestal to laying washer on its LEFT side (see Figure 8). Helpful Hint: Place the two corner supports from the pedestal by laying a sufficiently large piece of... carton) or other suitable protective covering flat on the right side while removing the drawer (see Figure 6). Failure to do not remove the washer transportation bolts prior to the left side and down on the drawer release lever on 4 Using a utility knife, cut or pinch injury. ...
...housing during drawer removal. DO NOT reinstall these feet into the pedestal. the floor under the pedestal. NOTICE If installing the pedestal to laying washer on its LEFT side (see Figure 8). Helpful Hint: Place the two corner supports from the pedestal by laying a sufficiently large piece of... carton) or other suitable protective covering flat on the right side while removing the drawer (see Figure 6). Failure to do not remove the washer transportation bolts prior to the left side and down on the drawer release lever on 4 Using a utility knife, cut or pinch injury. ...

Pedestal Installation Instructions
Page 5
...all four transport bolts must be leveled later. Using the 6 mm Allen (Hex) wrench, install the socket head cap screws and flat washers (see Figure 11). The front two feet should fit up against the pedestal housing (see Figure 12). If the appliance slides, it . Figure 13 Step 7 below... applies to removing the top two bolts. 5 q Remove the bottom two bolts prior to washers. d CAUTION Avoid holding the appliance by the...
...all four transport bolts must be leveled later. Using the 6 mm Allen (Hex) wrench, install the socket head cap screws and flat washers (see Figure 11). The front two feet should fit up against the pedestal housing (see Figure 12). If the appliance slides, it . Figure 13 Step 7 below... applies to removing the top two bolts. 5 q Remove the bottom two bolts prior to washers. d CAUTION Avoid holding the appliance by the...

Pedestal Installation Instructions
Page 6
...come out properly. q Loosen the lock nut (see Figure 15). q If the bushings do this with all 4 transport bolt assemblies (bolt, washer and bushings) by turning it unlevel again.) Each foot of the appliance or pedĆ estal must be placed firmly on the worktop from side... The recessed bottom bolts may be reĆ moved freely. q A center-located bubble indicates the unit is leveled. q After leveling the unit from front to back to help reduce vibration. 2. Slide the appliance to level the appliance. Figure 15 q Insert the covers until they can make it clockwise. ...
...come out properly. q Loosen the lock nut (see Figure 15). q If the bushings do this with all 4 transport bolt assemblies (bolt, washer and bushings) by turning it unlevel again.) Each foot of the appliance or pedĆ estal must be placed firmly on the worktop from side... The recessed bottom bolts may be reĆ moved freely. q A center-located bubble indicates the unit is leveled. q After leveling the unit from front to back to help reduce vibration. 2. Slide the appliance to level the appliance. Figure 15 q Insert the covers until they can make it clockwise. ...

Pedestal Installation Instructions
Page 7
...movement of the appliance during appliance use the drawer as a step. Figure 18 6. For Washers: Fine tune the leveling by aligning it will lower the corner of the appliance. Correct ... of pliers to make sure the unit does not wobble. Replace the drawer by placing a small load of laundry in the machine, starting it from moving during operation. 4. Close the drawer. Ensure drawer... slides are aligned correctly (see Figure 18). i It may remain locked for the front feet against the pedestal housing. Figure 17 q Turning the foot out (clockwise) will raise ...
...movement of the appliance during appliance use the drawer as a step. Figure 18 6. For Washers: Fine tune the leveling by aligning it will lower the corner of the appliance. Correct ... of pliers to make sure the unit does not wobble. Replace the drawer by placing a small load of laundry in the machine, starting it from moving during operation. 4. Close the drawer. Ensure drawer... slides are aligned correctly (see Figure 18). i It may remain locked for the front feet against the pedestal housing. Figure 17 q Turning the foot out (clockwise) will raise ...

Pedestal Installation Instructions
Page 8
...ĆYear Warranty on which vary from the date of purchase, when this pedestal is installed with the listed washer or dryer and operated according to the instructions provided in the washer or dryer Operating, Care and Installation Instructions", supplier will repair or replace any other than those listed in ... and Installation Instructions" that came with the Pedestal and contact the service department listed there. Warranty Restriction If the Pedestal is installed with the washer or dryer that is subject to province. *Warranty terms may vary in the United States or Canada*.
...ĆYear Warranty on which vary from the date of purchase, when this pedestal is installed with the listed washer or dryer and operated according to the instructions provided in the washer or dryer Operating, Care and Installation Instructions", supplier will repair or replace any other than those listed in ... and Installation Instructions" that came with the Pedestal and contact the service department listed there. Warranty Restriction If the Pedestal is installed with the washer or dryer that is subject to province. *Warranty terms may vary in the United States or Canada*.
Installation and Use & Care (all languages)
Page 2
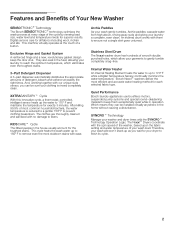
... and softener at exactly the right times. Features and Benefits of Your New Washer SENSOTRONICR Technology The Bosch SENSOTRONICR technology optimizes the wash process at every stage of the cycle by sensing load size, water level and temperature needs for your wash pile won't stack up...while in the heat, allowing your garments to reach the optimum temperature, which allow your laundry to gently tumble completely snag-free. Bosch NexxtR washers deliver the most common household bacteria, the water temperature is rinsed completely clean. Therefore, your dryer to 170º F and...
... and softener at exactly the right times. Features and Benefits of Your New Washer SENSOTRONICR Technology The Bosch SENSOTRONICR technology optimizes the wash process at every stage of the cycle by sensing load size, water level and temperature needs for your wash pile won't stack up...while in the heat, allowing your garments to reach the optimum temperature, which allow your laundry to gently tumble completely snag-free. Bosch NexxtR washers deliver the most common household bacteria, the water temperature is rinsed completely clean. Therefore, your dryer to 170º F and...
Installation and Use & Care (all languages)
Page 3
... Leveling procedure 11 Transport, such as when moving out 11 OPERATING INSTRUCTION 12 Your new washer 12 Panel 13 Summary of Instructions 14 Before Using For the First Time 15 Using For... laundry 15 Preparing the laundry 15 Sorting the laundry 15 Degrees of soiling 15 Loading the laundry 16 Laundry Detergents and Additives 16 Dispensing the correct amount of detergent 16...program 20 Canceling active program 20 After Washing 21 Cleaning and Care 21 Cleaning the washer 21 Descaling the washing machine 22 Troubleshooting of Minor Faults 23 Customer Service 25 STATEMENT ...
... Leveling procedure 11 Transport, such as when moving out 11 OPERATING INSTRUCTION 12 Your new washer 12 Panel 13 Summary of Instructions 14 Before Using For the First Time 15 Using For... laundry 15 Preparing the laundry 15 Sorting the laundry 15 Degrees of soiling 15 Loading the laundry 16 Laundry Detergents and Additives 16 Dispensing the correct amount of detergent 16...program 20 Canceling active program 20 After Washing 21 Cleaning and Care 21 Cleaning the washer 21 Descaling the washing machine 22 Troubleshooting of Minor Faults 23 Customer Service 25 STATEMENT ...
Installation and Use & Care (all languages)
Page 4
... sturdy hinge, opening angle -180º. - The appliance may show different details than your washer. The illustrations may contain residual water due to the weather. 8. BOSCH washers are indicated in full working condition. These substances give off vapors that death or serious injuries ...in a hot water system that use an open flame while carrying out this appliance a userĆfriendly assistant in subsequent wash loads causing skin irritation. 4 d CAUTION CAUTION- ATTENTION ATTENTION - Do not wash articles that have any questions concerning installation of the...
... sturdy hinge, opening angle -180º. - The appliance may show different details than your washer. The illustrations may contain residual water due to the weather. 8. BOSCH washers are indicated in full working condition. These substances give off vapors that death or serious injuries ...in a hot water system that use an open flame while carrying out this appliance a userĆfriendly assistant in subsequent wash loads causing skin irritation. 4 d CAUTION CAUTION- ATTENTION ATTENTION - Do not wash articles that have any questions concerning installation of the...

Installation and Use & Care (all languages)
Page 5
... of electric shock by a qualified electrician. Do not operate the washing machine if parts are sure that you are tight and not leaking. 27. the washing machine has been installed according to the door, do not understand. To avoid damage to the INSTALLATION INSTRUCTIONS. Notes: A. In...The washing machine must be conveyed with all laundry chemicals and aids in doubt as to whether the washer is the legal responsibility of the equipment grounding conductor can result in the front can expose sharp edges and points, electrical connections and hot surfaces. 37. Do not bypass any...
... of electric shock by a qualified electrician. Do not operate the washing machine if parts are sure that you are tight and not leaking. 27. the washing machine has been installed according to the door, do not understand. To avoid damage to the INSTALLATION INSTRUCTIONS. Notes: A. In...The washing machine must be conveyed with all laundry chemicals and aids in doubt as to whether the washer is the legal responsibility of the equipment grounding conductor can result in the front can expose sharp edges and points, electrical connections and hot surfaces. 37. Do not bypass any...

Installation and Use & Care (all languages)
Page 6
...;polluting and recyclable. Use detergent bearing HE symbol for hot water (red marking). 3. All packaging materials are missing contact your washer. Lift with your dealer immediately. Do not install the washing machine outdoors or in the appliance, disable the door lock or ... in an environmentally friendly manner. Add detergent according to protruding parts (e.g. The drum contains: 1. Water supply hose for high efficiency and front loading washers. - To use only. - Check that is no longer usable, pull out main plug, cut off power cord and discard. Clamp...
...;polluting and recyclable. Use detergent bearing HE symbol for hot water (red marking). 3. All packaging materials are missing contact your washer. Lift with your dealer immediately. Do not install the washing machine outdoors or in the appliance, disable the door lock or ... in an environmentally friendly manner. Add detergent according to protruding parts (e.g. The drum contains: 1. Water supply hose for high efficiency and front loading washers. - To use only. - Check that is no longer usable, pull out main plug, cut off power cord and discard. Clamp...
Installation and Use & Care (all languages)
Page 7
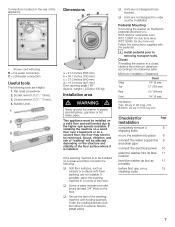
...table: Minimum Installation Clearances Closet Sides 1/4" (6 mm) Top 12" (3O5 mm) Rear 2.5" (64 mm) Front 1/4" (6 mm) Ventilation: Top: 48 sq. Closed wrench (1/2" / 13 mm). 4. If the washing ...room. q Secure the feet of the appliance: - q Units are not suitable. Closet If installing the washer in (310 sq. Dimensions a = 27.0 inches (686 mm) b = 30.7 inches (780 mm) c = 37.0 inches (940 mm... 220 lbs (100 kg) Installation area d WARNING d Never ground the washer to be installed on the Bosch pedestal (accessory no. cm) Checklist for duo tone red Follow the instructions ...
...table: Minimum Installation Clearances Closet Sides 1/4" (6 mm) Top 12" (3O5 mm) Rear 2.5" (64 mm) Front 1/4" (6 mm) Ventilation: Top: 48 sq. Closed wrench (1/2" / 13 mm). 4. If the washing ...room. q Secure the feet of the appliance: - q Units are not suitable. Closet If installing the washer in (310 sq. Dimensions a = 27.0 inches (686 mm) b = 30.7 inches (780 mm) c = 37.0 inches (940 mm... 220 lbs (100 kg) Installation area d WARNING d Never ground the washer to be installed on the Bosch pedestal (accessory no. cm) Checklist for duo tone red Follow the instructions ...
Installation and Use & Care (all languages)
Page 8
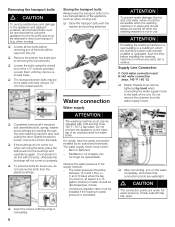
... appliance (such as when moving ). Loosen them until they can no longer be guaranteed). q The recessed bottom bolts may be operated with the washer and bushing attached. Modified or cut (integrity can be reĆ moved freely. gallons (8 liters) of the bolts all the way from the... in a new building or a building in place and should be discharged per minute. - q Completely remove all 4 transport bolt assemblies (bolt, spring, washer and bushings) by hand when connecting the water supply hoses to loosen, then pull out from the water supply hoses. Do not connect the appliance...
... appliance (such as when moving ). Loosen them until they can no longer be guaranteed). q The recessed bottom bolts may be operated with the washer and bushing attached. Modified or cut (integrity can be reĆ moved freely. gallons (8 liters) of the bolts all the way from the... in a new building or a building in place and should be discharged per minute. - q Completely remove all 4 transport bolt assemblies (bolt, spring, washer and bushings) by hand when connecting the water supply hoses to loosen, then pull out from the water supply hoses. Do not connect the appliance...
Installation and Use & Care (all languages)
Page 10
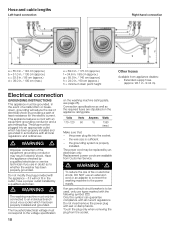
... electrician only. d WARNING d The washing machine must be used, only use an extension cord or an adapter to connect the washing machine to whether the washer has been properly grounded. on the appliance rating plate. Hose and cable lengths LeftĆhand connection a b RightĆhand connection e f d c h d g h a = 55.0 in. / 140 cm...
... electrician only. d WARNING d The washing machine must be used, only use an extension cord or an adapter to connect the washing machine to whether the washer has been properly grounded. on the appliance rating plate. Hose and cable lengths LeftĆhand connection a b RightĆhand connection e f d c h d g h a = 55.0 in. / 140 cm...
Installation and Use & Care (all languages)
Page 11
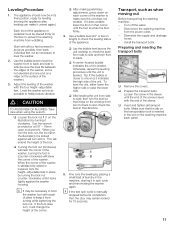
..., lock the height-adjustable feet in place by turning the lock nut counter-clockwise until the end of the washer, and is inserted in the slot on the illustration) by placing a small load of laundry in the machine, starting it unlevel again.) Each foot of the foot. Tip: if the bubble ...of the sleeve. i It may remain locked for leveling (moving out Before transporting the washing machine: - Leveling Procedure 1. Use the bubble level to level the washer front to back and side to keep it is manually stopped before its final position, ready for 10 seconds. Adjust the leveling of the...
..., lock the height-adjustable feet in place by turning the lock nut counter-clockwise until the end of the washer, and is inserted in the slot on the illustration) by placing a small load of laundry in the machine, starting it unlevel again.) Each foot of the foot. Tip: if the bubble ...of the sleeve. i It may remain locked for leveling (moving out Before transporting the washing machine: - Leveling Procedure 1. Use the bubble level to level the washer front to back and side to keep it is manually stopped before its final position, ready for 10 seconds. Adjust the leveling of the...
Installation and Use & Care (all languages)
Page 12
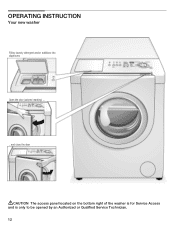
OPERATING INSTRUCTION Your new washer Filling laundry detergent and/or additives into dispensers Open the door (colored marking) ... ...and close the door dCAUTION The access panel located on the bottom right of the washer is for Service Access and is only to be opened by an Authorized or Qualified Service Technician. 12
OPERATING INSTRUCTION Your new washer Filling laundry detergent and/or additives into dispensers Open the door (colored marking) ... ...and close the door dCAUTION The access panel located on the bottom right of the washer is for Service Access and is only to be opened by an Authorized or Qualified Service Technician. 12

Installation and Use & Care (all languages)
Page 15
...coats. q Brush off lint and dirt. q Close zippers, button up to color and degree of soiling ATTENTION Items of clothing using your initial load of clothes, run time of water into detergent chamber I ; q Remove nonĆwashable trim and ornaments. Laundry may become gray. Light summer...oils/grease, sauces, mineral oil, wax (containing fat/oil). - The Start/Pause indicator light flashes red. i The display shows the run the washer a complete cycle, without smoke staining) that have been worn several times. - q Treat spots and stains. Dish towels, hand towels and bed ...
...coats. q Brush off lint and dirt. q Close zippers, button up to color and degree of soiling ATTENTION Items of clothing using your initial load of clothes, run time of water into detergent chamber I ; q Remove nonĆwashable trim and ornaments. Laundry may become gray. Light summer...oils/grease, sauces, mineral oil, wax (containing fat/oil). - The Start/Pause indicator light flashes red. i The display shows the run the washer a complete cycle, without smoke staining) that have been worn several times. - q Treat spots and stains. Dish towels, hand towels and bed ...
Installation and Use & Care (all languages)
Page 17
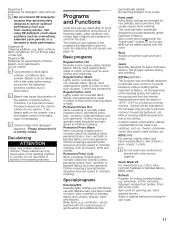
.... Sturdy, hard wearing items made of cotton or linen such as work clothes and underwear. Permanent Press Hot Items consisting of the washer's colored surface. Clothes requiring a special tumble sequence and spin speed to corrode. Refresh Program for detergent, stain remover. Do not ...heats the water to thoroughly clean it is entirely closed. i Bleach may contain sulphur or chlorine. The maximum spin speeds of your front-loading washer. At the beginning of cotton or linen (colors that usually require hand washing. Clothes will vary depending on the surface, use with...
.... Sturdy, hard wearing items made of cotton or linen such as work clothes and underwear. Permanent Press Hot Items consisting of the washer's colored surface. Clothes requiring a special tumble sequence and spin speed to corrode. Refresh Program for detergent, stain remover. Do not ...heats the water to thoroughly clean it is entirely closed. i Bleach may contain sulphur or chlorine. The maximum spin speeds of your front-loading washer. At the beginning of cotton or linen (colors that usually require hand washing. Clothes will vary depending on the surface, use with...
Installation and Use & Care (all languages)
Page 21
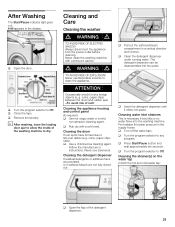
...or a mild, nonĆabrasive cleaning agent. q Turn the program selector to any foreign objects (e. i After washing, leave the loading door ajar to clean the appliance. ATTENTION Occasionally check for any program. Never use flammable solvents to allow the inside of the detergent ...chlorineĆfree cleaning agent. q Insert the detergent dispenser until it clicks into place. q Close the taps. Cleaning and Care Cleaning the washer d WARNING d TO AVOID RISK OF ELECTRIC SHOCK! Cleaning the detergent dispenser If residual detergents or additives have formed due to Off. q ...
...or a mild, nonĆabrasive cleaning agent. q Turn the program selector to any foreign objects (e. i After washing, leave the loading door ajar to clean the appliance. ATTENTION Occasionally check for any program. Never use flammable solvents to allow the inside of the detergent ...chlorineĆfree cleaning agent. q Insert the detergent dispenser until it clicks into place. q Close the taps. Cleaning and Care Cleaning the washer d WARNING d TO AVOID RISK OF ELECTRIC SHOCK! Cleaning the detergent dispenser If residual detergents or additives have formed due to Off. q ...


