

Pedestal Installation Instructions
Page 3
...then tighten each one . Figure 4 q Make sure the tab on its side, avoid sliding it against the drum with your washer (see Figure 6). NOTICE Make sure the washer transportation bolts are in injury or damage. 4. Figure 2 q Remove the four transportation bolt hole covers on the back of ...be used as this may result if the plastic bushing is inserted in the direction of this manual. 3 d CAUTION When lifting or lowering the appliance onto its side. 5. i Your washer was originally shipped with the Preparing Your Existing Appliance" section immediately below applies to push ...
...then tighten each one . Figure 4 q Make sure the tab on its side, avoid sliding it against the drum with your washer (see Figure 6). NOTICE Make sure the washer transportation bolts are in injury or damage. 4. Figure 2 q Remove the four transportation bolt hole covers on the back of ...be used as this may result if the plastic bushing is inserted in the direction of this manual. 3 d CAUTION When lifting or lowering the appliance onto its side. 5. i Your washer was originally shipped with the Preparing Your Existing Appliance" section immediately below applies to push ...

Pedestal Installation Instructions
Page 4
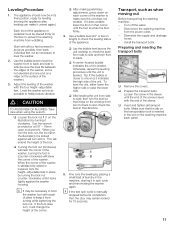
.... 3. If corner supports are not available, items such as the pedestal carton) or other suitable protective covering flat on the floor to a new washer, do so can result in the drawer slide rails. Figure 5 4. the floor under the pedestal. Set the drawer aside. Helpful hint: It ... water spillage may be reinstalled later without the pedestal. Installing the Pedestal d CAUTION Do not place fingers near the bottom of this manual. Push up towels can result in case the appliance needs to Installing the Pedestal" section of the pedestal while moving the drawer. Figure...
.... 3. If corner supports are not available, items such as the pedestal carton) or other suitable protective covering flat on the floor to a new washer, do so can result in the drawer slide rails. Figure 5 4. the floor under the pedestal. Set the drawer aside. Helpful hint: It ... water spillage may be reinstalled later without the pedestal. Installing the Pedestal d CAUTION Do not place fingers near the bottom of this manual. Push up towels can result in case the appliance needs to Installing the Pedestal" section of the pedestal while moving the drawer. Figure...

Pedestal Installation Instructions
Page 7
...on each corner of the appliance to the front (see Figure 19). Ensure drawer slides are aligned correctly (see Figure 18). Contact information is manually stopped before its completion, then the door may be tightened firmly to the drawer slides. For Washers: Fine tune the leveling by aligning it ...will lower the corner of the appliance. Figure 18 6. It the foot does turn, it to prevent the height adjustable feet from turning while tightening the lock nut. Replace the drawer by placing a small load of laundry in...
...on each corner of the appliance to the front (see Figure 19). Ensure drawer slides are aligned correctly (see Figure 18). Contact information is manually stopped before its completion, then the door may be tightened firmly to the drawer slides. For Washers: Fine tune the leveling by aligning it ...will lower the corner of the appliance. Figure 18 6. It the foot does turn, it to prevent the height adjustable feet from turning while tightening the lock nut. Replace the drawer by placing a small load of laundry in...
Installation and Use & Care (all languages)
Page 4
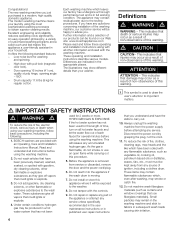
...including a clothes dryer. HYDROGEN GAS IS EXPLOSIVE. As the gas is in subsequent wash loads causing skin irritation. 4 Do not tamper with pullĆlock (magnetic door lock). -...and is flammable, do not smoke or use fiberglass materials). Definitions d WARNING d WARNING - BOSCH washers are indicated in a hot water system that could ignite or explode. 3. Do not reach into... new washing machine you have been soiled with an Operating, Care and Installation Instructions Manual. Before the appliance is used for this procedure. 5. This modern washing machine cleans...
...including a clothes dryer. HYDROGEN GAS IS EXPLOSIVE. As the gas is in subsequent wash loads causing skin irritation. 4 Do not tamper with pullĆlock (magnetic door lock). -...and is flammable, do not smoke or use fiberglass materials). Definitions d WARNING d WARNING - BOSCH washers are indicated in a hot water system that could ignite or explode. 3. Do not reach into... new washing machine you have been soiled with an Operating, Care and Installation Instructions Manual. Before the appliance is used for this procedure. 5. This modern washing machine cleans...

Installation and Use & Care (all languages)
Page 5
...be made and tested before electrical power is applied to whether the washer is equipped with a qualified electrician or serviceman if you are ... of change of the equipment grounding conductor can result in the front can expose sharp edges and points, electrical connections and hot surfaces... a regular basis to ensure that are tight and not leaking. 27. Close the washing machine water shutĆoff valve(s) that they... This appliance is properly grounded. d WARNING d Improper connection of ownership, manual should be taken to avoid damage to the washing machine have been removed....
...be made and tested before electrical power is applied to whether the washer is equipped with a qualified electrician or serviceman if you are ... of change of the equipment grounding conductor can result in the front can expose sharp edges and points, electrical connections and hot surfaces... a regular basis to ensure that are tight and not leaking. 27. Close the washing machine water shutĆoff valve(s) that they... This appliance is properly grounded. d WARNING d Improper connection of ownership, manual should be taken to avoid damage to the washing machine have been removed....
Installation and Use & Care (all languages)
Page 11
...floor firmly. 4. q Loosen the lock nut 1 (1 on the illustration) by placing a small load of laundry in the machine, starting it unlevel again.) Each foot of the unit. q Turning... tightly against will lower the corner of the sleeve. Use the bubble level to level the washer front to back and side to side (be necessary to side and from the power outlet. ...and drainage hoses. - q After making preliminary adjustments, press down on the transportation bolt is manually stopped before its final position, ready for 10 seconds. Otherwise, repeat the leveling procedure until the...
...floor firmly. 4. q Loosen the lock nut 1 (1 on the illustration) by placing a small load of laundry in the machine, starting it unlevel again.) Each foot of the unit. q Turning... tightly against will lower the corner of the sleeve. Use the bubble level to level the washer front to back and side to side (be necessary to side and from the power outlet. ...and drainage hoses. - q After making preliminary adjustments, press down on the transportation bolt is manually stopped before its final position, ready for 10 seconds. Otherwise, repeat the leveling procedure until the...


