Warranty
Page 1
... with new or remanufactured components or products), at BISSELL's option, free of charge from state to state. If you need information about repairs or replacement parts, or if you have questions regarding what it may issue you a Return Authorization Number and a pre-paid mailing label to return the unit to you need additional instructions regarding this product. This warranty does not apply to product used...
... with new or remanufactured components or products), at BISSELL's option, free of charge from state to state. If you need information about repairs or replacement parts, or if you have questions regarding what it may issue you a Return Authorization Number and a pre-paid mailing label to return the unit to you need additional instructions regarding this product. This warranty does not apply to product used...
User Guide - English
Page 1
Momentum® BAGLESS VACUUM USER'S GUIDE 82G7 SERIES 3 Safety Instructions 4 Product View 5-6 Assembly 6-9 Operation 10-16 Maintenance and Care 17-18 Troubleshooting 18 Consumer Services 19 Replacement Parts 20 Warranty
Momentum® BAGLESS VACUUM USER'S GUIDE 82G7 SERIES 3 Safety Instructions 4 Product View 5-6 Assembly 6-9 Operation 10-16 Maintenance and Care 17-18 Troubleshooting 18 Consumer Services 19 Replacement Parts 20 Warranty

User Guide - English
Page 2
..., so, should you ever have a problem, you purchased a BISSELL vacuum. Thanks again, from all of this complete, high-tech home cleaning system. Everything we back it with a limited one year warranty. My great-grandfather invented the floor sweeper in the design, manufacture, and service of high quality homecare products like your BISSELL vacuum . Today, BISSELL is well made, and we know about...
..., so, should you ever have a problem, you purchased a BISSELL vacuum. Thanks again, from all of this complete, high-tech home cleaning system. Everything we back it with a limited one year warranty. My great-grandfather invented the floor sweeper in the design, manufacture, and service of high quality homecare products like your BISSELL vacuum . Today, BISSELL is well made, and we know about...
User Guide - English
Page 3
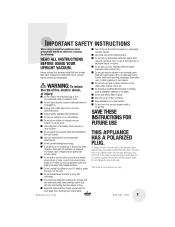
... handle vacuum cleaner or plug with vapors given off all parts of explosive liquids or vapors. ■ Do not pick up anything that may reduce air flow. ■ Keep hair, loose clothing, fingers, and all controls before conducting maintenance. keep openings free of electric shock, this user's guide. ■ Use only manufacturer's recommended attachments. ■ Do not use in place. ■ Use only on dry, indoor surfaces. ■ Keep appliance on cord...
... handle vacuum cleaner or plug with vapors given off all parts of explosive liquids or vapors. ■ Do not pick up anything that may reduce air flow. ■ Keep hair, loose clothing, fingers, and all controls before conducting maintenance. keep openings free of electric shock, this user's guide. ■ Use only manufacturer's recommended attachments. ■ Do not use in place. ■ Use only on dry, indoor surfaces. ■ Keep appliance on cord...
User Guide - English
Page 4
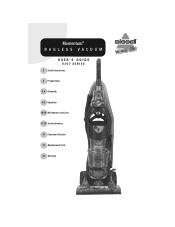
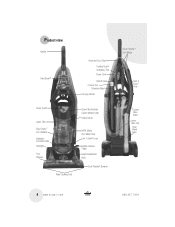
Product view Handle TurboBrush® Hose and Cord Clip Dusting Brush/ Upholstery Tool Power Cord Stretch Hose Crevice Tool Extension Wand Carrying Handle Power Switch Upper Tank Easy Empty™ Dirt Container Washable Pre-Motor Filter Headlight Foot Window Wide Cleaning Foot Clean Filter Indicator (Select Models Only) Debris Barrier HEPA Media Post Motor Filter Lock 'n Seal® Lever Handle Release Pedal Height Adjustment Knob Scuff Resistant Bumper Quick Release™ Cord Wraps Twist 'n Snap™ Hose Curved Hose Wand Lower Hose Clip Hose Wand Base 4 www.bissell.com...
Product view Handle TurboBrush® Hose and Cord Clip Dusting Brush/ Upholstery Tool Power Cord Stretch Hose Crevice Tool Extension Wand Carrying Handle Power Switch Upper Tank Easy Empty™ Dirt Container Washable Pre-Motor Filter Headlight Foot Window Wide Cleaning Foot Clean Filter Indicator (Select Models Only) Debris Barrier HEPA Media Post Motor Filter Lock 'n Seal® Lever Handle Release Pedal Height Adjustment Knob Scuff Resistant Bumper Quick Release™ Cord Wraps Twist 'n Snap™ Hose Curved Hose Wand Lower Hose Clip Hose Wand Base 4 www.bissell.com...

User Guide - English
Page 5
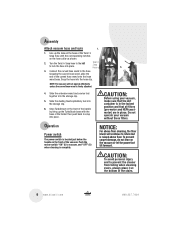
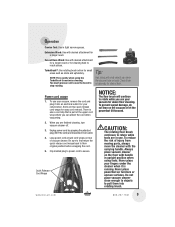
... plug in your vacuum cleaner is a Phillips screwdriver. IMPORTANT - www.bissell.com Hose Clip WARNING: Plastic film can be dangerous. To avoid danger of suffocation, keep away from the rear of the unit, slide the base, of the vacuum body. 3. Attach handle to the handle. 2. 2. Ensure that the handle and cord wrap are flush. 5. Tighten securely with all instructions and operating procedures. 3. 7. Attach the lower hose...
... plug in your vacuum cleaner is a Phillips screwdriver. IMPORTANT - www.bissell.com Hose Clip WARNING: Plastic film can be dangerous. To avoid danger of suffocation, keep away from the rear of the unit, slide the base, of the vacuum body. 3. Attach handle to the handle. 2. 2. Ensure that the handle and cord wrap are flush. 5. Tighten securely with all instructions and operating procedures. 3. 7. Attach the lower hose...
User Guide - English
Page 6
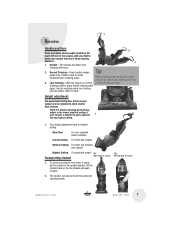
... the dusting brush/upholstery tool into the hose clip. CAUTION: Before using your vacuum without these filters. Connect the curved hose wand to vacuum, and "OFF" (O) when cleaning is in place. Push the rocker switch "ON" (I) to the hose. Slide the extension wand and crevice tool together into place. To prevent carpet damage, do not lean on the hose collar as shown. 2. Assembly Attach vacuum hose and tools 1. 1. Do not operate your vacuum, make...
... the dusting brush/upholstery tool into the hose clip. CAUTION: Before using your vacuum without these filters. Connect the curved hose wand to vacuum, and "OFF" (O) when cleaning is in place. Push the rocker switch "ON" (I) to the hose. Slide the extension wand and crevice tool together into place. To prevent carpet damage, do not lean on the hose collar as shown. 2. Assembly Attach vacuum hose and tools 1. 1. Do not operate your vacuum, make...
User Guide - English
Page 7
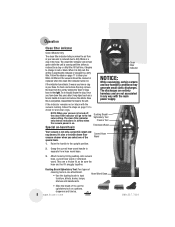
... under low furniture, check area first for most household floor cleaning tasks. The cleaner can be moved by using the carrying handle. 2b. wrong way to the lowest practical setting. For storage and above floor cleaning with your cleaner from room to desired setting. With the vacuum in the upright position, tilt the cleaner back on its rear wheels and push forward. 2. Bare Floor For non-carpeted, indoor...
... under low furniture, check area first for most household floor cleaning tasks. The cleaner can be moved by using the carrying handle. 2b. wrong way to the lowest practical setting. For storage and above floor cleaning with your cleaner from room to desired setting. With the vacuum in the upright position, tilt the cleaner back on its rear wheels and push forward. 2. Bare Floor For non-carpeted, indoor...
User Guide - English
Page 8
... special tools. 1. Dusting Brush/Upholstery Tool: Two types of cleaning tools in airflow when the vacuum power is running , follow the steps on page 15 to the red color setting. The clean filter indicator will go to check for and clear clogs. Special on-board tools Dusting Brush/ Upholstery Tool Crevice Tool Extension Wand Your vacuum is not only a powerful carpet and rug cleaner, it means you select one attachment. • Use the dusting brush to dust Hose Wand Base furniture, blinds, books, lamps...
... special tools. 1. Dusting Brush/Upholstery Tool: Two types of cleaning tools in airflow when the vacuum power is running , follow the steps on page 15 to the red color setting. The clean filter indicator will go to check for and clear clogs. Special on-board tools Dusting Brush/ Upholstery Tool Crevice Tool Extension Wand Your vacuum is not only a powerful carpet and rug cleaner, it means you select one attachment. • Use the dusting brush to dust Hose Wand Base furniture, blinds, books, lamps...
User Guide - English
Page 9
.... Never place your vacuum for easy cord removal. To use your fingers under the cleaner when it into rotating brush. Clip molded plug to power cord to stop rotating. To prevent carpet damage, do not lean on furniture or uneven surfaces. Extension Wand: Use with desired attachment for a longer reach or for cleaning hard to rotate while tools are two quick release cord wraps for above floor cleaning. Too much pressure...
.... Never place your vacuum for easy cord removal. To use your fingers under the cleaner when it into rotating brush. Clip molded plug to power cord to stop rotating. To prevent carpet damage, do not lean on furniture or uneven surfaces. Extension Wand: Use with desired attachment for a longer reach or for cleaning hard to rotate while tools are two quick release cord wraps for above floor cleaning. Too much pressure...

User Guide - English
Page 10
... electrical outlet before performing maintenance or troubleshooting checks. 2. NOTE: Emptying the dirt container after each use will help prevent over filling and ensure that the vacuum is very important that you empty your dirt container and check and clean your filters anytime the clean filter indicator (select models only) begins to prevent overfills. c o m 800.237.7691 Follow the instructions on the container, or more frequently to turn power switch...
... electrical outlet before performing maintenance or troubleshooting checks. 2. NOTE: Emptying the dirt container after each use will help prevent over filling and ensure that the vacuum is very important that you empty your dirt container and check and clean your filters anytime the clean filter indicator (select models only) begins to prevent overfills. c o m 800.237.7691 Follow the instructions on the container, or more frequently to turn power switch...

User Guide - English
Page 11
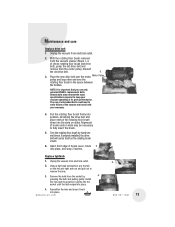
... and air dry thoroughly before replacing. If the filter becomes dirty, open the door, remove the filter and replace. NOTE: The post-motor filter is located in the slide out tray underneath the dirt container. Maintenance and care Cleaning the pre-motor and replacing the post-motor HEPA media filter 1. It is a white, pleated HEPA media filter. Unplug the vacuum from dirt particles. It is not washable and must be Filter hand washed in cold water with...
... and air dry thoroughly before replacing. If the filter becomes dirty, open the door, remove the filter and replace. NOTE: The post-motor filter is located in the slide out tray underneath the dirt container. Maintenance and care Cleaning the pre-motor and replacing the post-motor HEPA media filter 1. It is a white, pleated HEPA media filter. Unplug the vacuum from dirt particles. It is not washable and must be Filter hand washed in cold water with...
User Guide - English
Page 12
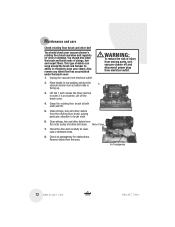
... Check rotating floor brush and drive belt You should also clean the brush and brush ends of strings, hair and carpet fibers. Check air passageway for wear, cuts or stressed areas. 8. Unplug the vacuum from the motor pulley and drive belt areas. c o m 800.237.7691 Place handle in order 2-4 as marked. Motor Pulley 7. Air Passageway 12 w w w . Remove debris from electrical outlet. 2. b i s s e l l . Lift tab 1 and release the three latches in low position and turn vacuum cleaner...
... Check rotating floor brush and drive belt You should also clean the brush and brush ends of strings, hair and carpet fibers. Check air passageway for wear, cuts or stressed areas. 8. Unplug the vacuum from the motor pulley and drive belt areas. c o m 800.237.7691 Place handle in order 2-4 as marked. Motor Pulley 7. Air Passageway 12 w w w . Remove debris from electrical outlet. 2. b i s s e l l . Lift tab 1 and release the three latches in low position and turn vacuum cleaner...
User Guide - English
Page 13
With the rotating floor brush removed from the vacuum cleaner (Steps 1-4 of check rotating floor brush and drive belt), grasp the old drive belt and remove from electrical outlet. 2. Discard the old drive belt. 3. 3. Alignment of the vacuum and could lead to early failure of brush ends in the space between the bristles. Unplug the vacuum from the motor pulley. Unplug the vacuum from the socket by 4. The use only genuine BISSELL replacement belts. Insert front...
With the rotating floor brush removed from the vacuum cleaner (Steps 1-4 of check rotating floor brush and drive belt), grasp the old drive belt and remove from electrical outlet. 2. Discard the old drive belt. 3. 3. Alignment of the vacuum and could lead to early failure of brush ends in the space between the bristles. Unplug the vacuum from the motor pulley. Unplug the vacuum from the socket by 4. The use only genuine BISSELL replacement belts. Insert front...

User Guide - English
Page 14
... ends of the TurboBrush to remove the faceplate and clear any obstructions. 3. brush from electrical outlet. 2. Reposition faceplate and secure with two screws. 14 w w w . b i s s e l l . Unplug the vacuum from the drive belt and clean debris. 4. c o m 800.237.7691 To clean debris from the brush, remove the 4. Maintenance and care Maintaining TurboBrush The TurboBrush should be checked regularly for clogs or debris wrapping around the...
... ends of the TurboBrush to remove the faceplate and clear any obstructions. 3. brush from electrical outlet. 2. Reposition faceplate and secure with two screws. 14 w w w . b i s s e l l . Unplug the vacuum from the drive belt and clean debris. 4. c o m 800.237.7691 To clean debris from the brush, remove the 4. Maintenance and care Maintaining TurboBrush The TurboBrush should be checked regularly for clogs or debris wrapping around the...
User Guide - English
Page 15
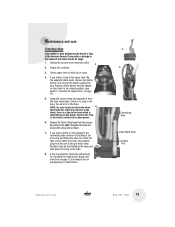
... wand or in the vacuum cleaner. Maintenance and care Clearing clogs Low suction or poor pickup may be due to a clog in the hose. If you notice debris or dirt clogged in the top of the tube. 8. filter indicator, when the indicator reads black, there is diminishing suction power. Remove the Twist 'n Snap hose from electrical outlet. 3. 2. Clean the tube of the motor, check for build up or clogs. 4. Reattach tube by first installing the...
... wand or in the vacuum cleaner. Maintenance and care Clearing clogs Low suction or poor pickup may be due to a clog in the hose. If you notice debris or dirt clogged in the top of the tube. 8. filter indicator, when the indicator reads black, there is diminishing suction power. Remove the Twist 'n Snap hose from electrical outlet. 3. 2. Clean the tube of the motor, check for build up or clogs. 4. Reattach tube by first installing the...
User Guide - English
Page 17
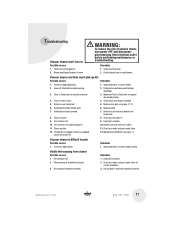
... brush roll 12. Pull out and re-insert dirt container correctly www.bissell.com 800.237.7691 17 Adjust powerfoot to push Possible causes 1. Check electrical plug 2. Replace brush 7. Remove brush and clean debris from electrical outlet before performing maintenance or troubleshooting. Vacuum cleaner and tools won 't turn power OFF and disconnect polarized plug from brush ends 8. Check hose and replace if needed 5. Check pre-motor and post-motor filters for correct installation 3. Clear clog, see pages 12-13 6. Dirt container full 9. Empty dirt...
... brush roll 12. Pull out and re-insert dirt container correctly www.bissell.com 800.237.7691 17 Adjust powerfoot to push Possible causes 1. Check electrical plug 2. Replace brush 7. Remove brush and clean debris from electrical outlet before performing maintenance or troubleshooting. Vacuum cleaner and tools won 't turn power OFF and disconnect polarized plug from brush ends 8. Check hose and replace if needed 5. Check pre-motor and post-motor filters for correct installation 3. Clear clog, see pages 12-13 6. Dirt container full 9. Empty dirt...
User Guide - English
Page 18
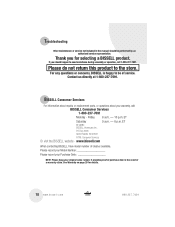
... service. Please record your Model Number Please record your Purchase Date NOTE: Please keep your warranty, call 1-800-237-7691. Thank you should be of cleaner available. BISSELL Consumer Services For information about repairs or replacement parts, or questions about your original sales receipt. ET Saturday Or write: BISSELL Homecare, Inc. b i s s e l l . c o m 800.237.7691 It provides proof of purchase date in the manual...
... service. Please record your Model Number Please record your Purchase Date NOTE: Please keep your warranty, call 1-800-237-7691. Thank you should be of cleaner available. BISSELL Consumer Services For information about repairs or replacement parts, or questions about your original sales receipt. ET Saturday Or write: BISSELL Homecare, Inc. b i s s e l l . c o m 800.237.7691 It provides proof of purchase date in the manual...
User Guide - English
Page 19
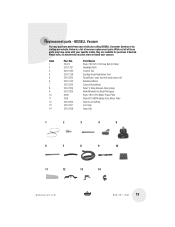
... common replacement parts. Part Name 1 32074 Style 7/9/10/12/14 Drive Belt (2-Pack) 2 203-1297 Headlight Bulb 3 203-1063 Crevice Tool 4 203-1228 Dusting Brush/Upholstery Tool 5 203-2302 TurboBrush, clear top with your specific model, they are available for purchase if desired. While not all attachments may purchase parts from your vacuum. Item Part No. Below is a list of these parts may have come with black brush roll...
... common replacement parts. Part Name 1 32074 Style 7/9/10/12/14 Drive Belt (2-Pack) 2 203-1297 Headlight Bulb 3 203-1063 Crevice Tool 4 203-1228 Dusting Brush/Upholstery Tool 5 203-2302 TurboBrush, clear top with your specific model, they are available for purchase if desired. While not all attachments may purchase parts from your vacuum. Item Part No. Below is a list of these parts may have come with black brush roll...
User Guide - English
Page 20
... repairs or replacement parts, or if you need additional instruction regarding this warranty or have other use not in accordance with new or remanufactured components or products), at : www.bissell.com 1260 w w w . If you need information about your warranty, contact BISSELL Consumer Services. PO Box 3606 Grand Rapids MI 49501 ATTN: Consumer Services BISSELL HOMECARE, INC. Printed in your BISSELL product should require service". BISSELL PowerTrak® Cyclonic and Momentum® Vacuums This warranty...
... repairs or replacement parts, or if you need additional instruction regarding this warranty or have other use not in accordance with new or remanufactured components or products), at : www.bissell.com 1260 w w w . If you need information about your warranty, contact BISSELL Consumer Services. PO Box 3606 Grand Rapids MI 49501 ATTN: Consumer Services BISSELL HOMECARE, INC. Printed in your BISSELL product should require service". BISSELL PowerTrak® Cyclonic and Momentum® Vacuums This warranty...


