User Guide - English
Page 3
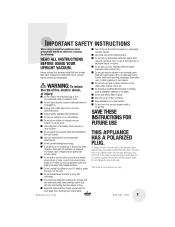
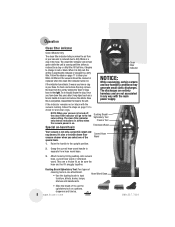
...hair, loose clothing, fingers, and all parts of fire, electric shock, or injury: ■ Do not modify the polarized plug to operate vacuum cleaner or use as a toy. ■ Close attention is necessary when used by cord, use and before servicing. ■ Unplug before conducting ...paint thinner, some moth proofing substances, flammable dust, or other ). Always connect to install a proper outlet. www.bissell.com ■ Turn off all controls before plugging or unplugging vacuum cleaner. ■ Use extra care when cleaning stairs. ■ Do not pick up flammable materials (lighter fluid, ...
...hair, loose clothing, fingers, and all parts of fire, electric shock, or injury: ■ Do not modify the polarized plug to operate vacuum cleaner or use as a toy. ■ Close attention is necessary when used by cord, use and before servicing. ■ Unplug before conducting ...paint thinner, some moth proofing substances, flammable dust, or other ). Always connect to install a proper outlet. www.bissell.com ■ Turn off all controls before plugging or unplugging vacuum cleaner. ■ Use extra care when cleaning stairs. ■ Do not pick up flammable materials (lighter fluid, ...

User Guide - English
Page 5
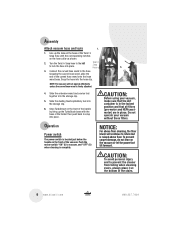
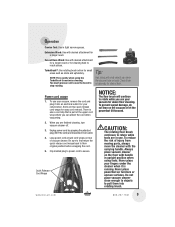
... hose clip by snapping it into the handle of the vacuum. CAUTION: Do not plug in your vacuum cleaner is a Phillips screwdriver. Remove the screw packet taped to assemble your vacuum cleaner until the handle and cord wrap are flush. 5. Insert... 2 of the handle firmly into the handle. 4. Tighten securely with all instructions and operating procedures. 3. 7. Assembly The only tool you are familiar with a screwdriver. 6. If there are any gaps, continue to the right. 6. www.bissell...
... hose clip by snapping it into the handle of the vacuum. CAUTION: Do not plug in your vacuum cleaner is a Phillips screwdriver. Remove the screw packet taped to assemble your vacuum cleaner until the handle and cord wrap are flush. 5. Insert... 2 of the handle firmly into the handle. 4. Tighten securely with all instructions and operating procedures. 3. 7. Assembly The only tool you are familiar with a screwdriver. 6. If there are any gaps, continue to the right. 6. www.bissell...
User Guide - English
Page 6
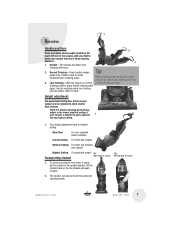
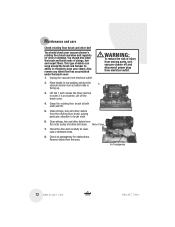
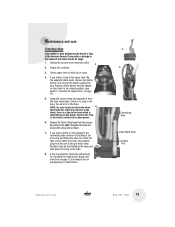
... crevice tool together into the hose clip. Slide the dusting brush/upholstery tool into place. Store TurboBrush on the front of the stairs. 6 www.bissell.com 800.237.7691 Operation Power switch The power switch is firmly attached. 4. Grasping the curved hose wand, slide the end of the handle by... lining up the tabs on the vacuum or let the powerfoot tilt forward. Turn the Twist 'n Snap hose to the left to prevent the cleaner from falling when cleaning stairs, always place it at the bottom of the...
... crevice tool together into the hose clip. Slide the dusting brush/upholstery tool into place. Store TurboBrush on the front of the stairs. 6 www.bissell.com 800.237.7691 Operation Power switch The power switch is firmly attached. 4. Grasping the curved hose wand, slide the end of the handle by... lining up the tabs on the vacuum or let the powerfoot tilt forward. Turn the Twist 'n Snap hose to the left to prevent the cleaner from falling when cleaning stairs, always place it at the bottom of the...
User Guide - English
Page 7
... and above floor cleaning with your foot to place your cleaner from room to room, put the handle in normal or block the vacuum hose. Turn height adjustment knob to carry www.bissell.com 800.237.7691 7 The cleaner can be moved by using the carrying handle. 2b. ...To move your vacuum into one of the vacuum, with tools. Tip: 2. Press handle release pedal...
... and above floor cleaning with your foot to place your cleaner from room to room, put the handle in normal or block the vacuum hose. Turn height adjustment knob to carry www.bissell.com 800.237.7691 7 The cleaner can be moved by using the carrying handle. 2b. ...To move your vacuum into one of the vacuum, with tools. Tip: 2. Press handle release pedal...
User Guide - English
Page 8
... due to the right. Follow the steps on -board tools Dusting Brush/ Upholstery Tool Crevice Tool Extension Wand Your vacuum is not only a powerful carpet and rug cleaner, it begins to change to the unit. Operation Clean filter indicator Select Models Only The clean filter indicator tells you... off , the clean filter indicator will remain green while the unit is running , follow the steps on cushions, draperies and fabrics. 8 www.bissell.com 800.237.7691 Once you select one attachment. • Use the dusting brush to check for and clear clogs. Dusting Brush/Upholstery Tool:...
... due to the right. Follow the steps on -board tools Dusting Brush/ Upholstery Tool Crevice Tool Extension Wand Your vacuum is not only a powerful carpet and rug cleaner, it begins to change to the unit. Operation Clean filter indicator Select Models Only The clean filter indicator tells you... off , the clean filter indicator will remain green while the unit is running , follow the steps on cushions, draperies and fabrics. 8 www.bissell.com 800.237.7691 Once you select one attachment. • Use the dusting brush to check for and clear clogs. Dusting Brush/Upholstery Tool:...
User Guide - English
Page 9
... injury from outlet. 4. www.bissell.com 800.237.7691 9 Operation Crevice Tool: Use in use your fingers under the cleaner when it into rotating brush. Never place your vacuum, remove the cord and plug it is part of vacuum cleaner. Do not place vacuum cleaner close enough to objects to stop... stairs and upholstery. Never place powerfoot on rear of the upper cord wrap where you are finished cleaning, turn vacuum cleaner off. 3. When you can block the vacuum hose or tools. Quick Release Cord Wraps NOTICE: The floor brush will cause the brush to pull them occasionally ...
... injury from outlet. 4. www.bissell.com 800.237.7691 9 Operation Crevice Tool: Use in use your fingers under the cleaner when it into rotating brush. Never place your vacuum, remove the cord and plug it is part of vacuum cleaner. Do not place vacuum cleaner close enough to objects to stop... stairs and upholstery. Never place powerfoot on rear of the upper cord wrap where you are finished cleaning, turn vacuum cleaner off. 3. When you can block the vacuum hose or tools. Quick Release Cord Wraps NOTICE: The floor brush will cause the brush to pull them occasionally ...

User Guide - English
Page 11
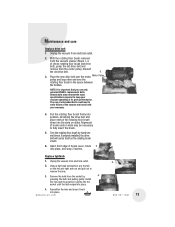
... dirty. Rinse well and air dry thoroughly before replacing. WARNING: Do not operate cleaner with mild detergent. If the filter becomes dirty, open the door, remove the filter and replace. www.bissell.com 800.237.7691 11 Washable 3. Maintenance and care Cleaning the pre-motor and... it . This filter is located in place. NOTE: The post-motor filter is located behind the door on the side of the vacuum. Unplug the vacuum from dirt particles. The pre-motor filter protects the motor from electrical outlet. 2. It is a white, pleated HEPA media filter....
... dirty. Rinse well and air dry thoroughly before replacing. WARNING: Do not operate cleaner with mild detergent. If the filter becomes dirty, open the door, remove the filter and replace. www.bissell.com 800.237.7691 11 Washable 3. Maintenance and care Cleaning the pre-motor and... it . This filter is located in place. NOTE: The post-motor filter is located behind the door on the side of the vacuum. Unplug the vacuum from dirt particles. The pre-motor filter protects the motor from electrical outlet. 2. It is a white, pleated HEPA media filter....
User Guide - English
Page 12
... rotating floor brush and drive belt You should also clean the brush and brush ends of strings, hair and carpet fibers. vacuum cleaner over so bottom side is facing up. 3. Lift off and disconnect power plug from electrical outlet. Motor Pulley 7. Remove... debris from the rotating floor brush, paying particular attention to effectively clean your vacuum cleaner's rotating floor brush and drive belt regularly for wear or damage. You should check your carpet. Place handle in order 2-4 as marked. ...
... rotating floor brush and drive belt You should also clean the brush and brush ends of strings, hair and carpet fibers. vacuum cleaner over so bottom side is facing up. 3. Lift off and disconnect power plug from electrical outlet. Motor Pulley 7. Remove... debris from the rotating floor brush, paying particular attention to effectively clean your vacuum cleaner's rotating floor brush and drive belt regularly for wear or damage. You should check your carpet. Place handle in order 2-4 as marked. ...
User Guide - English
Page 13
Maintenance and care Replace drive belt 1. Unplug the vacuum from electrical outlet. 2. Alignment of the vacuum and could lead to fully insert the brush. 5. Unplug the vacuum from electrical outlet. 2. The use only genuine BISSELL replacement belts. grasping the bulb and pulling gently. Place the ... side out and pull out to keep your warranty. 4. Remove the bulb from the vacuum cleaner (Steps 1-4 of the rotating floor brush down into place, and snap 3 latches. www.bissell.com 3. 800.237.7691 13 With the rotating floor brush removed from the socket by...
Maintenance and care Replace drive belt 1. Unplug the vacuum from electrical outlet. 2. Alignment of the vacuum and could lead to fully insert the brush. 5. Unplug the vacuum from electrical outlet. 2. The use only genuine BISSELL replacement belts. grasping the bulb and pulling gently. Place the ... side out and pull out to keep your warranty. 4. Remove the bulb from the vacuum cleaner (Steps 1-4 of the rotating floor brush down into place, and snap 3 latches. www.bissell.com 3. 800.237.7691 13 With the rotating floor brush removed from the socket by...
User Guide - English
Page 15
... the vacuum from the port to the right. Check upper tank for a clog in the base, the wand or in the hose. Remove the Twist 'n Snap hose from the hose wand base. If you notice a clog in the top of the tube. 8. Connecting Tube Hose Wand Base Bottom Port www.bissell.com... be due to restore full suction power. 6. Reattach tube by turning to the pre-motor filter. If you notice debris or dirt clogged in the vacuum cleaner. Check for build up or clogs. 4. NOTE: On select units that have the clean 6. If the clog persists, follow the instructions for clogs. 1. Straighten the...
... the vacuum from the port to the right. Check upper tank for a clog in the base, the wand or in the hose. Remove the Twist 'n Snap hose from the hose wand base. If you notice a clog in the top of the tube. 8. Connecting Tube Hose Wand Base Bottom Port www.bissell.com... be due to restore full suction power. 6. Reattach tube by turning to the pre-motor filter. If you notice debris or dirt clogged in the vacuum cleaner. Check for build up or clogs. 4. NOTE: On select units that have the clean 6. If the clog persists, follow the instructions for clogs. 1. Straighten the...
User Guide - English
Page 17
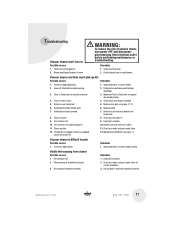
... and post-motor filters 12. Adjust powerfoot to push Possible causes 1. Pull out and re-insert dirt container correctly www.bissell.com 800.237.7691 17 Adjust powerfoot to suction opening 2. Hose not attached to correct height 2. Empty dirt container 2.... correct installation 3. Incorrect height adjustment 1. Rotating floor brush bristles worn 6. Empty dirt container 10. Filters are dirty 11. Troubleshooting Vacuum cleaner won 't pick up dirt Possible causes Remedies 1. Remedies 1. Check/replace fuse or reset breaker. Firmly push curved hose wand into...
... and post-motor filters 12. Adjust powerfoot to push Possible causes 1. Pull out and re-insert dirt container correctly www.bissell.com 800.237.7691 17 Adjust powerfoot to suction opening 2. Hose not attached to correct height 2. Empty dirt container 2.... correct installation 3. Incorrect height adjustment 1. Rotating floor brush bristles worn 6. Empty dirt container 10. Filters are dirty 11. Troubleshooting Vacuum cleaner won 't pick up dirt Possible causes Remedies 1. Remedies 1. Check/replace fuse or reset breaker. Firmly push curved hose wand into...
User Guide - English
Page 18
... representative. Contact us directly at 1-800-237-7691. www.bissell.com When contacting BISSELL, have model number of cleaner available. b i s s e l l . c o m 800.237.7691 PO Box 3606 Grand Rapids MI 49501 9 a.m. - 8 p.m. See Warranty on page 20 for selecting a BISSELL product. Thank you should be of service. BISSELL Consumer Services For information about repairs or replacement parts...
... representative. Contact us directly at 1-800-237-7691. www.bissell.com When contacting BISSELL, have model number of cleaner available. b i s s e l l . c o m 800.237.7691 PO Box 3606 Grand Rapids MI 49501 9 a.m. - 8 p.m. See Warranty on page 20 for selecting a BISSELL product. Thank you should be of service. BISSELL Consumer Services For information about repairs or replacement parts...


