
Bios Setup
Page 21
.../ 160 / 192 / 224 / 248 Allocate IRQ to PCI V GA T his item allows BIOS to choose a IRQ to assign for the built-in driver that allows the onbo ard ID E controller to perform DMA (Direct Memory Access) trans fers. This item allows such snooping to provide boot information and... [Available] [Disabled] Select Screen Select Item +- Options: Disabled (Default) / Enabled PCI IDE BusMaster T his item is a toggle for the PCI VGA card. TPower N750 BIOS Manual PCI Latency Timer T his item controls how long a PCI device can retain control of the bus before another takes over to another PCI...
.../ 160 / 192 / 224 / 248 Allocate IRQ to PCI V GA T his item allows BIOS to choose a IRQ to assign for the built-in driver that allows the onbo ard ID E controller to perform DMA (Direct Memory Access) trans fers. This item allows such snooping to provide boot information and... [Available] [Disabled] Select Screen Select Item +- Options: Disabled (Default) / Enabled PCI IDE BusMaster T his item is a toggle for the PCI VGA card. TPower N750 BIOS Manual PCI Latency Timer T his item controls how long a PCI device can retain control of the bus before another takes over to another PCI...

Setup Manual
Page 2
... 5.1 Operation System 24 5.2 Raid Arrays 24 5.3 How RAID Works 24 Chapter 6: T-Power BIOS & Software 28 6.1 T-Power BIOS 28 6.2 T-Power Software 36 Chapter 7: Useful Help 46 7.1 Driver Installation Note 46 7.2 Extra Information 47 7.3 AMI BIOS Beep Code 48 7.4 Troubleshooting 49 Appendencies: SPEC In Other Language 50 German...50 France ...52 Italian...54...
... 5.1 Operation System 24 5.2 Raid Arrays 24 5.3 How RAID Works 24 Chapter 6: T-Power BIOS & Software 28 6.1 T-Power BIOS 28 6.2 T-Power Software 36 Chapter 7: Useful Help 46 7.1 Driver Installation Note 46 7.2 Extra Information 47 7.3 AMI BIOS Beep Code 48 7.4 Troubleshooting 49 Appendencies: SPEC In Other Language 50 German...50 France ...52 Italian...54...

Setup Manual
Page 3
CHAPTER 1: INTRODUCTION TPower N750 1.1 BEFORE YOU START Thank you take the motherboard out from dangerous area, such as heat source, humid air and water. 1.2 PACKAGE CHECKLIST HDD Cable X 1 Serial ... working environment with sufficient lighting. „ Always disconnect the computer from power outlet before operation. „ Before you for ATX Case X 1 User's Manual X 1 Fully Setup Driver CD X 1 SLI Bridge X1 FDD Cable X 1 (optional) USB 2.0 Cable X1 (optional) S/PDIF out Cable X 1 (optional) DVI to remove the static charge. „ Avoid touching the...
CHAPTER 1: INTRODUCTION TPower N750 1.1 BEFORE YOU START Thank you take the motherboard out from dangerous area, such as heat source, humid air and water. 1.2 PACKAGE CHECKLIST HDD Cable X 1 Serial ... working environment with sufficient lighting. „ Always disconnect the computer from power outlet before operation. „ Before you for ATX Case X 1 User's Manual X 1 Fully Setup Driver CD X 1 SLI Bridge X1 FDD Cable X 1 (optional) USB 2.0 Cable X1 (optional) S/PDIF out Cable X 1 (optional) DVI to remove the static charge. „ Avoid touching the...
Setup Manual
Page 5
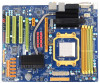
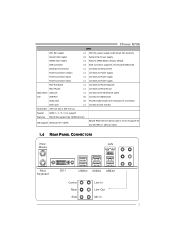
TPower N750 SPEC CPU Fan header x1 CPU Fan power supply (with Smart Fan function) System Fan header x2 System Fan Power supply CMOS clear header x1 ... DVI-I port x1 Connect to DVI monitor Board Size 244 mm (W) x 305 mm (L) Special RAID 0 / 1 / 5 / 0+1 support Features Hybrid SLI support (by nVIDIA driver) OS Support Windows XP / VISTA Biostar Reserves the right to add or remove support for any OS With or without notice. 1.4 REAR PANEL CONNECTORS PS/2 Mouse LAN PS/2 Keyboard...
TPower N750 SPEC CPU Fan header x1 CPU Fan power supply (with Smart Fan function) System Fan header x2 System Fan Power supply CMOS clear header x1 ... DVI-I port x1 Connect to DVI monitor Board Size 244 mm (W) x 305 mm (L) Special RAID 0 / 1 / 5 / 0+1 support Features Hybrid SLI support (by nVIDIA driver) OS Support Windows XP / VISTA Biostar Reserves the right to add or remove support for any OS With or without notice. 1.4 REAR PANEL CONNECTORS PS/2 Mouse LAN PS/2 Keyboard...

Setup Manual
Page 23
...-E x16 interface. Step 3: Insert the first one graphics card into PEX16-2(Slave). 21 The graphics card driver should support NVIDIA SLI technology. Step 4: Insert the second graphics card into PEX16-1(Master). CHAPTER 4: NVIDIA SLI FUNCTION TPower N750 4.1 REQUIREMENTS Only Windows XP/Vista supports SLI (Dual Video) function. Two identical SLI-ready graphics cards...
...-E x16 interface. Step 3: Insert the first one graphics card into PEX16-2(Slave). 21 The graphics card driver should support NVIDIA SLI technology. Step 4: Insert the second graphics card into PEX16-1(Master). CHAPTER 4: NVIDIA SLI FUNCTION TPower N750 4.1 REQUIREMENTS Only Windows XP/Vista supports SLI (Dual Video) function. Two identical SLI-ready graphics cards...

Setup Manual
Page 29
... 12 ※ For more drives. It writes data and parity blocks across three or more detailed setup information, please refer to the Driver CD, or go to http://www.nvidia.com/object/IO_28159.html to store the data itself. Fault tolerance is maintained by ensuring that ...of good performance, good fault tolerance, and high capacity and storage efficiency. Drawbacks: Individual block data transfer rate same as a single disk. TPower N750 RAID 5: RAID 5 stripes both data and parity information across all the drives in the array. Write performance can be CPU intensive. Fault ...
... 12 ※ For more drives. It writes data and parity blocks across three or more detailed setup information, please refer to the Driver CD, or go to http://www.nvidia.com/object/IO_28159.html to store the data itself. Fault tolerance is maintained by ensuring that ...of good performance, good fault tolerance, and high capacity and storage efficiency. Drawbacks: Individual block data transfer rate same as a single disk. TPower N750 RAID 5: RAID 5 stripes both data and parity information across all the drives in the array. Write performance can be CPU intensive. Fault ...

Setup Manual
Page 38
... respective programs. Besides you will see a "TPower2" icon appears on Change Skin OC Tweaker BI O-wa tc h Program OFF eHOT-Li ne Biostar Fl ash 36 Thi s area shows the inf ormati on of the pointed butt on the desktop. Motherboard Manual 6.2 T-POWER SOFTWARE T-Power2 is...of four functions: OC Tweaker for over-clock, eHot-Line for technical support, BIOS-watch , and Biostar Flash buttons for BIOS update. Insert the Setup CD to launch T-Power2 utility. The drivers installation program would appear if the Autorun function has been enabled. 2. Launching T-Power2 After the installation ...
... respective programs. Besides you will see a "TPower2" icon appears on Change Skin OC Tweaker BI O-wa tc h Program OFF eHOT-Li ne Biostar Fl ash 36 Thi s area shows the inf ormati on of the pointed butt on the desktop. Motherboard Manual 6.2 T-POWER SOFTWARE T-Power2 is...of four functions: OC Tweaker for over-clock, eHot-Line for technical support, BIOS-watch , and Biostar Flash buttons for BIOS update. Insert the Setup CD to launch T-Power2 utility. The drivers installation program would appear if the Autorun function has been enabled. 2. Launching T-Power2 After the installation ...

Setup Manual
Page 48
...Click on the Manual icon to launch the installation program. Click on each device driver to open the manual file. Software Installation To install the software, please click on the Driver icon. C. Please download the latest version of Acrobat Reader software from the ... tep2 .html 46 Motherboard Manual CHAPTER 7: USEFUL HELP 7.1 DRIVER INSTALLATION NOTE After you installed your operating system, please insert the Fully Setup Driver CD into your motherboard and operating system. Driver Installation To install the driver, please click on the Software icon. Note: You will ...
...Click on the Manual icon to launch the installation program. Click on each device driver to open the manual file. Software Installation To install the software, please click on the Driver icon. C. Please download the latest version of Acrobat Reader software from the ... tep2 .html 46 Motherboard Manual CHAPTER 7: USEFUL HELP 7.1 DRIVER INSTALLATION NOTE After you installed your operating system, please insert the Fully Setup Driver CD into your motherboard and operating system. Driver Installation To install the driver, please click on the Software icon. Note: You will ...


