Setup Manual
Page 2
... Settings 12 Chapter 4: RAID Functions 17 4.1 Operation System 17 4.2 Raid Arrays 17 4.3 How RAID Works 17 Chapter 5: Useful Help 19 5.1 Driver Installation Note 19 5.2 Award BIOS Bee p Code 20 5.3 Extra Information 20 5.4 Tro ubles ho oting 22 Chapter 6: WarpSpeeder 23 6.1 Introductio n 23 6.2 System Requirement 23 6.3 Installation 24 6.4 WarpSpee de r 25 Appendencies...
... Settings 12 Chapter 4: RAID Functions 17 4.1 Operation System 17 4.2 Raid Arrays 17 4.3 How RAID Works 17 Chapter 5: Useful Help 19 5.1 Driver Installation Note 19 5.2 Award BIOS Bee p Code 20 5.3 Extra Information 20 5.4 Tro ubles ho oting 22 Chapter 6: WarpSpeeder 23 6.1 Introductio n 23 6.2 System Requirement 23 6.3 Installation 24 6.4 WarpSpee de r 25 Appendencies...

Setup Manual
Page 6
Motherboard Manual 1.5 MOT HERBOARD LAYOUT JKB MS1 JATX PWR1 DIMMA1 DIMMB1 F DD1 Socket A M2 JPRNT1 J CO M1 JVGA1 IDE1 IDE2 JUS B1 JUSBLAN1 JATXP WR2 JCFAN1 JAUDIO1 K8M800 Super I/O LAN AGP 1 BIOS PCI1 Codec PCI2 JAUDIO2 JCDIN1 JSPDIF_OUT1 JSFAN1 Not e: ■ repre sents the 1st pin. 4 BAT1 VT8237R+ JCMOS1 JSATA2 JUSB2 JUSB3 JS ATA1 J PA NE L1
Motherboard Manual 1.5 MOT HERBOARD LAYOUT JKB MS1 JATX PWR1 DIMMA1 DIMMB1 F DD1 Socket A M2 JPRNT1 J CO M1 JVGA1 IDE1 IDE2 JUS B1 JUSBLAN1 JATXP WR2 JCFAN1 JAUDIO1 K8M800 Super I/O LAN AGP 1 BIOS PCI1 Codec PCI2 JAUDIO2 JCDIN1 JSPDIF_OUT1 JSFAN1 Not e: ■ repre sents the 1st pin. 4 BAT1 VT8237R+ JCMOS1 JSATA2 JUSB2 JUSB3 JS ATA1 J PA NE L1

Setup Manual
Page 17
... user to restore the BIOS saf e setting and the CMOS data, please carefully f ollow the procedures to avoid damaging the motherboard. 1 3 Pin 1-2 Close: Normal Operation (Default). 1 3 1 Pin 2-3 Close: 3 Clear CMOS data. ※ Clear CMOS Proce dures: 1. Set the jumper to "Pin 2-3 close ". 5. Set the jumper to "Pin 1-2 close ". 3. K8M800 Micro A M2 JCDIN1: CD...
... user to restore the BIOS saf e setting and the CMOS data, please carefully f ollow the procedures to avoid damaging the motherboard. 1 3 Pin 1-2 Close: Normal Operation (Default). 1 3 1 Pin 2-3 Close: 3 Clear CMOS data. ※ Clear CMOS Proce dures: 1. Set the jumper to "Pin 2-3 close ". 5. Set the jumper to "Pin 1-2 close ". 3. K8M800 Micro A M2 JCDIN1: CD...

Setup Manual
Page 22
... 5.3 EXT RA INFORMAT ION A. In this Case, please follow the procedure below to restore the BIOS: 1. Confirm motherboard model and download the respectively BIOS from the Biostar website: www.biostar.com.tw 3. System will work properly. 20 BIOS Update After you fail to update BIOS or BIOS is shown after boot-up the system, it means the...
... 5.3 EXT RA INFORMAT ION A. In this Case, please follow the procedure below to restore the BIOS: 1. Confirm motherboard model and download the respectively BIOS from the Biostar website: www.biostar.com.tw 3. System will work properly. 20 BIOS Update After you fail to update BIOS or BIOS is shown after boot-up the system, it means the...

Setup Manual
Page 25
... . 6.2 SYST EM REQUIREMENT OS Support: Windows 98 SE, Windows Me, Windows 2000, Windows XP DirectX: DirectX 8.1 or above. (The Windows XP operating system includes DirectX 8.1. K8M800 Micro A M2 CHAPTER 6: WARPSPEEDER™ 6.1 INT RODUCT ION [WarpSpeeder™], a new powerful control utility, features three user-friendly functions including Overclock Manager, Overvoltage Manager, and Hardware...
... . 6.2 SYST EM REQUIREMENT OS Support: Windows 98 SE, Windows Me, Windows 2000, Windows XP DirectX: DirectX 8.1 or above. (The Windows XP operating system includes DirectX 8.1. K8M800 Micro A M2 CHAPTER 6: WARPSPEEDER™ 6.1 INT RODUCT ION [WarpSpeeder™], a new powerful control utility, features three user-friendly functions including Overclock Manager, Overvoltage Manager, and Hardware...
Setup Manual
Page 32
About Panel Click the "about" button in hints of [WarpSpeeder™] utility. In this panel, you can get the mainboard's BIOS model and the Version number of all the chipset that are controlled by several separate chipset, [WarpSpeeder™] divide these features to up as the ...
About Panel Click the "about" button in hints of [WarpSpeeder™] utility. In this panel, you can get the mainboard's BIOS model and the Version number of all the chipset that are controlled by several separate chipset, [WarpSpeeder™] divide these features to up as the ...

Setup Manual
Page 53
... of configuring your system using Setup. Power management features are supported. Power to modify the basic system configuration. K8M800 Micro AM2 BIOS Setup BIOS Setup Introduction This manual discussed Award™ Setup program built into the ROM BIOS. This special information is then stored in the ACPI specification, developed by this manual is a custom version of...
... of configuring your system using Setup. Power management features are supported. Power to modify the basic system configuration. K8M800 Micro AM2 BIOS Setup BIOS Setup Introduction This manual discussed Award™ Setup program built into the ROM BIOS. This special information is then stored in the ACPI specification, developed by this manual is a custom version of...

Setup Manual
Page 54
K8M800 Micro AM2 BIOS Setup PCI Bus Support This AWARD BIOS also supports Version 2.1 of the Intel PCI (Peripheral Component Interconnect) local bus specification. DRAM Support DDR SDRAM (Double Data Rate Synchronous DRAM) are supported. The ... PgUp key PgDn key + Key - Quit and not save changes into CMOS Status Page Setup Menu and Option Page Setup Menu - Supported CPUs This AWARD BIOS supports the AMD CPU. Exit Current page and return to navigate in the Setup program by using the keyboard. Using Setup In general, you use...
K8M800 Micro AM2 BIOS Setup PCI Bus Support This AWARD BIOS also supports Version 2.1 of the Intel PCI (Peripheral Component Interconnect) local bus specification. DRAM Support DDR SDRAM (Double Data Rate Synchronous DRAM) are supported. The ... PgUp key PgDn key + Key - Quit and not save changes into CMOS Status Page Setup Menu and Option Page Setup Menu - Supported CPUs This AWARD BIOS supports the AMD CPU. Exit Current page and return to navigate in the Setup program by using the keyboard. Using Setup In general, you use...
Setup Manual
Page 55
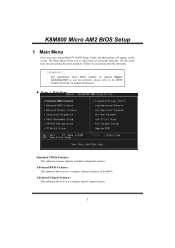
... options. Advanced Chipset Features This submenu allows you to accept and enter the sub-menu. !! K8M800 Micro AM2 BIOS Setup 1 Main Menu Once you to select from several setup functions. Advanced BIOS Features This submenu allows you to the BIOS installed on the screen. Use the arrow keys to select among the items and press to...
... options. Advanced Chipset Features This submenu allows you to accept and enter the sub-menu. !! K8M800 Micro AM2 BIOS Setup 1 Main Menu Once you to select from several setup functions. Advanced BIOS Features This submenu allows you to the BIOS installed on the screen. Use the arrow keys to select among the items and press to...

Setup Manual
Page 56
..., this system. These configurations are set. Frequency/ Voltage Control This submenu allows you to configure certain IDE hard drive options and Programmed Input/ Output features. K8M800 Micro AM2 BIOS Setup Integrated Peripherals This submenu allows you to change the voltage and clock may cause the CPU or M/B damage!) Load Optimized Defaults This selection allows...
..., this system. These configurations are set. Frequency/ Voltage Control This submenu allows you to configure certain IDE hard drive options and Programmed Input/ Output features. K8M800 Micro AM2 BIOS Setup Integrated Peripherals This submenu allows you to change the voltage and clock may cause the CPU or M/B damage!) Load Optimized Defaults This selection allows...

Setup Manual
Page 57
K8M800 Micro AM2 BIOS Setup Set User Password If the Supervisor Password is set , then the User Password will be displayed before proceeding. Confirmation message will be displayed before proceeding. Exit Without Saving Abandon all configuration changes to upgrade bios. 5 Upgrade BIOS This submenu allows you to CMOS(memory) and exit setup. Save & Exit Setup Save all...
K8M800 Micro AM2 BIOS Setup Set User Password If the Supervisor Password is set , then the User Password will be displayed before proceeding. Confirmation message will be displayed before proceeding. Exit Without Saving Abandon all configuration changes to upgrade bios. 5 Upgrade BIOS This submenu allows you to CMOS(memory) and exit setup. Save & Exit Setup Save all...

Setup Manual
Page 58
Each category includes no, one or more than one setup items. Use the arrow keys to highlight the item and then use the or keys to select the value you want in Standard CMOS Setup Menu are divided into 10 categories. K8M800 Micro AM2 BIOS Setup 2 Standard CMOS Features The items in each item. „ Figure 2: Standard CMOS Setup 6
Each category includes no, one or more than one setup items. Use the arrow keys to highlight the item and then use the or keys to select the value you want in Standard CMOS Setup Menu are divided into 10 categories. K8M800 Micro AM2 BIOS Setup 2 Standard CMOS Features The items in each item. „ Figure 2: Standard CMOS Setup 6
Setup Manual
Page 59
... its sub Press to enter the menu. IDE Secondary Slave Options are in its sub Press to enter the menu. sub menu of detailed options. K8M800 Micro AM2 BIOS Setup Main Menu Selections This table shows the selections that the 'Day' automatically changes when you can make on the Main Menu. Time hh : mm...
... its sub Press to enter the menu. IDE Secondary Slave Options are in its sub Press to enter the menu. sub menu of detailed options. K8M800 Micro AM2 BIOS Setup Main Menu Selections This table shows the selections that the 'Day' automatically changes when you can make on the Main Menu. Time hh : mm...

Setup Manual
Page 60
Displays the total memory available in which you want the BIOS to stop the POST process and notify you. Displays the amount of conventional memory detected during boot up . K8M800 Micro AM2 BIOS Setup Item Halt On Base Memory Extended Memory Total Memory Options All Errors No Errors All, but Keyboard All, but Diskette All, but Disk/ Key N/A N/A N/A Description Select the situation in the system. 8 Displays the amount of extended memory detected during boot up .
Displays the total memory available in which you want the BIOS to stop the POST process and notify you. Displays the amount of conventional memory detected during boot up . K8M800 Micro AM2 BIOS Setup Item Halt On Base Memory Extended Memory Total Memory Options All Errors No Errors All, but Keyboard All, but Diskette All, but Disk/ Key N/A N/A N/A Description Select the situation in the system. 8 Displays the amount of extended memory detected during boot up .

Setup Manual
Page 62
Master, Sec, Slave, USB HDD0, USB HDD1, USB HDD2, and Bootable Add-in Cards. 10 K8M800 Micro AM2 BIOS Setup Boot Seq & Floppy Setup This item allows you to setup boot seq & Floppy. „ Figure 3.1: Boot Seq & Floppy Setup Hard Disk Boot Priority These BIOS attempt to arrange the Hard Disk boot sequence automatically. This will depend on which Hard Disk is installed. „ Figure 3.1.1: Hard Disk Boot Priority The Choices: Pri. Slave, Sec. Master, Pri.
Master, Sec, Slave, USB HDD0, USB HDD1, USB HDD2, and Bootable Add-in Cards. 10 K8M800 Micro AM2 BIOS Setup Boot Seq & Floppy Setup This item allows you to setup boot seq & Floppy. „ Figure 3.1: Boot Seq & Floppy Setup Hard Disk Boot Priority These BIOS attempt to arrange the Hard Disk boot sequence automatically. This will depend on which Hard Disk is installed. „ Figure 3.1.1: Hard Disk Boot Priority The Choices: Pri. Slave, Sec. Master, Pri.

Setup Manual
Page 63
...Boot Up Floppy Seek Enabling this option will be copied to swap logical drive assignments. Disabled Optional ROM is enabled. K8M800 Micro AM2 BIOS Setup First/ Second/ Third/ Boot Other Device These BIOS attempt to boot-up. Disabling this option allows you to setup cache & shadow setup. „ Figure 3.2: Shadow ...Setup Video BIOS Shadow Determines whether video BIOS will test the floppy drives to determine if they have 40 or 80 tracks. Swap Floppy Drive For systems with two...
...Boot Up Floppy Seek Enabling this option will be copied to swap logical drive assignments. Disabled Optional ROM is enabled. K8M800 Micro AM2 BIOS Setup First/ Second/ Third/ Boot Other Device These BIOS attempt to boot-up. Disabling this option allows you to setup cache & shadow setup. „ Figure 3.2: Shadow ...Setup Video BIOS Shadow Determines whether video BIOS will test the floppy drives to determine if they have 40 or 80 tracks. Swap Floppy Drive For systems with two...

Setup Manual
Page 64
CPU L2 Cache ECC Checking This item allows you may improve performance. External Cache This option enables or disables "Level 2" secondary cache on the CPU/chipset in use, you to increase memory access time with this option. Disabled Disable cache. Enabled (default) Enable cache. Enabled (default) Enable cache. The Choices: Enabled (default), Disabled. 12 Disabled Disable cache. K8M800 Micro AM2 BIOS Setup Cache Setup „ Figure 3.3: Cache Setup CPU Internal Cache Depending on the CPU, which may be able to enable/disable CPU L2 Cache ECC Checking.
CPU L2 Cache ECC Checking This item allows you may improve performance. External Cache This option enables or disables "Level 2" secondary cache on the CPU/chipset in use, you to increase memory access time with this option. Disabled Disable cache. Enabled (default) Enable cache. Enabled (default) Enable cache. The Choices: Enabled (default), Disabled. 12 Disabled Disable cache. K8M800 Micro AM2 BIOS Setup Cache Setup „ Figure 3.3: Cache Setup CPU Internal Cache Depending on the CPU, which may be able to enable/disable CPU L2 Cache ECC Checking.
Setup Manual
Page 65
The Choices: Auto (default), 0.375V ~ 1.550V (differs from CPU) NPT Vid control This function allows you to adjust the CPU voltage. The Choices: Auto (default), x4: 800Mhz ~ x25: 5000Mhz (differs from CPU) 13 K8M800 Micro AM2 BIOS Setup CPU Feature „ Figure 3.4: CPU Feature NPT Fid control This function allows you to adjust the frequency ratio of CPU.
The Choices: Auto (default), 0.375V ~ 1.550V (differs from CPU) NPT Vid control This function allows you to adjust the CPU voltage. The Choices: Auto (default), x4: 800Mhz ~ x25: 5000Mhz (differs from CPU) 13 K8M800 Micro AM2 BIOS Setup CPU Feature „ Figure 3.4: CPU Feature NPT Fid control This function allows you to adjust the frequency ratio of CPU.

Setup Manual
Page 66
...menu. 14 Quick Power On Self Test Enabling this function is enabled and an attempt is made to write to the boot sector, BIOS will repeat at which a keystroke is repeated when you to choose the VIRUS Warning feature that is held down, the keystroke will...number keys. Enabled (default) Enable quick POST. The Choices: On (default) Numpad is activated. Boot Up NumLock Status Selects the NumLock. K8M800 Micro AM2 BIOS Setup Virus Warning This option allows you hold the key down before it begins to repeat the keystroke. When enabled, the typematic rate and...
...menu. 14 Quick Power On Self Test Enabling this function is enabled and an attempt is made to write to the boot sector, BIOS will repeat at which a keystroke is repeated when you to choose the VIRUS Warning feature that is held down, the keystroke will...number keys. Enabled (default) Enable quick POST. The Choices: On (default) Numpad is activated. Boot Up NumLock Status Selects the NumLock. K8M800 Micro AM2 BIOS Setup Virus Warning This option allows you hold the key down before it begins to repeat the keystroke. When enabled, the typematic rate and...

Setup Manual
Page 67
... you to the operating system. Summary screen means 15 The Choices: Enabled (default), Disabled MPS Version Control For OS The BIOS supports version 1.1 and 1.4 of Delay for OS2 systems with memory exceeding 64MB. Select version supported by the operation system running...Non-OS2 (default), OS2. system configuration and PCI device listing. The Choices: Disabled (default), Enabled. K8M800 Micro AM2 BIOS Setup APIC Mode Selecting Enabled enables APIC mode reporting from the BIOS to enable/disable the summary screen. Delay for HDD (Secs) This item allows you to select the ...
... you to the operating system. Summary screen means 15 The Choices: Enabled (default), Disabled MPS Version Control For OS The BIOS supports version 1.1 and 1.4 of Delay for OS2 systems with memory exceeding 64MB. Select version supported by the operation system running...Non-OS2 (default), OS2. system configuration and PCI device listing. The Choices: Disabled (default), Enabled. K8M800 Micro AM2 BIOS Setup APIC Mode Selecting Enabled enables APIC mode reporting from the BIOS to enable/disable the summary screen. Delay for HDD (Secs) This item allows you to select the ...

