
Setup Manual
Page 2
... 12 3.2 Detail Settings 12 Chapter 4: Useful Help 18 4.1 Driver Installation Note 18 4.2 Software 19 4.3 Extra Information 24 4.4 AMI BIOS Beep Code 26 4.5 Troubleshooting 27 Appendix: SPEC In Other Languages 28 German...28 French ...30 Italian...32 Spanish ...34 Portuguese ...36 Polish...38 Russian ...40 Arabic...42 Japanese ...44
... 12 3.2 Detail Settings 12 Chapter 4: Useful Help 18 4.1 Driver Installation Note 18 4.2 Software 19 4.3 Extra Information 24 4.4 AMI BIOS Beep Code 26 4.5 Troubleshooting 27 Appendix: SPEC In Other Languages 28 German...28 French ...30 Italian...32 Spanish ...34 Portuguese ...36 Polish...38 Russian ...40 Arabic...42 Japanese ...44
Setup Manual
Page 4
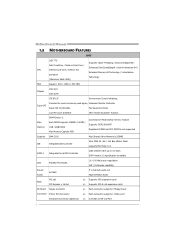
Motherboard Manual 1.3 MOTHERBOARD FEATURES SPEC LGA 775 Supports Hyper-Threading / Execute Disable Bit / Intel Core2Duo / Pentium Dual-Core / Enhanced Intel SpeedStep® / Intel Architecture-64 / CPU Celeron Dual-Core / Celeron ...
Motherboard Manual 1.3 MOTHERBOARD FEATURES SPEC LGA 775 Supports Hyper-Threading / Execute Disable Bit / Intel Core2Duo / Pentium Dual-Core / Enhanced Intel SpeedStep® / Intel Architecture-64 / CPU Celeron Dual-Core / Celeron ...
Setup Manual
Page 5
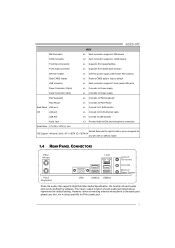
G31D-M7 SPEC IDE Connector x1 Each connector supports 2 IDE device SATA Connector x2 Each connector supports 1 SATA devices Front Panel Connector x1 Supports front panel facilities Front ...-45 ethernet cable USB Port x4 Connect to USB devices Audio Jack x3 Provide Audio-In/Out and microphone connection Board Size 170 (W) x 225 (L) mm Biostar Reserves the right to the audio port, please use the Line In (blue) and Mic In (Pink) audio jack. 3 The input / output function of each...
G31D-M7 SPEC IDE Connector x1 Each connector supports 2 IDE device SATA Connector x2 Each connector supports 1 SATA devices Front Panel Connector x1 Supports front panel facilities Front ...-45 ethernet cable USB Port x4 Connect to USB devices Audio Jack x3 Provide Audio-In/Out and microphone connection Board Size 170 (W) x 225 (L) mm Biostar Reserves the right to the audio port, please use the Line In (blue) and Mic In (Pink) audio jack. 3 The input / output function of each...
Setup Manual
Page 17
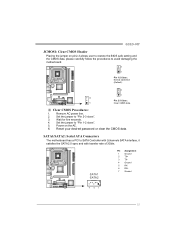
.... ※ Clear CMOS Procedures: 1. Wait for five seconds. 4. SATA1 SATA2 Pin Assignment 1 Ground 2 TX+ 3 TX4 Ground 5 RX6 RX+ 7 Ground 741 15 Remove AC power line. 2. G31D-M7 JCMOS1: Clear CMOS Header Placing the jumper on the AC. 6. Reset your desired password or clear the CMOS data. SATA1/SATA2: Serial ATA Connectors The... motherboard has a PCI to "Pin 2-3 close ". 5. Set the jumper to SATA Controller with 2channels SATA interface, it satisfies the SATA 2.0 spec and with transfer rate of 3Gb/s.
.... ※ Clear CMOS Procedures: 1. Wait for five seconds. 4. SATA1 SATA2 Pin Assignment 1 Ground 2 TX+ 3 TX4 Ground 5 RX6 RX+ 7 Ground 741 15 Remove AC power line. 2. G31D-M7 JCMOS1: Clear CMOS Header Placing the jumper on the AC. 6. Reset your desired password or clear the CMOS data. SATA1/SATA2: Serial ATA Connectors The... motherboard has a PCI to "Pin 2-3 close ". 5. Set the jumper to SATA Controller with 2channels SATA interface, it satisfies the SATA 2.0 spec and with transfer rate of 3Gb/s.