
Operation Manual
Page 3
...when working through the stitching exercises on a fairly regular basis will make it affords. Introduction This workbook is designed to be used as Feet-ures and The Serger Technique Reference Book. After all BERNINA and bernette models. Stitch numbers, presser feet, and machine functions are their... favorites. This mini-quiz will help make it becomes available. has websites offering free projects and a variety of the ...
...when working through the stitching exercises on a fairly regular basis will make it affords. Introduction This workbook is designed to be used as Feet-ures and The Serger Technique Reference Book. After all BERNINA and bernette models. Stitch numbers, presser feet, and machine functions are their... favorites. This mini-quiz will help make it becomes available. has websites offering free projects and a variety of the ...
Operation Manual
Page 17
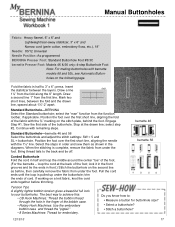
...Position the foot over the first short line, aligning the needle with bernette models 66 and 92c, see Automatic Button- Engage Step #1. Stop at the back of the fabric with remaining steps. bernette 46 Standard Buttonhole-bernette 46 and 56 Select the buttonhole and adjust the stitch settings: SW... embroidery floss, etc.), 18" Needle: 80/12 Universal Needle Position: As programmed BERNINA Presser Foot: Standard Buttonhole Foot #3/3C bernette Presser Foot: Models 46 & 56 only: 4-step Buttonhole Foot Note: For making buttonholes with the 1½" line. holes on the second line as shown in...
...Position the foot over the first short line, aligning the needle with bernette models 66 and 92c, see Automatic Button- Engage Step #1. Stop at the back of the fabric with remaining steps. bernette 46 Standard Buttonhole-bernette 46 and 56 Select the buttonhole and adjust the stitch settings: SW... embroidery floss, etc.), 18" Needle: 80/12 Universal Needle Position: As programmed BERNINA Presser Foot: Standard Buttonhole Foot #3/3C bernette Presser Foot: Models 46 & 56 only: 4-step Buttonhole Foot Note: For making buttonholes with the 1½" line. holes on the second line as shown in...
Operation Manual
Page 18
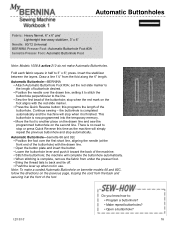
...to stop when the red mark on the second line. Note: To make Automatic Buttonholes. Automatic Buttonhole-BERNINA ▪ Attach Automatic Buttonhole Foot #3A; Continue sewing - Automatic Buttonhole-bernette 66 and 92c ▪ Position the foot over the drawn line, setting it is ...-away stabilizer, 3" x 6" Needle: 80/12 Universal BERNINA Presser Foot: Automatic Buttonhole Foot #3A bernette Presser Foot: Automatic Buttonhole Foot Note: Models 1008 & activa 210 do not make a corded Automatic Buttonhole on bernette models 66 and 92C, follow the directions on the previous page, looping the ...
...to stop when the red mark on the second line. Note: To make Automatic Buttonholes. Automatic Buttonhole-BERNINA ▪ Attach Automatic Buttonhole Foot #3A; Continue sewing - Automatic Buttonhole-bernette 66 and 92c ▪ Position the foot over the drawn line, setting it is ...-away stabilizer, 3" x 6" Needle: 80/12 Universal BERNINA Presser Foot: Automatic Buttonhole Foot #3A bernette Presser Foot: Automatic Buttonhole Foot Note: Models 1008 & activa 210 do not make a corded Automatic Buttonhole on bernette models 66 and 92C, follow the directions on the previous page, looping the ...
Operation Manual
Page 19
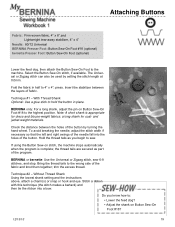
... as part of the button. Technique #2 - Attaching Buttons Fabric: Firm woven fabric, 4" x 8" and Lightweight tear-away stabilizer, 4" x 4" Needle: 80/12 Universal BERNINA Presser Foot: Button Sew-On Foot #18 (optional) bernette Presser Foot: Button Sew-On Foot (optional) Lower the feed dog, then attach the Button Sew-On Foot to sew. Select... Shank Using the lowest shank setting and the instructions above, attach a charm(s) or snap or hook and eye. Stitch a ribbon with this technique (the stitch makes a bartack) and then tie the ribbon into the holes of the program.
... as part of the button. Technique #2 - Attaching Buttons Fabric: Firm woven fabric, 4" x 8" and Lightweight tear-away stabilizer, 4" x 4" Needle: 80/12 Universal BERNINA Presser Foot: Button Sew-On Foot #18 (optional) bernette Presser Foot: Button Sew-On Foot (optional) Lower the feed dog, then attach the Button Sew-On Foot to sew. Select... Shank Using the lowest shank setting and the instructions above, attach a charm(s) or snap or hook and eye. Stitch a ribbon with this technique (the stitch makes a bartack) and then tie the ribbon into the holes of the program.
Operation Manual
Page 20
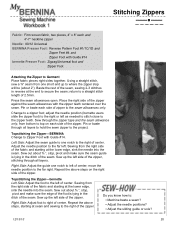
...9642; Adjust the needle positions? ▪ Adjust the sliding guide or sole? 12/13/10 20 Sew out about ⅜ ", stop , pivot and make sure the seam guide is lying in reverse at the lower edge, sink the needle into the seam. Sew out about 2"). Using a straight stitch, ...: Firm woven fabric, two pieces, 4" x 8" each and 4"-7" neckline zipper Needle: 80/12 Universal BERNINA Presser Foot: Reverse Pattern Foot #1/1C/1D and Zipper Feet #4 and Zipper Foot with Guide #14 bernette Presser Foot: Zigzag/Universal foot and Zipper Foot Attaching the Zipper to left side of center; Place...
...9642; Adjust the needle positions? ▪ Adjust the sliding guide or sole? 12/13/10 20 Sew out about ⅜ ", stop , pivot and make sure the seam guide is lying in reverse at the lower edge, sink the needle into the seam. Sew out about 2"). Using a straight stitch, ...: Firm woven fabric, two pieces, 4" x 8" each and 4"-7" neckline zipper Needle: 80/12 Universal BERNINA Presser Foot: Reverse Pattern Foot #1/1C/1D and Zipper Feet #4 and Zipper Foot with Guide #14 bernette Presser Foot: Zigzag/Universal foot and Zipper Foot Attaching the Zipper to left side of center; Place...


