
Operation Manual
Page 2
...all current BERNINA and bernette sewing machines. Table of Contents Introduction ...3 Sewing Machine Needles 4 Thread ...6 Presser Feet ...7 Securing Stitches...8 Turning Corners...9 Zigzag Stitch...10 Blind Hem ...11 Triple Straight Stitch 12 Vari-Overlock Stitch...13 Stretch Stitch ...14 Gathering Over Cord 15 Buttonholes ...16 Manual Buttonholes...17 Automatic Buttonholes 18 Attaching Buttons ...19 Stitching Zippers...20 Stitch, Function, and Foot Charts 21 8 Series activa 1008 bernette aurora 12/13/10 artista 3 Series The information in this workbook applies to models equipped...
...all current BERNINA and bernette sewing machines. Table of Contents Introduction ...3 Sewing Machine Needles 4 Thread ...6 Presser Feet ...7 Securing Stitches...8 Turning Corners...9 Zigzag Stitch...10 Blind Hem ...11 Triple Straight Stitch 12 Vari-Overlock Stitch...13 Stretch Stitch ...14 Gathering Over Cord 15 Buttonholes ...16 Manual Buttonholes...17 Automatic Buttonholes 18 Attaching Buttons ...19 Stitching Zippers...20 Stitch, Function, and Foot Charts 21 8 Series activa 1008 bernette aurora 12/13/10 artista 3 Series The information in this workbook applies to models equipped...
Operation Manual
Page 3
Stitch numbers, presser feet, and machine functions are listed for all types of stitchers, no matter which machines are useful when working through the stitching exercises on pages 8-20. This will help make it becomes available. Plus, BERNINA of this workbook have completed the exercises designated for your machine, attach the sewn samples to the information pages (or add an extra mounting page as a facing page) and insert the...
Stitch numbers, presser feet, and machine functions are listed for all types of stitchers, no matter which machines are useful when working through the stitching exercises on pages 8-20. This will help make it becomes available. Plus, BERNINA of this workbook have completed the exercises designated for your machine, attach the sewn samples to the information pages (or add an extra mounting page as a facing page) and insert the...
Operation Manual
Page 4
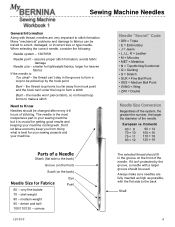
Sewing Machine Needles General Information Along with thread, needles are fully inserted as high as possible, with a larger groove should be changed after every 4-6 hours of the needle. assures proper stitch formation; the needle won't pierce fabric, so no thread loop forms to make sure needles are very important to a bent, damaged, or incorrect size or type needle. very fine batiste 70 - denim and twill 100/110/120...
Sewing Machine Needles General Information Along with thread, needles are fully inserted as high as possible, with a larger groove should be changed after every 4-6 hours of the needle. assures proper stitch formation; the needle won't pierce fabric, so no thread loop forms to make sure needles are very important to a bent, damaged, or incorrect size or type needle. very fine batiste 70 - denim and twill 100/110/120...
Operation Manual
Page 5
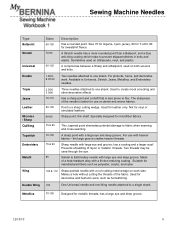
... fabric when seaming and cross-seaming. 70-100 75 & 90 80 A sharp point with a non-cutting metal wedge on both wovens and knits. Used for sweatshirt fleece. thin shaft. used through the eye. has a large eye and deep groove. 12/13/10 5 A compromise between a Sharp and a Ballpoint; Sewing Machine Needles Type Ballpoint Stretch Universal Double Triple Jeans Leather Microtex / Sharp Quilting Topstitch Embroidery...
... fabric when seaming and cross-seaming. 70-100 75 & 90 80 A sharp point with a non-cutting metal wedge on both wovens and knits. Used for sweatshirt fleece. thin shaft. used through the eye. has a large eye and deep groove. 12/13/10 5 A compromise between a Sharp and a Ballpoint; Sewing Machine Needles Type Ballpoint Stretch Universal Double Triple Jeans Leather Microtex / Sharp Quilting Topstitch Embroidery...
Operation Manual
Page 6
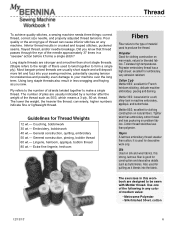
...-made, natural or blended fabrics. Thread To achieve quality stitches, a sewing machine needs three things: correct thread, correct size needle, and properly adjusted thread tensions. Long staple threads are usually indicated by a number after the weight of the thread such as you know that thread passes through the eye of material used for Thread Weights 12 wt.- excellent for French heirloom stitching, delicate machine embroidery, piecing and darning. Polyester Good for clothing...
...-made, natural or blended fabrics. Thread To achieve quality stitches, a sewing machine needs three things: correct thread, correct size needle, and properly adjusted thread tensions. Long staple threads are usually indicated by a number after the weight of the thread such as you know that thread passes through the eye of material used for Thread Weights 12 wt.- excellent for French heirloom stitching, delicate machine embroidery, piecing and darning. Polyester Good for clothing...
Operation Manual
Page 7
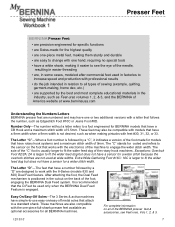
... for BERNINA models that attach to see Feet-ures, Vols 1, 2, & 3. 12/13/10 7 These machines are also compatible with the one-piece full-shank presser feet available as optional accessories for all types of the foot, engaging the BERNINA Dual Feed system. The Letter "C"-When a foot number is positioned in the industry, such as Feet-ures volumes 1, 2, & 3, and the BERNINA of 9mm. The "C" stands for coded and refers to work with...
... for BERNINA models that attach to see Feet-ures, Vols 1, 2, & 3. 12/13/10 7 These machines are also compatible with the one-piece full-shank presser feet available as optional accessories for all types of the foot, engaging the BERNINA Dual Feed system. The Letter "C"-When a foot number is positioned in the industry, such as Feet-ures volumes 1, 2, & 3, and the BERNINA of 9mm. The "C" stands for coded and refers to work with...
Operation Manual
Page 8
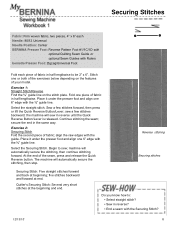
Securing Stitches Fabric: Firm woven fabric, two pieces, 4" x 6" each Needle: 80/12 Universal Needle Position: Center BERNINA Presser Foot: Reverse Pattern Foot #1/1C/1D with optional Quilting Seam Guide or optional Seam Guides with Rulers bernette Presser Foot: Zigzag/Universal Foot Fold each piece of the seam, press and release the Quick Reverse button. Place it under the presser foot and align one 6" edge with the ⅝" guide line. Sew a few stitches backward; Place it under the presser foot and align one 6" edge with...
Securing Stitches Fabric: Firm woven fabric, two pieces, 4" x 6" each Needle: 80/12 Universal Needle Position: Center BERNINA Presser Foot: Reverse Pattern Foot #1/1C/1D with optional Quilting Seam Guide or optional Seam Guides with Rulers bernette Presser Foot: Zigzag/Universal Foot Fold each piece of the seam, press and release the Quick Reverse button. Place it under the presser foot and align one 6" edge with the ⅝" guide line. Sew a few stitches backward; Place it under the presser foot and align one 6" edge with...
Operation Manual
Page 9
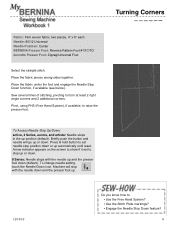
... reset. To change needle setting, touch the Needle Down icon. Machine will go up or down or up . 12/13/10 Do you know how to form at least 2 right angle corners and 2 additional corners. Press & hold button to raise the presser foot. Turning Corners Fabric: Firm woven fabric, two pieces, 4" x 6" each Needle: 80/12 Universal Needle Position: Center BERNINA Presser Foot: Reverse Pattern Foot #1/1C/1D bernette Presser Foot: Zigzag/Universal Foot Select the straight stitch...
... reset. To change needle setting, touch the Needle Down icon. Machine will go up or down or up . 12/13/10 Do you know how to form at least 2 right angle corners and 2 additional corners. Press & hold button to raise the presser foot. Turning Corners Fabric: Firm woven fabric, two pieces, 4" x 6" each Needle: 80/12 Universal Needle Position: Center BERNINA Presser Foot: Reverse Pattern Foot #1/1C/1D bernette Presser Foot: Zigzag/Universal Foot Select the straight stitch...
Operation Manual
Page 10
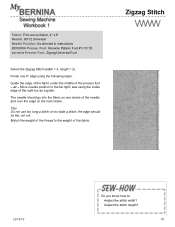
Fabric: Firm woven fabric, 4" x 6" Needle: 80/12 Universal Needle Position: As directed in instructions BERNINA Presser Foot: Reverse Pattern Foot #1/1C/1D bernette Presser Foot: Zigzag/Universal Foot Select the Zigzag Stitch (width = 4, length = 2). the edge should go into the fabric on the next stroke. or - Match the weight of the thread to the weight of the presser foot - Guide the edge of the fabric under the middle of the fabric. Move needle position to : ▪Adjust the stitch width? ▪Adjust the stitch length? 10...
Fabric: Firm woven fabric, 4" x 6" Needle: 80/12 Universal Needle Position: As directed in instructions BERNINA Presser Foot: Reverse Pattern Foot #1/1C/1D bernette Presser Foot: Zigzag/Universal Foot Select the Zigzag Stitch (width = 4, length = 2). the edge should go into the fabric on the next stroke. or - Match the weight of the thread to the weight of the presser foot - Guide the edge of the fabric under the middle of the fabric. Move needle position to : ▪Adjust the stitch width? ▪Adjust the stitch length? 10...
Operation Manual
Page 11
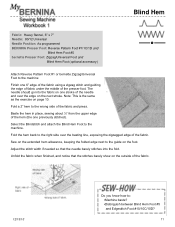
... the fabric using a zigzag stitch and guiding the edge of fabric under the middle of the presser foot. Note: This is the same as the exercise on the next stroke. Select the Blindstitch and attach the Blind Hem Foot to the wrong side of the fabric. Fold a 2" hem to the machine. Blind Hem Fabric: Heavy flannel, 6" x 7" Needle: 80/12 Universal Needle Position: As programmed BERNINA Presser Foot: Reverse Pattern Foot #1/1C/1D and Blind Hem Foot #5 bernette Presser Foot: Zigzag/Universal Foot and Blind Hem Foot (optional accessory) Attach Reverse Pattern Foot #1 or bernette Zigzag...
... the fabric using a zigzag stitch and guiding the edge of fabric under the middle of the presser foot. Note: This is the same as the exercise on the next stroke. Select the Blindstitch and attach the Blind Hem Foot to the wrong side of the fabric. Fold a 2" hem to the machine. Blind Hem Fabric: Heavy flannel, 6" x 7" Needle: 80/12 Universal Needle Position: As programmed BERNINA Presser Foot: Reverse Pattern Foot #1/1C/1D and Blind Hem Foot #5 bernette Presser Foot: Zigzag/Universal Foot and Blind Hem Foot (optional accessory) Attach Reverse Pattern Foot #1 or bernette Zigzag...
Operation Manual
Page 12
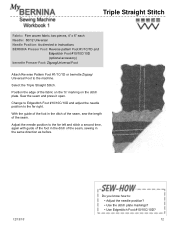
... machine. Triple Straight Stitch Fabric: Firm woven fabric, two pieces, 4" x 6" each Needle: 80/12 Universal Needle Position: As directed in instructions BERNINA Presser Foot: Reverse pattern Foot #1/1C/1D and Edgestitch Foot #10/10C/10D (optional accessory) bernette Presser Foot: Zigzag/Universal Foot Attach Reverse Pattern Foot #1/1C/1D or bernette Zigzag/ Universal Foot to the far right. Sew the seam and press it open. With the guide of the foot in the ditch of the seam, sew the length of the seam, sewing in the ditch of the seam. Adjust the needle position...
... machine. Triple Straight Stitch Fabric: Firm woven fabric, two pieces, 4" x 6" each Needle: 80/12 Universal Needle Position: As directed in instructions BERNINA Presser Foot: Reverse pattern Foot #1/1C/1D and Edgestitch Foot #10/10C/10D (optional accessory) bernette Presser Foot: Zigzag/Universal Foot Attach Reverse Pattern Foot #1/1C/1D or bernette Zigzag/ Universal Foot to the far right. Sew the seam and press it open. With the guide of the foot in the ditch of the seam, sew the length of the seam, sewing in the ditch of the seam. Adjust the needle position...
Operation Manual
Page 13
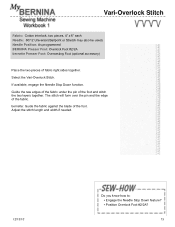
... two layers together. Select the Vari-Overlock Stitch. The stitch will form over the pin and the edge of fabric right sides together. If available, engage the Needle Stop Down function. Vari-Overlock Stitch Fabric: Cotton interlock, two pieces, 4" x 6" each Needle: 80/12 Universal (Ballpoint or Stretch may also be used) Needle Position: As programmed BERNINA Presser Foot: Overlock Foot #2/2A bernette Presser Foot: Overcasting Foot (optional accessory) Place the two pieces of the...
... two layers together. Select the Vari-Overlock Stitch. The stitch will form over the pin and the edge of fabric right sides together. If available, engage the Needle Stop Down function. Vari-Overlock Stitch Fabric: Cotton interlock, two pieces, 4" x 6" each Needle: 80/12 Universal (Ballpoint or Stretch may also be used) Needle Position: As programmed BERNINA Presser Foot: Overlock Foot #2/2A bernette Presser Foot: Overcasting Foot (optional accessory) Place the two pieces of the...
Operation Manual
Page 14
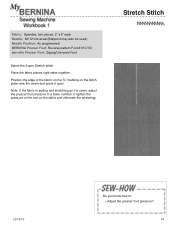
..., adjust the presser foot pressure to a lower number to : ▪ Adjust the presser foot pressure? 14 Stretch Stitch 12/13/10 Do you know how to lighten the pressure of the fabric on the ⅝" marking on the fabric and eliminate the stretching. Position the edge of the foot on the stitch plate; Fabric: Spandex, two pieces, 2" x 6" each Needle: 80/12 Universal (Ballpoint may also be used) Needle Position: As programmed BERNINA Presser Foot: Reverse pattern Foot #1/1C/1D bernette Presser Foot: Zigzag/Universal Foot Select...
..., adjust the presser foot pressure to a lower number to : ▪ Adjust the presser foot pressure? 14 Stretch Stitch 12/13/10 Do you know how to lighten the pressure of the fabric on the ⅝" marking on the fabric and eliminate the stretching. Position the edge of the foot on the stitch plate; Fabric: Spandex, two pieces, 2" x 6" each Needle: 80/12 Universal (Ballpoint may also be used) Needle Position: As programmed BERNINA Presser Foot: Reverse pattern Foot #1/1C/1D bernette Presser Foot: Zigzag/Universal Foot Select...
Operation Manual
Page 15
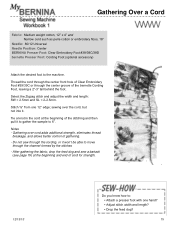
...; Adjust stitch width and length? ▪ Drop the feed dog? 15 After gathering the fabric, drop the feed dog and sew a bartack (see page 19) at the beginning of gathering. - Gathering Over a Cord Fabric: Medium weight cotton, 12" x 4" and Narrow cord such as perle cotton or embroidery floss, 18" Needle: 80/12 Universal Needle Position: Center BERNINA Presser Foot: Clear Embroidery Foot #39/39C/39D bernette Presser Foot: Cording Foot (optional accessory) Attach the desired foot to 6". Thread the cord through the center front hole of the bernette Cording Foot...
...; Adjust stitch width and length? ▪ Drop the feed dog? 15 After gathering the fabric, drop the feed dog and sew a bartack (see page 19) at the beginning of gathering. - Gathering Over a Cord Fabric: Medium weight cotton, 12" x 4" and Narrow cord such as perle cotton or embroidery floss, 18" Needle: 80/12 Universal Needle Position: Center BERNINA Presser Foot: Clear Embroidery Foot #39/39C/39D bernette Presser Foot: Cording Foot (optional accessory) Attach the desired foot to 6". Thread the cord through the center front hole of the bernette Cording Foot...
Operation Manual
Page 16
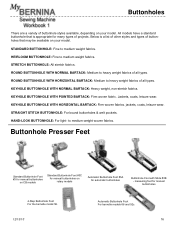
STRETCH BUTTONHOLE: All stretch fabrics. HAND-LOOK BUTTONHOLE: For light- Buttonhole Presser Feet Standard Buttonhole Foot #3 for manual buttonholes on CB models Standard Buttonhole Foot #3C for automatic buttonholes Buttonhole Foot with Slide #3B - Below is a list of other styles and types of buttonholes that is appropriate for manual buttonholes 4-Step Buttonhole Foot For the bernette model 56. 12/13/10 Automatic Buttonhole Foot For bernette models 66 and 92c. 16 STANDARD BUTTONHOLE: Fine to medium weight fabrics. KEYHOLE BUTTONHOLE WITH POINTED BARTACK: Firm woven fabric....
STRETCH BUTTONHOLE: All stretch fabrics. HAND-LOOK BUTTONHOLE: For light- Buttonhole Presser Feet Standard Buttonhole Foot #3 for manual buttonholes on CB models Standard Buttonhole Foot #3C for automatic buttonholes Buttonhole Foot with Slide #3B - Below is a list of other styles and types of buttonholes that is appropriate for manual buttonholes 4-Step Buttonhole Foot For the bernette model 56. 12/13/10 Automatic Buttonhole Foot For bernette models 66 and 92c. 16 STANDARD BUTTONHOLE: Fine to medium weight fabrics. KEYHOLE BUTTONHOLE WITH POINTED BARTACK: Firm woven fabric....
Operation Manual
Page 17
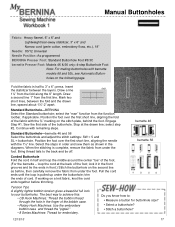
... the stitch plate, behind the foot. Standard Buttonhole-BERNINA Select the Standard buttonhole; Engage Step #1. bernette 46 Standard Buttonhole-bernette 46 and 56 Select the buttonhole and adjust the stitch settings: SW = 5 and SL = buttonhole. Mark two short lines, between the layers. Position the foot over the first short line, aligning the needle with remaining steps. Stop at the back of the bobbin case. • Rotary Hook Machines: Use the embroidery bobbin case and thread the...
... the stitch plate, behind the foot. Standard Buttonhole-BERNINA Select the Standard buttonhole; Engage Step #1. bernette 46 Standard Buttonhole-bernette 46 and 56 Select the buttonhole and adjust the stitch settings: SW = 5 and SL = buttonhole. Mark two short lines, between the layers. Position the foot over the first short line, aligning the needle with remaining steps. Stop at the back of the bobbin case. • Rotary Hook Machines: Use the embroidery bobbin case and thread the...
Operation Manual
Page 18
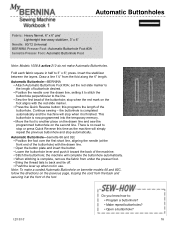
... drawn line. • Open the button plate and insert the button. • Lower the buttonhole lever and push it toward the back of the machine. • Stitch the buttonhole; Automatic Buttonholes Fabric: Heavy flannel, 6" x 6" and Lightweight tear-away stabilizer, 3" x 6" Needle: 80/12 Universal BERNINA Presser Foot: Automatic Buttonhole Foot #3A bernette Presser Foot: Automatic Buttonhole Foot Note: Models 1008 & activa 210 do not make a corded Automatic Buttonhole on bernette models 66 and 92C, follow the directions on the previous page, looping the cord from the back and...
... drawn line. • Open the button plate and insert the button. • Lower the buttonhole lever and push it toward the back of the machine. • Stitch the buttonhole; Automatic Buttonholes Fabric: Heavy flannel, 6" x 6" and Lightweight tear-away stabilizer, 3" x 6" Needle: 80/12 Universal BERNINA Presser Foot: Automatic Buttonhole Foot #3A bernette Presser Foot: Automatic Buttonhole Foot Note: Models 1008 & activa 210 do not make a corded Automatic Buttonhole on bernette models 66 and 92C, follow the directions on the previous page, looping the cord from the back and...
Operation Manual
Page 19
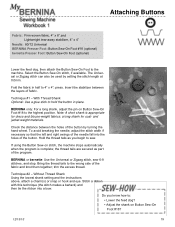
... machine. Note: A short shank is complete; Without Thread Shank Using the lowest shank setting and the instructions above, attach a charm(s) or snap or hook and eye. press. and jacket-weight materials. Hold the thread tails as part of the fabric and knot them together; Attaching Buttons Fabric: Firm woven fabric, 4" x 8" and Lightweight tear-away stabilizer, 4" x 4" Needle: 80/12 Universal BERNINA Presser Foot: Button Sew-On Foot #18 (optional) bernette Presser Foot: Button Sew-On Foot (optional) Lower the feed dog, then attach the Button Sew-On Foot...
... machine. Note: A short shank is complete; Without Thread Shank Using the lowest shank setting and the instructions above, attach a charm(s) or snap or hook and eye. press. and jacket-weight materials. Hold the thread tails as part of the fabric and knot them together; Attaching Buttons Fabric: Firm woven fabric, 4" x 8" and Lightweight tear-away stabilizer, 4" x 4" Needle: 80/12 Universal BERNINA Presser Foot: Button Sew-On Foot #18 (optional) bernette Presser Foot: Button Sew-On Foot (optional) Lower the feed dog, then attach the Button Sew-On Foot...
Operation Manual
Page 20
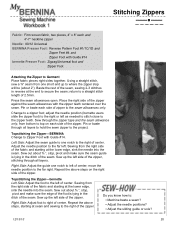
... of zipper to : ▪ Machine baste a seam? ▪ Adjust the needle positions? ▪ Adjust the sliding guide or sole? 12/13/10 20 Using a straight stitch, sew a ¾" seam from the right side of 2.5mm. Repeat the above steps, starting at the lower edge, sink the needle into the seam. Baste the rest of the zipper. Pin or baste each side of the seam. Topstitching the Zipper-BERNINA Change to Zipper Foot with Guide #14 bernette Presser Foot: Zigzag/Universal foot and Zipper Foot Attaching the Zipper to...
... of zipper to : ▪ Machine baste a seam? ▪ Adjust the needle positions? ▪ Adjust the sliding guide or sole? 12/13/10 20 Using a straight stitch, sew a ¾" seam from the right side of 2.5mm. Repeat the above steps, starting at the lower edge, sink the needle into the seam. Baste the rest of the zipper. Pin or baste each side of the seam. Topstitching the Zipper-BERNINA Change to Zipper Foot with Guide #14 bernette Presser Foot: Zigzag/Universal foot and Zipper Foot Attaching the Zipper to...
Operation Manual
Page 23
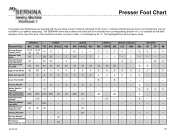
...-- 3A 3A 3A -- -- Sideways Motion Foot #40C 40C -- 40C -- -- -- Walking Foot #50 -- -- -- -- -- -- Circular Embroidery Attachment 83 -- -- -- -- 83 -- X -- 37 -- -- -- X X -- -- -- -- -- -- -- -- -- -- -- -- -- -- 46 X -X -X ---X ------- 23 BERNINA Stitch Regulator #42 42 42 42 -- -- -- The highlighted feet have a letter, it is indicated by the letter stamped on soles. Presser Feet Reverse Pattern Foot #1/1C/1D Overlock Foot #2/2A Standard Buttonhole Foot #3/3C Auto Buttonhole Foot #3A Zipper Foot #4/4D 8 Series artista 830 820...
...-- 3A 3A 3A -- -- Sideways Motion Foot #40C 40C -- 40C -- -- -- Walking Foot #50 -- -- -- -- -- -- Circular Embroidery Attachment 83 -- -- -- -- 83 -- X -- 37 -- -- -- X X -- -- -- -- -- -- -- -- -- -- -- -- -- -- 46 X -X -X ---X ------- 23 BERNINA Stitch Regulator #42 42 42 42 -- -- -- The highlighted feet have a letter, it is indicated by the letter stamped on soles. Presser Feet Reverse Pattern Foot #1/1C/1D Overlock Foot #2/2A Standard Buttonhole Foot #3/3C Auto Buttonhole Foot #3A Zipper Foot #4/4D 8 Series artista 830 820...


