
Operation Manual
Page 2
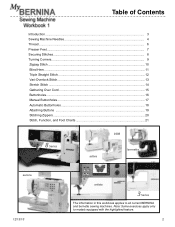
... Stitch ...14 Gathering Over Cord 15 Buttonholes ...16 Manual Buttonholes...17 Automatic Buttonholes 18 Attaching Buttons ...19 Stitching Zippers...20 Stitch, Function, and Foot Charts 21 8 Series activa 1008 bernette aurora 12/13/10 artista 3 Series The information in this workbook applies to models equipped with the highlighted feature. 2 Note: Some exercises...
... Stitch ...14 Gathering Over Cord 15 Buttonholes ...16 Manual Buttonholes...17 Automatic Buttonholes 18 Attaching Buttons ...19 Stitching Zippers...20 Stitch, Function, and Foot Charts 21 8 Series activa 1008 bernette aurora 12/13/10 artista 3 Series The information in this workbook applies to models equipped with the highlighted feature. 2 Note: Some exercises...
Operation Manual
Page 7
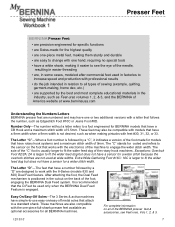
...2A is not desired, such as optional accessories for all of the BERNINA presser feet & accessories, see the eye of the needle, resulting in easier threading ▪ are, in the industry, such as Edgestitch Foot #10C or Jeans Foot #8D. These machines are also compatible with the one-piece full... feet available as when making pintucks with feet #30, 31, 32, or 33. Number Only-The number without a letter refers to a foot engineered for BERNINA models that have a CB Hook and a maximum stitch width of the rotary hook machines. It is recommended that the D-Feet be compatible with...
...2A is not desired, such as optional accessories for all of the BERNINA presser feet & accessories, see the eye of the needle, resulting in easier threading ▪ are, in the industry, such as Edgestitch Foot #10C or Jeans Foot #8D. These machines are also compatible with the one-piece full... feet available as when making pintucks with feet #30, 31, 32, or 33. Number Only-The number without a letter refers to a foot engineered for BERNINA models that have a CB Hook and a maximum stitch width of the rotary hook machines. It is recommended that the D-Feet be compatible with...
Operation Manual
Page 8
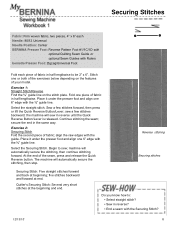
... the stitching, then stop. Select the straight stitch. align the raw edges with the ⅝" guide line. Place it under the presser foot and align one piece of fabric in half lengthwise to be 2" x 6". Select the Securing Stitch. Begin to : ▪ Select straight...two pieces, 4" x 6" each Needle: 80/12 Universal Needle Position: Center BERNINA Presser Foot: Reverse Pattern Foot #1/1C/1D with optional Quilting Seam Guide or optional Seam Guides with Rulers bernette Presser Foot: Zigzag/Universal Foot Fold each piece of fabric in half lengthwise. the machine will sew in ...
... the stitching, then stop. Select the straight stitch. align the raw edges with the ⅝" guide line. Place it under the presser foot and align one piece of fabric in half lengthwise to be 2" x 6". Select the Securing Stitch. Begin to : ▪ Select straight...two pieces, 4" x 6" each Needle: 80/12 Universal Needle Position: Center BERNINA Presser Foot: Reverse Pattern Foot #1/1C/1D with optional Quilting Seam Guide or optional Seam Guides with Rulers bernette Presser Foot: Zigzag/Universal Foot Fold each piece of fabric in half lengthwise. the machine will sew in ...
Operation Manual
Page 9
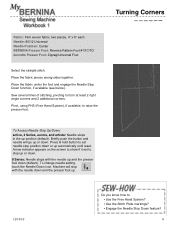
...needle stop up or down (default). Pivot, using FHS (Free Hand System), if available, to stop position down or up and the presser foot down . 8 Series: Needle stops with the needle down . Press & hold button to form at least 2 right angle corners and 2 ... Corners Fabric: Firm woven fabric, two pieces, 4" x 6" each Needle: 80/12 Universal Needle Position: Center BERNINA Presser Foot: Reverse Pattern Foot #1/1C/1D bernette Presser Foot: Zigzag/Universal Foot Select the straight stitch. Place the fabric under the foot and engage the Needle Stop Down function, if available (see below).
...needle stop up or down (default). Pivot, using FHS (Free Hand System), if available, to stop position down or up and the presser foot down . 8 Series: Needle stops with the needle down . Press & hold button to form at least 2 right angle corners and 2 ... Corners Fabric: Firm woven fabric, two pieces, 4" x 6" each Needle: 80/12 Universal Needle Position: Center BERNINA Presser Foot: Reverse Pattern Foot #1/1C/1D bernette Presser Foot: Zigzag/Universal Foot Select the straight stitch. Place the fabric under the foot and engage the Needle Stop Down function, if available (see below).
Operation Manual
Page 10
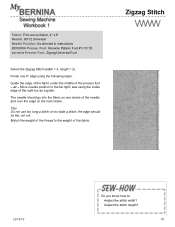
... position to the weight of the fabric. Fabric: Firm woven fabric, 4" x 6" Needle: 80/12 Universal Needle Position: As directed in instructions BERNINA Presser Foot: Reverse Pattern Foot #1/1C/1D bernette Presser Foot: Zigzag/Universal Foot Select the Zigzag Stitch (width = 4, length = 2). Match the weight of the needle and over the edge on one 6" edge using the...
... position to the weight of the fabric. Fabric: Firm woven fabric, 4" x 6" Needle: 80/12 Universal Needle Position: As directed in instructions BERNINA Presser Foot: Reverse Pattern Foot #1/1C/1D bernette Presser Foot: Zigzag/Universal Foot Select the Zigzag Stitch (width = 4, length = 2). Match the weight of the needle and over the edge on one 6" edge using the...
Operation Manual
Page 11
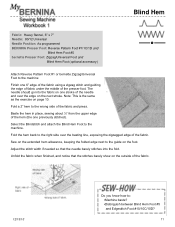
... stroke. Blind Hem Fabric: Heavy flannel, 6" x 7" Needle: 80/12 Universal Needle Position: As programmed BERNINA Presser Foot: Reverse Pattern Foot #1/1C/1D and Blind Hem Foot #5 bernette Presser Foot: Zigzag/Universal Foot and Blind Hem Foot (optional accessory) Attach Reverse Pattern Foot #1 or bernette Zigzag/Universal Foot to the machine Finish one 6" edge of the fabric using a zigzag stitch and guiding...
... stroke. Blind Hem Fabric: Heavy flannel, 6" x 7" Needle: 80/12 Universal Needle Position: As programmed BERNINA Presser Foot: Reverse Pattern Foot #1/1C/1D and Blind Hem Foot #5 bernette Presser Foot: Zigzag/Universal Foot and Blind Hem Foot (optional accessory) Attach Reverse Pattern Foot #1 or bernette Zigzag/Universal Foot to the machine Finish one 6" edge of the fabric using a zigzag stitch and guiding...
Operation Manual
Page 12
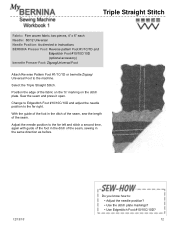
... as before. 12/13/10 Do you know how to the far left and stitch a second time, again with guide of the foot in the ditch of the seam, sewing in the ditch of the seam, sew the length of the fabric on the ⅝" ...Straight Stitch Fabric: Firm woven fabric, two pieces, 4" x 6" each Needle: 80/12 Universal Needle Position: As directed in instructions BERNINA Presser Foot: Reverse pattern Foot #1/1C/1D and Edgestitch Foot #10/10C/10D (optional accessory) bernette Presser Foot: Zigzag/Universal Foot Attach Reverse Pattern Foot #1/1C/1D or bernette Zigzag/ Universal Foot to the far right.
... as before. 12/13/10 Do you know how to the far left and stitch a second time, again with guide of the foot in the ditch of the seam, sewing in the ditch of the seam, sew the length of the fabric on the ⅝" ...Straight Stitch Fabric: Firm woven fabric, two pieces, 4" x 6" each Needle: 80/12 Universal Needle Position: As directed in instructions BERNINA Presser Foot: Reverse pattern Foot #1/1C/1D and Edgestitch Foot #10/10C/10D (optional accessory) bernette Presser Foot: Zigzag/Universal Foot Attach Reverse Pattern Foot #1/1C/1D or bernette Zigzag/ Universal Foot to the far right.
Operation Manual
Page 13
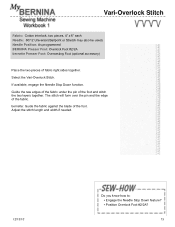
... each Needle: 80/12 Universal (Ballpoint or Stretch may also be used) Needle Position: As programmed BERNINA Presser Foot: Overlock Foot #2/2A bernette Presser Foot: Overcasting Foot (optional accessory) Place the two pieces of the foot and stitch the two layers together. Adjust the stitch length and width if needed. 12/13/10... Do you know how to: ▪ Engage the Needle Stop Down feature? ▪ Position Overlock Foot #2/2A? 13 bernette: Guide the fabric against the blade of the fabric. If available, engage the Needle Stop Down function. Select the Vari-Overlock...
... each Needle: 80/12 Universal (Ballpoint or Stretch may also be used) Needle Position: As programmed BERNINA Presser Foot: Overlock Foot #2/2A bernette Presser Foot: Overcasting Foot (optional accessory) Place the two pieces of the foot and stitch the two layers together. Adjust the stitch length and width if needed. 12/13/10... Do you know how to: ▪ Engage the Needle Stop Down feature? ▪ Position Overlock Foot #2/2A? 13 bernette: Guide the fabric against the blade of the fabric. If available, engage the Needle Stop Down function. Select the Vari-Overlock...
Operation Manual
Page 14
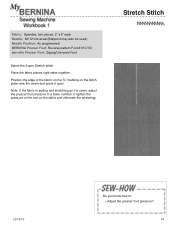
... pieces right sides together. Note: If the fabric is sewn, adjust the presser foot pressure to a lower number to : ▪ Adjust the presser foot pressure? 14 Position the edge of the foot on the stitch plate; sew the seam and press it is pulling and stretching as... it open. Fabric: Spandex, two pieces, 2" x 6" each Needle: 80/12 Universal (Ballpoint may also be used) Needle Position: As programmed BERNINA Presser Foot: Reverse pattern Foot #1/1C/1D bernette Presser Foot: Zigzag/Universal Foot ...
... pieces right sides together. Note: If the fabric is sewn, adjust the presser foot pressure to a lower number to : ▪ Adjust the presser foot pressure? 14 Position the edge of the foot on the stitch plate; sew the seam and press it is pulling and stretching as... it open. Fabric: Spandex, two pieces, 2" x 6" each Needle: 80/12 Universal (Ballpoint may also be used) Needle Position: As programmed BERNINA Presser Foot: Reverse pattern Foot #1/1C/1D bernette Presser Foot: Zigzag/Universal Foot ...
Operation Manual
Page 15
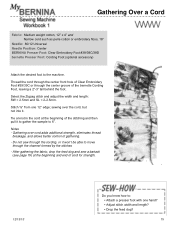
...After gathering the fabric, drop the feed dog and sew a bartack (see page 19) at the beginning of the bernette Cording Foot, leaving a 2"-3" tail behind the foot. Do not sew through the cording, or it to gather the sample to the machine. Tie a knot in the...9642; Attach a presser foot with one 12" edge; Gathering Over a Cord Fabric: Medium weight cotton, 12" x 4" and Narrow cord such as perle cotton or embroidery floss, 18" Needle: 80/12 Universal Needle Position: Center BERNINA Presser Foot: Clear Embroidery Foot #39/39C/39D bernette Presser Foot: Cording Foot (optional accessory) Attach ...
...After gathering the fabric, drop the feed dog and sew a bartack (see page 19) at the beginning of the bernette Cording Foot, leaving a 2"-3" tail behind the foot. Do not sew through the cording, or it to gather the sample to the machine. Tie a knot in the...9642; Attach a presser foot with one 12" edge; Gathering Over a Cord Fabric: Medium weight cotton, 12" x 4" and Narrow cord such as perle cotton or embroidery floss, 18" Needle: 80/12 Universal Needle Position: Center BERNINA Presser Foot: Clear Embroidery Foot #39/39C/39D bernette Presser Foot: Cording Foot (optional accessory) Attach ...
Operation Manual
Page 16
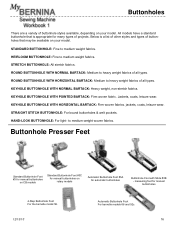
... weight fabrics. Buttonhole Presser Feet Standard Buttonhole Foot #3 for manual buttonholes on CB models Standard Buttonhole Foot #3C for manual buttonholes on rotary models Automatic Buttonhole Foot #3A for manual buttonholes 4-Step Buttonhole Foot For the bernette model 56. 12/13/10 Automatic Buttonhole Foot For bernette models 66 and 92c. 16 Below is appropriate for many types...
... weight fabrics. Buttonhole Presser Feet Standard Buttonhole Foot #3 for manual buttonholes on CB models Standard Buttonhole Foot #3C for manual buttonholes on rotary models Automatic Buttonhole Foot #3A for manual buttonholes 4-Step Buttonhole Foot For the bernette model 56. 12/13/10 Automatic Buttonhole Foot For bernette models 66 and 92c. 16 Below is appropriate for many types...
Operation Manual
Page 17
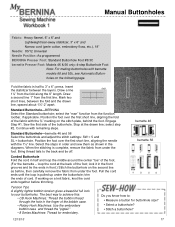
... the first short line, aligning the needle with bernette models 66 and 92c, see Automatic Button- select step #2. Select the steps in front.) Stitch the buttonhole on the stitch plate, behind the foot. lock it in the front grooves and tie the ends... Narrow cord (perle cotton, embroidery floss, etc.), 18" Needle: 80/12 Universal Needle Position: As programmed BERNINA Presser Foot: Standard Buttonhole Foot #3/3C bernette Presser Foot: Models 46 & 56 only: 4-step Buttonhole Foot Note: For making buttonholes with the 1½" line. Engage Step #1. Mark two short lines, between the ...
... the first short line, aligning the needle with bernette models 66 and 92c, see Automatic Button- select step #2. Select the steps in front.) Stitch the buttonhole on the stitch plate, behind the foot. lock it in the front grooves and tie the ends... Narrow cord (perle cotton, embroidery floss, etc.), 18" Needle: 80/12 Universal Needle Position: As programmed BERNINA Presser Foot: Standard Buttonhole Foot #3/3C bernette Presser Foot: Models 46 & 56 only: 4-step Buttonhole Foot Note: For making buttonholes with the 1½" line. Engage Step #1. Mark two short lines, between the ...
Operation Manual
Page 18
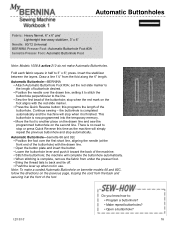
... tear-away stabilizer, 3" x 6" Needle: 80/12 Universal BERNINA Presser Foot: Automatic Buttonhole Foot #3A bernette Presser Foot: Automatic Buttonhole Foot Note: Models 1008 & activa 210 do not make a corded Automatic Buttonhole on bernette models 66 and 92C, follow the directions on the previous page, looping the cord ... the layers. This buttonhole is finished. Automatic Buttonhole-bernette 66 and 92c ▪ Position the foot over the drawn line, setting it is now programmed into the temporary memory. ▪ Move the foot to stop when it to stitch the buttonhole perpendicular to...
... tear-away stabilizer, 3" x 6" Needle: 80/12 Universal BERNINA Presser Foot: Automatic Buttonhole Foot #3A bernette Presser Foot: Automatic Buttonhole Foot Note: Models 1008 & activa 210 do not make a corded Automatic Buttonhole on bernette models 66 and 92C, follow the directions on the previous page, looping the cord ... the layers. This buttonhole is finished. Automatic Buttonhole-bernette 66 and 92c ▪ Position the foot over the drawn line, setting it is now programmed into the temporary memory. ▪ Move the foot to stop when it to stitch the buttonhole perpendicular to...
Operation Manual
Page 19
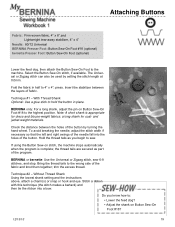
... Fold the fabric in place. trim the excess thread. Technique #2 - press. Check the distance between the layers of the button. BERNINA or bernette: Use the Universal or Zigzag stitch, sew 6-8 stitches, and stop. Bring the thread tails to hold the button in half to the... stabilizer, 4" x 4" Needle: 80/12 Universal BERNINA Presser Foot: Button Sew-On Foot #18 (optional) bernette Presser Foot: Button Sew-On Foot (optional) Lower the feed dog, then attach the Button Sew-On Foot to sew. If using the Button Sew-on Button Sew-On Foot #18? 12/13/10 19 Select the Button ...
... Fold the fabric in place. trim the excess thread. Technique #2 - press. Check the distance between the layers of the button. BERNINA or bernette: Use the Universal or Zigzag stitch, sew 6-8 stitches, and stop. Bring the thread tails to hold the button in half to the... stabilizer, 4" x 4" Needle: 80/12 Universal BERNINA Presser Foot: Button Sew-On Foot #18 (optional) bernette Presser Foot: Button Sew-On Foot (optional) Lower the feed dog, then attach the Button Sew-On Foot to sew. If using the Button Sew-on Button Sew-On Foot #18? 12/13/10 19 Select the Button ...
Operation Manual
Page 20
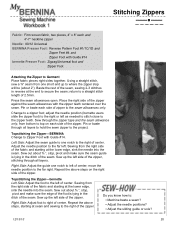
...seam. Pin or baste each and 4"-7" neckline zipper Needle: 80/12 Universal BERNINA Presser Foot: Reverse Pattern Foot #1/1C/1D and Zipper Feet #4 and Zipper Foot with Guide #14 bernette Presser Foot: Zigzag/Universal foot and Zipper Foot Attaching the Zipper to Garment Place fabric pieces right sides together. Change to the... right. Repeat the above steps, starting at the lower edge, sink the needle into the seam. Topstitching the Zipper-bernette Left Side: Adjust the foot to the left side of the zipper. Sew through the zipper tape and the seam allowance only, from the right ...
...seam. Pin or baste each and 4"-7" neckline zipper Needle: 80/12 Universal BERNINA Presser Foot: Reverse Pattern Foot #1/1C/1D and Zipper Feet #4 and Zipper Foot with Guide #14 bernette Presser Foot: Zigzag/Universal foot and Zipper Foot Attaching the Zipper to Garment Place fabric pieces right sides together. Change to the... right. Repeat the above steps, starting at the lower edge, sink the needle into the seam. Topstitching the Zipper-bernette Left Side: Adjust the foot to the left side of the zipper. Sew through the zipper tape and the seam allowance only, from the right ...

Operation Manual
Page 22
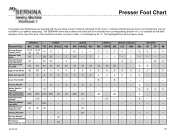
... 11 11 11 11 11 Needle Stop Down yes yes yes yes yes yes On-screen Buttonhole Measuring yes yes yes yes yes yes Presser Foot Pressure yes yes yes yes yes yes Slide-on Tray yes yes yes yes yes yes aurora 450 440QE 430 yes yes yes yes yes... yes yes yes yes 11 11 11 yes yes yes no no no yes yes yes yes yes yes 3 Series activa mechanical bernette 380 350PE 330 210 1008 92c 66 56 46 yes yes yes no no yes yes yes no yes yes yes yes yes opt opt no yes yes yes...
... 11 11 11 11 11 Needle Stop Down yes yes yes yes yes yes On-screen Buttonhole Measuring yes yes yes yes yes yes Presser Foot Pressure yes yes yes yes yes yes Slide-on Tray yes yes yes yes yes yes aurora 450 440QE 430 yes yes yes yes yes... yes yes yes yes 11 11 11 yes yes yes no no no yes yes yes yes yes yes 3 Series activa mechanical bernette 380 350PE 330 210 1008 92c 66 56 46 yes yes yes no no yes yes yes no yes yes yes yes yes opt opt no yes yes yes...
Operation Manual
Page 23
.../20D 20C 20C 20C 20C 20 20 Patchwork Foot #37/37D -- 37D -- -- -- -- Circular Embroidery Attachment 83 -- -- -- -- 83 -- X -- -- -- -- -- -- -- -- -- -- -- -- -- -- -- -- -- -- -- -- -- -- -- -- -- -- -- -- -- -- 12/13/10 bernette 66 56 C J -- -- -- Darning Foot #9 -- -- -- 9 -- 9 Button Sew-On Foot #18 18 -- 18 -- -- -- Freemotion Couching Foot #43 -- -- -- -- 43 -- X -- -- -- -- -- BERNINA Stitch Regulator #42 42 42 42 -- -- -- I I 5 5 5 5 5 X 8 -- 8 -- -- -- -- -- -- -- -- indicates that...
.../20D 20C 20C 20C 20C 20 20 Patchwork Foot #37/37D -- 37D -- -- -- -- Circular Embroidery Attachment 83 -- -- -- -- 83 -- X -- -- -- -- -- -- -- -- -- -- -- -- -- -- -- -- -- -- -- -- -- -- -- -- -- -- -- -- -- -- 12/13/10 bernette 66 56 C J -- -- -- Darning Foot #9 -- -- -- 9 -- 9 Button Sew-On Foot #18 18 -- 18 -- -- -- Freemotion Couching Foot #43 -- -- -- -- 43 -- X -- -- -- -- -- BERNINA Stitch Regulator #42 42 42 42 -- -- -- I I 5 5 5 5 5 X 8 -- 8 -- -- -- -- -- -- -- -- indicates that...


