
Operation Manual
Page 2
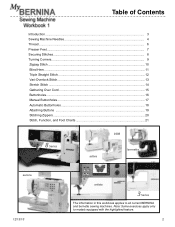
Note: Some exercises apply only to all current BERNINA and bernette sewing machines. Table of Contents Introduction ...3 Sewing Machine Needles 4 Thread ...6 Presser Feet ...7 Securing Stitches...8 Turning Corners...9 Zigzag Stitch...10 Blind Hem ...11 Triple Straight Stitch 12 Vari-Overlock ... Manual Buttonholes...17 Automatic Buttonholes 18 Attaching Buttons ...19 Stitching Zippers...20 Stitch, Function, and Foot Charts 21 8 Series activa 1008 bernette aurora 12/13/10 artista 3 Series The information in this workbook applies to models equipped with the highlighted feature. 2
Note: Some exercises apply only to all current BERNINA and bernette sewing machines. Table of Contents Introduction ...3 Sewing Machine Needles 4 Thread ...6 Presser Feet ...7 Securing Stitches...8 Turning Corners...9 Zigzag Stitch...10 Blind Hem ...11 Triple Straight Stitch 12 Vari-Overlock ... Manual Buttonholes...17 Automatic Buttonholes 18 Attaching Buttons ...19 Stitching Zippers...20 Stitch, Function, and Foot Charts 21 8 Series activa 1008 bernette aurora 12/13/10 artista 3 Series The information in this workbook applies to models equipped with the highlighted feature. 2
Operation Manual
Page 3
... regular basis will help you use your machine can share ideas and inspiration with quality sewing machines, and informative publications and classes. They can quickly find it affords. Taking the class is just the first step. Visit all BERNINA and bernette models. Sign up now for all of these and don't forget the...
... regular basis will help you use your machine can share ideas and inspiration with quality sewing machines, and informative publications and classes. They can quickly find it affords. Taking the class is just the first step. Visit all BERNINA and bernette models. Sign up now for all of these and don't forget the...
Operation Manual
Page 4
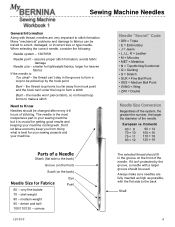
...and the hook can be changed after every 4-6 hours of the needle. shirt-weight 80 - Always make a stitch Need to the back. Sewing Machine Needles General Information Along with thread, needles are fully inserted as high as possible, with the flat side to Know Needles should fit in... your sewing machine but it isn't protected by the hook point Bent - When selecting the correct needle, consider the following: Needle system - 130/705H Needle...
...and the hook can be changed after every 4-6 hours of the needle. shirt-weight 80 - Always make a stitch Need to the back. Sewing Machine Needles General Information Along with thread, needles are fully inserted as high as possible, with the flat side to Know Needles should fit in... your sewing machine but it isn't protected by the hook point Bent - When selecting the correct needle, consider the following: Needle system - 130/705H Needle...
Operation Manual
Page 5
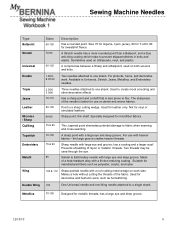
... knits. used through the eye. Used for manufactured fibers such as hemstitching. 100 One Universal needle and one shank. Sharp needle with a friction-reducing coating. Sewing Machine Needles Type Ballpoint Stretch Universal Double Triple Jeans Leather Microtex / Sharp Quilting Topstitch Embroidery Metafil Wing Double Wing Sizes 60-100 70-90 60...
... knits. used through the eye. Used for manufactured fibers such as hemstitching. 100 One Universal needle and one shank. Sharp needle with a friction-reducing coating. Sewing Machine Needles Type Ballpoint Stretch Universal Double Triple Jeans Leather Microtex / Sharp Quilting Topstitch Embroidery Metafil Wing Double Wing Sizes 60-100 70-90 60...
Operation Manual
Page 6
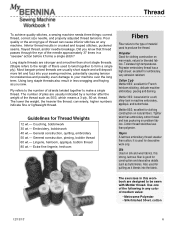
...embroidery, very abrasion resistant. General construction, quilting, embroidery 50 wt.- Tolerates high temperatures. Thread To achieve quality stitches, a sewing machine needs three things: correct thread, correct size needle, and properly adjusted thread tensions. excellent for clothing construction on silk .... excellent for clothing construction on any color of plies are stronger and smoother than cotton, it blends into your sewing machine, potentially causing tension inconsistencies and possibly even damage to your machine over the long term. Long staple threads ...
...embroidery, very abrasion resistant. General construction, quilting, embroidery 50 wt.- Tolerates high temperatures. Thread To achieve quality stitches, a sewing machine needs three things: correct thread, correct size needle, and properly adjusted thread tensions. excellent for clothing construction on silk .... excellent for clothing construction on any color of plies are stronger and smoother than cotton, it blends into your sewing machine, potentially causing tension inconsistencies and possibly even damage to your machine over the long term. Long staple threads ...
Operation Manual
Page 7
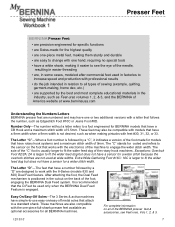
...with one -piece full-shank presser feet available as Feet-ures volumes 1, 2, & 3, and the BERNINA of America website at wide widths. Exceptions: Overlock Foot #2/2A: 2A is larger to all types of sewing (example, quilting, garment-making, home dec, etc.) ▪ are supported by the best and ...most complete educational materials in the industry, such as optional accessories for all of the BERNINA presser feet & accessories, see the eye of the needle...
...with one -piece full-shank presser feet available as Feet-ures volumes 1, 2, & 3, and the BERNINA of America website at wide widths. Exceptions: Overlock Foot #2/2A: 2A is larger to all types of sewing (example, quilting, garment-making, home dec, etc.) ▪ are supported by the best and ...most complete educational materials in the industry, such as optional accessories for all of the BERNINA presser feet & accessories, see the eye of the needle...
Operation Manual
Page 8
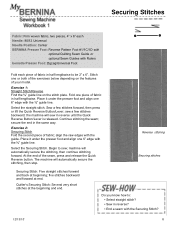
...the machine will automatically secure the stitching, then stop. align the raw edges with Rulers bernette Presser Foot: Zigzag/Universal Foot Fold each piece of fabric in half lengthwise to be 2" x 6". ...piece of your model. Select the Securing Stitch. Stitch one 6" edge with the ⅝" guide line. sew a few stitches forward, then press or lift the Quick Reverse Button/Lever; Fold one 6" edge with ... 4" x 6" each Needle: 80/12 Universal Needle Position: Center BERNINA Presser Foot: Reverse Pattern Foot #1/1C/1D with optional Quilting Seam Guide or optional Seam Guides with the...
...the machine will automatically secure the stitching, then stop. align the raw edges with Rulers bernette Presser Foot: Zigzag/Universal Foot Fold each piece of fabric in half lengthwise to be 2" x 6". ...piece of your model. Select the Securing Stitch. Stitch one 6" edge with the ⅝" guide line. sew a few stitches forward, then press or lift the Quick Reverse Button/Lever; Fold one 6" edge with ... 4" x 6" each Needle: 80/12 Universal Needle Position: Center BERNINA Presser Foot: Reverse Pattern Foot #1/1C/1D with optional Quilting Seam Guide or optional Seam Guides with the...
Operation Manual
Page 9
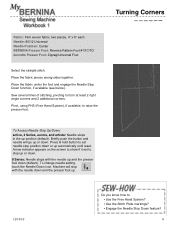
... at least 2 right angle corners and 2 additional corners. Sew several lines of stitching, pivoting to raise the presser foot. Turning Corners Fabric: Firm woven fabric, two pieces, 4" x 6" each Needle: 80/12 Universal Needle Position: Center BERNINA Presser Foot: Reverse Pattern Foot #1/1C/1D bernette Presser Foot: Zigzag/Universal Foot Select the straight stitch.
... at least 2 right angle corners and 2 additional corners. Sew several lines of stitching, pivoting to raise the presser foot. Turning Corners Fabric: Firm woven fabric, two pieces, 4" x 6" each Needle: 80/12 Universal Needle Position: Center BERNINA Presser Foot: Reverse Pattern Foot #1/1C/1D bernette Presser Foot: Zigzag/Universal Foot Select the straight stitch.
Operation Manual
Page 10
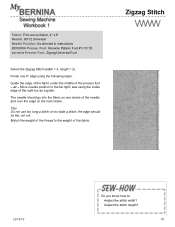
...should lie flat, not roll. Fabric: Firm woven fabric, 4" x 6" Needle: 80/12 Universal Needle Position: As directed in instructions BERNINA Presser Foot: Reverse Pattern Foot #1/1C/1D bernette Presser Foot: Zigzag/Universal Foot Select the Zigzag Stitch (width = 4, length = 2). or - Finish one stroke of the right toe ...as a guide. sew using the inside edge of the needle and over the edge on one 6" edge using the ...
...should lie flat, not roll. Fabric: Firm woven fabric, 4" x 6" Needle: 80/12 Universal Needle Position: As directed in instructions BERNINA Presser Foot: Reverse Pattern Foot #1/1C/1D bernette Presser Foot: Zigzag/Universal Foot Select the Zigzag Stitch (width = 4, length = 2). or - Finish one stroke of the right toe ...as a guide. sew using the inside edge of the needle and over the edge on one 6" edge using the ...
Operation Manual
Page 11
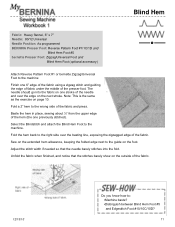
...into the fold. Adjust the stitch width if needed so that the stitches barely show on the next stroke. Baste the hem in place, sewing about ¼" from the upper edge of the hem (the one stroke of the needle and over the basting line, exposing the zigzagged ...Foot #5 and Edgestitch Foot #10/10C/10D? 11 Blind Hem Fabric: Heavy flannel, 6" x 7" Needle: 80/12 Universal Needle Position: As programmed BERNINA Presser Foot: Reverse Pattern Foot #1/1C/1D and Blind Hem Foot #5 bernette Presser Foot: Zigzag/Universal Foot and Blind Hem Foot (optional accessory) Attach Reverse Pattern Foot #1 or...
...into the fold. Adjust the stitch width if needed so that the stitches barely show on the next stroke. Baste the hem in place, sewing about ¼" from the upper edge of the hem (the one stroke of the needle and over the basting line, exposing the zigzagged ...Foot #5 and Edgestitch Foot #10/10C/10D? 11 Blind Hem Fabric: Heavy flannel, 6" x 7" Needle: 80/12 Universal Needle Position: As programmed BERNINA Presser Foot: Reverse Pattern Foot #1/1C/1D and Blind Hem Foot #5 bernette Presser Foot: Zigzag/Universal Foot and Blind Hem Foot (optional accessory) Attach Reverse Pattern Foot #1 or...
Operation Manual
Page 12
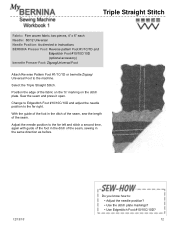
...Sew the seam and press it open. Triple Straight Stitch Fabric: Firm woven fabric, two pieces, 4" x 6" each Needle: 80/12 Universal Needle Position: As directed in instructions BERNINA Presser Foot: Reverse pattern Foot #1/1C/1D and Edgestitch Foot #10/10C/10D (optional accessory) bernette... Presser Foot: Zigzag/Universal Foot Attach Reverse Pattern Foot #1/1C/1D or bernette Zigzag/ Universal Foot to the far right.
...Sew the seam and press it open. Triple Straight Stitch Fabric: Firm woven fabric, two pieces, 4" x 6" each Needle: 80/12 Universal Needle Position: As directed in instructions BERNINA Presser Foot: Reverse pattern Foot #1/1C/1D and Edgestitch Foot #10/10C/10D (optional accessory) bernette... Presser Foot: Zigzag/Universal Foot Attach Reverse Pattern Foot #1/1C/1D or bernette Zigzag/ Universal Foot to the far right.
Operation Manual
Page 14
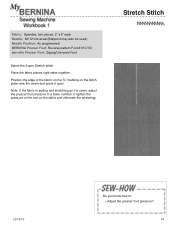
...Spandex, two pieces, 2" x 6" each Needle: 80/12 Universal (Ballpoint may also be used) Needle Position: As programmed BERNINA Presser Foot: Reverse pattern Foot #1/1C/1D bernette Presser Foot: Zigzag/Universal Foot Select the Super Stretch stitch. Place the fabric pieces right sides together. Stretch Stitch 12/13/10... Do you know how to lighten the pressure of the fabric on the ⅝" marking on the fabric and eliminate the stretching. sew ...
...Spandex, two pieces, 2" x 6" each Needle: 80/12 Universal (Ballpoint may also be used) Needle Position: As programmed BERNINA Presser Foot: Reverse pattern Foot #1/1C/1D bernette Presser Foot: Zigzag/Universal Foot Select the Super Stretch stitch. Place the fabric pieces right sides together. Stretch Stitch 12/13/10... Do you know how to lighten the pressure of the fabric on the ⅝" marking on the fabric and eliminate the stretching. sew ...
Operation Manual
Page 15
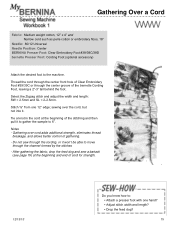
..., 12" x 4" and Narrow cord such as perle cotton or embroidery floss, 18" Needle: 80/12 Universal Needle Position: Center BERNINA Presser Foot: Clear Embroidery Foot #39/39C/39D bernette Presser Foot: Cording Foot (optional accessory) Attach the desired foot to move through the channel formed by the stitches - Stitch ⅝... #39/39C or through the cording, or it to gather the sample to : ▪ Attach a presser foot with one 12" edge; Do not sew through the center groove of the stitching and then pull it won't be able to the machine. Select the Zigzag stitch and adjust the width...
..., 12" x 4" and Narrow cord such as perle cotton or embroidery floss, 18" Needle: 80/12 Universal Needle Position: Center BERNINA Presser Foot: Clear Embroidery Foot #39/39C/39D bernette Presser Foot: Cording Foot (optional accessory) Attach the desired foot to move through the channel formed by the stitches - Stitch ⅝... #39/39C or through the cording, or it to gather the sample to : ▪ Attach a presser foot with one 12" edge; Do not sew through the center groove of the stitching and then pull it won't be able to the machine. Select the Zigzag stitch and adjust the width...
Operation Manual
Page 17
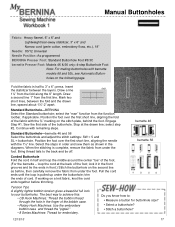
... size? ▪ Select a buttonhole? ▪ Stitch a buttonhole? 12/13/10 17 Continue with bernette models 66 and 92c, see Automatic Button- Select the steps in order and sew them as before trimming. lock it in the front grooves and tie the ends in the finger of ... 3" x 6" and Narrow cord (perle cotton, embroidery floss, etc.), 18" Needle: 80/12 Universal Needle Position: As programmed BERNINA Presser Foot: Standard Buttonhole Foot #3/3C bernette Presser Foot: Models 46 & 56 only: 4-step Buttonhole Foot Note: For making buttonholes with remaining steps. Position the foot over the...
... size? ▪ Select a buttonhole? ▪ Stitch a buttonhole? 12/13/10 17 Continue with bernette models 66 and 92c, see Automatic Button- Select the steps in order and sew them as before trimming. lock it in the front grooves and tie the ends in the finger of ... 3" x 6" and Narrow cord (perle cotton, embroidery floss, etc.), 18" Needle: 80/12 Universal Needle Position: As programmed BERNINA Presser Foot: Standard Buttonhole Foot #3/3C bernette Presser Foot: Models 46 & 56 only: 4-step Buttonhole Foot Note: For making buttonholes with remaining steps. Position the foot over the...
Operation Manual
Page 18
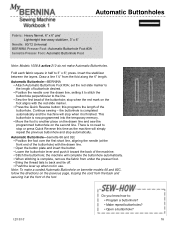
... button. • Lower the buttonhole lever and push it to stitch the buttonhole perpendicular to another place on the drawn line and sew the programmed buttonhole on the previous page, looping the cord from the back and securing it is no need to 3" x 6";...and Lightweight tear-away stabilizer, 3" x 6" Needle: 80/12 Universal BERNINA Presser Foot: Automatic Buttonhole Foot #3A bernette Presser Foot: Automatic Buttonhole Foot Note: Models 1008 & activa 210 do not make a corded Automatic Buttonhole on bernette models 66 and 92C, follow the directions on the second line. set the red slide ...
... button. • Lower the buttonhole lever and push it to stitch the buttonhole perpendicular to another place on the drawn line and sew the programmed buttonhole on the previous page, looping the cord from the back and securing it is no need to 3" x 6";...and Lightweight tear-away stabilizer, 3" x 6" Needle: 80/12 Universal BERNINA Presser Foot: Automatic Buttonhole Foot #3A bernette Presser Foot: Automatic Buttonhole Foot Note: Models 1008 & activa 210 do not make a corded Automatic Buttonhole on bernette models 66 and 92C, follow the directions on the second line. set the red slide ...
Operation Manual
Page 19
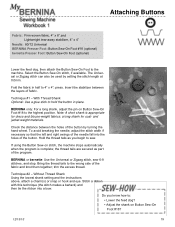
...so that the left and right swings of the needle fall into a bow. If using the Button Sew-on Button Sew-On Foot #18 to sew. BERNINA or bernette: Use the Universal or Zigzag stitch, sew 6-8 stitches, and stop. Bring the thread tails to the machine. Stitch a ribbon with this technique...4" x 8" and Lightweight tear-away stabilizer, 4" x 4" Needle: 80/12 Universal BERNINA Presser Foot: Button Sew-On Foot #18 (optional) bernette Presser Foot: Button Sew-On Foot (optional) Lower the feed dog, then attach the Button Sew-On Foot to the wrong side of the fabric and knot them together; Select the...
...so that the left and right swings of the needle fall into a bow. If using the Button Sew-on Button Sew-On Foot #18 to sew. BERNINA or bernette: Use the Universal or Zigzag stitch, sew 6-8 stitches, and stop. Bring the thread tails to the machine. Stitch a ribbon with this technique...4" x 8" and Lightweight tear-away stabilizer, 4" x 4" Needle: 80/12 Universal BERNINA Presser Foot: Button Sew-On Foot #18 (optional) bernette Presser Foot: Button Sew-On Foot (optional) Lower the feed dog, then attach the Button Sew-On Foot to the wrong side of the fabric and knot them together; Select the...
Operation Manual
Page 20
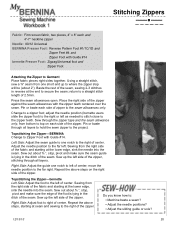
...notch to the zipper teeth. Sew up the left of the zipper. adjust the needle position (bernette users slide the zipper foot) to Garment Place fabric pieces right sides together. Topstitching the Zipper-BERNINA Change to Zipper Foot with Guide #14 bernette Presser Foot: Zigzag/Universal ...foot and Zipper Foot Attaching the Zipper to the right or left . Using a straight stitch, sew a ¾" seam from one notch to the left...
...notch to the zipper teeth. Sew up the left of the zipper. adjust the needle position (bernette users slide the zipper foot) to Garment Place fabric pieces right sides together. Topstitching the Zipper-BERNINA Change to Zipper Foot with Guide #14 bernette Presser Foot: Zigzag/Universal ...foot and Zipper Foot Attaching the Zipper to the right or left . Using a straight stitch, sew a ¾" seam from one notch to the left...
Operation Manual
Page 21
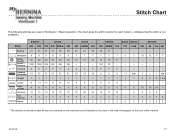
... 630 21 21 21 21 30 30 Blindstitch 9 9 9 9 9 9 Button Sew-On 60 60 60 60 60 60 Quilter's Securing 1324 1324 324 324 324 324 Securing...3 3 3 3 3 3 Zigzag 2 2 2 2 2 2 aurora 450 440QE 430 21 21 19 7 7 7 17 17 16 -- -- -- 5 5 5 10 10 10 1 1 1 9 9 9 6 6 6 15 26 24 3 3 3 2 2 2 3 Series activa classic bernette 380 350PE 330 210 1008 92c 66 56 46* 23 21 -- -- -- -- -- -- -- 7 7 7 5 14 12 11 -- 104 75 -- -- 5 5 5 -- 3 13 12 5 7 -- -- -- -- -- -- -- -- -- -- -- -- -- -- -- 0 0 0 11 dial 1 1 1 ...
... 630 21 21 21 21 30 30 Blindstitch 9 9 9 9 9 9 Button Sew-On 60 60 60 60 60 60 Quilter's Securing 1324 1324 324 324 324 324 Securing...3 3 3 3 3 3 Zigzag 2 2 2 2 2 2 aurora 450 440QE 430 21 21 19 7 7 7 17 17 16 -- -- -- 5 5 5 10 10 10 1 1 1 9 9 9 6 6 6 15 26 24 3 3 3 2 2 2 3 Series activa classic bernette 380 350PE 330 210 1008 92c 66 56 46* 23 21 -- -- -- -- -- -- -- 7 7 7 5 14 12 11 -- 104 75 -- -- 5 5 5 -- 3 13 12 5 7 -- -- -- -- -- -- -- -- -- -- -- -- -- -- -- 0 0 0 11 dial 1 1 1 ...
Operation Manual
Page 23
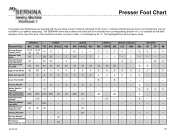
... -- BERNINA Stitch Regulator #42 42 42 42 -- -- -- Circular Embroidery Attachment 83 -- -- -- -- 83 -- X -- -- -- -- -- X X -- -- -- -- -- -- -- -- -- -- -- -- -- -- 46 X -X -X ---X ------- 23 If the bernette foot... -- -- 3 Series activa classic 380 350PE 330 210 1008 92c 1 1 1 1 1 C 2 -- -- -- 2 -- -- -- -- 3 3 -- 3A 3A 3A -- -- X 20 -- 20 -- -- The BERNINA name and numbers are included with the purchase of the sole. Darning Foot #9 -- -- -- 9 -- 9 Button Sew-On Foot #18 18 -- 18 -- -- -- D 4...
... -- BERNINA Stitch Regulator #42 42 42 42 -- -- -- Circular Embroidery Attachment 83 -- -- -- -- 83 -- X -- -- -- -- -- X X -- -- -- -- -- -- -- -- -- -- -- -- -- -- 46 X -X -X ---X ------- 23 If the bernette foot... -- -- 3 Series activa classic 380 350PE 330 210 1008 92c 1 1 1 1 1 C 2 -- -- -- 2 -- -- -- -- 3 3 -- 3A 3A 3A -- -- X 20 -- 20 -- -- The BERNINA name and numbers are included with the purchase of the sole. Darning Foot #9 -- -- -- 9 -- 9 Button Sew-On Foot #18 18 -- 18 -- -- -- D 4...


