
User Guide
Page 1
...any air vents blocked. Do not unplug by the manufacturer as contained in . 2. No responsibility will be added to the nearest authorized BERNINA dealer or service center for grounding be taken on the cord, instead, grasp the plug before pulling. 16. SAVE THESE INSTRUCTIONS! ... any adjustments in the needle area, such as described in use the BERNINA original stitch plate. Always unplug the sewing computer from accumulation of electrical shock: 1. To disconnect, turn all controls to those parts in this sewing computer only for a double-insulated product must be marked...
...any air vents blocked. Do not unplug by the manufacturer as contained in . 2. No responsibility will be added to the nearest authorized BERNINA dealer or service center for grounding be taken on the cord, instead, grasp the plug before pulling. 16. SAVE THESE INSTRUCTIONS! ... any adjustments in the needle area, such as described in use the BERNINA original stitch plate. Always unplug the sewing computer from accumulation of electrical shock: 1. To disconnect, turn all controls to those parts in this sewing computer only for a double-insulated product must be marked...

User Guide
Page 29
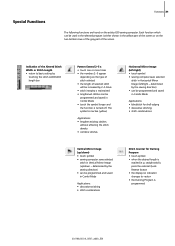
.... 324 Securing Function (with attached embroidery module • starts and stops the BSR function (optional) when BSR foot is attached and plugged in the right part of the screen indicates that the function was activated • sewing computer stops at the end. The sewing computer stops • programming the function within...
.... 324 Securing Function (with attached embroidery module • starts and stops the BSR function (optional) when BSR foot is attached and plugged in the right part of the screen indicates that the function was activated • sewing computer stops at the end. The sewing computer stops • programming the function within...
User Guide
Page 31
... Image (left/right - Each function which can be used in the selected program is either shown in the yellow part of the screen or on the two bottom rows of the gray part of selected stitch will be increased by 2-5 times • stitch integrity is maintained • lengthened stitches can be programmed...
... Image (left/right - Each function which can be used in the selected program is either shown in the yellow part of the screen or on the two bottom rows of the gray part of selected stitch will be increased by 2-5 times • stitch integrity is maintained • lengthened stitches can be programmed...

User Guide
Page 64
... use • sew the buttonhole in difficult fabrics. Place the plates from the back between fabric and bottom of slide foot up to the thick part of the height compensating plates for buttonholes (available as optional accessory) is recommended when sewing buttonholes in the same direction on the fabric (with or...
... use • sew the buttonhole in difficult fabrics. Place the plates from the back between fabric and bottom of slide foot up to the thick part of the height compensating plates for buttonholes (available as optional accessory) is recommended when sewing buttonholes in the same direction on the fabric (with or...
User Guide
Page 118
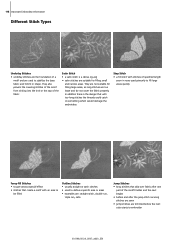
... run, satin Jump Stitches • long stitches that create a motif with stitches of the motif finishes and the next begins • before and after one part of specified length sewn in rows used primarily to fill large areas quickly Fancy-Fill Stitches • to give areas a special effect • stitches that...
... run, satin Jump Stitches • long stitches that create a motif with stitches of the motif finishes and the next begins • before and after one part of specified length sewn in rows used primarily to fill large areas quickly Fancy-Fill Stitches • to give areas a special effect • stitches that...
User Guide
Page 148
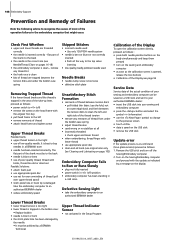
...at a still stand (hour glass remains) proceed as follows: 1. The flat part of the shank must be polished by the needle: • It must be saved on a USB stick and sent to your authorized BERNINA dealer: • insert the USB stick into your sewing and embroidery computer &#... not fully inserted • power switch in «0» (off the Sewing/Embroidery computer 2. flat part of the shank to recognize the causes of most of the operation failures in a BERNINA store • needle has been inserted incorrectly. 148 Embroidery Support Prevention and Remedy of Failures Note the...
...at a still stand (hour glass remains) proceed as follows: 1. The flat part of the shank must be polished by the needle: • It must be saved on a USB stick and sent to your authorized BERNINA dealer: • insert the USB stick into your sewing and embroidery computer &#... not fully inserted • power switch in «0» (off the Sewing/Embroidery computer 2. flat part of the shank to recognize the causes of most of the operation failures in a BERNINA store • needle has been inserted incorrectly. 148 Embroidery Support Prevention and Remedy of Failures Note the...
User Guide
Page 156
... about various embroidery computer features Update • latest version • updating the sewing and embroidery computer software: installing a newer or the latest version, or updating parts of a program Upgrade • to take to a higher level, to improve, to promote • upgrading the sewing and embroidery computer means improving or extending its...
... about various embroidery computer features Update • latest version • updating the sewing and embroidery computer software: installing a newer or the latest version, or updating parts of a program Upgrade • to take to a higher level, to improve, to promote • upgrading the sewing and embroidery computer means improving or extending its...


