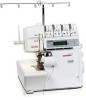
User Guide
Page 1
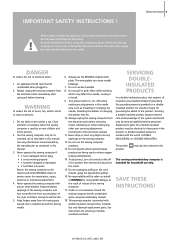
... changing the needle, threading the bobbin or changing the presser foot etc. 10. Do not use the BERNINA original stitch plate. Do not pull or push fabric while stitching, which may also be identical to persons: 1. Always unplug the sewing computer from the outlet. Use only identical replacement parts. SERVICING DOUBLEINSULATED PRODUCTS In a double-insulated product, two systems of insulation are being used as the result of misuse of doubleinsulated machines...
... changing the needle, threading the bobbin or changing the presser foot etc. 10. Do not use the BERNINA original stitch plate. Do not pull or push fabric while stitching, which may also be identical to persons: 1. Always unplug the sewing computer from the outlet. Use only identical replacement parts. SERVICING DOUBLEINSULATED PRODUCTS In a double-insulated product, two systems of insulation are being used as the result of misuse of doubleinsulated machines...
User Guide
Page 5
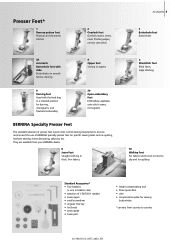
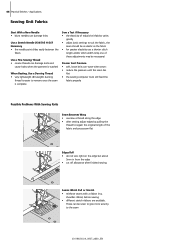
... to slip and for quilting Standard Accessories* • four bobbins (+ one in bobbin case) • selection of BERNINA specialty presser feet for sewing buttonholes *can vary from your BERNINA dealer. 8 Jeans foot Straight stitching in a lowered position for darning, monograms, and freehand embroidery 20 Open embroidery foot Embroidery, appliqué, satin stitch seams, monograms BERNINA Specialty Presser Feet The standard selection of presser feet covers most normal sewing requirements, but we recommend the use of 130/705 H needles • seam ripper • small screwdriver...
... to slip and for quilting Standard Accessories* • four bobbins (+ one in bobbin case) • selection of BERNINA specialty presser feet for sewing buttonholes *can vary from your BERNINA dealer. 8 Jeans foot Straight stitching in a lowered position for darning, monograms, and freehand embroidery 20 Open embroidery foot Embroidery, appliqué, satin stitch seams, monograms BERNINA Specialty Presser Feet The standard selection of presser feet covers most normal sewing requirements, but we recommend the use of 130/705 H needles • seam ripper • small screwdriver...

User Guide
Page 13
....04_0507_a630_EN Operating Instructions 13 Refer to the back • insert the needle as far as it clicks into its vertical position • add the foam pad A for sewing with more than one thread, i.e. double needle work • raise the pin until it will go • tighten the needle clamp screw ! Changing the Needle Removing the Needle • raise the needle • turn power switch to «0» (off) • lower the presser foot...
....04_0507_a630_EN Operating Instructions 13 Refer to the back • insert the needle as far as it clicks into its vertical position • add the foam pad A for sewing with more than one thread, i.e. double needle work • raise the pin until it will go • tighten the needle clamp screw ! Changing the Needle Removing the Needle • raise the needle • turn power switch to «0» (off) • lower the presser foot...
User Guide
Page 15
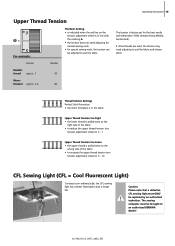
Operating instructions 15 Upper Thread Tension 3 A 5 For example: The Basic Setting • is indicated when the red line on the tension adjustment wheel is in the fabric Upper Thread Tension too Tight • the lower thread is pulled more to the wrong side of the fabric • to reduce the upper thread tension turn tension adjustment wheel to 5 - 10 CFL Sewing Light (CFL = Cool Fluorescent Light) Contrary to suit the fabric Tension Needle Metallic thread approx. 3 90 Mono...
Operating instructions 15 Upper Thread Tension 3 A 5 For example: The Basic Setting • is indicated when the red line on the tension adjustment wheel is in the fabric Upper Thread Tension too Tight • the lower thread is pulled more to the wrong side of the fabric • to reduce the upper thread tension turn tension adjustment wheel to 5 - 10 CFL Sewing Light (CFL = Cool Fluorescent Light) Contrary to suit the fabric Tension Needle Metallic thread approx. 3 90 Mono...
User Guide
Page 24
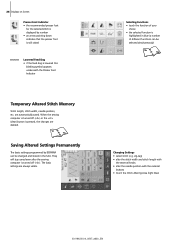
...) button is pressed, the changes are deleted. 37 37 Saving Altered Settings Permanently The basic settings programmed by number • an arrow pointing down indicates that the presser foot is still raised Lowered Feed Dog • if the feed dog is turned off («0»). When the sewing computer is lowered this blinking symbol appears underneath the Presser Foot Indicator Temporary Altered Stitch Memory Stitch length, stitch width, needle position, etc. zig-zag) •...
...) button is pressed, the changes are deleted. 37 37 Saving Altered Settings Permanently The basic settings programmed by number • an arrow pointing down indicates that the presser foot is still raised Lowered Feed Dog • if the feed dog is turned off («0»). When the sewing computer is lowered this blinking symbol appears underneath the Presser Foot Indicator Temporary Altered Stitch Memory Stitch length, stitch width, needle position, etc. zig-zag) •...
User Guide
Page 38
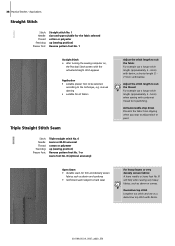
... (sewing position) Reverse pattern foot No. 1 Straight Stitch • after turning the sewing computer on, the Practical Stitch screen with denim. 031196.50.04_0507_a630_EN 38 Practical Stitches - Activate needle stop down Prevents the fabric from slipping when you stop to the technique, e.g. Applications Straight Stitch Stitch: Needle: Thread: Feed dog: Presser foot: Straight stitch No. 1 size and type suitable for topstitching. For heavy layers or very densely woven fabrics: A Jeans needle or Jeans foot No. 8 will help when sewing very...
... (sewing position) Reverse pattern foot No. 1 Straight Stitch • after turning the sewing computer on, the Practical Stitch screen with denim. 031196.50.04_0507_a630_EN 38 Practical Stitches - Activate needle stop down Prevents the fabric from slipping when you stop to the technique, e.g. Applications Straight Stitch Stitch: Needle: Thread: Feed dog: Presser foot: Straight stitch No. 1 size and type suitable for topstitching. For heavy layers or very densely woven fabrics: A Jeans needle or Jeans foot No. 8 will help when sewing very...
User Guide
Page 41
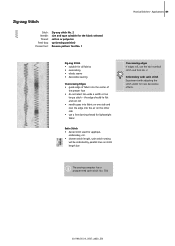
... a width or too long a stitch - Applications 41 Zig-zag Stitch • suitable for new decorative effects. Zig-zag Stitch Stitch: Needle: Thread: Feed dog: Presser foot: Zig-zag stitch No. 2 size and type suitable for appliqué, embroidery, etc. • shorten stitch length, satin stitch setting will be indicated by parallel lines on the other side • use a fine darning thread for lightweight fabric Satin Stitch • dense stitch used for the fabric selected cotton or polyester up (sewing position) Reverse pattern foot No. 1 Practical Stitches - the edge should lie...
... a width or too long a stitch - Applications 41 Zig-zag Stitch • suitable for new decorative effects. Zig-zag Stitch Stitch: Needle: Thread: Feed dog: Presser foot: Zig-zag stitch No. 2 size and type suitable for appliqué, embroidery, etc. • shorten stitch length, satin stitch setting will be indicated by parallel lines on the other side • use a fine darning thread for lightweight fabric Satin Stitch • dense stitch used for the fabric selected cotton or polyester up (sewing position) Reverse pattern foot No. 1 Practical Stitches - the edge should lie...
User Guide
Page 43
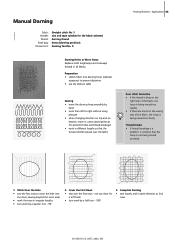
... irregular lengths • turn work in curves (avoid points as 2nd rows 031196.50.04_0507_a630_EN Manual Darning Stitch: Needle: Thread: Feed dog: Presser foot: Straight stitch No. 1 size and type suitable for a soft finish • turn work by a half turn - 90° 2. Cover the First Rows • sew over the fabric Practical Stitches - Darning foot No. 9 Darning Holes or Worn Areas Replaces both lengthways and crossways threads in same direction as this prevents holes and thread breakage) • work by...
... irregular lengths • turn work in curves (avoid points as 2nd rows 031196.50.04_0507_a630_EN Manual Darning Stitch: Needle: Thread: Feed dog: Presser foot: Straight stitch No. 1 size and type suitable for a soft finish • turn work by a half turn - 90° 2. Cover the First Rows • sew over the fabric Practical Stitches - Darning foot No. 9 Darning Holes or Worn Areas Replaces both lengthways and crossways threads in same direction as this prevents holes and thread breakage) • work by...
User Guide
Page 44
... When Basting, Use a Darning Thread • very lightweight (80 weight) darning thread is easier to remove once the seam is complete Sew a Test if Necessary • the elasticity of today's knit fabrics varies greatly • adjust basic settings to suit the fabric, the seam should be as elastic as the fabric • for greater elasticity use a shorter stitch length and/or stitch width (only one of these adjustments may be necessary) Presser Foot Pressure • soft, loose...
... When Basting, Use a Darning Thread • very lightweight (80 weight) darning thread is easier to remove once the seam is complete Sew a Test if Necessary • the elasticity of today's knit fabrics varies greatly • adjust basic settings to suit the fabric, the seam should be as elastic as the fabric • for greater elasticity use a shorter stitch length and/or stitch width (only one of these adjustments may be necessary) Presser Foot Pressure • soft, loose...
User Guide
Page 49
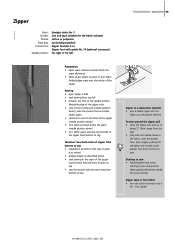
... even stitch formation use a 90 - 100 needle 031196.50.04_0507_a630_EN Zipper Stitch: Needle: Thread: Feed dog: Presser foot: Needle position: Straight stitch No. 1 size and type suitable for the fabric selected cotton or polyester up to about 2" (5cm) away from the pull • stop in the seam of the zipper end and sew first side from bottom to top • sew the second side the same way from bottom to top Practical Stitches - Open zipper...
... even stitch formation use a 90 - 100 needle 031196.50.04_0507_a630_EN Zipper Stitch: Needle: Thread: Feed dog: Presser foot: Needle position: Straight stitch No. 1 size and type suitable for the fabric selected cotton or polyester up to about 2" (5cm) away from the pull • stop in the seam of the zipper end and sew first side from bottom to top • sew the second side the same way from bottom to top Practical Stitches - Open zipper...
User Guide
Page 50
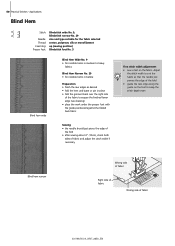
... Blind Hem Stitch: Needle: Thread: Feed dog: Presser foot: Blindstitch wide No. 9, Blindstitch narrow No. 29 size and type suitable for the fabric selected cotton, polyester, silk or monofilament up (sewing position) Blindstitch foot No. 5 Blind hem wide Blind Hem Wide No. 9 • for invisible hems in medium to heavy fabrics Blind Hem Narrow No. 29 • for invisible hems in batiste Preparation • finish the raw edges as desired • fold the hem and baste...
... Blind Hem Stitch: Needle: Thread: Feed dog: Presser foot: Blindstitch wide No. 9, Blindstitch narrow No. 29 size and type suitable for the fabric selected cotton, polyester, silk or monofilament up (sewing position) Blindstitch foot No. 5 Blind hem wide Blind Hem Wide No. 9 • for invisible hems in medium to heavy fabrics Blind Hem Narrow No. 29 • for invisible hems in batiste Preparation • finish the raw edges as desired • fold the hem and baste...
User Guide
Page 53
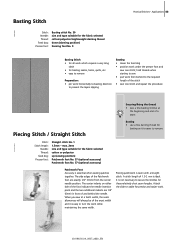
...starting to sew • pull work from the center needle position. Applications 53 Basting Stitch • for all work which requires a very long stitch • for the fabric selected cotton/polyester/leightweight darning thread down (darning position) Darning foot No. 9 Practical Stitches - Basting Stitch Stitch: Needle: Thread: Feed dog: Presser foot: Basting stitch No. 30 size and type suitable for basting seams, hems, quilts, etc. • easy to remove Preparation: • pin work horizontally to basting direction to prevent the layers slipping Basting • lower the feed dog...
...starting to sew • pull work from the center needle position. Applications 53 Basting Stitch • for all work which requires a very long stitch • for the fabric selected cotton/polyester/leightweight darning thread down (darning position) Darning foot No. 9 Practical Stitches - Basting Stitch Stitch: Needle: Thread: Feed dog: Presser foot: Basting stitch No. 30 size and type suitable for basting seams, hems, quilts, etc. • easy to remove Preparation: • pin work horizontally to basting direction to prevent the layers slipping Basting • lower the feed dog...
User Guide
Page 74
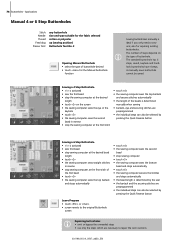
... the Quick Reverse button Leave Program • touch «ESC» or «man» • screen reverts to the original Buttonhole screen Repairing buttonholes • omit or bypass the unneeded steps • use only the steps which are necessary to sew one; Applications Manual 4 or 6 Step Buttonholes Stitch: Needle: Thread: Feed dog: Presser foot: any buttonhole size and type suitable for the fabric selected cotton or polyester up (sewing position) Buttonhole foot No. 3 Opening Manual Buttonhole •...
... the Quick Reverse button Leave Program • touch «ESC» or «man» • screen reverts to the original Buttonhole screen Repairing buttonholes • omit or bypass the unneeded steps • use only the steps which are necessary to sew one; Applications Manual 4 or 6 Step Buttonholes Stitch: Needle: Thread: Feed dog: Presser foot: any buttonhole size and type suitable for the fabric selected cotton or polyester up (sewing position) Buttonhole foot No. 3 Opening Manual Buttonhole •...
User Guide
Page 80
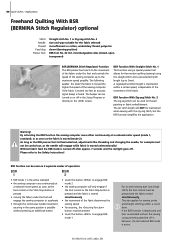
... 2 • the sewing computer will only engage if the foot control or the Start-Stop-button is pressed and the fabric is moved simultaneously • the movement of the fabric under the foot will NOT be pressed • touch the button «BSR1» to 5mm). Applications Freehand Quilting With BSR (BERNINA Stitch Regulator) optional Stitch: Needle: Thread: Feed dog: Presser foot: Straight stich No. 1 or Zig-zag stitch No. 2 size and type suitable for securing...
... 2 • the sewing computer will only engage if the foot control or the Start-Stop-button is pressed and the fabric is moved simultaneously • the movement of the fabric under the foot will NOT be pressed • touch the button «BSR1» to 5mm). Applications Freehand Quilting With BSR (BERNINA Stitch Regulator) optional Stitch: Needle: Thread: Feed dog: Presser foot: Straight stich No. 1 or Zig-zag stitch No. 2 size and type suitable for securing...
User Guide
Page 104
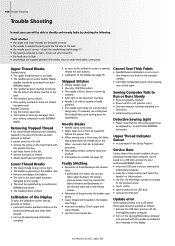
...; remove the screw on the sewing and embroidery computer • as soon as indicated by checking the following. Needle Breaks • Needle clamp screw loose. • Fabric taken out in a cold room. • restart sewing computer Defective Sewing Light • Please note that the CFL-sewing light must be replaced by an authorized BERNINA technician. • The needle is correct - use fabric edge) between the tension discs or under the bobbin case spring. • Lower thread still threaded...
...; remove the screw on the sewing and embroidery computer • as soon as indicated by checking the following. Needle Breaks • Needle clamp screw loose. • Fabric taken out in a cold room. • restart sewing computer Defective Sewing Light • Please note that the CFL-sewing light must be replaced by an authorized BERNINA technician. • The needle is correct - use fabric edge) between the tension discs or under the bobbin case spring. • Lower thread still threaded...
User Guide
Page 114
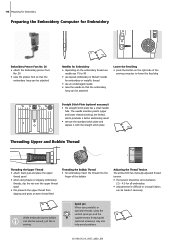
... bobbin Adjusting the Thread Tension The artista 630 has manually adjusted thread tension. • the tension should be set to between 2.5 - 4.5 for all embroidery • adjustments for embroidery or metallic thread • use an undamaged needle • raise the needle so that the embroidery hoop can also be attached Lower the Feed Dog • press the button on the embroidery thread use needle size 75 to lower the feed dog Straight Stitch Plate (optional accessory) • the straight stitch plate has a small needle hole. The needle insertion points (upper and lower thread...
... bobbin Adjusting the Thread Tension The artista 630 has manually adjusted thread tension. • the tension should be set to between 2.5 - 4.5 for all embroidery • adjustments for embroidery or metallic thread • use an undamaged needle • raise the needle so that the embroidery hoop can also be attached Lower the Feed Dog • press the button on the embroidery thread use needle size 75 to lower the feed dog Straight Stitch Plate (optional accessory) • the straight stitch plate has a small needle hole. The needle insertion points (upper and lower thread...
User Guide
Page 148
... threaded: • check upper and lower thread • when embroidering, thread finger with lower thread • use appropriate spool disc • clean and oil hook (use the «To Next Page» symbol to change to an authorized BERNINA dealer • reduce embroidery speed Skipped Stitches • incorrect needle used: • Use only 130/705H needle system • needle is trapped in the Setup Program 031196.50.04_0507_a630_EN Remove the USB stick and turn on the sewing and embroidery...
... threaded: • check upper and lower thread • when embroidering, thread finger with lower thread • use appropriate spool disc • clean and oil hook (use the «To Next Page» symbol to change to an authorized BERNINA dealer • reduce embroidery speed Skipped Stitches • incorrect needle used: • Use only 130/705H needle system • needle is trapped in the Setup Program 031196.50.04_0507_a630_EN Remove the USB stick and turn on the sewing and embroidery...
User Guide
Page 163
... Embroidery Threads 119 External Function Buttons • Altering Needle Position 29 • Needle Up/Down 29 • Pattern End 29 • Quick Reverse Button on Head Frame 29 • Securing Function 29 • Slide Speed Control 29, 128 • Start-Stop Button 29, 128 031196.50.04_0507_a630_EN F Fabric, Needle, Thread 16 Feed Dog • Feed Dog and Fabric Feed 20-21 • Feed Dog Up/Down 20 • Lowered Feed Dog 24 • Sewing Corners 21 Flat Joining Seam 47 Foot Control 8 Free...
... Embroidery Threads 119 External Function Buttons • Altering Needle Position 29 • Needle Up/Down 29 • Pattern End 29 • Quick Reverse Button on Head Frame 29 • Securing Function 29 • Slide Speed Control 29, 128 • Start-Stop Button 29, 128 031196.50.04_0507_a630_EN F Fabric, Needle, Thread 16 Feed Dog • Feed Dog and Fabric Feed 20-21 • Feed Dog Up/Down 20 • Lowered Feed Dog 24 • Sewing Corners 21 Flat Joining Seam 47 Foot Control 8 Free...
User Guide
Page 164
... Compensating Tool 21 Hems with Practical Stitches 47 Honeycomb Stitch Edges 51 Hooping the Fabric 115 I Important Embroidery Information 117-118 Important Facts about Thread and Needles 16 Inserting the Bobbin 11 K Key to Signs 3 M Main Category Buttons • Alphabets • Buttonholes • Decorative Stitches • Embroidery Mode/ Sewing Mode • Personal Program • Practical Stitches • Quilt Stitches • Setup Program • Tutorial for Embroidery Manual Darning Memory Sewing • Correcting a Stitch Combination •...
... Compensating Tool 21 Hems with Practical Stitches 47 Honeycomb Stitch Edges 51 Hooping the Fabric 115 I Important Embroidery Information 117-118 Important Facts about Thread and Needles 16 Inserting the Bobbin 11 K Key to Signs 3 M Main Category Buttons • Alphabets • Buttonholes • Decorative Stitches • Embroidery Mode/ Sewing Mode • Personal Program • Practical Stitches • Quilt Stitches • Setup Program • Tutorial for Embroidery Manual Darning Memory Sewing • Correcting a Stitch Combination •...
User Guide
Page 165
... Foot Control 122 Z • Starting to Embroider with Start-Stop-Button 122 Zig-zag Stitch 41 Stitch Display 23 Zig-zag or Straight Stitch Eyelets 76 Stitch Plate 20, 114 Zipper 49 Stitch Selection 23, 25 Stitch Summary 157-160 Straight Stitch 38 Stretch- • Update 99-100 U • Version Information 99 Sewing Light-CFL 15 Upper Thread Tension 15 Sewing on Elastic, Shirring Elastic/Cord 52 Slide-on Bobbin Winder 10 Thread Tension 15, 114 Thread, Needle, Fabric 16 Threading the Bobbin Thread 114 Threading the Upper Thread 11, 114 • Double...
... Foot Control 122 Z • Starting to Embroider with Start-Stop-Button 122 Zig-zag Stitch 41 Stitch Display 23 Zig-zag or Straight Stitch Eyelets 76 Stitch Plate 20, 114 Zipper 49 Stitch Selection 23, 25 Stitch Summary 157-160 Straight Stitch 38 Stretch- • Update 99-100 U • Version Information 99 Sewing Light-CFL 15 Upper Thread Tension 15 Sewing on Elastic, Shirring Elastic/Cord 52 Slide-on Bobbin Winder 10 Thread Tension 15, 114 Thread, Needle, Fabric 16 Threading the Bobbin Thread 114 Threading the Upper Thread 11, 114 • Double...


