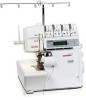
User Guide
Page 1
...as described in . 2. Do not allow to the nearest authorized BERNINA dealer or service center for examination, repair, electrical or mechanical adjustment. 4. Use only attachments recommended by the manufacturer as contained in this instruction manual. 11. Never operate this sewing computer if: • it ...Read all moving parts. An appliance should a means for household use the BERNINA original stitch plate. Close attention is necessary when this sewing computer. Use this sewing computer from all instructions before cleaning. Never drop or insert any object into water Return the ...
...as described in . 2. Do not allow to the nearest authorized BERNINA dealer or service center for examination, repair, electrical or mechanical adjustment. 4. Use only attachments recommended by the manufacturer as contained in this instruction manual. 11. Never operate this sewing computer if: • it ...Read all moving parts. An appliance should a means for household use the BERNINA original stitch plate. Close attention is necessary when this sewing computer. Use this sewing computer from all instructions before cleaning. Never drop or insert any object into water Return the ...
User Guide
Page 4
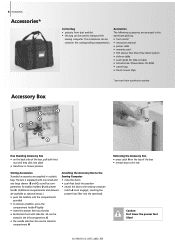
...); The accessories can be stored in the corresponding compartments Accessories The following accessories are arranged in the styrofoam packing: • foot control • instruction manual • power cable • warranty card • FHS presser foot lifter (Free Hand System) • slide-on table • seam ...; close the doors • push feet back into the opening J Removing the Accessory Box • press catch A on table • Instructional / Presentation CD-ROM • carrier bag • Touch Screen Stylo *can vary from dust and dirt • this bag can be used...
...); The accessories can be stored in the corresponding compartments Accessories The following accessories are arranged in the styrofoam packing: • foot control • instruction manual • power cable • warranty card • FHS presser foot lifter (Free Hand System) • slide-on table • seam ...; close the doors • push feet back into the opening J Removing the Accessory Box • press catch A on table • Instructional / Presentation CD-ROM • carrier bag • Touch Screen Stylo *can vary from dust and dirt • this bag can be used...
User Guide
Page 106
...with «ESC» for a service to a BERNINA dealer. If the service was done by touching «ESC», but will appear again when restarting the sewing computer. Deleta data on the USB stick. Drawers. Corresponding instructions are on «0» again and the display does ...will penetrate presser foot or stitch plate. Check the settings in the Security screen. The sewing computer must be on page 103 of the manual. The display can be cleared temporarily by touching «OK». The display can be cleaned / lubricated. Deleting or overwriting data ,...
...with «ESC» for a service to a BERNINA dealer. If the service was done by touching «ESC», but will appear again when restarting the sewing computer. Deleta data on the USB stick. Drawers. Corresponding instructions are on «0» again and the display does ...will penetrate presser foot or stitch plate. Check the settings in the Security screen. The sewing computer must be on page 103 of the manual. The display can be cleared temporarily by touching «OK». The display can be cleaned / lubricated. Deleting or overwriting data ,...

User Guide
Page 109
Setting up the Embroidery Computer Details Setting up the Embroidery Computer 109 2 4 3 6 1 Embroidery surface 2 Embroidery arm 3 Embroidery hoop connection 4 Accessory box 1 5 Connecting lug right 6 Connecting lug center 7 Sewing computer connecting cable 8 Cable holder 5 Front view 1 8 8 Back view The side view (handwheel) of the sewing and embroidery 7 computer with the cable connections are shown on page 7 of the sewing computer instruction manual. 031196.50.04_0507_a630_EN
Setting up the Embroidery Computer Details Setting up the Embroidery Computer 109 2 4 3 6 1 Embroidery surface 2 Embroidery arm 3 Embroidery hoop connection 4 Accessory box 1 5 Connecting lug right 6 Connecting lug center 7 Sewing computer connecting cable 8 Cable holder 5 Front view 1 8 8 Back view The side view (handwheel) of the sewing and embroidery 7 computer with the cable connections are shown on page 7 of the sewing computer instruction manual. 031196.50.04_0507_a630_EN

User Guide
Page 149
...will be cleared temporarily by touching «OK». Check upper thread and perhaps lower thread. The winder speed can be changed . Corresponding instructions are on the screen. This notification will appear again when restarting the sewing computer. For example delete data, etc. Press the button &#... specific fact. The message disappears automatically if the presser foot was lowered. They serve as a reminder, warning, or confirmation of the manual. The embroidery computer must do something, before the function can be drawn to carry out the function?
...will be cleared temporarily by touching «OK». Check upper thread and perhaps lower thread. The winder speed can be changed . Corresponding instructions are on the screen. This notification will appear again when restarting the sewing computer. For example delete data, etc. Press the button &#... specific fact. The message disappears automatically if the presser foot was lowered. They serve as a reminder, warning, or confirmation of the manual. The embroidery computer must do something, before the function can be drawn to carry out the function?
User Guide
Page 164
...Embroidery Mode/ Sewing Mode • Personal Program • Practical Stitches • Quilt Stitches • Setup Program • Tutorial for Embroidery Manual Darning Memory Sewing • Correcting a Stitch Combination • Deleting Drawer 26-28 26 27 26 27, 128 27 26 27 28 28 ...8226; Quilt Stitches Summary 77 Quilting with BSR 80-83 • Activating the BSR Sewing Function 83 • Application with Overlock Seams Safety Instructions Saving Altered Settings Permanently 48 1 24-25 S Saving Motifs • Deleting a Saved Motif • Deleting All Saved Motifs • ...
...Embroidery Mode/ Sewing Mode • Personal Program • Practical Stitches • Quilt Stitches • Setup Program • Tutorial for Embroidery Manual Darning Memory Sewing • Correcting a Stitch Combination • Deleting Drawer 26-28 26 27 26 27, 128 27 26 27 28 28 ...8226; Quilt Stitches Summary 77 Quilting with BSR 80-83 • Activating the BSR Sewing Function 83 • Application with Overlock Seams Safety Instructions Saving Altered Settings Permanently 48 1 24-25 S Saving Motifs • Deleting a Saved Motif • Deleting All Saved Motifs • ...


