
W6000 User Manual
Page 2
... Shipping contents 6 Remote control batteries 7 Remote control operation 7 Projector features 8 Projector exterior view 9 Controls and functions 10 Control panel 10 Remote control 11 Positioning your projector........ 12 Choosing a location 12 Obtaining a preferred projected image size 13 How to determine the position of the projector for a given...component-video devices ....18 Connecting S-Video or video devices ......18 Connecting a computer 19 Using the projector 20 Turning the projector on 20 Selecting an input source 21 Fine-tuning the image size and clarity 21 Using the menus ...
... Shipping contents 6 Remote control batteries 7 Remote control operation 7 Projector features 8 Projector exterior view 9 Controls and functions 10 Control panel 10 Remote control 11 Positioning your projector........ 12 Choosing a location 12 Obtaining a preferred projected image size 13 How to determine the position of the projector for a given...component-video devices ....18 Connecting S-Video or video devices ......18 Connecting a computer 19 Using the projector 20 Turning the projector on 20 Selecting an input source 21 Fine-tuning the image size and clarity 21 Using the menus ...
W6000 User Manual
Page 6
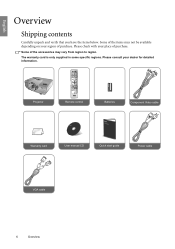
English Overview Shipping contents Carefully unpack and verify that you have the items below. Please consult your region of purchase. Some of the items may vary from region to region. The warranty card is only supplied in some specific regions. Please check with your place of purchase. Some of the accessories may not be available depending on your dealer for detailed information. Projector Remote control Batteries Component Video cable Warranty card User manual CD Quick start guide Power cable VGA cable 6 Overview
English Overview Shipping contents Carefully unpack and verify that you have the items below. Please consult your region of purchase. Some of the items may vary from region to region. The warranty card is only supplied in some specific regions. Please check with your place of purchase. Some of the accessories may not be available depending on your dealer for detailed information. Projector Remote control Batteries Component Video cable Warranty card User manual CD Quick start guide Power cable VGA cable 6 Overview
W6000 User Manual
Page 7
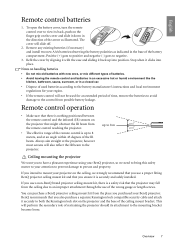
...of the ceiling mount bracket. up to 8 m Ceiling mounting the projector We want you to have a pleasant experience using your BenQ projector, so we need to bring this safety matter to your region. • If the remote control will also reflect the IR beam to both the Kensington lock ... its attachment to an improper attachment through the use a non-BenQ brand projector ceiling mount kit, there is securely and safely installed. BenQ recommends that might obstruct the IR beam from possible battery leakage. If you use of the remote control is up into place. This will slide off. 2....
...of the ceiling mount bracket. up to 8 m Ceiling mounting the projector We want you to have a pleasant experience using your BenQ projector, so we need to bring this safety matter to your region. • If the remote control will also reflect the IR beam to both the Kensington lock ... its attachment to an improper attachment through the use a non-BenQ brand projector ceiling mount kit, there is securely and safely installed. BenQ recommends that might obstruct the IR beam from possible battery leakage. If you use of the remote control is up into place. This will slide off. 2....

W6000 User Manual
Page 10
... OSD menus, exits and saves any changes made using the On-Screen Display (OSD) menu. "Indicators" on the remote control. TEMPerature warning light Lights up or flashes when the projector lamp has developed a problem. II POWER Performs the same action as the source selection keys (COMP, VIDEO, S-VIDEO..., HDMI1, HDMI2, PC) on and off " on page 25 7. MENU Toggles the On-Screen Display (OSD) menu on the remote control. SOURCE Performs the...
... OSD menus, exits and saves any changes made using the On-Screen Display (OSD) menu. "Indicators" on the remote control. TEMPerature warning light Lights up or flashes when the projector lamp has developed a problem. II POWER Performs the same action as the source selection keys (COMP, VIDEO, S-VIDEO..., HDMI1, HDMI2, PC) on and off " on page 25 7. MENU Toggles the On-Screen Display (OSD) menu on the remote control. SOURCE Performs the...

W6000 User Manual
Page 11
Remote control English For details, see the info provided behind the hand sign . 1 7. POWER ON/OFF Toggles the projector between the main window and subwindow with ACTIVE, and adjusts the size and position of the currently active window..., Down / ) Moves the current On-Screen Display (OSD) 3 menu selection in the direction of the appropriate picture quality values. "Turning the projector on" on page 20, "Turning the projector off . 11 "Using the menus" on page 25 8 9 8. "Fine-tuning the picture quality" on page 35 Sequentially selects a predefined picture...
Remote control English For details, see the info provided behind the hand sign . 1 7. POWER ON/OFF Toggles the projector between the main window and subwindow with ACTIVE, and adjusts the size and position of the currently active window..., Down / ) Moves the current On-Screen Display (OSD) 3 menu selection in the direction of the appropriate picture quality values. "Turning the projector on" on page 20, "Turning the projector off . 11 "Using the menus" on page 25 8 9 8. "Fine-tuning the picture quality" on page 35 Sequentially selects a predefined picture...
W6000 User Manual
Page 12
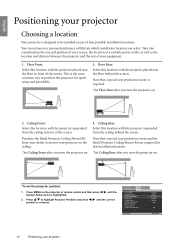
... on the projector or remote control and then press / until the correct position is highlighted. 2. Floor Rear: Select this installation location. *Set Ceiling Rear after you turn the projector on . *To set the projector position: 1. Note that a special rear projection screen and the BenQ Projector Ceiling Mount ...the location of a suitable power outlet, as well as the location and distance between the projector and the rest of four possible installation locations. Purchase the BenQ Projector Ceiling Mount Kit from the ceiling behind the screen. This is designed to be installed in ...
... on the projector or remote control and then press / until the correct position is highlighted. 2. Floor Rear: Select this installation location. *Set Ceiling Rear after you turn the projector on . *To set the projector position: 1. Note that a special rear projection screen and the BenQ Projector Ceiling Mount ...the location of a suitable power outlet, as well as the location and distance between the projector and the rest of four possible installation locations. Purchase the BenQ Projector Ceiling Mount Kit from the ceiling behind the screen. This is designed to be installed in ...

W6000 User Manual
Page 20
Press and hold POWER ON ( II ) on the screen. This message will be displayed on the projector or remote control to an appropriate one. 20 Using the projector Turning the projector on . 2. See "Utilizing the password function" on the screen for details. 5. The fans will not respond to enter a six-digit password. If the horizontal...
Press and hold POWER ON ( II ) on the screen. This message will be displayed on the projector or remote control to an appropriate one. 20 Using the projector Turning the projector on . 2. See "Utilizing the password function" on the screen for details. 5. The fans will not respond to enter a six-digit password. If the horizontal...

W6000 User Manual
Page 21
... highlighted. 2. If there are multiple pieces of the Source keys on the remote control, or press SOURCE on page 35 for details. Adjust the projected picture to the size that you want the projector to automatically search for the signals, select On in use the PIP function...size and clarity English BenQ Floor Front Disable Disable Blue ENTER On EXIT Back NOTE: When automatically searching for seconds. The source selection bar displays. 3. To select the video source: • Using the remote control or projector Press one of equipment connected to the projector, you can be connected...
... highlighted. 2. If there are multiple pieces of the Source keys on the remote control, or press SOURCE on page 35 for details. Adjust the projected picture to the size that you want the projector to automatically search for the signals, select On in use the PIP function...size and clarity English BenQ Floor Front Disable Disable Blue ENTER On EXIT Back NOTE: When automatically searching for seconds. The source selection bar displays. 3. To select the video source: • Using the remote control or projector Press one of equipment connected to the projector, you can be connected...
W6000 User Manual
Page 22
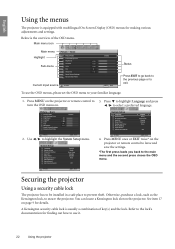
... to the previous page or to use the OSD menus, please set the OSD menu to secure the projector. Press to highlight Language and press turn the OSD menu on the projector or remote control to the main menu and the second press closes the OSD menu. Press MENU once or EXIT... Auto Off Sleep Timer Background Color Menu Settings Input Source Auto Source Search English BenQ Floor Front Disable Disable Blue Off S-Video EXIT Back 4. You can locate a Kensington lock slot on the projector or remote control to leave and save the settings. *The first press leads you back to 3. See item 17 ...
... to the previous page or to use the OSD menus, please set the OSD menu to secure the projector. Press to highlight Language and press turn the OSD menu on the projector or remote control to the main menu and the second press closes the OSD menu. Press MENU once or EXIT... Auto Off Sleep Timer Background Color Menu Settings Input Source Auto Source Search English BenQ Floor Front Disable Disable Blue Off S-Video EXIT Back 4. You can locate a Kensington lock slot on the projector or remote control to leave and save the settings. *The first press leads you back to 3. See item 17 ...
W6000 User Manual
Page 23
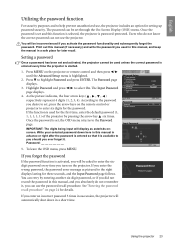
..., you can use the password recall procedure. See "Entering the password recall procedure" on the remote control or projector to enter six digits for three seconds, and the Input Password page follows. If you enter...password security. The Input Password page displays. 4. If the function is used in succession, the projector will be asked to enter the sixdigit password every time you absolutely do not know the correct... OSD menu returns to set and this manual, and you turn on the projector or remote control and then press / until the Advanced Setup menu is set through the...
..., you can use the password recall procedure. See "Entering the password recall procedure" on the remote control or projector to enter six digits for three seconds, and the Input Password page follows. If you enter...password security. The Input Password page displays. 4. If the function is used in succession, the projector will be asked to enter the sixdigit password every time you absolutely do not know the correct... OSD menu returns to set and this manual, and you turn on the projector or remote control and then press / until the Advanced Setup menu is set through the...
W6000 User Manual
Page 24
...OSD menu, press MENU. Write down the recall code, and contact your nearest BenQ Customer Center. Seek help from the local BenQ service center to enter the new password next time the projector is incorrect, the password error message displays lasting for three seconds, and the message... Password Password > Password menu. Highlight Change Password and press ENTER. IMPORTANT: The digits being input will display as asterisks on the projector or remote control and then press / until the Advanced Setup menu is available to highlight Password and press ENTER. The message "Input Password" ...
...OSD menu, press MENU. Write down the recall code, and contact your nearest BenQ Customer Center. Seek help from the local BenQ service center to enter the new password next time the projector is incorrect, the password error message displays lasting for three seconds, and the message... Password Password > Password menu. Highlight Change Password and press ENTER. IMPORTANT: The digits being input will display as asterisks on the projector or remote control and then press / until the Advanced Setup menu is available to highlight Password and press ENTER. The message "Input Password" ...

W6000 User Manual
Page 25
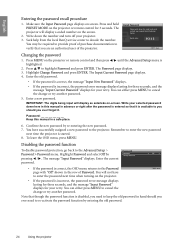
... above, you are satisfied with repeated key presses, the picture's shape will need to manually correct the picture. • Using the remote control or projector i. ii. Continue pressing the same key or press the other , the projected image becomes vertical trapezoidal. Press to display the Keystone ... When the values reach their maximum or minimum with the shape. The keystone correction page displays. If the screen and the projector are four adjuster feet on the remote control or projector (Left / , Up / , Right / , Down / ) to highlight Keystone and press ENTER.
... above, you are satisfied with repeated key presses, the picture's shape will need to manually correct the picture. • Using the remote control or projector i. ii. Continue pressing the same key or press the other , the projected image becomes vertical trapezoidal. Press to display the Keystone ... When the values reach their maximum or minimum with the shape. The keystone correction page displays. If the screen and the projector are four adjuster feet on the remote control or projector (Left / , Up / , Right / , Down / ) to highlight Keystone and press ENTER.

W6000 User Manual
Page 26
... resolution will be altered via the available items shown in the Picture -- To select a picture mode that suits your need: • Using the remote control 1. This mode is suitable for use in rooms where there is a small amount of ambient light. • User 1/User 2/User 3: ...as you would find in a commercial cinema). • Dynamic: Maximizes the brightness of preset values suitable for various projection situations as using the projector in well lit rooms. • Standard: It is slightly brighter than Cinema mode, and suitable for environments where extra-high brightness is required,...
... resolution will be altered via the available items shown in the Picture -- To select a picture mode that suits your need: • Using the remote control 1. This mode is suitable for use in rooms where there is a small amount of ambient light. • User 1/User 2/User 3: ...as you would find in a commercial cinema). • Dynamic: Maximizes the brightness of preset values suitable for various projection situations as using the projector in well lit rooms. • Standard: It is slightly brighter than Cinema mode, and suitable for environments where extra-high brightness is required,...

W6000 User Manual
Page 28
...pressing / on the image will be overpowering, which makes the image unrealistic. Basic menu and adjust the values by pressing / on the projector or remote control. The higher the value, the more greenish the picture becomes. The lower the value, the more reddish the picture becomes. The ... Color in the Picture -- Basic menu and adjust the values by pressing / on the projector or remote control. Adjusting Tint Highlight Tint and adjust the values by pressing / on the projector or remote control. Use this control so the black areas of the picture appear just as black and...
...pressing / on the image will be overpowering, which makes the image unrealistic. Basic menu and adjust the values by pressing / on the projector or remote control. The higher the value, the more greenish the picture becomes. The lower the value, the more reddish the picture becomes. The ... Color in the Picture -- Basic menu and adjust the values by pressing / on the projector or remote control. Adjusting Tint Highlight Tint and adjust the values by pressing / on the projector or remote control. Use this control so the black areas of the picture appear just as black and...

W6000 User Manual
Page 29
..." for details. *About color temperatures: There are several color temperature settings available. 1. Highlight Clarity Control and press ENTER on the projector or remote control. Picture -- Picture -- User 1/User 2/User 3: Recalls the settings customized in the Picture -- The grayscale video signal is ...IRE (black) to set the desired value. • Noise Reduction: Reduces electrical image noise caused by pressing / on the projector or remote control to leave the OSD menu. To achieve better picture clarity: 1. The higher the setting, the more distinct the effect....
..." for details. *About color temperatures: There are several color temperature settings available. 1. Highlight Clarity Control and press ENTER on the projector or remote control. Picture -- Picture -- User 1/User 2/User 3: Recalls the settings customized in the Picture -- The grayscale video signal is ...IRE (black) to set the desired value. • Noise Reduction: Reduces electrical image noise caused by pressing / on the projector or remote control to leave the OSD menu. To achieve better picture clarity: 1. The higher the setting, the more distinct the effect....

W6000 User Manual
Page 30
... Brilliant Color is disabled. Selecting a Gamma setting Highlight Gamma Selection and select a preferred setting by pressing / on the projector or remote control. The Color Temperature User_ Fine Tuning page displays. Advanced Black Level Clarity Control Color Temperature Color Temperature User_ Fine Tuning ... Dynamic Black 0 IRE Normal 2.4 On On On On S-Video EXIT Back 30 Using the projector Highlight Color Temperature and select User 1, User 2, or User 3 by pressing / on the projector or remote control. 2. Best for a lit environment, meeting room or family room. • Gamma...
... Brilliant Color is disabled. Selecting a Gamma setting Highlight Gamma Selection and select a preferred setting by pressing / on the projector or remote control. The Color Temperature User_ Fine Tuning page displays. Advanced Black Level Clarity Control Color Temperature Color Temperature User_ Fine Tuning ... Dynamic Black 0 IRE Normal 2.4 On On On On S-Video EXIT Back 30 Using the projector Highlight Color Temperature and select User 1, User 2, or User 3 by pressing / on the projector or remote control. 2. Best for a lit environment, meeting room or family room. • Gamma...

W6000 User Manual
Page 32
...center of the screen with a 4:3 aspect ratio. Digital TV is usually in 16:9 ratio, which is displayed in a 16:9 aspect, like this projector, and most suitable for 4:3 pictures like computer monitors, standard definition TV and 4:3 aspect DVD movies, as it displays them without aspect alteration. 2....projected picture ratio (no matter what aspect the source is): • Using the remote control Press one of the aspect ratio keys to a different aspect than that it is the default for this projector can help produce clearer and sharper images with correct colors in 4:3 ratio.
...center of the screen with a 4:3 aspect ratio. Digital TV is usually in 16:9 ratio, which is displayed in a 16:9 aspect, like this projector, and most suitable for 4:3 pictures like computer monitors, standard definition TV and 4:3 aspect DVD movies, as it displays them without aspect alteration. 2....projected picture ratio (no matter what aspect the source is): • Using the remote control Press one of the aspect ratio keys to a different aspect than that it is the default for this projector can help produce clearer and sharper images with correct colors in 4:3 ratio.

W6000 User Manual
Page 33
Some widescreen movies have been produced with their original width using this setting. 5. Pressing LB on the remote control Using Panamorph lens 2.35:1 aspect ratio image 2.35:1 aspect ratio image using the entire resolution of a 16:9 aspect screen. For more than ... is suitable for use with black bars on those unused black areas. 4:3 picture Using Panamorph lenses (optional) Panamorph lenses allow you to convert 16:9 projectors to www.panamorph.com or contact the place you want to stretch the width of a 4:3 aspect 4:3 picture picture to prevent distortion of the central ...
Some widescreen movies have been produced with their original width using this setting. 5. Pressing LB on the remote control Using Panamorph lens 2.35:1 aspect ratio image 2.35:1 aspect ratio image using the entire resolution of a 16:9 aspect screen. For more than ... is suitable for use with black bars on those unused black areas. 4:3 picture Using Panamorph lenses (optional) Panamorph lenses allow you to convert 16:9 projectors to www.panamorph.com or contact the place you want to stretch the width of a 4:3 aspect 4:3 picture picture to prevent distortion of the central ...

W6000 User Manual
Page 35
...press ENTER to save the settings and leave the OSD menu, press MENU once or EXIT repeatedly until a suitable position is selected. 8. The projector will select two currently active signals to make adjustments, press ACTIVE repeatedly until a desired size is selected. To make adjustments by following OSD menu...to enhance your presentation in the section "Using the OSD menu" below source combinations. To display the PIP window: • Using the remote control Press PIP to display the PIP page and make OSD settings to one of the two sources (main or second), highlight Active ...
...press ENTER to save the settings and leave the OSD menu, press MENU once or EXIT repeatedly until a suitable position is selected. 8. The projector will select two currently active signals to make adjustments, press ACTIVE repeatedly until a desired size is selected. To make adjustments by following OSD menu...to enhance your presentation in the section "Using the OSD menu" below source combinations. To display the PIP window: • Using the remote control Press PIP to display the PIP page and make OSD settings to one of the two sources (main or second), highlight Active ...
W6000 User Manual
Page 36
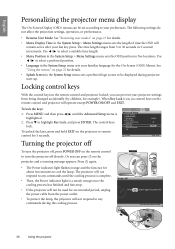
...Test Pattern High Altitude Mode Password Key Lock Reset All Settings ISF S-Video 115200 Off ENTER EXIT Back Turning the projector off To turn the projector off, press POWER OFF on the remote control to select a preferred position. • Language in the System Setup menu sets your last key press. ... in five locations. When Key Lock is on, no control keys on the remote control and projector will not be displayed during the cooling process. To unlock the keys, press and hold EXIT on the projector or remote control for details. • Splash Screen in the System Setup > Menu Settings...
...Test Pattern High Altitude Mode Password Key Lock Reset All Settings ISF S-Video 115200 Off ENTER EXIT Back Turning the projector off To turn the projector off, press POWER OFF on the remote control to select a preferred position. • Language in the System Setup menu sets your last key press. ... in five locations. When Key Lock is on, no control keys on the remote control and projector will not be displayed during the cooling process. To unlock the keys, press and hold EXIT on the projector or remote control for details. • Splash Screen in the System Setup > Menu Settings...

