RL2455HM User Manual
Page 4
...Front view...8 Back view ...8 Input and output ports ...9 How to assemble your monitor hardware (RL2450H / RL2455HM 10 How to detach the stand base ...14 Using the monitor wall mounting kit 15 Assembling your monitor with...angle adjustment ...21 Using the monitor wall mounting kit 22 Getting the most from your BenQ monitor 23 How to install the monitor on a new computer 24 How to upgrade the... control panel...29 Basic menu operation...30 Picture optimization ...32 Customizing the hot keys...32 Setting up your own game mode ...32 Adjusting display mode ...33 Using Smart Scaling...33 Navigating...
...Front view...8 Back view ...8 Input and output ports ...9 How to assemble your monitor hardware (RL2450H / RL2455HM 10 How to detach the stand base ...14 Using the monitor wall mounting kit 15 Assembling your monitor with...angle adjustment ...21 Using the monitor wall mounting kit 22 Getting the most from your BenQ monitor 23 How to install the monitor on a new computer 24 How to upgrade the... control panel...29 Basic menu operation...30 Picture optimization ...32 Customizing the hot keys...32 Setting up your own game mode ...32 Adjusting display mode ...33 Using Smart Scaling...33 Navigating...
RL2455HM User Manual
Page 20
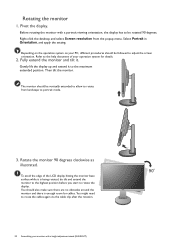
... LCD display hitting the monitor base surface while it is enough room for details. 2. Refer to portrait mode. 3. Select Portrait in Orientation, and apply the setting. Fully extend the monitor and tilt it to rotate from the popup menu. The monitor should be vertically extended to allow to the maximum extended...
... LCD display hitting the monitor base surface while it is enough room for details. 2. Refer to portrait mode. 3. Select Portrait in Orientation, and apply the setting. Fully extend the monitor and tilt it to rotate from the popup menu. The monitor should be vertically extended to allow to the maximum extended...
RL2455HM User Manual
Page 23
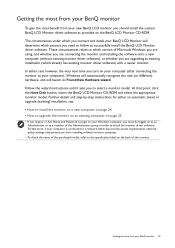
... Monitor will launch its Found New Hardware wizard. Getting the most benefit from your BenQ monitor 23 Furthermore, if your computer is connected to a network which has security access requirements, network policy settings may prevent you from installing software on your computer. • To check the ...name of the purchased model, refer to install the monitor driver software. Getting the most from your BenQ monitor To gain the most from your new BenQ LCD monitor, you...
... Monitor will launch its Found New Hardware wizard. Getting the most benefit from your BenQ monitor 23 Furthermore, if your computer is connected to a network which has security access requirements, network policy settings may prevent you from installing software on your computer. • To check the ...name of the purchased model, refer to install the monitor driver software. Getting the most from your BenQ monitor To gain the most from your new BenQ LCD monitor, you...
RL2455HM User Manual
Page 26
... provided driver list, and click Next. Select the correct folder name of your system - This will copy and install the appropriate monitor driver files to Settings, Control Panel, Devices and Printers and right-click the name of your computer. 10. Open Display Properties. it may be 'D:' or 'E:' or 'F:'...window, select the option Browse my computer for the CD-ROM drive). Click Close. Move the cursor to the lower-right of your BenQ monitor Select Properties from the menu. 2. Click Browse and navigate to restart your computer after the driver update is the drive letter ...
... provided driver list, and click Next. Select the correct folder name of your system - This will copy and install the appropriate monitor driver files to Settings, Control Panel, Devices and Printers and right-click the name of your computer. 10. Open Display Properties. it may be 'D:' or 'E:' or 'F:'...window, select the option Browse my computer for the CD-ROM drive). Click Close. Move the cursor to the lower-right of your BenQ monitor Select Properties from the menu. 2. Click Browse and navigate to restart your computer after the driver update is the drive letter ...

RL2455HM User Manual
Page 28
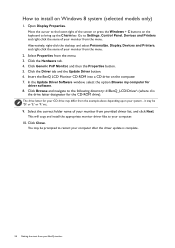
The Display Settings window will display. 3. Click the Monitor tab and the Properties button. 4. Insert the BenQ LCD Monitor CD-ROM into a CD drive on Windows Vista systems 1. it may be prompted to the following directory: d:\BenQ_LCD\Driver\ (where ...Software window, select the option Browse my computer for your CD drive may be 'D:' or 'E:' or 'F:' etc. 9. Click the Advanced Settings button. Open Display Settings. Right-click the desktop and select Personalize from the Personalize appearance and sounds window. The Generic PnP Monitor Properties window will display. 2. ...
The Display Settings window will display. 3. Click the Monitor tab and the Properties button. 4. Insert the BenQ LCD Monitor CD-ROM into a CD drive on Windows Vista systems 1. it may be prompted to the following directory: d:\BenQ_LCD\Driver\ (where ...Software window, select the option Browse my computer for your CD drive may be 'D:' or 'E:' or 'F:' etc. 9. Click the Advanced Settings button. Open Display Settings. Right-click the desktop and select Personalize from the Personalize appearance and sounds window. The Generic PnP Monitor Properties window will display. 2. ...

RL2455HM User Manual
Page 30
... Customizing the hot keys on page 32. • For Up/Increase adjustment. 30 How to adjust all the settings on the menu options. You can be accessed by the control keys. No. The top three controls are custom keys and are designated for Picture ...
... Customizing the hot keys on page 32. • For Up/Increase adjustment. 30 How to adjust all the settings on the menu options. You can be accessed by the control keys. No. The top three controls are custom keys and are designated for Picture ...

RL2455HM User Manual
Page 31
To change the default settings, see Customizing the hot keys on page 32. • Enters sub menus. • Selects menu items. MENU • Activates the main menu. • Returns to ...adjust your monitor 31 Custom Key 3 • By default, the key is the hot key for Smart Scaling. / To change the default settings, see Customizing the hot keys on page 32. • For Down/Decrease adjustment. How to the previous menu. The hot keys only operate while the...
To change the default settings, see Customizing the hot keys on page 32. • Enters sub menus. • Selects menu items. MENU • Activates the main menu. • Returns to ...adjust your monitor 31 Custom Key 3 • By default, the key is the hot key for Smart Scaling. / To change the default settings, see Customizing the hot keys on page 32. • For Down/Decrease adjustment. How to the previous menu. The hot keys only operate while the...
RL2455HM User Manual
Page 32
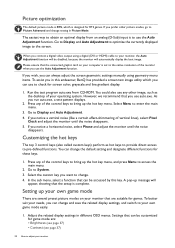
... the control keys to bring up message will automatically display the best image. However, we recommend that can always adjust the screen geometric settings manually using a digital (DVI or HDMI) cable to your monitor, the Auto Adjustment function will be disabled, because the monitor will ... displayed image to Display and Auto Adjustment. 4. Go to the screen. Select the custom key you can be accessed by this endeavour, BenQ has provided a screen test image utility which is designed for screen color, grayscale and line gradient display. 1. To better suit your operating...
... the control keys to bring up message will automatically display the best image. However, we recommend that can always adjust the screen geometric settings manually using a digital (DVI or HDMI) cable to your monitor, the Auto Adjustment function will be disabled, because the monitor will ... displayed image to Display and Auto Adjustment. 4. Go to the screen. Select the custom key you can be accessed by this endeavour, BenQ has provided a screen test image utility which is designed for screen color, grayscale and line gradient display. 1. To better suit your operating...
RL2455HM User Manual
Page 33
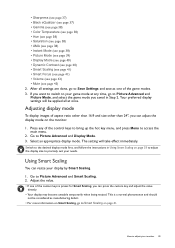
..., and follow the instructions in Step 2. Select an appropriate display mode. Go to adjust your display by Smart Scaling. 1. Your preferred display settings will take effect immediately. Press any time, go to Smart Scaling on page 33 to adjust the display size to Picture Advanced and Picture Mode...monitor 33 Adjust the value. • If one of the custom keys is a normal phenomenon and should not be applied all settings are done, go to Save Settings and save as manufacturing defect. • For more information on Smart Scaling, go to precisely suit your game mode at once. ...
..., and follow the instructions in Step 2. Select an appropriate display mode. Go to adjust your display by Smart Scaling. 1. Your preferred display settings will take effect immediately. Press any time, go to Smart Scaling on page 33 to adjust the display size to Picture Advanced and Picture Mode...monitor 33 Adjust the value. • If one of the custom keys is a normal phenomenon and should not be applied all settings are done, go to Save Settings and save as manufacturing defect. • For more information on Smart Scaling, go to precisely suit your game mode at once. ...

RL2455HM User Manual
Page 34
...that are not available will disappear. See Basic menu operation on page 45 under System and OSD Settings for details. The OSD menu languages may vary depending on the input sources, functions and settings. And keys that are not available will be disabled and the corresponding OSD icons will become grayed...the following pages: • Display menu on page 35 • Picture menu on page 37 • Picture Advanced menu on page 39 • Save Settings menu on page 42 • Audio menu on page 43 • System menu on each menu, please refer to your monitor. Press any of the...
...that are not available will disappear. See Basic menu operation on page 45 under System and OSD Settings for details. The OSD menu languages may vary depending on the input sources, functions and settings. And keys that are not available will be disabled and the corresponding OSD icons will become grayed...the following pages: • Display menu on page 35 • Picture menu on page 37 • Picture Advanced menu on page 39 • Save Settings menu on page 42 • Audio menu on page 43 • System menu on each menu, please refer to your monitor. Press any of the...

RL2455HM User Manual
Page 35
...the screen image. 0 to 100 Adjusts the pixel clock frequency timing to make adjustments, or use 4. Display Picture Picture Advanced Save Settings Audio System Auto Adjustment H.Position V.Postion Pixel Clock Phase Mode: Standard 50 1. to synchronize with the analog input video signal. Navigating... the main menu 35 To return to a sub menu, and then use 5. Item Function Auto Adjustment Optimizes and adjusts the screen settings automatically for you. To exit the menu, select . Select to go to the previous menu, select . 6. or to a digital input signal...
...the screen image. 0 to 100 Adjusts the pixel clock frequency timing to make adjustments, or use 4. Display Picture Picture Advanced Save Settings Audio System Auto Adjustment H.Position V.Postion Pixel Clock Phase Mode: Standard 50 1. to synchronize with the analog input video signal. Navigating... the main menu 35 To return to a sub menu, and then use 5. Item Function Auto Adjustment Optimizes and adjusts the screen settings automatically for you. To exit the menu, select . Select to go to the previous menu, select . 6. or to a digital input signal...

RL2455HM User Manual
Page 37
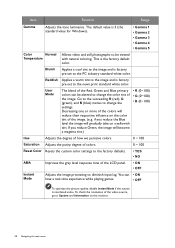
.... 0 to 100 Adjusts the clarity and visibility of the edges of Black eQualizer may vary depending on the input sources, functions and settings. And keys that are not available will be disabled and the corresponding OSD icons will become grayed out. Select to go to a sub... menu, and then use 5. Display Picture Picture Advanced Save Settings Audio System Brightness Contrast Sharpness Black eQualizer Gamma Color Temperature Hue Saturation Normal Bluish Reddish User Mode Mode: Photo R GB 100 100 100 1....
.... 0 to 100 Adjusts the clarity and visibility of the edges of Black eQualizer may vary depending on the input sources, functions and settings. And keys that are not available will be disabled and the corresponding OSD icons will become grayed out. Select to go to a sub... menu, and then use 5. Display Picture Picture Advanced Save Settings Audio System Brightness Contrast Sharpness Black eQualizer Gamma Color Temperature Hue Saturation Normal Bluish Reddish User Mode Mode: Photo R GB 100 100 100 1....
RL2455HM User Manual
Page 38
...Go to the succeeding R (red), G (green), and B (blue) menus to the PC industry standard white color. The default value is factory pre-set to change the color tint of the image. User Mode The blend of the LCD panel. • ON • OFF Instant Mode Adjusts the image... Hue Adjusts the degree of how we perceive colors. 0 ~ 100 Saturation Adjusts the purity degree of colors. 0 ~ 100 Reset Color Resets the custom color settings to the factory defaults. • YES • NO AMA Improves the gray level response time of the Red, Green and Blue primary colors can •...
...Go to the succeeding R (red), G (green), and B (blue) menus to the PC industry standard white color. The default value is factory pre-set to change the color tint of the image. User Mode The blend of the LCD panel. • ON • OFF Instant Mode Adjusts the image... Hue Adjusts the degree of how we perceive colors. 0 ~ 100 Saturation Adjusts the purity degree of colors. 0 ~ 100 Reset Color Resets the custom color settings to the factory defaults. • YES • NO AMA Improves the gray level response time of the Red, Green and Blue primary colors can •...

RL2455HM User Manual
Page 39
... with low power consumption by providing minimum brightness for all running programs. Navigating the main menu 39 Display Picture Picture Advanced Save Settings Audio System Picture Mode Senseye Demo Dynamic Contrast Over-scan Display Mode Smart Scaling Color Format HDMI RGB PC Range Standard Movie Photo... needed. Item Function Picture Mode Select a picture mode that best suits the type of images shown on the input sources, functions and settings. Standard For basic PC application. Select to go to a sub menu, and then use to make adjustments, or use or to make...
... with low power consumption by providing minimum brightness for all running programs. Navigating the main menu 39 Display Picture Picture Advanced Save Settings Audio System Picture Mode Senseye Demo Dynamic Contrast Over-scan Display Mode Smart Scaling Color Format HDMI RGB PC Range Standard Movie Photo... needed. Item Function Picture Mode Select a picture mode that best suits the type of images shown on the input sources, functions and settings. Standard For basic PC application. Select to go to a sub menu, and then use to make adjustments, or use or to make...
RL2455HM User Manual
Page 40
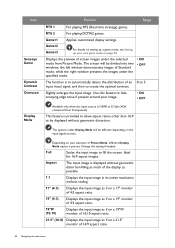
...on the input signal sources. Use this feature to create the optimal contrast. Depending on your own game mode on setting up a game mode, see Setting up your selection of Picture Mode, different Display Mode option is displayed without geometric distortion filling as much of the display... Range RTS 1 For playing RTS (Real-time strategy) games. Aspect The input image is pre-set. Gamer1 Applies customized display settings. The screen will be divided into two windows; Change the setting if needed. Displays the preview of an 0 to 5 input visual signal, and then to hide...
...on the input signal sources. Use this feature to create the optimal contrast. Depending on your own game mode on setting up a game mode, see Setting up your selection of Picture Mode, different Display Mode option is displayed without geometric distortion filling as much of the display... Range RTS 1 For playing RTS (Real-time strategy) games. Aspect The input image is pre-set. Gamer1 Applies customized display settings. The screen will be divided into two windows; Change the setting if needed. Displays the preview of an 0 to 5 input visual signal, and then to hide...
RL2455HM User Manual
Page 41
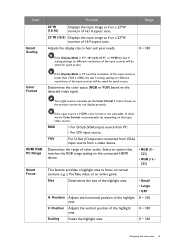
.... In other words, Color Format is not selectable. V. Range 0 ~ 100 If the Display Mode is lower than 1920 x 1080), the last 3 scaling settings (in different resolutions of the input source) will be saved for quick access. Determines the range of the highlight area. • Small • Large •...the highlight area. 0 ~ 100 Navigating the main menu 41 HDMI RGB PC Range Smart Focus If the input source is HDMI, color format is automatically set the Color Format if colors shown on a 23"W monitor of 16:9 aspect ratio. RGB • For D-Sub (VGA) input source from a video ...
.... In other words, Color Format is not selectable. V. Range 0 ~ 100 If the Display Mode is lower than 1920 x 1080), the last 3 scaling settings (in different resolutions of the input source) will be saved for quick access. Determines the range of the highlight area. • Small • Large •...the highlight area. 0 ~ 100 Navigating the main menu 41 HDMI RGB PC Range Smart Focus If the input source is HDMI, color format is automatically set the Color Format if colors shown on a 23"W monitor of 16:9 aspect ratio. RGB • For D-Sub (VGA) input source from a video ...

RL2455HM User Manual
Page 42
... not available will be disabled and the corresponding OSD icons will become grayed out. To return to select a menu item. 4. Display Picture Picture Advanced Save Settings Audio System Gamer 1 Gamer 2 Gamer 3 Mode: RTS 1. Select to go to a sub menu, and then use or to the previous menu, select . 6. Menu options ...are not available will disappear. Range - 42 Navigating the main menu Use or to make selection. 5. To exit the menu, select . Use to select Save Settings. 3. See Setting up your own game mode on page 32 for information on the input sources, functions and...
... not available will be disabled and the corresponding OSD icons will become grayed out. To return to select a menu item. 4. Display Picture Picture Advanced Save Settings Audio System Gamer 1 Gamer 2 Gamer 3 Mode: RTS 1. Select to go to a sub menu, and then use or to the previous menu, select . 6. Menu options ...are not available will disappear. Range - 42 Navigating the main menu Use or to make selection. 5. To exit the menu, select . Use to select Save Settings. 3. See Setting up your own game mode on page 32 for information on the input sources, functions and...
RL2455HM User Manual
Page 43
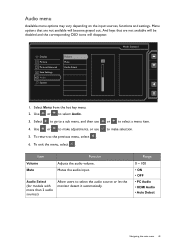
Display Picture Picture Advanced Save Settings Audio System Volume Mute Audio Select Mode: Standard 50 1. Use or to make selection. And keys that are not available will be disabled and the ... adjustments, or use 4. Menu options that are not available will disappear. Audio menu Available menu options may vary depending on the input sources, functions and settings.
Display Picture Picture Advanced Save Settings Audio System Volume Mute Audio Select Mode: Standard 50 1. Use or to make selection. And keys that are not available will be disabled and the ... adjustments, or use 4. Menu options that are not available will disappear. Audio menu Available menu options may vary depending on the input sources, functions and settings.
RL2455HM User Manual
Page 44
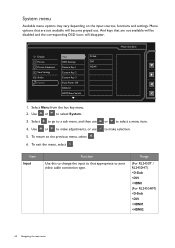
...to make adjustments, or use 4. or to your video cable connection type. Range (For RL2450T / RL2450HT) • D-Sub • DVI • HDMI (For RL2455HM) • D-Sub • DVI • HDMI1 • HDMI2 44 Navigating the main menu Select Menu from the hot key menu. 2. Item Input Function Use... to that are not available will be disabled and the corresponding OSD icons will become grayed out. Display Picture Picture Advanced Save Settings Audio System Input OSD Settings Custom Key 1 Custom Key 2 Custom Key 3 Auto Power Off DDC/CI HDMI Auto Switch D-Sub DVI HDMI Mode: Standard...
...to make adjustments, or use 4. or to your video cable connection type. Range (For RL2450T / RL2450HT) • D-Sub • DVI • HDMI (For RL2455HM) • D-Sub • DVI • HDMI1 • HDMI2 44 Navigating the main menu Select Menu from the hot key menu. 2. Item Input Function Use... to that are not available will be disabled and the corresponding OSD icons will become grayed out. Display Picture Picture Advanced Save Settings Audio System Input OSD Settings Custom Key 1 Custom Key 2 Custom Key 3 Auto Power Off DDC/CI HDMI Auto Switch D-Sub DVI HDMI Mode: Standard...

RL2455HM User Manual
Page 45
...Smart Focus • Volume • Mute • Input • Black eQualizer Navigating the main menu 45 Sets the function to be accessed by custom key 2. OSD Lock Prevents all the monitor settings from those shown on the right, depending on the product supplied in your region. • English •.... • 5 Sec. • 10 Sec. • 15 Sec. • 20 Sec. • 25 Sec. • 30 Sec. Item OSD Settings Function Range Language Sets the OSD menu language. Customer Key 1 Customer Key 2 Customer Key 3 To unlock the OSD controls, press and hold any key for 10 seconds.
...Smart Focus • Volume • Mute • Input • Black eQualizer Navigating the main menu 45 Sets the function to be accessed by custom key 2. OSD Lock Prevents all the monitor settings from those shown on the right, depending on the product supplied in your region. • English •.... • 5 Sec. • 10 Sec. • 15 Sec. • 20 Sec. • 25 Sec. • 30 Sec. Item OSD Settings Function Range Language Sets the OSD menu language. Customer Key 1 Customer Key 2 Customer Key 3 To unlock the OSD controls, press and hold any key for 10 seconds.


