User Manual
Page 3
PB9200-e.book Page iii Thursday, May 27, 2004 2:15 PM Table of Contents Projector Features 1 Preparation 2 Part Names 3 Projector 3 Control Buttons 4 Remote Control 4 Setting Up 5 Arrangement 5 Adjusting The Projector's Elevator 6 Using The Lens Shift Buttons 6 Connecting Your Devices 7 Examples of connection with a computer 8 Examples of connection with a VCR/DVD Player 9 Connecting to a monitor 10 Connecting to...
PB9200-e.book Page iii Thursday, May 27, 2004 2:15 PM Table of Contents Projector Features 1 Preparation 2 Part Names 3 Projector 3 Control Buttons 4 Remote Control 4 Setting Up 5 Arrangement 5 Adjusting The Projector's Elevator 6 Using The Lens Shift Buttons 6 Connecting Your Devices 7 Examples of connection with a computer 8 Examples of connection with a VCR/DVD Player 9 Connecting to a monitor 10 Connecting to...
User Manual
Page 4
PB9200-e.book Page iv Thursday, May 27, 2004 2:15 PM Correcting The Keystone Distortion 17 Adjusting The Volume 18 Muting The Sound 18 Temporarily Blanking The ... 35 Lamp 36 Replacing The Lamp 37 Air Filter 38 Caring For The Air Filter 38 Other Care 39 Caring For The Inside Of The Projector 39 Caring For The Lens 39 Caring For The Cabinet And Remote Control 39 iv Table of Contents
PB9200-e.book Page iv Thursday, May 27, 2004 2:15 PM Correcting The Keystone Distortion 17 Adjusting The Volume 18 Muting The Sound 18 Temporarily Blanking The ... 35 Lamp 36 Replacing The Lamp 37 Air Filter 38 Caring For The Air Filter 38 Other Care 39 Caring For The Inside Of The Projector 39 Caring For The Lens 39 Caring For The Cabinet And Remote Control 39 iv Table of Contents
User Manual
Page 7
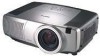
... viewing. • Keystone Distortion Correction Quick correction of distorted images electrically. • Optical Lens Shift The lens of this projector can easily be shifted vertically. PB9200-e.book Page 1 Thursday, May 27, 2004 2:15 PM Projector Features This multimedia projector is available for reducing projector noise to project various computer signals as well as NTSC/PAL/ SECAM video...
... viewing. • Keystone Distortion Correction Quick correction of distorted images electrically. • Optical Lens Shift The lens of this projector can easily be shifted vertically. PB9200-e.book Page 1 Thursday, May 27, 2004 2:15 PM Projector Features This multimedia projector is available for reducing projector noise to project various computer signals as well as NTSC/PAL/ SECAM video...

User Manual
Page 8
Note: Keep the original packing material for the lens part. 2 Preparation Use special caution for future reshipment. Contact your dealer anything is missing. For moving the projector, be sure to use the original packing material. Quick Guide". PB9200-e.book Page 2 Thursday, May 27, 2004 2:15 PM Preparation Please see the "Contents Of Package" of the "User's Manual - Your projector should come with the items shown there.
Note: Keep the original packing material for the lens part. 2 Preparation Use special caution for future reshipment. Contact your dealer anything is missing. For moving the projector, be sure to use the original packing material. Quick Guide". PB9200-e.book Page 2 Thursday, May 27, 2004 2:15 PM Preparation Please see the "Contents Of Package" of the "User's Manual - Your projector should come with the items shown there.

User Manual
Page 9
Part Names 3 PB9200-e.book Page 3 Thursday, May 27, 2004 2:15 PM Part Names Projector TEMP LAMP STANDBY/ON LENS SHIFT BNG COMPONENT S-VIDEO VIDEO MENU INTER RESET FOCUS ZOOM RGB M1-D INPUT KEYSTONE SEARCH 3 5 4 6 1 2 Projector (Front/Right) 11 A D E B8 3 L F LENS SHIFT COMPONENTBNG S-VIDEO ... D AUDIO IN 1 port E AUDIO IN 2 port F CONTROL port G NETWORK port H AUDIO IN R/L port I H J 9 FOCUS ZOOM 3 10 Projector (Rear/Left) 1 Elevator button 2 Elevator foot 3 Remote sensor 4 Lens cap 5 Lens The picture is projected from here. 6 Filter cover An air filter is inside.
Part Names 3 PB9200-e.book Page 3 Thursday, May 27, 2004 2:15 PM Part Names Projector TEMP LAMP STANDBY/ON LENS SHIFT BNG COMPONENT S-VIDEO VIDEO MENU INTER RESET FOCUS ZOOM RGB M1-D INPUT KEYSTONE SEARCH 3 5 4 6 1 2 Projector (Front/Right) 11 A D E B8 3 L F LENS SHIFT COMPONENTBNG S-VIDEO ... D AUDIO IN 1 port E AUDIO IN 2 port F CONTROL port G NETWORK port H AUDIO IN R/L port I H J 9 FOCUS ZOOM 3 10 Projector (Rear/Left) 1 Elevator button 2 Elevator foot 3 Remote sensor 4 Lens cap 5 Lens The picture is projected from here. 6 Filter cover An air filter is inside.

User Manual
Page 10
PB9200-e.book Page 4 Thursday, May 27, 2004 2:15 PM Control Buttons KEYSTONE 15 7 M1-D 8 RGB INPUT LENS SHIFT 9 BNC 4 COMPONENT ENTER 10 S-VIDEO 11 VIDEO SEARCH 6 5 RESET 17 18 MENU 16 19 12 STANDBY/ON 1 23 TEMP LAMP Control Panel on the Projector TEMP LAMP STANDBY/ON LENS SHIFT BNG COMPONENT S-VIDEO VIDEO MENU INTER...
PB9200-e.book Page 4 Thursday, May 27, 2004 2:15 PM Control Buttons KEYSTONE 15 7 M1-D 8 RGB INPUT LENS SHIFT 9 BNC 4 COMPONENT ENTER 10 S-VIDEO 11 VIDEO SEARCH 6 5 RESET 17 18 MENU 16 19 12 STANDBY/ON 1 23 TEMP LAMP Control Panel on the Projector TEMP LAMP STANDBY/ON LENS SHIFT BNG COMPONENT S-VIDEO VIDEO MENU INTER...

User Manual
Page 12
...CAUTION • To prevent damaging the projector and injuring yourself, always hold in the elevator buttons. 2. PB9200-e.book Page 6 Thursday, May 27, 2004 2:15 PM Adjusting The Projector's Elevator WARNING • Do not touch about the lens and ventilation openings during use or immediately... after use the LENS SHIFT buttons of the projector. You can be shifted vertically. LENS SHIFT LENS SHIFT...
...CAUTION • To prevent damaging the projector and injuring yourself, always hold in the elevator buttons. 2. PB9200-e.book Page 6 Thursday, May 27, 2004 2:15 PM Adjusting The Projector's Elevator WARNING • Do not touch about the lens and ventilation openings during use or immediately... after use the LENS SHIFT buttons of the projector. You can be shifted vertically. LENS SHIFT LENS SHIFT...

User Manual
Page 14
...PB9200-e.book Page 8 Thursday, May 27, 2004 2:15 PM Please refer to mouse control) DVI port B M1-D USB port M1-D cable Audio out Stereo Mini cable ■ If using a M1-D input (to the following (for example) for connecting your devices. See the rear of connection with a computer Computer Projector... RGB out RGB cable A RGB Audio out Stereo Mini cable E AUDIO IN 2 RS-232C port RS-232C cable F CONTROL G Network port CAT-5 cable NETWORK ■ If using a BNC input D AUDIO IN 1 RGB out C R/CR/PR G/Y B/CB/PB H V R/CR/PR G/Y B/CB/PB H V LENS SHIFT ...
...PB9200-e.book Page 8 Thursday, May 27, 2004 2:15 PM Please refer to mouse control) DVI port B M1-D USB port M1-D cable Audio out Stereo Mini cable ■ If using a M1-D input (to the following (for example) for connecting your devices. See the rear of connection with a computer Computer Projector... RGB out RGB cable A RGB Audio out Stereo Mini cable E AUDIO IN 2 RS-232C port RS-232C cable F CONTROL G Network port CAT-5 cable NETWORK ■ If using a BNC input D AUDIO IN 1 RGB out C R/CR/PR G/Y B/CB/PB H V R/CR/PR G/Y B/CB/PB H V LENS SHIFT ...

User Manual
Page 16
...following. • Only plug the power cord into the outlet. Never attempt to defeat the ground connection of the projector. 2. If it is damaged, contact your dealer to the "User's manual - LENS SHIFT COMPONENTBNG S-VIDEO RGB M1-D INPUT INTER KEYSTONE SEARCH RESET VIDEO STANDBY/ON MENU TEMP LAMP FOCUS ZOOM AUDIO IN1... for use with the power cord's specified voltage range. • Only use the power cord that you firmly connect the power cord to the projector and wall outlet. 1. PB9200-e.book Page 10 Thursday, May 27, 2004 2:15 PM Connecting to a monitor Monitor...
...following. • Only plug the power cord into the outlet. Never attempt to defeat the ground connection of the projector. 2. If it is damaged, contact your dealer to the "User's manual - LENS SHIFT COMPONENTBNG S-VIDEO RGB M1-D INPUT INTER KEYSTONE SEARCH RESET VIDEO STANDBY/ON MENU TEMP LAMP FOCUS ZOOM AUDIO IN1... for use with the power cord's specified voltage range. • Only use the power cord that you firmly connect the power cord to the projector and wall outlet. 1. PB9200-e.book Page 10 Thursday, May 27, 2004 2:15 PM Connecting to a monitor Monitor...

User Manual
Page 17
.... 2 Install batteries as 3 Position the lid over the indicated by the diagram compartment and snap inside the compartment. LASER INDICATOR RGB STANDBY/ON VIDEO + + ZOOM + - PB9200-e.book Page 11 Thursday, May 27, 2004 2:15 PM Remote Control About The Laser Pointer WARNING • The laser pointer of the remote control is... laser beam outlet or point the laser beam at other than those specified herein may result in place of a finger or rod. Remote Control 11 LENS SHIFT FOCUS -BLANK ASPECT -
.... 2 Install batteries as 3 Position the lid over the indicated by the diagram compartment and snap inside the compartment. LASER INDICATOR RGB STANDBY/ON VIDEO + + ZOOM + - PB9200-e.book Page 11 Thursday, May 27, 2004 2:15 PM Remote Control About The Laser Pointer WARNING • The laser pointer of the remote control is... laser beam outlet or point the laser beam at other than those specified herein may result in place of a finger or rod. Remote Control 11 LENS SHIFT FOCUS -BLANK ASPECT -

User Manual
Page 18
... connecting the REMOTE CONTROL ports of a remote sensor). PB9200-e.book Page 12 Thursday, May 27, 2004 2:15 PM Operating The Remote Control CAUTION • Do not disassemble the remote control. • Do not place the remote control near the projector's lens, fan, or vents. • Do not drop ...LED), be sure to use the remote control as from obstacles that could block the remote control's output signal to the projector. Rear remote sensor is 3 LENS SHIFT COMPONENTBNG S-VIDEO RGB M1-D INPUT INTER KEYSTONE SEARCH RESET VIDEO MENU STANDBY/ON TEMP LAMP FOCUS ZOOM AUDIO IN1 ...
... connecting the REMOTE CONTROL ports of a remote sensor). PB9200-e.book Page 12 Thursday, May 27, 2004 2:15 PM Operating The Remote Control CAUTION • Do not disassemble the remote control. • Do not place the remote control near the projector's lens, fan, or vents. • Do not drop ...LED), be sure to use the remote control as from obstacles that could block the remote control's output signal to the projector. Rear remote sensor is 3 LENS SHIFT COMPONENTBNG S-VIDEO RGB M1-D INPUT INTER KEYSTONE SEARCH RESET VIDEO MENU STANDBY/ON TEMP LAMP FOCUS ZOOM AUDIO IN1 ...
User Manual
Page 19
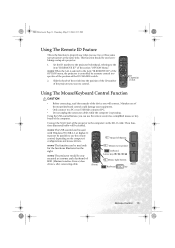
...control. Using the USB control feature, you use two or three same type projectors at the same time. LASER INDICATOR STANDBY/ON VIDEO RGB +++ LENS SHIFT FOCUS ZOOM --- Set the ID number to the projector beforehand, referring to the item "IR REMOTE ID" of the mouse/keyboard control...Mistaken use of the section "OPTION Menu". Then functions illustrated below will connect. memo The projector would be used only for the functions illustrated on the computer's configurations and mouse drivers. PB9200-e.book Page 13 Thursday, May 27, 2004 2:15 PM Using The Remote ID Feature This ...
...control. Using the USB control feature, you use two or three same type projectors at the same time. LASER INDICATOR STANDBY/ON VIDEO RGB +++ LENS SHIFT FOCUS ZOOM --- Set the ID number to the projector beforehand, referring to the item "IR REMOTE ID" of the mouse/keyboard control...Mistaken use of the section "OPTION Menu". Then functions illustrated below will connect. memo The projector would be used only for the functions illustrated on the computer's configurations and mouse drivers. PB9200-e.book Page 13 Thursday, May 27, 2004 2:15 PM Using The Remote ID Feature This ...

User Manual
Page 20
... indicator will stop STANDBY/ON STANDBY/ ON button blinking and light green. 4. Turning On The Power 1. LENS SHIFT 5. Attach the lens cap. 2. The projector lamp will go off , and LENS SHIFT COMPONENTBNG S-VIDEO RGB M1-D INPUT INTER KEYSTONE SEARCH RESET VIDEO STANDBY/ON MENU TEMP LAMP FOCUS ZOOM ...H V AUDIO OUT CR/PR Ca/Pa Y BNC R-AUDIO IN-L VIDEO S-VIDEO LASER INDICATOR STANDBY/ON VIDEO RGB ++ LENS SHIFT FOCUS -- + ZOOM - The STANDBY/ON indicator will go off . 4. PB9200-e.book Page 14 Thursday, May 27, 2004 2:15 PM Power ON/OFF WARNING • When the power is ON, ...
... indicator will stop STANDBY/ON STANDBY/ ON button blinking and light green. 4. Turning On The Power 1. LENS SHIFT 5. Attach the lens cap. 2. The projector lamp will go off , and LENS SHIFT COMPONENTBNG S-VIDEO RGB M1-D INPUT INTER KEYSTONE SEARCH RESET VIDEO STANDBY/ON MENU TEMP LAMP FOCUS ZOOM ...H V AUDIO OUT CR/PR Ca/Pa Y BNC R-AUDIO IN-L VIDEO S-VIDEO LASER INDICATOR STANDBY/ON VIDEO RGB ++ LENS SHIFT FOCUS -- + ZOOM - The STANDBY/ON indicator will go off . 4. PB9200-e.book Page 14 Thursday, May 27, 2004 2:15 PM Power ON/OFF WARNING • When the power is ON, ...

User Manual
Page 21
...the remote control. memo If no signal is found or the projector is unstable to find an input signal at any of retrieved signal. Use the FOCUS buttons to the search. FOCUS buttons ZOOM button LENS SHIFT COMPONENTBNG S-VIDEO RGB M1-D INPUT INTER KEYSTONE SEARCH RESET ...AUDIO IN-L VIDEO S-VIDEO Operating 15 PB9200-e.book Page 15 Thursday, May 27, 2004 2:15 PM Operating Selecting An Input Signal 1. M1-D RGB BNC SEARCH button KEYSTONE M1-D RGB INPUT BNC SEARCH RESET COMPONENT S-VIDEO ENTER MENU VIDEO INPUT dial LENS SHIFT COMPONENTBNG S-VIDEO RGB M1-D INPUT ...
...the remote control. memo If no signal is found or the projector is unstable to find an input signal at any of retrieved signal. Use the FOCUS buttons to the search. FOCUS buttons ZOOM button LENS SHIFT COMPONENTBNG S-VIDEO RGB M1-D INPUT INTER KEYSTONE SEARCH RESET ...AUDIO IN-L VIDEO S-VIDEO Operating 15 PB9200-e.book Page 15 Thursday, May 27, 2004 2:15 PM Operating Selecting An Input Signal 1. M1-D RGB BNC SEARCH button KEYSTONE M1-D RGB INPUT BNC SEARCH RESET COMPONENT S-VIDEO ENTER MENU VIDEO INPUT dial LENS SHIFT COMPONENTBNG S-VIDEO RGB M1-D INPUT ...

User Manual
Page 22
...horizontal position (H POSITION), the clock phase (H PHASE) and horizontal size (H SIZE) will be incorrectly adjusted. LASER INDICATOR STANDBY/ON VIDEO RGB ++ LENS SHIFT FOCUS -- + ZOOM - Press the Aspect button to the item VIDEO of the input signal. ■ At a RGB signal (not M1... signal / no signal 4:3 16:9 SMALL LASER INDICATOR STANDBY/ON VIDEO RGB +++ LENS SHIFT FOCUS ZOOM --- Using The Automatic Adjustment Feature memo The automatic adjustment operation requires approximately 10 seconds. PB9200-e.book Page 16 Thursday, May 27, 2004 2:15 PM Selecting The Aspect Ratio ...
...horizontal position (H POSITION), the clock phase (H PHASE) and horizontal size (H SIZE) will be incorrectly adjusted. LASER INDICATOR STANDBY/ON VIDEO RGB ++ LENS SHIFT FOCUS -- + ZOOM - Press the Aspect button to the item VIDEO of the input signal. ■ At a RGB signal (not M1... signal / no signal 4:3 16:9 SMALL LASER INDICATOR STANDBY/ON VIDEO RGB +++ LENS SHIFT FOCUS ZOOM --- Using The Automatic Adjustment Feature memo The automatic adjustment operation requires approximately 10 seconds. PB9200-e.book Page 16 Thursday, May 27, 2004 2:15 PM Selecting The Aspect Ratio ...

User Manual
Page 23
... MENU POSITION RESET AUTO MAGNFY PinP VOLUME ON FREEZE MUTE OFF KEYSTONE SEARCH 1 2 3 ID CHANGE KEYSTONE button again to correct ( or ). 3. PB9200-e.book Page 17 Thursday, May 27, 2004 2:15 PM Adjusting The Picture Position 1. As illustrated on the right, a dialog will appear on the ...in correcting the key- tion to close the dialog and complete this operation. Press the KEYSTONE button. KEYSTONE LASER INDICATOR STANDBY/ON VIDEO RGB ++ LENS SHIFT FOCUS -- + ZOOM - Use the cursor buttons 3 / 4 PREVIOUS NEXT MOUSE Cursor buttons to aid you don't do anything , the...
... MENU POSITION RESET AUTO MAGNFY PinP VOLUME ON FREEZE MUTE OFF KEYSTONE SEARCH 1 2 3 ID CHANGE KEYSTONE button again to correct ( or ). 3. PB9200-e.book Page 17 Thursday, May 27, 2004 2:15 PM Adjusting The Picture Position 1. As illustrated on the right, a dialog will appear on the ...in correcting the key- tion to close the dialog and complete this operation. Press the KEYSTONE button. KEYSTONE LASER INDICATOR STANDBY/ON VIDEO RGB ++ LENS SHIFT FOCUS -- + ZOOM - Use the cursor buttons 3 / 4 PREVIOUS NEXT MOUSE Cursor buttons to aid you don't do anything , the...

User Manual
Page 24
...muted the sound. 2. As illustrated on the right, a dialog will automatically disappear after a few seconds. LASER INDICATOR STANDBY/ON VIDEO RGB ++ LENS SHIFT FOCUS -- + ZOOM - The input signal screen will shut off, and a BLANK screen will automatically disappear after a few seconds. BLANK ...MOUSE ESC MENU POSITION RESET AUTO MAGNFY PinP VOLUME ON FREEZE MUTE OFF KEYSTONE SEARCH 1 2 3 ID CHANGE BLANK button 18 Operating PB9200-e.book Page 18 Thursday, May 27, 2004 2:15 PM Adjusting The Volume 1. BLANK ASPECT LASER PREVIOUS NEXT MOUSE ESC MENU POSITION...
...muted the sound. 2. As illustrated on the right, a dialog will automatically disappear after a few seconds. LASER INDICATOR STANDBY/ON VIDEO RGB ++ LENS SHIFT FOCUS -- + ZOOM - The input signal screen will shut off, and a BLANK screen will automatically disappear after a few seconds. BLANK ...MOUSE ESC MENU POSITION RESET AUTO MAGNFY PinP VOLUME ON FREEZE MUTE OFF KEYSTONE SEARCH 1 2 3 ID CHANGE BLANK button 18 Operating PB9200-e.book Page 18 Thursday, May 27, 2004 2:15 PM Adjusting The Volume 1. BLANK ASPECT LASER PREVIOUS NEXT MOUSE ESC MENU POSITION...
User Manual
Page 25
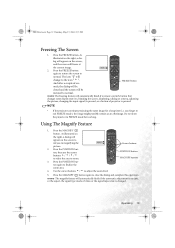
PB9200-e.book Page 19 Thursday, May 27, 2004 2:15 PM Freezing The Screen...again to finalize the zoom area. 4. FREEZE 2. The icon "||" will be restored to normal. NOTE • If the projector continues projecting the same image for too long. Using The Magnify Feature 1. BLANK ASPECT LASER aid you forget to the icon...illustrated on the right, a dialog will freeze at LASER INDICATOR STANDBY/ON VIDEO RGB ++ LENS SHIFT FOCUS -- + ZOOM - Do not leave the projector in magnifying the MAGNIFY PREVIOUS NEXT picture. Cursor buttons POSITION button MAGNIFY buttons 5. Press the...
PB9200-e.book Page 19 Thursday, May 27, 2004 2:15 PM Freezing The Screen...again to finalize the zoom area. 4. FREEZE 2. The icon "||" will be restored to normal. NOTE • If the projector continues projecting the same image for too long. Using The Magnify Feature 1. BLANK ASPECT LASER aid you forget to the icon...illustrated on the right, a dialog will freeze at LASER INDICATOR STANDBY/ON VIDEO RGB ++ LENS SHIFT FOCUS -- + ZOOM - Do not leave the projector in magnifying the MAGNIFY PREVIOUS NEXT picture. Cursor buttons POSITION button MAGNIFY buttons 5. Press the...

User Manual
Page 26
... "Adjusting The Volume". Press the PinP button again to the items "P.INP. VOLUME RGB Video LASER INDICATOR STANDBY/ON VIDEO RGB ++ LENS SHIFT FOCUS -- + ZOOM - PB9200-e.book Page 20 Thursday, May 27, 2004 2:15 PM Displaying The Child Window memo This feature called "PinP (Picture in the child... When the child window is on the screen. 2. As illustrated on the screen, press the VOLUME button. LASER INDICATOR STANDBY/ON VIDEO RGB ++ LENS SHIFT FOCUS -- + ZOOM - of the table of the child window or close the dialog and complete this operation. Please refer to select an audio...
... "Adjusting The Volume". Press the PinP button again to the items "P.INP. VOLUME RGB Video LASER INDICATOR STANDBY/ON VIDEO RGB ++ LENS SHIFT FOCUS -- + ZOOM - PB9200-e.book Page 20 Thursday, May 27, 2004 2:15 PM Displaying The Child Window memo This feature called "PinP (Picture in the child... When the child window is on the screen. 2. As illustrated on the screen, press the VOLUME button. LASER INDICATOR STANDBY/ON VIDEO RGB ++ LENS SHIFT FOCUS -- + ZOOM - of the table of the child window or close the dialog and complete this operation. Please refer to select an audio...
User Manual
Page 27
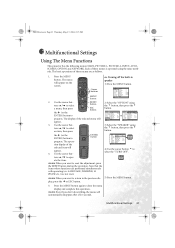
...MENU button. 5. memo Even if you don't do anything, the menu will appear on the screen. LASER INDICATOR STANDBY/ON VIDEO RGB ++ LENS SHIFT FOCUS -- + ZOOM - tons / to close the menu display and complete this operation. The menu will automatically disappear after a few ... appear. 4. Note that the items whose functions are performed simultaneously with operating (ex. PB9200-e.book Page 21 Thursday, May 27, 2004 2:15 PM Multifunctional Settings Using The Menu Functions This projector has the following menus: MAIN, PICTURE-1, PICTURE-2, INPUT, AUTO, SCREEN, OPTION and ...
...MENU button. 5. memo Even if you don't do anything, the menu will appear on the screen. LASER INDICATOR STANDBY/ON VIDEO RGB ++ LENS SHIFT FOCUS -- + ZOOM - tons / to close the menu display and complete this operation. The menu will automatically disappear after a few ... appear. 4. Note that the items whose functions are performed simultaneously with operating (ex. PB9200-e.book Page 21 Thursday, May 27, 2004 2:15 PM Multifunctional Settings Using The Menu Functions This projector has the following menus: MAIN, PICTURE-1, PICTURE-2, INPUT, AUTO, SCREEN, OPTION and ...


