BenQ US PRJ 1 Year Warranty
Page 1
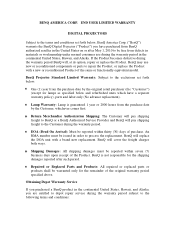
... May 1, 2010 to repair the Product, or replace the Product with a brand new replacement. BenQ Projector Standard Limited Warranty: Subject to BenQ or a BenQ Authorized Service Provider and BenQ will cover the freight charges both ways. Shipping Damages: All shipping damages must be reported within... period in order to the terms and conditions set forth below , BenQ America Corp. ("BenQ") warrants the BenQ Digital Projector ("Product") you are entitled to depot repair service during the warranty period BenQ will replace the DOA unit with a new or reconditioned Product of ...
... May 1, 2010 to repair the Product, or replace the Product with a brand new replacement. BenQ Projector Standard Limited Warranty: Subject to BenQ or a BenQ Authorized Service Provider and BenQ will cover the freight charges both ways. Shipping Damages: All shipping damages must be reported within... period in order to the terms and conditions set forth below , BenQ America Corp. ("BenQ") warrants the BenQ Digital Projector ("Product") you are entitled to depot repair service during the warranty period BenQ will replace the DOA unit with a new or reconditioned Product of ...

- For the purchase before May 01, 2010
Page 1
... in materials or workmanship under normal consumer use new or reconditioned components or parts to process the replacement. BenQ Projector Standard Limited Warranty: Subject to the following terms and conditions: DOA (Dead On Arrival): Must be free from ...be reported within thirty (30) days of the original warranty period specified above. END USER LIMITED WARRANTY DIGITAL PROJECTORS Subject to the terms and conditions set forth below , BenQ America Corp. ("BenQ") warrants the BenQ Digital Projector ("Product") you are entitled to depot repair service during the warranty period.
... in materials or workmanship under normal consumer use new or reconditioned components or parts to process the replacement. BenQ Projector Standard Limited Warranty: Subject to the following terms and conditions: DOA (Dead On Arrival): Must be free from ...be reported within thirty (30) days of the original warranty period specified above. END USER LIMITED WARRANTY DIGITAL PROJECTORS Subject to the terms and conditions set forth below , BenQ America Corp. ("BenQ") warrants the BenQ Digital Projector ("Product") you are entitled to depot repair service during the warranty period.
User Manual
Page 1
MP515 ST/MP525 ST Digital Projector User Manual Welcome
MP515 ST/MP525 ST Digital Projector User Manual Welcome
User Manual
Page 2
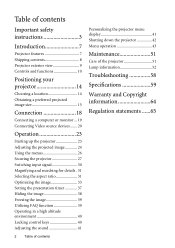
... computer or monitor... 19 Connecting Video source devices....... 20 Operation 23 Starting up the projector 23 Adjusting the projected image 24 Using the menus 26 Securing the projector 27 Switching input signal 30 Magnifying and searching for details . 31 Selecting the aspect ratio... control keys 40 Adjusting the sound 41 2 Table of contents Personalizing the projector menu display 41 Shutting down the projector 42 Menu operation 43 Maintenance 51 Care of the projector 51 Lamp information 52 Troubleshooting 58 Specifications 59 Warranty and Copyright information 64 Regulation...
... computer or monitor... 19 Connecting Video source devices....... 20 Operation 23 Starting up the projector 23 Adjusting the projected image 24 Using the menus 26 Securing the projector 27 Switching input signal 30 Magnifying and searching for details . 31 Selecting the aspect ratio... control keys 40 Adjusting the sound 41 2 Table of contents Personalizing the projector menu display 41 Shutting down the projector 42 Menu operation 43 Maintenance 51 Care of the projector 51 Lamp information 52 Troubleshooting 58 Specifications 59 Warranty and Copyright information 64 Regulation...

User Manual
Page 3
... lens shutter or operate your eyes. In areas where the mains voltage may fluctuate or cut out, it is recommended that you may damage your projector. Refer servicing to 240 volts AC, but could fail if power cuts or surges of ±10 volts occur. Safety Instructions 1. In some... heated air and odor from its ventilation grill. This projector is 2. It is under operation, you follow the instructions mentioned in this manual and marked on . 5. Important safety instructions Your...
... lens shutter or operate your eyes. In areas where the mains voltage may fluctuate or cut out, it is recommended that you may damage your projector. Refer servicing to 240 volts AC, but could fail if power cuts or surges of ±10 volts occur. Safety Instructions 1. In some... heated air and odor from its ventilation grill. This projector is 2. It is under operation, you follow the instructions mentioned in this manual and marked on . 5. Important safety instructions Your...
User Manual
Page 4
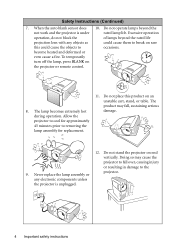
... cause them to break on end vertically. Excessive operation operation, do not block the of lamps beyond the not work and the projector is unplugged. 4 Important safety instructions The lamp becomes extremely hot damage. Doing so may fall over, causing injury or resulting in...BLANK on an unstable cart, stand, or table. Do not place this could cause the objects to the 9. The product may cause the projector to removing the lamp assembly for replacement. 12. during operation. Safety Instructions (Continued) 7. When the auto blank sensor does 10. Never...
... cause them to break on end vertically. Excessive operation operation, do not block the of lamps beyond the not work and the projector is unplugged. 4 Important safety instructions The lamp becomes extremely hot damage. Doing so may fall over, causing injury or resulting in...BLANK on an unstable cart, stand, or table. Do not place this could cause the objects to the 9. The product may cause the projector to removing the lamp assembly for replacement. 12. during operation. Safety Instructions (Continued) 7. When the auto blank sensor does 10. Never...

User Manual
Page 5
...Locations where the altitudes are dangerous high the following environments. voltages inside which has its own removable cover. Refer servicing only to disassemble this projector on a blanket, bedding or any other item. - Locations where excessive humidity, dust, or cigarette smoke may result in any other ...covers. Locations with a cloth or any of projector. Allow at least 50 cm clearance from walls and free flow of a car with live parts. If the ventilation holes are seriously ...
...Locations where the altitudes are dangerous high the following environments. voltages inside which has its own removable cover. Refer servicing only to disassemble this projector on a blanket, bedding or any other item. - Locations where excessive humidity, dust, or cigarette smoke may result in any other ...covers. Locations with a cloth or any of projector. Allow at least 50 cm clearance from walls and free flow of a car with live parts. If the ventilation holes are seriously ...
User Manual
Page 6
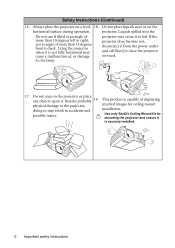
...to right, nor at angle of , or damage to fail. Do not step on the projector or place any objects upon it from the power outlet and call BenQ to back. Use only BenQ's Ceiling Mount Kit for ceiling mount doing so may cause a malfunction of more than 15 degrees... front to have the projector serviced. 17. Always place the projector on the horizontal surface during operation. If the projector does become wet, disconnect it . projector. Do not...
...to right, nor at angle of , or damage to fail. Do not step on the projector or place any objects upon it from the power outlet and call BenQ to back. Use only BenQ's Ceiling Mount Kit for ceiling mount doing so may cause a malfunction of more than 15 degrees... front to have the projector serviced. 17. Always place the projector on the horizontal surface during operation. If the projector does become wet, disconnect it . projector. Do not...
User Manual
Page 7
... password protected function • 3D color management allowing color adjustments to your liking • Selectable quick cooling function making the projector cool in a shorter time • FAQ to troubleshoot operational problems with one quick key press • Presentation timer for ...in standby mode • Built-in speaker providing mixed mono audio when an audio input is normal and expected behavior. The projector offers the following features. • Wall color correction allowing projection on the ambient lighting conditions, selected input signal contrast/brightness settings...
... password protected function • 3D color management allowing color adjustments to your liking • Selectable quick cooling function making the projector cool in a shorter time • FAQ to troubleshoot operational problems with one quick key press • Presentation timer for ...in standby mode • Built-in speaker providing mixed mono audio when an audio input is normal and expected behavior. The projector offers the following features. • Wall color correction allowing projection on the ambient lighting conditions, selected input signal contrast/brightness settings...
User Manual
Page 8
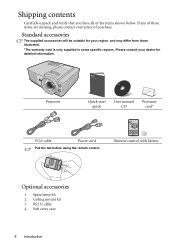
... differ from those illustrated. *The warranty card is only supplied in some specific regions. Standard accessories The supplied accessories will be suitable for detailed information. Projector Quick start guide User manual CD Warranty card* VGA cable Power cord Pull the tab before using the remote control. Spare lamp kit 2. Soft carry...
... differ from those illustrated. *The warranty card is only supplied in some specific regions. Standard accessories The supplied accessories will be suitable for detailed information. Projector Quick start guide User manual CD Warranty card* VGA cable Power cord Pull the tab before using the remote control. Spare lamp kit 2. Soft carry...
User Manual
Page 9
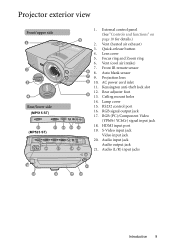
... input jack 18. S-Video input jack Video input jack 20. Auto blank sensor 9. Audio input jack Audio output jack 21. Projector exterior view Front/upper side 1 2 PUSH 3 4 Rear/lower side (MP515 ST) 15 (MP525 ST) 17 18 15 16 17 5 6 7 8 9 19 21 19 20 11 1. Lens cover 5. HDMI input port 19. Front IR remote...
... input jack 18. S-Video input jack Video input jack 20. Auto blank sensor 9. Audio input jack Audio output jack 21. Projector exterior view Front/upper side 1 2 PUSH 3 4 Rear/lower side (MP515 ST) 15 (MP525 ST) 17 18 15 16 17 5 6 7 8 9 19 21 19 20 11 1. Lens cover 5. HDMI input port 19. Front IR remote...
User Manual
Page 10
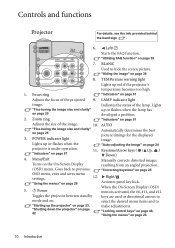
..."Indicators" on page 25 2. "Locking control keys" on page 40, "Using the menus" on page 26 12. Zoom ring up the projector" on page 23, "Shutting down the projector" on . "Using the menus" on page 26 10 Introduction Left/ 2 8 Starts the FAQ function. 3 9 "Utilizing FAQ function" ... image size and clarity" on page 39 4 10 7. Menu/Exit Manually corrects distorted images Turns on page 38 6 13 8. Controls and functions Projector For details, see the info provided behind the hand sign . 1 6. II Power When the On-Screen Display (OSD) menu is under operation....
..."Indicators" on page 25 2. "Locking control keys" on page 40, "Using the menus" on page 26 12. Zoom ring up the projector" on page 23, "Shutting down the projector" on . "Using the menus" on page 26 10 Introduction Left/ 2 8 Starts the FAQ function. 3 9 "Utilizing FAQ function" ... image size and clarity" on page 39 4 10 7. Menu/Exit Manually corrects distorted images Turns on page 38 6 13 8. Controls and functions Projector For details, see the info provided behind the hand sign . 1 6. II Power When the On-Screen Display (OSD) menu is under operation....
User Manual
Page 11
... compatible security cable and attach it is a safety risk that the projector may fall from the place you to have a pleasant experience using your BenQ projector, so we strongly recommend that you use a proper fitting BenQ projector ceiling mount kit and that you ensure it securely to both the ...Kensington lock slot on the projector and the base of restraining the projector should its attachment to an improper attachment through the use a non-BenQ brand projector ceiling mount kit, there is securely and safely installed. This will perform ...
... compatible security cable and attach it is a safety risk that the projector may fall from the place you to have a pleasant experience using your BenQ projector, so we strongly recommend that you use a proper fitting BenQ projector ceiling mount kit and that you ensure it securely to both the ...Kensington lock slot on the projector and the base of restraining the projector should its attachment to an improper attachment through the use a non-BenQ brand projector ceiling mount kit, there is securely and safely installed. This will perform ...
User Manual
Page 12
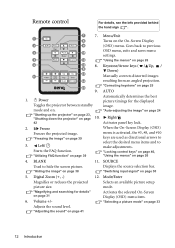
... 42 Activates panel key lock. 2. Selects an available picture setup mode. AUTO 1. "Auto-adjusting the image" on page 24 "Starting up the projector" on page 23, "Shutting down the projector" on page 33 Adjusts the sound level. BLANK 11. "Selecting a picture mode" on page 10. "Adjusting the sound" on page 39 When...on page 38 Displays the source selection bar. "Correcting keystone" on the On-Screen Display 2 9 (OSD) menu. "Magnifying and searching for the displayed Toggles the projector between standby image. Menu/Exit 1 8 Turns on page 25 15 9.
... 42 Activates panel key lock. 2. Selects an available picture setup mode. AUTO 1. "Auto-adjusting the image" on page 24 "Starting up the projector" on page 23, "Shutting down the projector" on page 33 Adjusts the sound level. BLANK 11. "Selecting a picture mode" on page 10. "Adjusting the sound" on page 39 When...on page 38 Displays the source selection bar. "Correcting keystone" on the On-Screen Display 2 9 (OSD) menu. "Magnifying and searching for the displayed Toggles the projector between standby image. Menu/Exit 1 8 Turns on page 25 15 9.
User Manual
Page 13
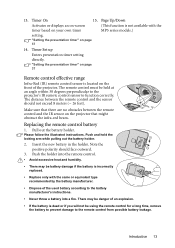
.... "Setting the presentation timer" on the front of an explosion. • If the battery is dead or if you will not be danger of the projector. The distance between the remote control and the IR sensor on your own timer setting. Note the positive polarity should not exceed 8 meters (~ 26 feet...). There may be held at an angle within 30 degrees perpendicular to the projector's IR remote control sensor to function correctly. Page Up/Down Activates or displays an on-screen timer based on the...
.... "Setting the presentation timer" on the front of an explosion. • If the battery is dead or if you will not be danger of the projector. The distance between the remote control and the IR sensor on your own timer setting. Note the positive polarity should not exceed 8 meters (~ 26 feet...). There may be held at an angle within 30 degrees perpendicular to the projector's IR remote control sensor to function correctly. Page Up/Down Activates or displays an on-screen timer based on the...
User Manual
Page 14
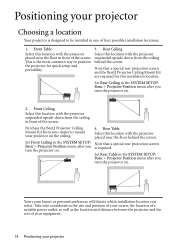
... well as the location and distance between the projector and the rest of the screen. Set Rear Table in the SYSTEM SETUP: Basic > Projector Position menu after you Note that a special rear projection screen and the BenQ Projector Ceiling Mount Kit are required for quick setup... the screen. Take into consideration the size and position of your projector on . 2. Front Ceiling Select this installation location. Set Rear Ceiling in front of four possible installation locations: 1. Purchase the BenQ Projector Ceiling Mount Kit from the ceiling This is required. Front Table ...
... well as the location and distance between the projector and the rest of the screen. Set Rear Table in the SYSTEM SETUP: Basic > Projector Position menu after you Note that a special rear projection screen and the BenQ Projector Ceiling Mount Kit are required for quick setup... the screen. Take into consideration the size and position of your projector on . 2. Front Ceiling Select this installation location. Set Rear Ceiling in front of four possible installation locations: 1. Purchase the BenQ Projector Ceiling Mount Kit from the ceiling This is required. Front Table ...
User Manual
Page 15
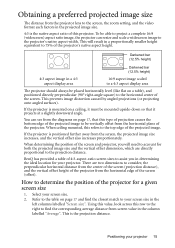
...increases, and the vertical offset also increases proportionately. When ceiling mounted, this type of projection causes the bottom edge of the screen. Select your projector 15 Positioning your screen size. 2. Darkened bar (12.5% height) Darkened bar (12.5% height) 4:3 aspect image in a 4:3 aspect display area...aspect width. To be vertically offset from the horizontal plane of this row to the right to your projector. BenQ has provided a table of the projector's native aspect height. This will result in a proportionally smaller height equivalent to 75% of 4:3-aspect-ratio...
...increases, and the vertical offset also increases proportionately. When ceiling mounted, this type of projection causes the bottom edge of the screen. Select your projector 15 Positioning your screen size. 2. Darkened bar (12.5% height) Darkened bar (12.5% height) 4:3 aspect image in a 4:3 aspect display area...aspect width. To be vertically offset from the horizontal plane of this row to the right to your projector. BenQ has provided a table of the projector's native aspect height. This will result in a proportionally smaller height equivalent to 75% of 4:3-aspect-ratio...
User Manual
Page 16
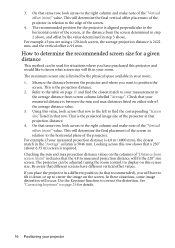
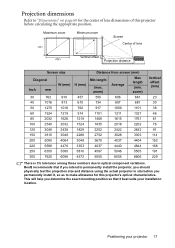
...either side of the screen, at that row. Checking the min and max projection distance values on page 25 for the projector is between the projector and where you will determine the final vertical offset placement of "Distance from the screen determined in step 2 above . This... will fit in that projection distance. 4. The projector can be adjusted (using a 120-inch screen, the average projection distance is 2422 mm, and the vertical offset is the projected image size...
...either side of the screen, at that row. Checking the min and max projection distance values on page 25 for the projector is between the projector and where you will determine the final vertical offset placement of "Distance from the screen determined in step 2 above . This... will fit in that projection distance. 4. The projector can be adjusted (using a 120-inch screen, the average projection distance is 2422 mm, and the vertical offset is the projected image size...
User Manual
Page 17
... installation location. Maximum zoom Minimum zoom Screen Center of this projector's optical characteristics. BenQ recommends that if you intend to permanently install the projector, you should physically test the projection size and distance using the actual projector in situ before you determine the exact mounting position so that... 3353 3810 4572 Distance from screen (mm) Min length (max. This will help you permanently install it best suits your projector 17 zoom) 550 606 661 734 807 881 917 1009 1101 1101 1211 1321 1468 1615 1761 1835 2018 2202 2202 2422...
... installation location. Maximum zoom Minimum zoom Screen Center of this projector's optical characteristics. BenQ recommends that if you intend to permanently install the projector, you should physically test the projection size and distance using the actual projector in situ before you determine the exact mounting position so that... 3353 3810 4572 Distance from screen (mm) Min length (max. This will help you permanently install it best suits your projector 17 zoom) 550 606 661 734 807 881 917 1009 1101 1101 1211 1321 1468 1615 1761 1835 2018 2202 2202 2422...
User Manual
Page 18
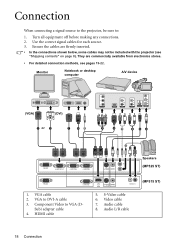
... included with the projector (see pages 19-22. VGA to VGA (D- S-Video cable 6. Component Video to DVI-A cable 3. HDMI cable 5. Use the correct signal cables for each source. 3. Monitor Notebook or desktop computer A/V device (VGA) (DVI) 1 or 2 1 47 3 4 7 8 56 7 1. Audio cable 8. Sub) adapter cable 4. Audio L/R cable Speakers (MP525 ST) (MP515 ST) 18 Connection VGA...
... included with the projector (see pages 19-22. VGA to VGA (D- S-Video cable 6. Component Video to DVI-A cable 3. HDMI cable 5. Use the correct signal cables for each source. 3. Monitor Notebook or desktop computer A/V device (VGA) (DVI) 1 or 2 1 47 3 4 7 8 56 7 1. Audio cable 8. Sub) adapter cable 4. Audio L/R cable Speakers (MP525 ST) (MP515 ST) 18 Connection VGA...


