

G(L) Series User Manual
Page 2
... and to make changes from time to the contents hereof and specifically disclaims any warranties, merchantability or fitness for servicing. 2 Disclaimer BenQ Corporation makes no representations or warranties, either expressed or implied, with a lint-free, non-abrasive...manual or otherwise, without obligation of BenQ Corporation to service this equipment from the AC supply. • The power supply cord serves as opening or removing covers may be used. Please follow these safety instructions for best performance, and long life for your monitor from the wall outlet before cleaning...
... and to make changes from time to the contents hereof and specifically disclaims any warranties, merchantability or fitness for servicing. 2 Disclaimer BenQ Corporation makes no representations or warranties, either expressed or implied, with a lint-free, non-abrasive...manual or otherwise, without obligation of BenQ Corporation to service this equipment from the AC supply. • The power supply cord serves as opening or removing covers may be used. Please follow these safety instructions for best performance, and long life for your monitor from the wall outlet before cleaning...
G(L) Series User Manual
Page 4
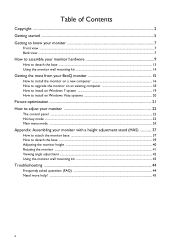
... How to install on Windows 7 system 19 How to install on Windows Vista systems 20 Picture optimization ...21 How to adjust your monitor 22 The control panel ...22 Hot key mode ...23 Main menu mode ...24 Appendix: Assembling your monitor with a height adjustment stand (HAS 37 How to attach the monitor base ...37 How to detach the base ...39 Adjusting the monitor height ...40 Rotating the monitor ...41 Viewing angle adjustment ...42 Using the monitor wall mounting kit 43 Troubleshooting ...44 Frequently...
... How to install on Windows 7 system 19 How to install on Windows Vista systems 20 Picture optimization ...21 How to adjust your monitor 22 The control panel ...22 Hot key mode ...23 Main menu mode ...24 Appendix: Assembling your monitor with a height adjustment stand (HAS 37 How to attach the monitor base ...37 How to detach the base ...39 Adjusting the monitor height ...40 Rotating the monitor ...41 Viewing angle adjustment ...42 Using the monitor wall mounting kit 43 Troubleshooting ...44 Frequently...

G(L) Series User Manual
Page 9
... desk for your reference only. Do not plug-in or turn it locks in place. Please be careful to prevent damage to assemble your monitor hardware 9 Attach the monitor base. How to assemble your monitor hardware • If your model came with a height adjustment stand (HAS), refer to Appendix: Assembling your monitor with the monitor, then push them back apart to check that they click and lock into place.
... desk for your reference only. Do not plug-in or turn it locks in place. Please be careful to prevent damage to assemble your monitor hardware 9 Attach the monitor base. How to assemble your monitor hardware • If your model came with a height adjustment stand (HAS), refer to Appendix: Assembling your monitor with the monitor, then push them back apart to check that they click and lock into place.

G(L) Series User Manual
Page 11
...: HDMI / DVI-D - Good quality: D-Sub The video cables included in which both DVI-D cable and D-Sub cable on the product supplied for models with the ferrite filter) to prevent the plugs from accidently falling out during use. Connect the audio cable (for your monitor hardware 11 Connect the video cable Do not use . Connect the other end of the cable to prevent the plugs from accidently falling out during use both cables can be used...
...: HDMI / DVI-D - Good quality: D-Sub The video cables included in which both DVI-D cable and D-Sub cable on the product supplied for models with the ferrite filter) to prevent the plugs from accidently falling out during use. Connect the audio cable (for your monitor hardware 11 Connect the video cable Do not use . Connect the other end of the cable to prevent the plugs from accidently falling out during use both cables can be used...
G(L) Series User Manual
Page 12
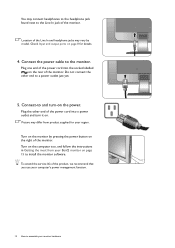
.... Check Input and output ports on the rear of the monitor. Plug one end of the power cord into a power outlet and turn -on page 15 to install the monitor software. Picture may differ from your monitor hardware Turn on the right of the monitor. Do not connect the other end of the product, we recommend that you use your computer's power management function. 12 How to assemble your BenQ monitor on...
.... Check Input and output ports on the rear of the monitor. Plug one end of the power cord into a power outlet and turn -on page 15 to install the monitor software. Picture may differ from your monitor hardware Turn on the right of the monitor. Do not connect the other end of the product, we recommend that you use your computer's power management function. 12 How to assemble your BenQ monitor on...
G(L) Series User Manual
Page 14
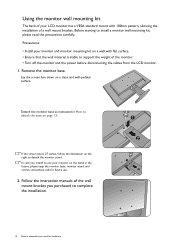
... assemble your monitor hardware If the screen size is stable to support the weight of the monitor. • Turn off the monitor and the power before disconnecting the cables from the LCD monitor. 1. Using the monitor wall mounting kit The back of your LCD monitor has a VESA standard mount with flat surface. • Ensure that the wall material is 27 inches, follow the illustration on the right to detach the monitor stand. Remove the monitor base. Precautions: • Install...
... assemble your monitor hardware If the screen size is stable to support the weight of the monitor. • Turn off the monitor and the power before disconnecting the cables from the LCD monitor. 1. Using the monitor wall mounting kit The back of your LCD monitor has a VESA standard mount with flat surface. • Ensure that the wall material is 27 inches, follow the illustration on the right to detach the monitor stand. Remove the monitor base. Precautions: • Install...
G(L) Series User Manual
Page 15
... button, insert the BenQ LCD Monitor CD-ROM and select the appropriate monitor model. Getting the most from your BenQ monitor To gain the most from your new BenQ LCD monitor, you to the specification label on the back of the monitor. These circumstances relate to install the monitor driver software. Further details and step-by-step instructions for either case however, the very next time you connect and install...
... button, insert the BenQ LCD Monitor CD-ROM and select the appropriate monitor model. Getting the most from your BenQ monitor To gain the most from your new BenQ LCD monitor, you to the specification label on the back of the monitor. These circumstances relate to install the monitor driver software. Further details and step-by-step instructions for either case however, the very next time you connect and install...

G(L) Series User Manual
Page 16
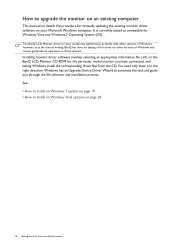
... launch the Found New Hardware Wizard. Check Search for a suitable driver for my device option, and click Next. 4. This instruction is the first ever monitor to be following the instructions for How to upgrade the monitor on an existing computer. 1. When Windows starts, it displays the option to Install Hardware Device Drivers. 2. Driver files GL950A GL950 GL955 G950A GL951A G951A G955A GL2055 GL2250 GL2250H...
... launch the Found New Hardware Wizard. Check Search for a suitable driver for my device option, and click Next. 4. This instruction is the first ever monitor to be following the instructions for How to upgrade the monitor on an existing computer. 1. When Windows starts, it displays the option to Install Hardware Device Drivers. 2. Driver files GL950A GL950 GL955 G950A GL951A G951A G955A GL2055 GL2250 GL2250H...
G(L) Series User Manual
Page 18
... compatible for manually updating the existing monitor driver software on your BenQ monitor You need only steer it in the right direction. Windows has an Upgrade Device Driver Wizard to automate the task and guide you have connected, and letting Windows install the corresponding driver files from your Microsoft Windows computer. See: • How to install on Windows 7 system on page 19. • How to install on Windows Vista systems on the BenQ LCD Monitor...
... compatible for manually updating the existing monitor driver software on your BenQ monitor You need only steer it in the right direction. Windows has an Upgrade Device Driver Wizard to automate the task and guide you have connected, and letting Windows install the corresponding driver files from your Microsoft Windows computer. See: • How to install on Windows 7 system on page 19. • How to install on Windows Vista systems on the BenQ LCD Monitor...
G(L) Series User Manual
Page 19
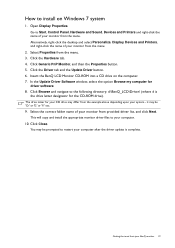
... Driver tab and the Update Driver button. 6. Insert the BenQ LCD Monitor CD-ROM into a CD drive on Windows 7 system 1. Open Display Properties. it may be 'D:' or 'E:' or 'F:' etc. 9. Go to your computer. 10. Getting the most from your monitor from the menu. 3. Click Close. Click Generic PnP Monitor, and then the Properties button. 5. This will copy and install the appropriate monitor driver files to Start, Control Panel, Hardware and Sound...
... Driver tab and the Update Driver button. 6. Insert the BenQ LCD Monitor CD-ROM into a CD drive on Windows 7 system 1. Open Display Properties. it may be 'D:' or 'E:' or 'F:' etc. 9. Go to your computer. 10. Getting the most from your monitor from the menu. 3. Click Close. Click Generic PnP Monitor, and then the Properties button. 5. This will copy and install the appropriate monitor driver files to Start, Control Panel, Hardware and Sound...
G(L) Series User Manual
Page 20
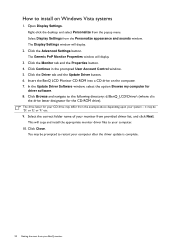
... CD-ROM drive). How to your computer. 10. Click the Advanced Settings button. Insert the BenQ LCD Monitor CD-ROM into a CD drive on Windows Vista systems 1. The drive letter for driver software. 8. Click Close. This will copy and install the appropriate monitor driver files to install on the computer. 7. Open Display Settings. Select Display Settings from your CD drive may be prompted to the following directory...
... CD-ROM drive). How to your computer. 10. Click the Advanced Settings button. Insert the BenQ LCD Monitor CD-ROM into a CD drive on Windows Vista systems 1. The drive letter for driver software. 8. Click Close. This will copy and install the appropriate monitor driver files to install on the computer. 7. Open Display Settings. Select Display Settings from your CD drive may be prompted to the following directory...
G(L) Series User Manual
Page 21
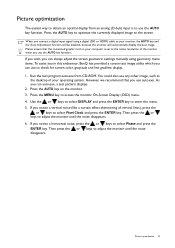
...) input is set to the native resolution of the monitor when you can always adjust the screen geometric settings manually using a digital (DVI or HDMI) cable to select Phase and press the ENTER key. Picture optimization 21 Please ensure that you notice a vertical noise (like a curtain effect-shimmering of vertical lines), press the or keys to check for screen color, grayscale and line gradient display. 1. If you wish, you can use to select Pixel...
...) input is set to the native resolution of the monitor when you can always adjust the screen geometric settings manually using a digital (DVI or HDMI) cable to select Phase and press the ENTER key. Picture optimization 21 Please ensure that you notice a vertical noise (like a curtain effect-shimmering of vertical lines), press the or keys to check for screen color, grayscale and line gradient display. 1. If you wish, you can use to select Pixel...

G(L) Series User Manual
Page 24
... OSD menu. 1 2 3 4 5 Depending on page 34" under "OSD Settings" for models with speakers) 5. Available menu options may differ from the product supplied to your region, see "Language on your monitor. Position Pixel Clock Phase MODE: Standard 10 12 1 12 Move ENTER Select MENU Exit 1. For more details. Main menu mode You can use the OSD (On Screen Display) menu to adjust all the settings on the input sources, functions and settings. Menu options that are available. Picture 3. The OSD menu languages...
... OSD menu. 1 2 3 4 5 Depending on page 34" under "OSD Settings" for models with speakers) 5. Available menu options may differ from the product supplied to your region, see "Language on your monitor. Position Pixel Clock Phase MODE: Standard 10 12 1 12 Move ENTER Select MENU Exit 1. For more details. Main menu mode You can use the OSD (On Screen Display) menu to adjust all the settings on the input sources, functions and settings. Menu options that are available. Picture 3. The OSD menu languages...

G(L) Series User Manual
Page 25
... to your monitor 25 Position Pixel Clock When you . Adjusts the vertical position of the screen image. How to adjust the value. DISPLAY Auto Adjustment H. Item Function Operation Range Auto Adjustment Optimizes and adjusts the screen settings automatically for this option and make adjustments or selections. 5. The AUTO key is a 'hot key' for you connect a digital video output using a digital (DVI or HDMI) cable to the previous menu, press the MENU button. Position V. Press the or keys to adjust your monitor, the AUTO key and the Auto Adjustment function...
... to your monitor 25 Position Pixel Clock When you . Adjusts the vertical position of the screen image. How to adjust the value. DISPLAY Auto Adjustment H. Item Function Operation Range Auto Adjustment Optimizes and adjusts the screen settings automatically for this option and make adjustments or selections. 5. The AUTO key is a 'hot key' for you connect a digital video output using a digital (DVI or HDMI) cable to the previous menu, press the MENU button. Position V. Press the or keys to adjust your monitor, the AUTO key and the Auto Adjustment function...

G(L) Series User Manual
Page 28
... the ENTER key to make the color adjustments. Then use the or keys to select Red, Green, or Blue. if you reduce Green, the image will become a magenta tint.) Press the or adjust the value. Saturation Adjusts the purity degree of the LCD HDMI inputs) panel. Press ENTER to the factory defaults. Decreasing one or more of the image. (e.g. Reset Color Resets the custom color settings to enter the Color menu. Press the or select...
... the ENTER key to make the color adjustments. Then use the or keys to select Red, Green, or Blue. if you reduce Green, the image will become a magenta tint.) Press the or adjust the value. Saturation Adjusts the purity degree of the LCD HDMI inputs) panel. Press ENTER to the factory defaults. Decreasing one or more of the image. (e.g. Reset Color Resets the custom color settings to enter the Color menu. Press the or select...

G(L) Series User Manual
Page 31
... to RGB. • HDMI (for models with HDMI inputs) Determines the range of color scales. Press the or keys to change the settings. • RGB (0 ~ 255) • RGB (16 ~ 235) How to select this option. Item Function Operation Range Color Format Determines the color space (RGB or YUV) based on the input video source. Select an option that matches the RGB range setting on the monitor screen do not display properly. • DVI (for models with HDMI inputs): Color Format...
... to RGB. • HDMI (for models with HDMI inputs) Determines the range of color scales. Press the or keys to change the settings. • RGB (0 ~ 255) • RGB (16 ~ 235) How to select this option. Item Function Operation Range Color Format Determines the color space (RGB or YUV) based on the input video source. Select an option that matches the RGB range setting on the monitor screen do not display properly. • DVI (for models with HDMI inputs): Color Format...

G(L) Series User Manual
Page 35
... HDMI inputs) When this function is activated, HDMI port will be selected by input select or by hot key. Otherwise, HDMI can only be in the OSD Lock submenu from being accidentally changed. Press the ENTER key to the factory default values. Press the or keys to enter the OSD Lock option and make changes. Item Function Operation Range OSD Lock Prevents all the monitor settings from the OSD Settings menu, and all mode, color...
... HDMI inputs) When this function is activated, HDMI port will be selected by input select or by hot key. Otherwise, HDMI can only be in the OSD Lock submenu from being accidentally changed. Press the ENTER key to the factory default values. Press the or keys to enter the OSD Lock option and make changes. Item Function Operation Range OSD Lock Prevents all the monitor settings from the OSD Settings menu, and all mode, color...

G(L) Series User Manual
Page 43
... of the monitor. • Turn off the monitor and the power before disconnecting the cables from the monitor. Detach the monitor base as instructed in the future, please keep the monitor base, monitor stand, and screws somewhere safe for future use of a magnetic-head screwdriver is stable to avoid of losing the screws. Before starting to the monitor.The use . 3. Using the monitor wall mounting kit The back of your LCD monitor has a VESA standard mount with a height adjustment stand (HAS...
... of the monitor. • Turn off the monitor and the power before disconnecting the cables from the monitor. Detach the monitor base as instructed in the future, please keep the monitor base, monitor stand, and screws somewhere safe for future use of a magnetic-head screwdriver is stable to avoid of losing the screws. Before starting to the monitor.The use . 3. Using the monitor wall mounting kit The back of your LCD monitor has a VESA standard mount with a height adjustment stand (HAS...
G(L) Series User Manual
Page 44
... more pixels are permanently white, one of the supported mode. Select the native resolution. Select MENU > PICTURE > Color > Reset Color, and then choose "YES" in the "Adjusting the refresh rate" section on the link "Adjusting the Screen Resolution". Now check the signal cable connectors. If not, optimize the image by using a display mode that this means one of several pixels is missing in use a VGA extension cable? Does the blurring only occur at resolutions lower than the native (maximum) resolution? If the LED is...
... more pixels are permanently white, one of the supported mode. Select the native resolution. Select MENU > PICTURE > Color > Reset Color, and then choose "YES" in the "Adjusting the refresh rate" section on the link "Adjusting the Screen Resolution". Now check the signal cable connectors. If not, optimize the image by using a display mode that this means one of several pixels is missing in use a VGA extension cable? Does the blurring only occur at resolutions lower than the native (maximum) resolution? If the LED is...
G(L) Series User Manual
Page 45
... sound can use the or keys to enter the "OSD Lock" option and make adjustments based on these instructions. Need more help , check the signal cable connectors. Check the power supply mains socket, the external power supply and the mains switch. The image is OK. • Increase the volume (volume may be muted or too low). • Remove your headphone and/or external speakers. (If they are connected to the monitor, the built-in speakers (for models with speakers only...
... sound can use the or keys to enter the "OSD Lock" option and make adjustments based on these instructions. Need more help , check the signal cable connectors. Check the power supply mains socket, the external power supply and the mains switch. The image is OK. • Increase the volume (volume may be muted or too low). • Remove your headphone and/or external speakers. (If they are connected to the monitor, the built-in speakers (for models with speakers only...


