
User Manual
Page 2
... for pluggable equipment. Clean the LCD monitor surface with respect to the contents hereof and specifically disclaims any warranties, merchantability or fitness for servicing. 2 Avoid using any liquid, aerosol or glass cleaners. • Slots and openings on the marked label. v Servicing • Do not attempt to service this publication and to make changes from the AC supply. • The power supply cord serves as dropping...
... for pluggable equipment. Clean the LCD monitor surface with respect to the contents hereof and specifically disclaims any warranties, merchantability or fitness for servicing. 2 Avoid using any liquid, aerosol or glass cleaners. • Slots and openings on the marked label. v Servicing • Do not attempt to service this publication and to make changes from the AC supply. • The power supply cord serves as dropping...
User Manual
Page 3
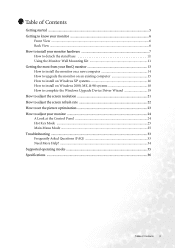
... to install on Windows 2000, ME, & 98 systems 18 How to complete the Windows Upgrade Device Driver Wizard 19 How to adjust the screen resolution 21 How to adjust the screen refresh rate 22 How to set the picture optimization 23 How to adjust your monitor 24 A Look at the Control Panel 24 Hot Key Mode ...25 Main Menu Mode ...25 Troubleshooting ...33 Frequently Asked Questions (FAQ 33 Need More Help? ...34 Supported operating modes 35 Specifications ...36...
... to install on Windows 2000, ME, & 98 systems 18 How to complete the Windows Upgrade Device Driver Wizard 19 How to adjust the screen resolution 21 How to adjust the screen refresh rate 22 How to set the picture optimization 23 How to adjust your monitor 24 A Look at the Control Panel 24 Hot Key Mode ...25 Main Menu Mode ...25 Troubleshooting ...33 Frequently Asked Questions (FAQ 33 Need More Help? ...34 Supported operating modes 35 Specifications ...36...
User Manual
Page 7
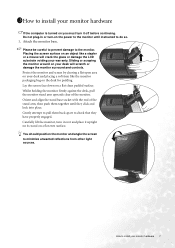
... back apart to check that they click and lock into place. 1311How to install your desk will crack the glass or damage the LCD substrate voiding your monitor hardware 7 How to install your warranty. Attach the monitor base. Orient and align the stand base socket with the end of the monitor. Carefully lift the monitor, turn it upright on its stand on the power to the monitor...
... back apart to check that they click and lock into place. 1311How to install your desk will crack the glass or damage the LCD substrate voiding your monitor hardware 7 How to install your warranty. Attach the monitor base. Orient and align the stand base socket with the end of the monitor. Carefully lift the monitor, turn it upright on its stand on the power to the monitor...
User Manual
Page 8
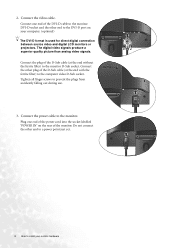
... labelled 'POWER IN' on your monitor hardware The digital video signals produce a superior quality picture than analog video signals. Connect the plug of the D-Sub cable (at the end without the ferrite filter) to the monitor D-Sub socket. Connect the other plug of the D-Sub cable (at the end with the ferrite filter) to install your computer. (optional) The DVI-D format is used for direct digital connection between source video and digital LCD monitors or projectors...
... labelled 'POWER IN' on your monitor hardware The digital video signals produce a superior quality picture than analog video signals. Connect the plug of the D-Sub cable (at the end without the ferrite filter) to the monitor D-Sub socket. Connect the other plug of the D-Sub cable (at the end with the ferrite filter) to install your computer. (optional) The DVI-D format is used for direct digital connection between source video and digital LCD monitors or projectors...

User Manual
Page 9
... on the computer too, and follow the instructions in place behind the monitor stand. 5. Connect-to install your BenQ monitor to install the monitor software. Plug the other end of the monitor. Position the cables together and reinsert the clip over them to retain the cables neatly in Section 4: Getting the most from your monitor hardware 9 4. Turn on . Turn on the monitor by squeezing the clip inwards as illustrated...
... on the computer too, and follow the instructions in place behind the monitor stand. 5. Connect-to install your BenQ monitor to install the monitor software. Plug the other end of the monitor. Position the cables together and reinsert the clip over them to retain the cables neatly in Section 4: Getting the most from your monitor hardware 9 4. Turn on . Turn on the monitor by squeezing the clip inwards as illustrated...
User Manual
Page 11
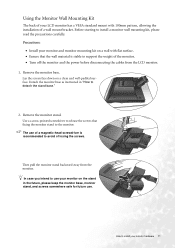
... monitor. • Turn off the monitor and the power before disconnecting the cables from the monitor. Remove the monitor stand. In case you intend to use your monitor on the stand in "How to the monitor. Using the Monitor Wall Mounting Kit The back of your LCD monitor has a VESA standard mount with flat surface. • Ensure that fixing the monitor stand to detach the stand base." 2. Precautions: • Install your monitor and monitor mounting kit on a clean and well-padded surface. Use...
... monitor. • Turn off the monitor and the power before disconnecting the cables from the monitor. Remove the monitor stand. In case you intend to use your monitor on the stand in "How to the monitor. Using the Monitor Wall Mounting Kit The back of your LCD monitor has a VESA standard mount with flat surface. • Ensure that fixing the monitor stand to detach the stand base." 2. Precautions: • Install your monitor and monitor mounting kit on a clean and well-padded surface. Use...

User Manual
Page 13
... need to follow . Further details and step-by-step instructions for both an automatic (new) or upgrade (existing) installation follow to select a monitor model. Follow the wizard instructions until it asks you to successfully install the BenQ LCD Monitor driver software. Getting the most from your new BenQ color LCD flat screen monitor, you should install the custom BenQ LCD Monitor driver software as a member of Microsoft Windows you are using, and whether you are connecting the monitor and installing...
... need to follow . Further details and step-by-step instructions for both an automatic (new) or upgrade (existing) installation follow to select a monitor model. Follow the wizard instructions until it asks you to successfully install the BenQ LCD Monitor driver software. Getting the most from your new BenQ color LCD flat screen monitor, you should install the custom BenQ LCD Monitor driver software as a member of Microsoft Windows you are using, and whether you are connecting the monitor and installing...

User Manual
Page 14
... it (and has monitor driver software installed), you are adding the BenQ LCD Monitor to an existing computer that has already had a monitor driver installed before , and for which has never had another monitor connected to confirm that the wizard has selected the correct name of your monitor as "BenQ FP93G/FP93GX" and click Next. 6. Follow the instructions in How to upgrade the monitor on an existing computer...
... it (and has monitor driver software installed), you are adding the BenQ LCD Monitor to an existing computer that has already had a monitor driver installed before , and for which has never had another monitor connected to confirm that the wizard has selected the correct name of your monitor as "BenQ FP93G/FP93GX" and click Next. 6. Follow the instructions in How to upgrade the monitor on an existing computer...
User Manual
Page 15
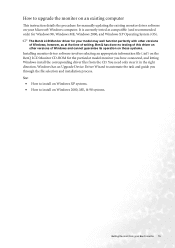
... (.inf) on the BenQ LCD Monitor CD-ROM for the particular model monitor you through the file selection and installation process. Windows has an Upgrade Device Driver Wizard to install on Windows 2000, ME, & 98 systems. Getting the most from the CD. How to upgrade the monitor on an existing computer This instruction details the procedure for manually updating the existing monitor driver software on your model may well function...
... (.inf) on the BenQ LCD Monitor CD-ROM for the particular model monitor you through the file selection and installation process. Windows has an Upgrade Device Driver Wizard to install on Windows 2000, ME, & 98 systems. Getting the most from the CD. How to upgrade the monitor on an existing computer This instruction details the procedure for manually updating the existing monitor driver software on your model may well function...

User Manual
Page 16
... Display Properties window will display. The Monitor Properties window will display. 3. If the driver provider is only one monitor in these instructions. 5. Insert the BenQ LCD Monitor CD-ROM into a CD drive on the CD, and click the Next button. Please wait while the wizard searches for your system. • Under the Classic view, click Start | Control Panel | Display. • Under the Category view, click Start | Control Panel | Appearance and Themes | Change the screen resolution...
... Display Properties window will display. The Monitor Properties window will display. 3. If the driver provider is only one monitor in these instructions. 5. Insert the BenQ LCD Monitor CD-ROM into a CD drive on the CD, and click the Next button. Please wait while the wizard searches for your system. • Under the Classic view, click Start | Control Panel | Display. • Under the Category view, click Start | Control Panel | Appearance and Themes | Change the screen resolution...

User Manual
Page 17
Getting the most from your BenQ monitor 17 You do not need to restart Windows XP, as the BenQ LCD monitor drivers will close the Display Properties windows. This will operate immediately with no further action required by you.
Getting the most from your BenQ monitor 17 You do not need to restart Windows XP, as the BenQ LCD monitor drivers will close the Display Properties windows. This will operate immediately with no further action required by you.
User Manual
Page 18
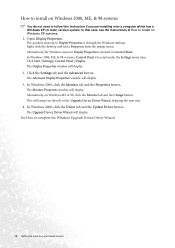
... your BenQ monitor The Monitor Properties window will display. 2. The Display Properties window will display. This will display. See How to complete the Windows Upgrade Device Driver Wizard. 18 Getting the most from the popup menu. Open Display Properties. Click Start | Settings | Control Panel | Display. Click the Settings tab and the Advanced button. The Upgrade Device Driver Wizard will jump you are installing onto a computer which has a Windows XP (or later) version system. Alternatively, the Windows menu to Display...
... your BenQ monitor The Monitor Properties window will display. 2. The Display Properties window will display. This will display. See How to complete the Windows Upgrade Device Driver Wizard. 18 Getting the most from the popup menu. Open Display Properties. Click Start | Settings | Control Panel | Display. Click the Settings tab and the Advanced button. The Upgrade Device Driver Wizard will jump you are installing onto a computer which has a Windows XP (or later) version system. Alternatively, the Windows menu to Display...
User Manual
Page 19
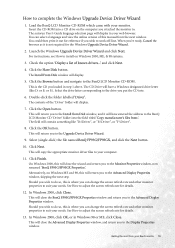
... from the next window. This will have a Windows designated drive letter (like "D:\Driver", or "E:\Driver", or "F:\Driver". 8. How to adjust the screen refresh rate for details. 12. You can change the screen refresh rate and other monitor properties to the Display Properties window. For instructions, see How to install on the computer you can select a language and view the online version of this manual from :'. The autorun User's Guide language selection page will return...
... from the next window. This will have a Windows designated drive letter (like "D:\Driver", or "E:\Driver", or "F:\Driver". 8. How to adjust the screen refresh rate for details. 12. You can change the screen refresh rate and other monitor properties to the Display Properties window. For instructions, see How to install on the computer you can select a language and view the online version of this manual from :'. The autorun User's Guide language selection page will return...
User Manual
Page 21
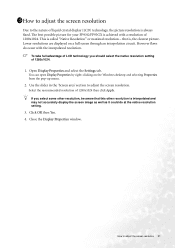
... you should select the native resolution setting of 1280x1024. 1. Open Display Properties and select the Settings tab. Click OK then Yes. 4. 1511How to adjust the screen resolution Due to the nature of liquid crystal display (LCD) technology, the picture resolution is achieved with the interpolated resolution. The best possible picture for your FP93G/FP93GX is always fixed. This is interpolated and may not accurately display the screen image as well as...
... you should select the native resolution setting of 1280x1024. 1. Open Display Properties and select the Settings tab. Click OK then Yes. 4. 1511How to adjust the screen resolution Due to the nature of liquid crystal display (LCD) technology, the picture resolution is achieved with the interpolated resolution. The best possible picture for your FP93G/FP93GX is always fixed. This is interpolated and may not accurately display the screen image as well as...
User Manual
Page 22
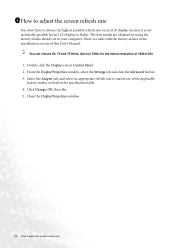
... the applicable factory modes as listed in the specification table. 4. From the Display Properties window, select the Settings tab and click the Advanced button. 3. Select the Adapter tab, and select an appropriate refresh rate to adjust the screen refresh rate Double click the Display icon in your computer. Click Change, OK, then Yes. 5. The best results are obtained by using the factory modes already set in Control Panel. 2. 1611How to adjust the screen refresh rate You don...
... the applicable factory modes as listed in the specification table. 4. From the Display Properties window, select the Settings tab and click the Advanced button. 3. Select the Adapter tab, and select an appropriate refresh rate to adjust the screen refresh rate Double click the Display icon in your computer. Click Change, OK, then Yes. 5. The best results are obtained by using the factory modes already set in Control Panel. 2. 1611How to adjust the screen refresh rate You don...

User Manual
Page 23
... a screen test image utility which you in this manual. You could also use to check for screen color, grayscale and line gradient display. 1. Then, press the W or X keys to adjust the monitor until the noise disappears. 4. Then press the W or X keys to select Pixel Clock and press the Enter key again. If you run auto.exe, a test pattern displays. 2. How to set the picture optimization The...
... a screen test image utility which you in this manual. You could also use to check for screen color, grayscale and line gradient display. 1. Then, press the W or X keys to adjust the monitor until the noise disappears. 4. Then press the W or X keys to select Pixel Clock and press the Enter key again. If you run auto.exe, a test pattern displays. 2. How to set the picture optimization The...

User Manual
Page 32
Press the Exit key to return to previous menu. Press the Exit key to return to previous menu. Press the Exit key to return to previous menu. 32 How to activate the new settings. Miscellaneous sub menu Input Select: Press the W or X keys to select D-sub (analog) or DVI (digital) input to adjust your monitor Display Information: Select Display Information to adjust the degree of Sharpness. Sharpness: Press the W or X keys to display the current monitor property settings.
Press the Exit key to return to previous menu. Press the Exit key to return to previous menu. Press the Exit key to return to previous menu. 32 How to activate the new settings. Miscellaneous sub menu Input Select: Press the W or X keys to select D-sub (analog) or DVI (digital) input to adjust your monitor Display Information: Select Display Information to adjust the degree of Sharpness. Sharpness: Press the W or X keys to display the current monitor property settings.

User Manual
Page 33
... not help, check the signal cable connectors. Press any pin is bent or broken off , please contact your dealer to one or more pixels are permanently red, green, blue or another color. • Clean the LCD screen. • Cycle power on-off and is bent or broken off , please contact your dealer to factory settings. Check the power supply mains socket, the external power supply and the mains switch. Is the image now...
... not help, check the signal cable connectors. Press any pin is bent or broken off , please contact your dealer to one or more pixels are permanently red, green, blue or another color. • Clean the LCD screen. • Cycle power on-off and is bent or broken off , please contact your dealer to factory settings. Check the power supply mains socket, the external power supply and the mains switch. Is the image now...

User Manual
Page 34
Need More Help? If your problems remain after checking this manual, please contact your place of purchase or e-mail us at: Support@BenQ.com 34 Troubleshooting The image is displaced in one direction: Read the How to adjust the screen resolution section and then select the correct resolution, refresh rate and make adjustments based on these instructions. The image is distorted, flashes or flickers: Read the How to adjust the screen resolution section and then select the correct resolution, refresh rate and make adjustments based on these instructions.
Need More Help? If your problems remain after checking this manual, please contact your place of purchase or e-mail us at: Support@BenQ.com 34 Troubleshooting The image is displaced in one direction: Read the How to adjust the screen resolution section and then select the correct resolution, refresh rate and make adjustments based on these instructions. The image is distorted, flashes or flickers: Read the How to adjust the screen resolution section and then select the correct resolution, refresh rate and make adjustments based on these instructions.
User Manual
Page 35
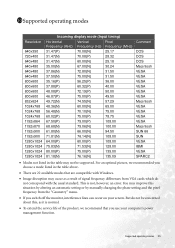
For an optimal picture, we recommend that are 22 available modes that you switch off the monitor, interference lines can occur on your computer's power management function. Supported operating modes 35 But do not correspond with the usual standard. This is normal. • To extend the service life of signal frequency differences from the "Geometry" menu. • If you use your screen. You may improve...
For an optimal picture, we recommend that are 22 available modes that you switch off the monitor, interference lines can occur on your computer's power management function. Supported operating modes 35 But do not correspond with the usual standard. This is normal. • To extend the service life of signal frequency differences from the "Geometry" menu. • If you use your screen. You may improve...


