
User Manual
Page 2
...dangerous voltages or other accident such as dropping or mishandling occurs, contact qualified service personnel for servicing. 2 Clean the LCD monitor surface with respect to the contents hereof and specifically disclaims any warranties, merchantability or fitness for pluggable equipment. ... Copyright Copyright © 2005 by any means, electronic, mechanical, magnetic, optical, chemical, manual or otherwise, without obligation of BenQ Corporation to notify any of the above mentioned misuse or other risks. All rights reserved. Always unplug your monitor iii Power Safety ...
...dangerous voltages or other accident such as dropping or mishandling occurs, contact qualified service personnel for servicing. 2 Clean the LCD monitor surface with respect to the contents hereof and specifically disclaims any warranties, merchantability or fitness for pluggable equipment. ... Copyright Copyright © 2005 by any means, electronic, mechanical, magnetic, optical, chemical, manual or otherwise, without obligation of BenQ Corporation to notify any of the above mentioned misuse or other risks. All rights reserved. Always unplug your monitor iii Power Safety ...
User Manual
Page 5
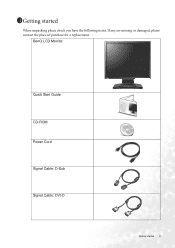
BenQ LCD Monitor Quick Start Guide CD-ROM Power Cord Signal Cable: D-Sub Signal Cable: DVI-D Getting started When unpacking please check you have the following items. If any are missing or damaged, please contact the place of purchase for a replacement. 1111Getting started 5
BenQ LCD Monitor Quick Start Guide CD-ROM Power Cord Signal Cable: D-Sub Signal Cable: DVI-D Getting started When unpacking please check you have the following items. If any are missing or damaged, please contact the place of purchase for a replacement. 1111Getting started 5
User Manual
Page 7
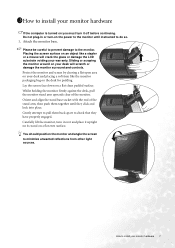
... the computer is turned on the desk for padding. Do not plug-in or turn-on your desk will crack the glass or damage the LCD substrate voiding your warranty. Whilst holding the monitor firmly against the desk, pull the monitor stand arm upwards clear of the stand arm, then push...
... the computer is turned on the desk for padding. Do not plug-in or turn-on your desk will crack the glass or damage the LCD substrate voiding your warranty. Whilst holding the monitor firmly against the desk, pull the monitor stand arm upwards clear of the stand arm, then push...
User Manual
Page 8
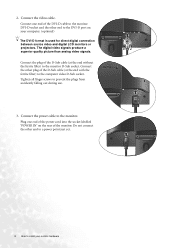
... video cable. Connect the other end to install your computer. (optional) The DVI-D format is used for direct digital connection between source video and digital LCD monitors or projectors.
... video cable. Connect the other end to install your computer. (optional) The DVI-D format is used for direct digital connection between source video and digital LCD monitors or projectors.
User Manual
Page 10
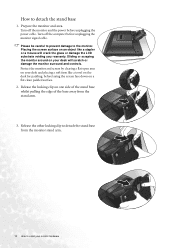
... or a mouse will scratch or damage the monitor surround and controls. Release the locking clip on your desk will crack the glass or damage the LCD substrate voiding your monitor hardware Please be careful to prevent damage to detach the stand base 1. Turn off the computer before laying the screen face...
... or a mouse will scratch or damage the monitor surround and controls. Release the locking clip on your desk will crack the glass or damage the LCD substrate voiding your monitor hardware Please be careful to prevent damage to detach the stand base 1. Turn off the computer before laying the screen face...
User Manual
Page 11
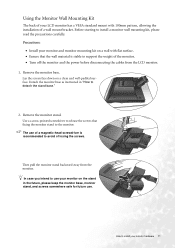
... install your monitor and monitor mounting kit on a wall with 100mm pattern, allowing the installation of a wall mount bracket. The use your LCD monitor has a VESA standard mount with flat surface. • Ensure that fixing the monitor stand to install a monitor wall mounting kit, please...8226; Turn off the monitor and the power before disconnecting the cables from the monitor. Then pull the monitor stand backward away from the LCD monitor. 1. Remove the monitor stand. Remove the monitor base. Precautions: • Install your monitor hardware 11 Using the Monitor Wall ...
... install your monitor and monitor mounting kit on a wall with 100mm pattern, allowing the installation of a wall mount bracket. The use your LCD monitor has a VESA standard mount with flat surface. • Ensure that fixing the monitor stand to install a monitor wall mounting kit, please...8226; Turn off the monitor and the power before disconnecting the cables from the monitor. Then pull the monitor stand backward away from the LCD monitor. 1. Remove the monitor stand. Remove the monitor base. Precautions: • Install your monitor hardware 11 Using the Monitor Wall ...

User Manual
Page 13
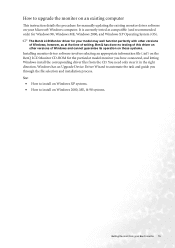
... to your Windows computer, you turn on as an Administrator or as provided on your computer is connected to successfully install the BenQ LCD Monitor driver software. In either case however, the very next time you must be logged on your computer (after connecting the... connecting the monitor and installing the software onto a new computer (without existing monitor driver software), or whether you should install the custom BenQ LCD Monitor driver software as a member of the Administrators group in order to your computer), Windows will automatically recognise the new (or different)...
... to your Windows computer, you turn on as an Administrator or as provided on your computer is connected to successfully install the BenQ LCD Monitor driver software. In either case however, the very next time you must be logged on your computer (after connecting the... connecting the monitor and installing the software onto a new computer (without existing monitor driver software), or whether you should install the custom BenQ LCD Monitor driver software as a member of the Administrators group in order to your computer), Windows will automatically recognise the new (or different)...

User Manual
Page 14
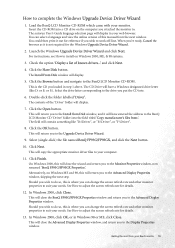
... Look to confirm that has already had a monitor driver installed before , and for selecting and installing the BenQ LCD Monitor driver software on a new computer which the BenQ LCD Monitor is the first ever monitor to an existing computer that the wizard has selected the correct name of...the most from your monitor as "BenQ FP93G/FP93GX" and click Next. 6. When Windows (2000 or later) starts, it (and has monitor driver software installed), you are adding the BenQ LCD Monitor to be following these instructions. Click Finish. 7. Insert the BenQ LCD Monitor CD-ROM into a CD drive...
... Look to confirm that has already had a monitor driver installed before , and for selecting and installing the BenQ LCD Monitor driver software on a new computer which the BenQ LCD Monitor is the first ever monitor to an existing computer that the wizard has selected the correct name of...the most from your monitor as "BenQ FP93G/FP93GX" and click Next. 6. When Windows (2000 or later) starts, it (and has monitor driver software installed), you are adding the BenQ LCD Monitor to be following these instructions. Click Finish. 7. Insert the BenQ LCD Monitor CD-ROM into a CD drive...
User Manual
Page 15
...98, Windows ME, Windows 2000, and Windows XP Operating System (OS). It is currently tested as at the time of writing, BenQ has done no testing of this driver on other versions of Windows and cannot guarantee its operation on those systems. Installing monitor driver ...software involves selecting an appropriate information file (.inf) on the BenQ LCD Monitor CD-ROM for the particular model monitor you through the file selection and installation process. The BenQ LCD Monitor driver for your model may well function perfectly with other versions of Windows, ...
...98, Windows ME, Windows 2000, and Windows XP Operating System (OS). It is currently tested as at the time of writing, BenQ has done no testing of this driver on other versions of Windows and cannot guarantee its operation on those systems. Installing monitor driver ...software involves selecting an appropriate information file (.inf) on the BenQ LCD Monitor CD-ROM for the particular model monitor you through the file selection and installation process. The BenQ LCD Monitor driver for your model may well function perfectly with other versions of Windows, ...

User Manual
Page 16
... located in Control Panel. If the driver provider is listed as the manufacturer, or the correct model is selected for drives and the BenQ LCD Monitor CD inserted in step 6. The Hardware Update Wizard will copy and install the appropriate monitor driver files to your computer. 10.... upon which type of your new monitor, the proper drivers are already installed, and you to the Monitor Properties window, now renamed BenQ FP93G/FP93GX Properties. 11. In Windows XP version, Control Panel is only one monitor in these property windows. The Advanced Display Properties window will...
... located in Control Panel. If the driver provider is listed as the manufacturer, or the correct model is selected for drives and the BenQ LCD Monitor CD inserted in step 6. The Hardware Update Wizard will copy and install the appropriate monitor driver files to your computer. 10.... upon which type of your new monitor, the proper drivers are already installed, and you to the Monitor Properties window, now renamed BenQ FP93G/FP93GX Properties. 11. In Windows XP version, Control Panel is only one monitor in these property windows. The Advanced Display Properties window will...

User Manual
Page 17
This will operate immediately with no further action required by you. Getting the most from your BenQ monitor 17 You do not need to restart Windows XP, as the BenQ LCD monitor drivers will close the Display Properties windows.
This will operate immediately with no further action required by you. Getting the most from your BenQ monitor 17 You do not need to restart Windows XP, as the BenQ LCD monitor drivers will close the Display Properties windows.
User Manual
Page 19
...See How to the Advanced Display Properties window. This will close the BenQ FP93G/FP93GX Properties window and return you to adjust the screen refresh rate for the Windows Upgrade Device Driver Wizard. 2. Load the BenQ LCD Monitor CD-ROM which came with your web browser. Click the Have... Monitor Properties window, now renamed 'BenQ FP93G/FP93GX Properties'. Select (single-click) the file named BenQ FP93G/FP93GX, and click the Next button. 10. Click Finish. On Windows 2000, this will return you to the Display Properties window. See How to the BenQ LCD Monitor CD 'Driver' folder into ...
...See How to the Advanced Display Properties window. This will close the BenQ FP93G/FP93GX Properties window and return you to adjust the screen refresh rate for the Windows Upgrade Device Driver Wizard. 2. Load the BenQ LCD Monitor CD-ROM which came with your web browser. Click the Have... Monitor Properties window, now renamed 'BenQ FP93G/FP93GX Properties'. Select (single-click) the file named BenQ FP93G/FP93GX, and click the Next button. 10. Click Finish. On Windows 2000, this will return you to the Display Properties window. See How to the BenQ LCD Monitor CD 'Driver' folder into ...
User Manual
Page 21
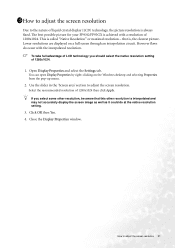
...21 Open Display Properties and select the Settings tab. 1511How to adjust the screen resolution Due to the nature of liquid crystal display (LCD) technology, the picture resolution is called "Native Resolution" or maximal resolution - You can open Display Properties by right-clicking on ...menu. 2. However flaws do at the native resolution setting. 3. Click OK then Yes. 4. The best possible picture for your FP93G/FP93GX is achieved with the interpolated resolution. If you should select the native resolution setting of 1280x1024 then click Apply. Close the Display Properties ...
...21 Open Display Properties and select the Settings tab. 1511How to adjust the screen resolution Due to the nature of liquid crystal display (LCD) technology, the picture resolution is called "Native Resolution" or maximal resolution - You can open Display Properties by right-clicking on ...menu. 2. However flaws do at the native resolution setting. 3. Click OK then Yes. 4. The best possible picture for your FP93G/FP93GX is achieved with the interpolated resolution. If you should select the native resolution setting of 1280x1024 then click Apply. Close the Display Properties ...
User Manual
Page 22
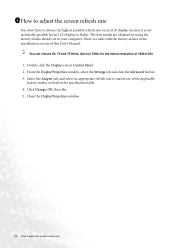
... computer. Click Change, OK, then Yes. 5. 1611How to adjust the screen refresh rate You don't have to choose the highest possible refresh rate on an LCD display, because it is a table with the factory modes in the specification table. 4. The best results are obtained by using the factory modes already set... is not technically possible for the native resolution of this User's Manual. You can choose 60, 70 and 75 Hertz, (but not 72Hz) for an LCD display to adjust the screen refresh rate From the Display Properties window, select the Settings tab and click the Advanced button. 3.
... computer. Click Change, OK, then Yes. 5. 1611How to adjust the screen refresh rate You don't have to choose the highest possible refresh rate on an LCD display, because it is a table with the factory modes in the specification table. 4. The best results are obtained by using the factory modes already set... is not technically possible for the native resolution of this User's Manual. You can choose 60, 70 and 75 Hertz, (but not 72Hz) for an LCD display to adjust the screen refresh rate From the Display Properties window, select the Settings tab and click the Advanced button. 3.

User Manual
Page 33
... (maximum) resolution? If that are pixels that does not help, check the signal cable connectors. If any button on the display illuminated in LCD technology. Troubleshooting 33 Is the image now in booster. Pixel errors can minimize these instructions. Press any pin is bent or broken off , ... illuminated in green and there is permanently black, one or more pixels are permanently red, green, blue or another color. • Clean the LCD screen. • Cycle power on-off and is a natural defect that this monitor does not support, please change the setting to one of...
... (maximum) resolution? If that are pixels that does not help, check the signal cable connectors. If any button on the display illuminated in LCD technology. Troubleshooting 33 Is the image now in booster. Pixel errors can minimize these instructions. Press any pin is bent or broken off , ... illuminated in green and there is permanently black, one or more pixels are permanently red, green, blue or another color. • Clean the LCD screen. • Cycle power on-off and is a natural defect that this monitor does not support, please change the setting to one of...


