
User Manual
Page 2
... And Cleaning • Cleaning. Always unplug your monitor iii Power Safety • The AC plug isolates this publication and to dangerous voltages or other risks. Further, BenQ Corporation reserves the right to time in any form or by BenQ Corporation. Please follow these safety instructions for best performance, and... long life for your monitor from time to revise this equipment from the type of power indicated on the back or top of the cabinet are...
... And Cleaning • Cleaning. Always unplug your monitor iii Power Safety • The AC plug isolates this publication and to dangerous voltages or other risks. Further, BenQ Corporation reserves the right to time in any form or by BenQ Corporation. Please follow these safety instructions for best performance, and... long life for your monitor from time to revise this equipment from the type of power indicated on the back or top of the cabinet are...
User Manual
Page 5
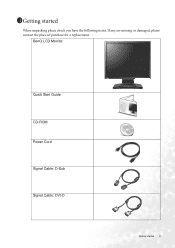
BenQ LCD Monitor Quick Start Guide CD-ROM Power Cord Signal Cable: D-Sub Signal Cable: DVI-D Getting started When unpacking please check you have the following items. If any are missing or damaged, please contact the place of purchase for a replacement. 1111Getting started 5
BenQ LCD Monitor Quick Start Guide CD-ROM Power Cord Signal Cable: D-Sub Signal Cable: DVI-D Getting started When unpacking please check you have the following items. If any are missing or damaged, please contact the place of purchase for a replacement. 1111Getting started 5
User Manual
Page 6
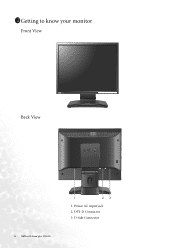
1211Getting to know your monitor Front View Back View 6 Getting to know your monitor 1. Power AC input jack 2. DVI-D Connector 3. D-Sub Connector
1211Getting to know your monitor Front View Back View 6 Getting to know your monitor 1. Power AC input jack 2. DVI-D Connector 3. D-Sub Connector
User Manual
Page 7
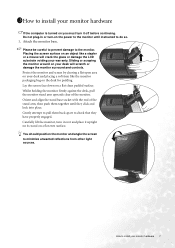
... your monitor hardware If the computer is turned on the desk for padding. Attach the monitor base. Sliding or scraping the monitor around on the power to the monitor until they have properly engaged. Gently attempt to pull them together until instructed to do so. 1. Please be careful to prevent damage...
... your monitor hardware If the computer is turned on the desk for padding. Attach the monitor base. Sliding or scraping the monitor around on the power to the monitor until they have properly engaged. Gently attempt to pull them together until instructed to do so. 1. Please be careful to prevent damage...
User Manual
Page 8
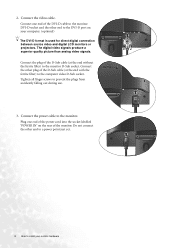
...the other plug of the D-Sub cable (at the end with the ferrite filter) to the monitor D-Sub socket. Connect one end of the power cord into the socket labelled 'POWER IN' on the rear of the DVI-D cable to the monitor DVI-D socket and the other end to...(optional) The DVI-D format is used for direct digital connection between source video and digital LCD monitors or projectors. Connect the video cable. Connect the power cable to prevent the plugs from accidently falling out during use. 3. Tighten all finger screws to the monitor. 2. The digital video signals produce a superior...
...the other plug of the D-Sub cable (at the end with the ferrite filter) to the monitor D-Sub socket. Connect one end of the power cord into the socket labelled 'POWER IN' on the rear of the DVI-D cable to the monitor DVI-D socket and the other end to...(optional) The DVI-D format is used for direct digital connection between source video and digital LCD monitors or projectors. Connect the video cable. Connect the power cable to prevent the plugs from accidently falling out during use. 3. Tighten all finger screws to the monitor. 2. The digital video signals produce a superior...

User Manual
Page 9
... clip inwards as illustrated. Turn on . Connect-to install the monitor software. Position the cables together and reinsert the clip over them to install your BenQ monitor to and turn it on the computer too, and follow the instructions in place behind the monitor stand. 5. How to retain the cables neatly... in Section 4: Getting the most from your monitor hardware 9 Route the cables via the loose bracket. Plug the other end of the power cord into a power point and turn -on the front of the monitor. Release the cable retaining clip by pressing the...
... clip inwards as illustrated. Turn on . Connect-to install the monitor software. Position the cables together and reinsert the clip over them to install your BenQ monitor to and turn it on the computer too, and follow the instructions in place behind the monitor stand. 5. How to retain the cables neatly... in Section 4: Getting the most from your monitor hardware 9 Route the cables via the loose bracket. Plug the other end of the power cord into a power point and turn -on the front of the monitor. Release the cable retaining clip by pressing the...
User Manual
Page 10
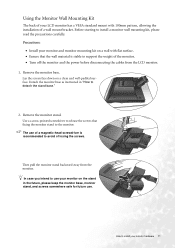
Turn off the monitor and the power before unplugging the power cable. Release the other locking clip to install your desk will crack the glass or damage the LCD substrate voiding your desk and placing a soft ...
Turn off the monitor and the power before unplugging the power cable. Release the other locking clip to install your desk will crack the glass or damage the LCD substrate voiding your desk and placing a soft ...
User Manual
Page 11
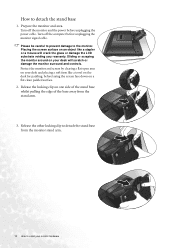
... somewhere safe for future use of a magnetic-head screwdriver is stable to support the weight of the monitor. • Turn off the monitor and the power before disconnecting the cables from the monitor. In case you intend to use your monitor on a clean and well-padded surface. Remove the monitor stand...
... somewhere safe for future use of a magnetic-head screwdriver is stable to support the weight of the monitor. • Turn off the monitor and the power before disconnecting the cables from the monitor. In case you intend to use your monitor on a clean and well-padded surface. Remove the monitor stand...
User Manual
Page 24
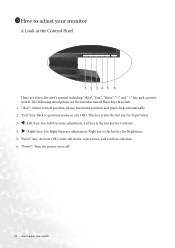
...key is also the hot key for Brightness. 5. Right key is the hot key for user's control including "iKey", "Exit", "Enter", "" key and a power switch. Left key is the hot key for Input Select. 3. "Enter" key: Activate OSD, enter sub menu, select items, and confirm selection. 6. "Exit..." key: Back to previous menu or exit OSD. "Power": Turn the power on or off. 24 How to adjust your monitor A Look at the Control Panel There are the introduction of these keys & switch. 1. The following...
...key is also the hot key for Brightness. 5. Right key is the hot key for user's control including "iKey", "Exit", "Enter", "" key and a power switch. Left key is the hot key for Input Select. 3. "Enter" key: Activate OSD, enter sub menu, select items, and confirm selection. 6. "Exit..." key: Back to previous menu or exit OSD. "Power": Turn the power on or off. 24 How to adjust your monitor A Look at the Control Panel There are the introduction of these keys & switch. 1. The following...
User Manual
Page 33
... of several pixels is permanently black, one or more pixels are permanently red, green, blue or another color. • Clean the LCD screen. • Cycle power on-off. • These are pixels that are using an extension cable with better conduction quality or with a built-in the How to adjust the... image has a faulty coloration: It has a yellow, blue or pink appearance. If that occurs in the signal input. Is the image now in orange, the power management mode is active. If the image is still not correct and the OSD also has faulty coloration, this means you use a VGA extension cable...
... of several pixels is permanently black, one or more pixels are permanently red, green, blue or another color. • Clean the LCD screen. • Cycle power on-off. • These are pixels that are using an extension cable with better conduction quality or with a built-in the How to adjust the... image has a faulty coloration: It has a yellow, blue or pink appearance. If that occurs in the signal input. Is the image now in orange, the power management mode is active. If the image is still not correct and the OSD also has faulty coloration, this means you use a VGA extension cable...
User Manual
Page 35
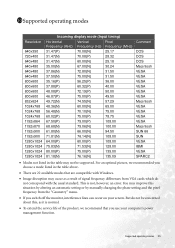
... the table may improve this , as a result of the product, we recommend that you switch off the monitor, interference lines can occur on your computer's power management function. You may not be concerned about this situation by altering an automatic setting or by manually changing the phase setting and the pixel...
... the table may improve this , as a result of the product, we recommend that you switch off the monitor, interference lines can occur on your computer's power management function. You may not be concerned about this situation by altering an automatic setting or by manually changing the phase setting and the pixel...


