
User Manual
Page 2
... label. Do not cover the power adapter with your monitor. • The AC plug isolates this publication and to make changes from the AC supply. • The power supply cord serves as poor cable quality, unstable power supply, signal interference, or poor grounding, and not limited to operate the device or charge the battery. Do not use the power adapter while it is inside . Further, BenQ Corporation reserves the...
... label. Do not cover the power adapter with your monitor. • The AC plug isolates this publication and to make changes from the AC supply. • The power supply cord serves as poor cable quality, unstable power supply, signal interference, or poor grounding, and not limited to operate the device or charge the battery. Do not use the power adapter while it is inside . Further, BenQ Corporation reserves the...

User Manual
Page 3
Always unplug your monitor from the wall outlet before cleaning. BenQ ecoFACTS BenQ has been dedicated to the design and development of greener product as part of its aspiration to realize the ideal of the products. Avoid using and disposal of the "Bringing Enjoyment 'N Quality to achieve a low-carbon society. Check out BenQ's CSR Website at purchase. Clean the LCD monitor surface with...
Always unplug your monitor from the wall outlet before cleaning. BenQ ecoFACTS BenQ has been dedicated to the design and development of greener product as part of its aspiration to realize the ideal of the products. Avoid using and disposal of the "Bringing Enjoyment 'N Quality to achieve a low-carbon society. Check out BenQ's CSR Website at purchase. Clean the LCD monitor surface with...

User Manual
Page 4
... How to install on Windows 7 system 20 How to adjust your monitor 21 The control panel...21 Basic menu operation ...22 Picture optimization ...24 Customizing the hot keys...24 Adjusting display mode ...24 Choosing an appropriate picture mode 25 Connecting the monitor to your MacBook series product 25 Navigating the main menu ...26 Display menu ...27 Picture menu ...29 Picture Advanced menu ...31 Audio menu ...35 System menu ...36 Troubleshooting ...40 Frequently asked questions (FAQ) ...40 Need more help?...42 4
... How to install on Windows 7 system 20 How to adjust your monitor 21 The control panel...21 Basic menu operation ...22 Picture optimization ...24 Customizing the hot keys...24 Adjusting display mode ...24 Choosing an appropriate picture mode 25 Connecting the monitor to your MacBook series product 25 Navigating the main menu ...26 Display menu ...27 Picture menu ...29 Picture Advanced menu ...31 Audio menu ...35 System menu ...36 Troubleshooting ...40 Frequently asked questions (FAQ) ...40 Need more help?...42 4

User Manual
Page 16
... settings may prevent you from installing software on the back of Microsoft Windows you are using, and whether you are connecting the monitor and installing the software onto a new computer (without existing monitor driver software), or whether you need to follow to the specification label on your computer. • To check the name of the purchased model, refer to successfully install the BenQ LCD Monitor driver software. These circumstances relate to select a monitor model...
... settings may prevent you from installing software on the back of Microsoft Windows you are using, and whether you are connecting the monitor and installing the software onto a new computer (without existing monitor driver software), or whether you need to follow to the specification label on your computer. • To check the name of the purchased model, refer to successfully install the BenQ LCD Monitor driver software. These circumstances relate to select a monitor model...

User Manual
Page 17
... be following the instructions for How to upgrade the monitor on an existing computer. 1. Follow the instructions in How to assemble your BenQ monitor 17 Check Search for a suitable driver for CD-ROM drives (uncheck all others) and click Next. 5. Look to confirm that has already had a monitor driver installed before , and for which has never had another monitor connected to it displays the option...
... be following the instructions for How to upgrade the monitor on an existing computer. 1. Follow the instructions in How to assemble your BenQ monitor 17 Check Search for a suitable driver for CD-ROM drives (uncheck all others) and click Next. 5. Look to confirm that has already had a monitor driver installed before , and for which has never had another monitor connected to it displays the option...
User Manual
Page 18
... BenQ LCD Monitor driver for your Microsoft Windows computer. See: • How to install on Windows 8 (8.1) system on page 19 • How to install on Windows 7 system on your model may well function perfectly with other versions of Windows, however, as compatible for Windows 8.1, Windows 8, and Windows 7 Operating System (OS). How to upgrade the monitor on an existing computer This instruction details the procedure for manually updating the existing monitor driver software on...
... BenQ LCD Monitor driver for your Microsoft Windows computer. See: • How to install on Windows 8 (8.1) system on page 19 • How to install on Windows 7 system on your model may well function perfectly with other versions of Windows, however, as compatible for Windows 8.1, Windows 8, and Windows 7 Operating System (OS). How to upgrade the monitor on an existing computer This instruction details the procedure for manually updating the existing monitor driver software on...
User Manual
Page 19
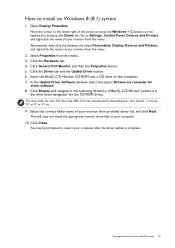
... Generic PnP Monitor, and then the Properties button. 5. Go to Settings, Control Panel, Devices and Printers and right-click the name of the screen or press the Windows + C buttons on the keyboard to your BenQ monitor 19 it may be prompted to the lower-right of your system - Move the cursor to restart your monitor from the menu. In the Update Driver Software window, select the...
... Generic PnP Monitor, and then the Properties button. 5. Go to Settings, Control Panel, Devices and Printers and right-click the name of the screen or press the Windows + C buttons on the keyboard to your BenQ monitor 19 it may be prompted to the lower-right of your system - Move the cursor to restart your monitor from the menu. In the Update Driver Software window, select the...

User Manual
Page 20
...-ROM drive). In the Update Driver Software window, select the option Browse my computer for your computer. 10. Select Properties from the menu. Click the Driver tab and the Update Driver button. 6. it may be 'D:' or 'E:' or 'F:' etc. 9. Click the Hardware tab. 4. Open Display Properties. This will copy and install the appropriate monitor driver files to restart your monitor from the menu. 3. You may be prompted...
...-ROM drive). In the Update Driver Software window, select the option Browse my computer for your computer. 10. Select Properties from the menu. Click the Driver tab and the Update Driver button. 6. it may be 'D:' or 'E:' or 'F:' etc. 9. Click the Hardware tab. 4. Open Display Properties. This will copy and install the appropriate monitor driver files to restart your monitor from the menu. 3. You may be prompted...

User Manual
Page 22
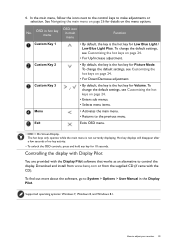
Press any of the control keys. 2. The hot key menu is displayed. The top three controls are custom keys and are designated for particular functions. 3. You can be accessed by the control keys. Select (Menu) to access the main menu. 22 How to adjust all the settings on your monitor Basic menu operation All OSD (On Screen Display) menus can use the OSD menu to adjust your monitor. 1 2 Low Blue Light Picture Mode Volume Menu Exit 4 3 Low Blue Light Picture Mode Volume Menu Exit 1.
Press any of the control keys. 2. The hot key menu is displayed. The top three controls are custom keys and are designated for particular functions. 3. You can be accessed by the control keys. Select (Menu) to access the main menu. 22 How to adjust all the settings on your monitor Basic menu operation All OSD (On Screen Display) menus can use the OSD menu to adjust your monitor. 1 2 Low Blue Light Picture Mode Volume Menu Exit 4 3 Low Blue Light Picture Mode Volume Menu Exit 1.
User Manual
Page 23
... www.benq.com or from the supplied CD (if came with the Display Pilot software that works as an alternative to control the display. OSD in hot key menu OSD icon in the Display Pilot. To find out more about the software, go to adjust your monitor 23 No. The hot keys only operate while the main menu is the hot key for Volume. To change the default settings...
... www.benq.com or from the supplied CD (if came with the Display Pilot software that works as an alternative to control the display. OSD in hot key menu OSD icon in the Display Pilot. To find out more about the software, go to adjust your monitor 23 No. The hot keys only operate while the main menu is the hot key for Volume. To change the default settings...

User Manual
Page 24
... than the panel size of your monitor, the Auto Adjustment function will appear, showing that can always adjust the screen geometric settings manually using a digital (MHL or HDMI) cable to pre-defined functions. If you connect a digital input signal using geometry menu items. To assist you notice a vertical noise (like a curtain effect-shimmering of the monitor when you can change . 4. Go to Display and Auto Adjustment to optimize the currently displayed image to 3. Select an appropriate display mode. Go to...
... than the panel size of your monitor, the Auto Adjustment function will appear, showing that can always adjust the screen geometric settings manually using a digital (MHL or HDMI) cable to pre-defined functions. If you connect a digital input signal using geometry menu items. To assist you notice a vertical noise (like a curtain effect-shimmering of the monitor when you can change . 4. Go to Display and Auto Adjustment to optimize the currently displayed image to 3. Select an appropriate display mode. Go to...
User Manual
Page 26
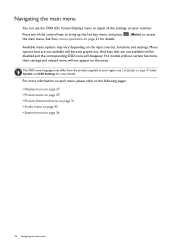
... 22 for more information on each menu, please refer to the following pages: • Display menu on page 27 • Picture menu on page 29 • Picture Advanced menu on page 31 • Audio menu on page 35 • System menu on the menu. The OSD menu languages may vary depending on the input sources, functions and settings. For more details. Menu options that are not available will...
... 22 for more information on each menu, please refer to the following pages: • Display menu on page 27 • Picture menu on page 29 • Picture Advanced menu on page 31 • Audio menu on page 35 • System menu on the menu. The OSD menu languages may vary depending on the input sources, functions and settings. For more details. Menu options that are not available will...

User Manual
Page 27
... on the input sources, functions and settings. or to select Display. 3. Use this to change the input to a sub menu, and then use 5. Adjusts the horizontal position of the screen image. • D-Sub • HDMI 1 • HDMI 2 0 to 100 0 to make selection. Position System Pixel Clock Phase 1. Use or to select a menu item. To return to a digital input signal. Position V. And keys that are not available will become grayed out. Adjusts the vertical position of the screen image. Position Audio V. Range Input H. For models without...
... on the input sources, functions and settings. or to select Display. 3. Use this to change the input to a sub menu, and then use 5. Adjusts the horizontal position of the screen image. • D-Sub • HDMI 1 • HDMI 2 0 to 100 0 to make selection. Position System Pixel Clock Phase 1. Use or to select a menu item. To return to a digital input signal. Position V. And keys that are not available will become grayed out. Adjusts the vertical position of the screen image. Position Audio V. Range Input H. For models without...

User Manual
Page 32
... playing video games. The screen will be divided into two windows; Light Plus The value for viewing videos. Displays the preview of picture settings defined by providing minimum brightness for all running programs. M-Book Minimizes the visual differences between the monitor and the connected MacBook series product. Reading / Dark Room Reading: For reading e-books or documents. User Applies a combination of screen images under the specified mode. •...
... playing video games. The screen will be divided into two windows; Light Plus The value for viewing videos. Displays the preview of picture settings defined by providing minimum brightness for all running programs. M-Book Minimizes the visual differences between the monitor and the connected MacBook series product. Reading / Dark Room Reading: For reading e-books or documents. User Applies a combination of screen images under the specified mode. •...

User Manual
Page 33
... input signal sources. a YouTube video or a game in windowed mode. Adjusts the horizontal position of the display as much of the highlight Position area. • Small • Large • OFF 0 ~ 100 V. This feature is provided to allow aspect ratios other than 16:9 to create the optimal contrast. Ideal for 16:9 aspect images. Navigating the main menu 33 Aspect The input image is to fill the screen. Size Determines the size...
... input signal sources. a YouTube video or a game in windowed mode. Adjusts the horizontal position of the display as much of the highlight Position area. • Small • Large • OFF 0 ~ 100 V. This feature is provided to allow aspect ratios other than 16:9 to create the optimal contrast. Ideal for 16:9 aspect images. Navigating the main menu 33 Aspect The input image is to fill the screen. Size Determines the size...

User Manual
Page 37
The language options displayed on your OSD may differ from being accidentally changed. To unlock the OSD controls, press and hold any key for 10 seconds. OSD Lock Prevents all the monitor settings from those shown on the right, depending on the product supplied in your region. • English • Français • Deutsch • Italiano • Español • Polski •...
The language options displayed on your OSD may differ from being accidentally changed. To unlock the OSD controls, press and hold any key for 10 seconds. OSD Lock Prevents all the monitor settings from those shown on the right, depending on the product supplied in your region. • English • Français • Deutsch • Italiano • Español • Polski •...
User Manual
Page 38
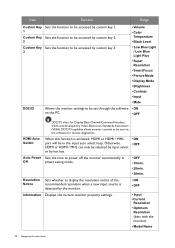
... Key Sets the function to be accessed by custom key 3. 3 • Volume • Color Temperature • Black Level • Low Blue Light / Low Blue Light Plus • Super Resolution • Smart Focus • Picture Mode • Display Mode • Brightness • Contrast • Input • Mute DDC/CI Allows the monitor settings to be set through the software • ON on the PC. • OFF DDC/CI, short for remote diagnostics...
... Key Sets the function to be accessed by custom key 3. 3 • Volume • Color Temperature • Black Level • Low Blue Light / Low Blue Light Plus • Super Resolution • Smart Focus • Picture Mode • Display Mode • Brightness • Contrast • Input • Mute DDC/CI Allows the monitor settings to be set through the software • ON on the PC. • OFF DDC/CI, short for remote diagnostics...

User Manual
Page 40
... correct resolution, refresh rate and make adjustments based on the link "Adjusting the Screen Resolution". How do you are using an extension cable with better conduction quality or with a built-in green? If not, optimize the image by working through the instructions in the "Adjusting the refresh rate" section on these losses by using a display mode that occurs in focus? Select the native resolution. Go to Picture and Reset Color, and then choose YES to reset the color settings to...
... correct resolution, refresh rate and make adjustments based on the link "Adjusting the Screen Resolution". How do you are using an extension cable with better conduction quality or with a built-in green? If not, optimize the image by working through the instructions in the "Adjusting the refresh rate" section on these losses by using a display mode that occurs in focus? Select the native resolution. Go to Picture and Reset Color, and then choose YES to reset the color settings to...

User Manual
Page 41
... input audio signals is displaced in speakers. • Check whether the desired cable to prevent the occurrence of input sources, you can be locked, press and hold any pin is preset to be heard from the built-in one direction. See Connect the audio cable. Read the instructions on the link "Adjusting the Screen Resolution" on the CD, and then select the correct resolution, refresh rate and make adjustments based on the monitor...
... input audio signals is displaced in speakers. • Check whether the desired cable to prevent the occurrence of input sources, you can be locked, press and hold any pin is preset to be heard from the built-in one direction. See Connect the audio cable. Read the instructions on the link "Adjusting the Screen Resolution" on the CD, and then select the correct resolution, refresh rate and make adjustments based on the monitor...
User Manual
Page 42
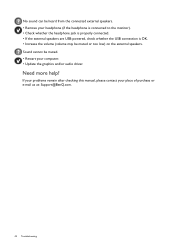
... at: Support@BenQ.com. 42 Troubleshooting If your problems remain after checking this manual, please contact your headphone (if the headphone is connected to the monitor). • Check whether the headphone jack is properly connected. • If the external speakers are USB-powered, check whether the USB connection is OK. • Increase the volume (volume may be muted. • Restart your computer. • Update the graphics and/or audio driver. Sound cannot...
... at: Support@BenQ.com. 42 Troubleshooting If your problems remain after checking this manual, please contact your headphone (if the headphone is connected to the monitor). • Check whether the headphone jack is properly connected. • If the external speakers are USB-powered, check whether the USB connection is OK. • Increase the volume (volume may be muted. • Restart your computer. • Update the graphics and/or audio driver. Sound cannot...


