
Resolution file
Page 1
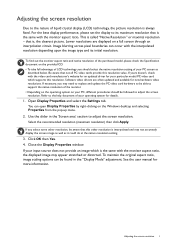
... screen resolution. If you should be able to support the native resolution of the monitor. • Depending on the operating system on the provided CD. • To take full advantage of your input source does not provide an image which supports this resolution value. For the best display performance, please set the display to the nature of your particular model PC video card which is always fixed. Image blurring across pixel...
... screen resolution. If you should be able to support the native resolution of the monitor. • Depending on the operating system on the provided CD. • To take full advantage of your input source does not provide an image which supports this resolution value. For the best display performance, please set the display to the nature of your particular model PC video card which is always fixed. Image blurring across pixel...
Resolution file
Page 2
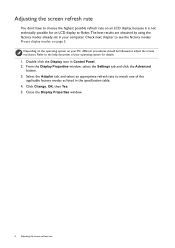
... the Display icon in your operating system for an LCD display to flicker. Close the Display Properties window. 2 Adjusting the screen refresh rate The best results are obtained by using the factory modes already set in Control Panel. 2. Check next chapter to see the factory modes: Preset display modes on your PC, different procedures should be followed to match one of your computer. Select the Adapter tab, and select an appropriate refresh rate to adjust the screen resolution.
... the Display icon in your operating system for an LCD display to flicker. Close the Display Properties window. 2 Adjusting the screen refresh rate The best results are obtained by using the factory modes already set in Control Panel. 2. Check next chapter to see the factory modes: Preset display modes on your PC, different procedures should be followed to match one of your computer. Select the Adapter tab, and select an appropriate refresh rate to adjust the screen resolution.
Resolution file
Page 4
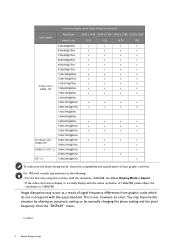
For 18.5-inch models, pay attention to 1360x768. Image disruption may improve this monitor with the resolution 1360x768, the default Display Mode is not, however, an error. You may occur as a result of signal frequency differences from graphic cards which do not correspond with the native resolution of your graphic card first. Incoming display mode (Input timing) (continued) Input signal D-Sub / DVI / HDMI / DP DVI-Dual Link / HDMI / DP HDMI 2.0 / DP 1.2 DP 1.3 Resolution Aspect ratio 640x480@60Hz...
For 18.5-inch models, pay attention to 1360x768. Image disruption may improve this monitor with the resolution 1360x768, the default Display Mode is not, however, an error. You may occur as a result of signal frequency differences from graphic cards which do not correspond with the native resolution of your graphic card first. Incoming display mode (Input timing) (continued) Input signal D-Sub / DVI / HDMI / DP DVI-Dual Link / HDMI / DP HDMI 2.0 / DP 1.2 DP 1.3 Resolution Aspect ratio 640x480@60Hz...

Safety Warning and Notice
Page 2
... to the monitor, do not dissemble or repair the monitor. 8. power cable) only with local technical standards if the user brings the monitor out of the user if problems (such as electric shock and fire. Full 3/29/2019 Cleaning Ensure that the power cord is connected to a grounded power outlet before turning on the product has been altered, deleted, removed or made by unauthorized service organizations...
... to the monitor, do not dissemble or repair the monitor. 8. power cable) only with local technical standards if the user brings the monitor out of the user if problems (such as electric shock and fire. Full 3/29/2019 Cleaning Ensure that the power cord is connected to a grounded power outlet before turning on the product has been altered, deleted, removed or made by unauthorized service organizations...

User Manual
Page 5
... ...2 Getting started ...6 Getting to know your monitor 8 Front view ...8 Back view...8 Input and output ports...9 Connection ...11 How to assemble your monitor hardware 15 How to detach the stand and the base 22 Adjusting the monitor height ...24 Rotating the monitor ...25 Viewing angle adjustment ...26 Using the monitor wall mounting kit 27 Getting the most from your BenQ monitor 28 How to install the monitor on a new computer 29 How to upgrade the monitor on an...
... ...2 Getting started ...6 Getting to know your monitor 8 Front view ...8 Back view...8 Input and output ports...9 Connection ...11 How to assemble your monitor hardware 15 How to detach the stand and the base 22 Adjusting the monitor height ...24 Rotating the monitor ...25 Viewing angle adjustment ...26 Using the monitor wall mounting kit 27 Getting the most from your BenQ monitor 28 How to install the monitor on a new computer 29 How to upgrade the monitor on an...
User Manual
Page 27
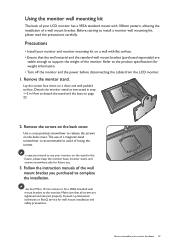
... keep the monitor base, monitor stand, and screws somewhere safe for weight information. • Turn off the monitor and the power before disconnecting the cables from the LCD monitor. 1. In case you purchased to complete the installation. Precautions • Install your monitor and monitor mounting kit on the stand in How to detach the stand and the base on the back cover. Remove the monitor stand. Use four M4 x 10 mm screws to fix a VESA standard wall mount bracket to install a monitor wall mounting...
... keep the monitor base, monitor stand, and screws somewhere safe for weight information. • Turn off the monitor and the power before disconnecting the cables from the LCD monitor. 1. In case you purchased to complete the installation. Precautions • Install your monitor and monitor mounting kit on the stand in How to detach the stand and the base on the back cover. Remove the monitor stand. Use four M4 x 10 mm screws to fix a VESA standard wall mount bracket to install a monitor wall mounting...
User Manual
Page 28
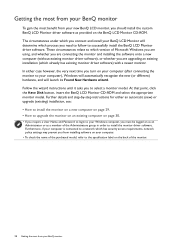
... connecting the monitor and installing the software onto a new computer (without existing monitor driver software), or whether you need to follow to successfully install the BenQ LCD Monitor driver software. Follow the wizard instructions until it asks you turn on as an Administrator or as provided on the back of the monitor. 28 Getting the most from installing software on your computer. • To check the name of the purchased model...
... connecting the monitor and installing the software onto a new computer (without existing monitor driver software), or whether you need to follow to successfully install the BenQ LCD Monitor driver software. Follow the wizard instructions until it asks you turn on as an Administrator or as provided on the back of the monitor. 28 Getting the most from installing software on your computer. • To check the name of the purchased model...
User Manual
Page 29
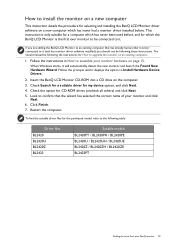
... instructions in How to Install Hardware Device Drivers. 2. If you should instead be connected to it displays the option to assemble your BenQ monitor 29 Click Finish. 7. To find the suitable driver files for How to the following table. Follow the prompts until it . This instruction is the first ever monitor to be following the instructions for the purchased model, refer to upgrade the monitor...
... instructions in How to Install Hardware Device Drivers. 2. If you should instead be connected to it displays the option to assemble your BenQ monitor 29 Click Finish. 7. To find the suitable driver files for How to the following table. Follow the prompts until it . This instruction is the first ever monitor to be following the instructions for the purchased model, refer to upgrade the monitor...
User Manual
Page 30
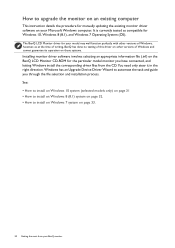
... manually updating the existing monitor driver software on your BenQ monitor See: • How to install on Windows 10 system (selected models only) on page 31 • How to install on Windows 8 (8.1) system on page 32. • How to install on Windows 7 system on page 33. 30 Getting the most from the CD. Windows has an Upgrade Device Driver Wizard to automate the task and guide you have connected...
... manually updating the existing monitor driver software on your BenQ monitor See: • How to install on Windows 10 system (selected models only) on page 31 • How to install on Windows 8 (8.1) system on page 32. • How to install on Windows 7 system on page 33. 30 Getting the most from the CD. Windows has an Upgrade Device Driver Wizard to automate the task and guide you have connected...
User Manual
Page 31
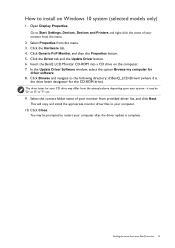
... Monitor, and then the Properties button. 5. You may differ from provided driver list, and click Next. Insert the BenQ LCD Monitor CD-ROM into a CD drive on Windows 10 system (selected models only) 1. it may be prompted to Start, Settings, Devices, Devices and Printers and right-click the name of your monitor from the menu. 3. Go to restart your system - In the Update Driver Software window...
... Monitor, and then the Properties button. 5. You may differ from provided driver list, and click Next. Insert the BenQ LCD Monitor CD-ROM into a CD drive on Windows 10 system (selected models only) 1. it may be prompted to Start, Settings, Devices, Devices and Printers and right-click the name of your monitor from the menu. 3. Go to restart your system - In the Update Driver Software window...
User Manual
Page 32
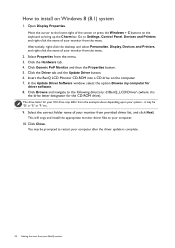
... 'F:' etc. 9. Open Display Properties. You may be prompted to bring up the Charm bar. How to your computer. 10. Click the Hardware tab. 4. This will copy and install the appropriate monitor driver files to install on Windows 8 (8.1) system 1. Click Browse and navigate to Settings, Control Panel, Devices and Printers and right-click the name of the screen or press the Windows + C buttons on...
... 'F:' etc. 9. Open Display Properties. You may be prompted to bring up the Charm bar. How to your computer. 10. Click the Hardware tab. 4. This will copy and install the appropriate monitor driver files to install on Windows 8 (8.1) system 1. Click Browse and navigate to Settings, Control Panel, Devices and Printers and right-click the name of the screen or press the Windows + C buttons on...

User Manual
Page 35
... default, the key is displayed. No. To change the default settings, see Customizing the hot keys on page 37. • For Up/Increase adjustment. Select (Menu) to make adjustments or selection. Press any of the control keys. 2. In the main menu, follow the icons next to the control keys to access the main menu. 4. Basic menu operation All OSD (On Screen Display) menus can use the OSD menu to adjust your monitor...
... default, the key is displayed. No. To change the default settings, see Customizing the hot keys on page 37. • For Up/Increase adjustment. Select (Menu) to make adjustments or selection. Press any of the control keys. 2. In the main menu, follow the icons next to the control keys to access the main menu. 4. Basic menu operation All OSD (On Screen Display) menus can use the OSD menu to adjust your monitor...
User Manual
Page 37
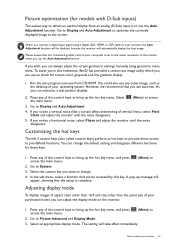
... the main menu. (Menu) to 2. How to adjust your monitor, the Auto Adjustment function will automatically display the best image. As you in this key. Go to access 3. If you wish, you want to change the default setting and designate different functions for these keys. 1. Select the main menu. (Menu) to Picture Advanced and Display Mode. 3. Adjusting display mode To display images of aspect ratio other than the panel size of the control keys to...
... the main menu. (Menu) to 2. How to adjust your monitor, the Auto Adjustment function will automatically display the best image. As you in this key. Go to access 3. If you wish, you want to change the default setting and designate different functions for these keys. 1. Select the main menu. (Menu) to Picture Advanced and Display Mode. 3. Adjusting display mode To display images of aspect ratio other than the panel size of the control keys to...

User Manual
Page 40
Position System V. Use or to a digital input signal. To exit the menu, select . Range Auto Pivot Not applicable to select Display. 3. Mode: Standard Display Picture Auto Adjustment 50 Auto Pivot Picture Advanced Input Audio H. Use or to make adjustments, or use 4. Menu options that are not available will not appear on the input sources, functions and settings. Position Ergonomics Pixel Clock Eco Phase 1. or to the previous menu, select . 6. For models with the monitor. See page •ON 25 for you. And...
Position System V. Use or to a digital input signal. To exit the menu, select . Range Auto Pivot Not applicable to select Display. 3. Mode: Standard Display Picture Auto Adjustment 50 Auto Pivot Picture Advanced Input Audio H. Use or to make adjustments, or use 4. Menu options that are not available will not appear on the input sources, functions and settings. Position Ergonomics Pixel Clock Eco Phase 1. or to the previous menu, select . 6. For models with the monitor. See page •ON 25 for you. And...

User Manual
Page 41
... document on the provided CD for models with the analog input video signal. See also: Picture optimization (for available input connectors of the screen image. 0 to 100 Adjusts the pixel clock frequency timing to your video cable connection type. Position Pixel Clock Function Range Use this to change the input to that appropriate to synchronize with the analog input video signal. Adjusts the horizontal position of the screen image. •D-Sub •DVI •HDMI •DisplayPort 0 to a digital input signal. Adjusts the pixel clock phase timing to synchronize...
... document on the provided CD for models with the analog input video signal. See also: Picture optimization (for available input connectors of the screen image. 0 to 100 Adjusts the pixel clock frequency timing to your video cable connection type. Position Pixel Clock Function Range Use this to change the input to that appropriate to synchronize with the analog input video signal. Adjusts the horizontal position of the screen image. •D-Sub •DVI •HDMI •DisplayPort 0 to a digital input signal. Adjusts the pixel clock phase timing to synchronize...

User Manual
Page 45
... input source is decreased compared with low power consumption by providing minimum brightness for each Low Blue Light mode indicates how much blue light is HDMI, DP, or D-Sub (VGA converted from Picture Mode. Eco For saving electricity with the Standard mode. The screen will be divided into two windows; Item Function Presentation Minimizes the differences of color, contrast, and brightness between the monitor and the connected MacBook series product. the left window demonstrates images...
... input source is decreased compared with low power consumption by providing minimum brightness for each Low Blue Light mode indicates how much blue light is HDMI, DP, or D-Sub (VGA converted from Picture Mode. Eco For saving electricity with the Standard mode. The screen will be divided into two windows; Item Function Presentation Minimizes the differences of color, contrast, and brightness between the monitor and the connected MacBook series product. the left window demonstrates images...

User Manual
Page 51
... menu 51 Reset All Resets all mode, color and geometry settings to display the resolution notice of the recommended resolution when a new input source is activated, HDMI port will be selected by input select or by the monitor. Item Function HDMI Auto Switch (for data transmission. Range • ON • OFF • OFF • 10min. • 20min. • 30min. • ON • OFF • Input • Current Resolution • Optimum Resolution (best with HDMI inputs...
... menu 51 Reset All Resets all mode, color and geometry settings to display the resolution notice of the recommended resolution when a new input source is activated, HDMI port will be selected by input select or by the monitor. Item Function HDMI Auto Switch (for data transmission. Range • ON • OFF • OFF • 10min. • 20min. • 30min. • ON • OFF • Input • Current Resolution • Optimum Resolution (best with HDMI inputs...
User Manual
Page 56
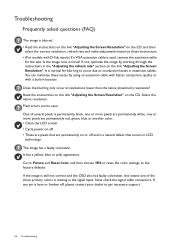
... the correct resolution, refresh rate and make adjustments based on the CD. You can be seen. If any pin is used, remove the extension cable for blurring to occur due to the factory defaults. Read the instructions on the link "Adjusting the Screen Resolution" on these losses by working through the instructions in the signal input. It has a yellow, blue or pink appearance. Pixel errors can minimize these instructions. • (For models with a built...
... the correct resolution, refresh rate and make adjustments based on the CD. You can be seen. If any pin is used, remove the extension cable for blurring to occur due to the factory defaults. Read the instructions on the link "Adjusting the Screen Resolution" on these losses by working through the instructions in the signal input. It has a yellow, blue or pink appearance. Pixel errors can minimize these instructions. • (For models with a built...
User Manual
Page 57
... correct resolution, refresh rate and make adjustments based on the screen, this means you can be heard from the link "Adjusting the Screen Resolution". • If the LED is illuminated in one of input sources, you are running at its native resolution. If that this monitor does not support, please change the setting to set a proper aspect ratio for details. You are using a display mode that does not help, check the signal cable connectors. No sound can use . • Use a screensaver...
... correct resolution, refresh rate and make adjustments based on the screen, this means you can be heard from the link "Adjusting the Screen Resolution". • If the LED is illuminated in one of input sources, you are running at its native resolution. If that this monitor does not support, please change the setting to set a proper aspect ratio for details. You are using a display mode that does not help, check the signal cable connectors. No sound can use . • Use a screensaver...
User Manual
Page 58
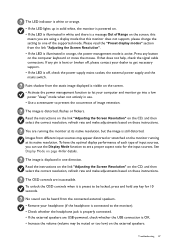
... connected to ON. See Sensor Range on page 55 for more help? No sound can be heard from www.BenQ.com for more support and local customer service. 58 Troubleshooting The ECO sensor of the monitor. If your problems remain after checking this is neither a manufacturing defect nor is located at the front bottom of the monitor does not work well. Adjust the sensor range...
... connected to ON. See Sensor Range on page 55 for more help? No sound can be heard from www.BenQ.com for more support and local customer service. 58 Troubleshooting The ECO sensor of the monitor. If your problems remain after checking this is neither a manufacturing defect nor is located at the front bottom of the monitor does not work well. Adjust the sensor range...


