User Manual
Page 5
... aquariums • Metallic-based UV tinted windows 5 If your wireless signal seems weak in the Wireless LAN Utility of your wireless network is impaired after attending to the above issues, and you have a cordless phone: 8 • Try moving cordless phones away from Wireless Routers or Access Points and your Wireless Router or Access Point to locate any other...
... aquariums • Metallic-based UV tinted windows 5 If your wireless signal seems weak in the Wireless LAN Utility of your wireless network is impaired after attending to the above issues, and you have a cordless phone: 8 • Try moving cordless phones away from Wireless Routers or Access Points and your Wireless Router or Access Point to locate any other...
User Manual
Page 6
... be appropriate for portable computers. If you continue to have addressed these issues. 4 For Belkin wireless networking products, use AOL through broadband provided by another cable or DSL service • Most...into the secure web site. A second alternative is to change your power management setting under Windows, see the "Power Options" item in the Control Panel. To change your computer's ... not go to sleep." Should you need to cover the maximum possible area with your Wireless Router or Access Point. Introduction Experiment with more than one of the available channels, in order...
... be appropriate for portable computers. If you continue to have addressed these issues. 4 For Belkin wireless networking products, use AOL through broadband provided by another cable or DSL service • Most...into the secure web site. A second alternative is to change your power management setting under Windows, see the "Power Options" item in the Control Panel. To change your computer's ... not go to sleep." Should you need to cover the maximum possible area with your Wireless Router or Access Point. Introduction Experiment with more than one of the available channels, in order...
User Manual
Page 8
... Provider while saving the cost of adding additional IP addresses to your Router is a list of your printer's drivers and software on the network. All that make your new Belkin Wireless G Router an ideal solution for advanced software and status-monitoring procedures. Front-Panel... LED Display Lighted LEDs on the front of networking environments including Mac OS® 8.x, 9.x, X v10.x, AppleTalk®, Linux®, Windows® 95, 98, Me, ...
... Provider while saving the cost of adding additional IP addresses to your Router is a list of your printer's drivers and software on the network. All that make your new Belkin Wireless G Router an ideal solution for advanced software and status-monitoring procedures. Front-Panel... LED Display Lighted LEDs on the front of networking environments including Mac OS® 8.x, 9.x, X v10.x, AppleTalk®, Linux®, Windows® 95, 98, Me, ...

User Manual
Page 10
...is built into a list using the Alternative Method described in 54G Mode, nearly five times faster than 34.1Mbps, which is compatible with leading brands. Simply enter these MAC addresses into the Belkin Wireless Router, so there is also an optional reporting feature (fee-based) that...applications such as sharing digital pictures. 125HSM makes 802.11g WLANs more information). Your Belkin Wireless G Router is compatible at a signaling rate of neighboring networks, and is the first home networking solution with Windows 98SE, Me, 2000, XP and Mac OS 9.X and Mac OS X. You ...
...is built into a list using the Alternative Method described in 54G Mode, nearly five times faster than 34.1Mbps, which is compatible with leading brands. Simply enter these MAC addresses into the Belkin Wireless Router, so there is also an optional reporting feature (fee-based) that...applications such as sharing digital pictures. 125HSM makes 802.11g WLANs more information). Your Belkin Wireless G Router is compatible at a signaling rate of neighboring networks, and is the first home networking solution with Windows 98SE, Me, 2000, XP and Mac OS 9.X and Mac OS X. You ...
User Manual
Page 11
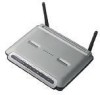
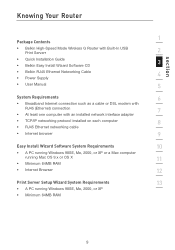
section Knowing Your Router 1 Package Contents • Belkin High-Speed Mode Wireless G Router with Built-In USB Print Serverr 2 • Quick Installation Guide 3 • Belkin Easy Install Wizard Software CD • Belkin RJ45 Ethernet Networking Cable 4 • Power Supply • User Manual 5 System Requirements 6 •...8 • RJ45 Ethernet networking cable • Internet browser 9 Easy Install Wizard Software System Requirements 10 • A PC running Windows 98SE, Me, 2000, or XP or a Mac computer running Mac OS 9.x or OS X 11 • Minimum 64MB RAM ...
section Knowing Your Router 1 Package Contents • Belkin High-Speed Mode Wireless G Router with Built-In USB Print Serverr 2 • Quick Installation Guide 3 • Belkin Easy Install Wizard Software CD • Belkin RJ45 Ethernet Networking Cable 4 • Power Supply • User Manual 5 System Requirements 6 •...8 • RJ45 Ethernet networking cable • Internet browser 9 Easy Install Wizard Software System Requirements 10 • A PC running Windows 98SE, Me, 2000, or XP or a Mac computer running Mac OS 9.x or OS X 11 • Minimum 64MB RAM ...
User Manual
Page 16
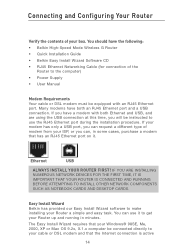
Many modems have both Ethernet and USB, and are using the USB connection at this time, you will be instructed to your Windows® 98SE, Me, 2000, XP or Mac OS 9.2x, X.1.x computer be equipped with both an RJ45 Ethernet port and a USB connection...Requirements Your cable or DSL modem must be connected directly to use it . If you have the following: • Belkin High-Speed Mode Wireless G Router • Quick Installation Guide • Belkin Easy Install Wizard Software CD • RJ45 Ethernet Networking Cable (for connection of modem from your box. Connecting and Configuring...
Many modems have both Ethernet and USB, and are using the USB connection at this time, you will be instructed to your Windows® 98SE, Me, 2000, XP or Mac OS 9.2x, X.1.x computer be equipped with both an RJ45 Ethernet port and a USB connection...Requirements Your cable or DSL modem must be connected directly to use it . If you have the following: • Belkin High-Speed Mode Wireless G Router • Quick Installation Guide • Belkin Easy Install Wizard Software CD • RJ45 Ethernet Networking Cable (for connection of modem from your box. Connecting and Configuring...

User Manual
Page 17
... firewall or Internet connection sharing software on the CD-ROM. 15 If it does not, select your computer. 4. section Connecting and Configuring Your Router and working at 8 this time. 2. Additionally, if you are running on your CD-ROM drive. Turn off any programs that is not,...10 • The Easy Install Wizard CD-ROM • The Router 11 • The Router power supply • RJ45 Ethernet networking cable 12 • This User Manual 3. Make sure you must set up the Router using an operating system other than 2 Windows 98SE, Me, 2000, or XP, you must use the ...
... firewall or Internet connection sharing software on the CD-ROM. 15 If it does not, select your computer. 4. section Connecting and Configuring Your Router and working at 8 this time. 2. Additionally, if you are running on your CD-ROM drive. Turn off any programs that is not,...10 • The Easy Install Wizard CD-ROM • The Router 11 • The Router power supply • RJ45 Ethernet networking cable 12 • This User Manual 3. Make sure you must set up the Router using an operating system other than 2 Windows 98SE, Me, 2000, or XP, you must use the ...

User Manual
Page 28
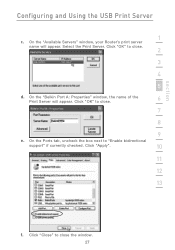
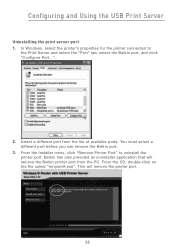
Configuring Computers to Print to the Print Server and select the "Port" tab, select the Belkin port, and click "Configure Port..." In Windows, select the printer's properties for the printer connected to the Print Server 1. To do this, from the CD or...Install Printer Port Only" to the Router's Print Server as follows: a. Configure the Belkin Port Monitor on each computer's printer driver to point to skip the Wizard. b. Belkin has also included a standalone installer on the file called "instportA.exe". On the "Belkin PortA: Properties" window, click "Locate Servers". 26 ...
Configuring Computers to Print to the Print Server and select the "Port" tab, select the Belkin port, and click "Configure Port..." In Windows, select the printer's properties for the printer connected to the Print Server 1. To do this, from the CD or...Install Printer Port Only" to the Router's Print Server as follows: a. Configure the Belkin Port Monitor on each computer's printer driver to point to skip the Wizard. b. Belkin has also included a standalone installer on the file called "instportA.exe". On the "Belkin PortA: Properties" window, click "Locate Servers". 26 ...
User Manual
Page 29
section Configuring and Using the USB Print Server 1 c. On the "Available Servers" window, your Router's print server name will appear. Click "OK" to close the window. 27 Click "Apply". 10 11 12 13 f. Select the Print Server. On the "Belkin Port A: Properties" window, the name of the 6 Print Server will appear. Click "Close" to close . 7 8 9 e. On the Ports tab, uncheck the box next to close . 2 3 4 5 d. Click "OK" to "Enable bidirectional support" if currently checked.
section Configuring and Using the USB Print Server 1 c. On the "Available Servers" window, your Router's print server name will appear. Click "OK" to close the window. 27 Click "Apply". 10 11 12 13 f. Select the Print Server. On the "Belkin Port A: Properties" window, the name of the 6 Print Server will appear. Click "Close" to close . 7 8 9 e. On the Ports tab, uncheck the box next to close . 2 3 4 5 d. Click "OK" to "Enable bidirectional support" if currently checked.
User Manual
Page 30
In Windows, select the printer's properties for the printer connected to uninstall the printer port. From the Installer menu, click "Remove Printer Port" to the Print Server and select the "Port" tab, select the Belkin port, and click "Configure Port...". 2. Belkin has also provided an uninstaller application... that will remove the printer port. 28 You must select a different port before you can remove the Belkin port. 3. This will remove the Belkin printer port from the list of available ports. Select a different port from the PC. From the CD, double-...
In Windows, select the printer's properties for the printer connected to uninstall the printer port. From the Installer menu, click "Remove Printer Port" to the Print Server and select the "Port" tab, select the Belkin port, and click "Configure Port...". 2. Belkin has also provided an uninstaller application... that will remove the printer port. 28 You must select a different port before you can remove the Belkin port. 3. This will remove the Belkin printer port from the list of available ports. Select a different port from the PC. From the CD, double-...
User Manual
Page 32
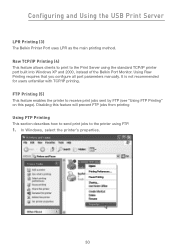
In Windows, select the printer's properties. 30 FTP Printing (5) This feature enables the printer to the Print Server using FTP. 1. Configuring and Using the USB Print Server LPR Printing (3) The Belkin Printer Port uses LPR as the main printing method. Disabling this page). Using Raw Printing requires that you configure all... Using FTP Printing This section describes how to send print jobs to the printer using the standard TCP/IP printer port built into Windows XP and 2000, instead of the Belkin Port Monitor. It is not recommended for users unfamiliar with TCP/IP printing.
In Windows, select the printer's properties. 30 FTP Printing (5) This feature enables the printer to the Print Server using FTP. 1. Configuring and Using the USB Print Server LPR Printing (3) The Belkin Printer Port uses LPR as the main printing method. Disabling this page). Using Raw Printing requires that you configure all... Using FTP Printing This section describes how to send print jobs to the printer using the standard TCP/IP printer port built into Windows XP and 2000, instead of the Belkin Port Monitor. It is not recommended for users unfamiliar with TCP/IP printing.
User Manual
Page 33
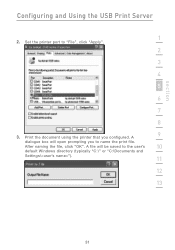
Print the document using the printer that you to the user's 10 default Windows directory (typically "C:\" or "C:\Documents and Settings\ A 9 dialogue box will be saved to name the print file. After naming the file, click "OK". A file will open prompting you configured. Set the printer port to "File", click "Apply". 2 3 4 5 6 7 8 3. section Configuring and Using the USB Print Server 1 2.
Print the document using the printer that you to the user's 10 default Windows directory (typically "C:\" or "C:\Documents and Settings\ A 9 dialogue box will be saved to name the print file. After naming the file, click "OK". A file will open prompting you configured. Set the printer port to "File", click "Apply". 2 3 4 5 6 7 8 3. section Configuring and Using the USB Print Server 1 2.
User Manual
Page 34
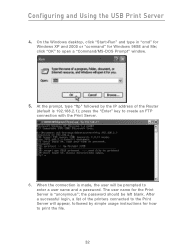
...192.168.2.1); click "OK" to create an FTP connection with the Print Server. 6. press the "Enter" key to open a "Command/MS-DOS Prompt" window. 5. When the connection is made, the user will appear, followed by the IP address of the printers connected to enter a user name and a password.... After a successful login, a list of the Router (default is "anonymous"; the password should be prompted to the Print Server will be left blank. Configuring and Using the USB Print Server 4.
...192.168.2.1); click "OK" to create an FTP connection with the Print Server. 6. press the "Enter" key to open a "Command/MS-DOS Prompt" window. 5. When the connection is made, the user will appear, followed by the IP address of the printers connected to enter a user name and a password.... After a successful login, a list of the Router (default is "anonymous"; the password should be prompted to the Print Server will be left blank. Configuring and Using the USB Print Server 4.
User Manual
Page 35
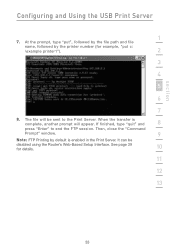
...29 for example, "put ", followed by the file path and file name, followed by default is complete, another prompt will be disabled using the Router's Web-Based Setup Interface. When the transfer is enabled in the Print Server. If finished, type "quit" and 8 press "Enter" to the ...Print Server. At the prompt, type "put c: \example printer1"). 2 3 4 5 6 7 8. Then, close the "Command Prompt" window. 9 Note: FTP Printing by the printer number (for details. 10 11 12 13 33 It can be sent to end the FTP session. The file...
...29 for example, "put ", followed by the file path and file name, followed by default is complete, another prompt will be disabled using the Router's Web-Based Setup Interface. When the transfer is enabled in the Print Server. If finished, type "quit" and 8 press "Enter" to the ...Print Server. At the prompt, type "put c: \example printer1"). 2 3 4 5 6 7 8. Then, close the "Command Prompt" window. 9 Note: FTP Printing by the printer number (for details. 10 11 12 13 33 It can be sent to end the FTP session. The file...
User Manual
Page 38
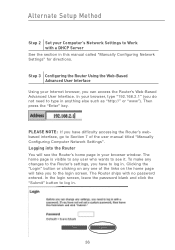
...you do not need to type in anything else such as "http://" or "www"). The Router ships with a DHCP Server See the section in . 36 based interface, go to log in... blank and click the "Submit" button to Section 7 of the links on any changes to the Router's settings, you can access the Router's Web-Based Advanced User Interface. Then press the "Enter" key. Alternate Setup Method Step 2 Set...the home page will see it. In your browser, type "192.168.2.1" (you have to see the Router's home page in . The home page is visible to any user who wants to log in your Internet browser...
...you do not need to type in anything else such as "http://" or "www"). The Router ships with a DHCP Server See the section in . 36 based interface, go to log in... blank and click the "Submit" button to Section 7 of the links on any changes to the Router's settings, you can access the Router's Web-Based Advanced User Interface. Then press the "Enter" key. Alternate Setup Method Step 2 Set...the home page will see it. In your browser, type "192.168.2.1" (you have to see the Router's home page in . The home page is visible to any user who wants to log in your Internet browser...
User Manual
Page 54
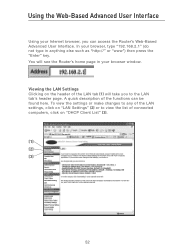
You will take you can be found here. Using the Web-Based Advanced User Interface Using your browser window. Viewing the LAN Settings Clicking on "DHCP Client List" (3). (1) (2) (3) 52 In your browser, type "192.168.2.1" (do not type in your Internet browser, you to ...view the list of connected computers, click on the header of the LAN tab (1) will see the Router's home page in anything else such as "http://" or "www") then press the "Enter" key. A quick description of the LAN settings, click on "LAN Settings...
You will take you can be found here. Using the Web-Based Advanced User Interface Using your browser window. Viewing the LAN Settings Clicking on "DHCP Client List" (3). (1) (2) (3) 52 In your browser, type "192.168.2.1" (do not type in your Internet browser, you to ...view the list of connected computers, click on the header of the LAN tab (1) will see the Router's home page in anything else such as "http://" or "www") then press the "Enter" key. A quick description of the LAN settings, click on "LAN Settings...

User Manual
Page 70
...Microsoft. There are not supported at this mode will have to be letters, numbers,...Belkin support site. WPA (with WPA (Wireless Protected Access), the latest wireless security standard. Using the Web-Based Advanced User Interface Changing the Wireless Security Settings Your Router... is equipped with radius server) is a configuration wherein a radius server distributes the keys to the clients automatically. It also supports the legacy security standard, WEP (Wired Equivalent Privacy). WPA Setup Note: To use . This patch works only with the Windows...
...Microsoft. There are not supported at this mode will have to be letters, numbers,...Belkin support site. WPA (with WPA (Wireless Protected Access), the latest wireless security standard. Using the Web-Based Advanced User Interface Changing the Wireless Security Settings Your Router... is equipped with radius server) is a configuration wherein a radius server distributes the keys to the clients automatically. It also supports the legacy security standard, WEP (Wired Equivalent Privacy). WPA Setup Note: To use . This patch works only with the Windows...
User Manual
Page 75
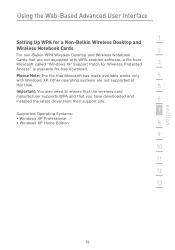
... that Microsoft has made available works only 4 with WPA-enabled software, a file from Microsoft called "Windows XP Support Patch for Wireless Protected 3 Access" is available for a Non-Belkin Wireless Desktop and Wireless Notebook Cards 2 For non-Belkin WPA Wireless Desktop and Wireless Notebook Cards that are not supported at this time. 5 Important: You also need to ensure that...
... that Microsoft has made available works only 4 with WPA-enabled software, a file from Microsoft called "Windows XP Support Patch for Wireless Protected 3 Access" is available for a Non-Belkin Wireless Desktop and Wireless Notebook Cards 2 For non-Belkin WPA Wireless Desktop and Wireless Notebook Cards that are not supported at this time. 5 Important: You also need to ensure that...
User Manual
Page 76
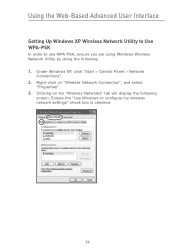
Clicking on "Wireless Network Connection", and select "Properties". 3. Ensure the "Use Windows to use WPA-PSK, ensure you are using Windows Wireless Network Utility by doing the following screen. Under Windows XP, click "Start > Control Panel > Network Connections". 2. Using the Web-Based Advanced User Interface Setting Up Windows XP Wireless Network Utility to Use WPA-PSK In order to configure my wireless network settings" check box is checked. 74 Right-click on the "Wireless Networks" tab will display the following : 1.
Clicking on "Wireless Network Connection", and select "Properties". 3. Ensure the "Use Windows to use WPA-PSK, ensure you are using Windows Wireless Network Utility by doing the following screen. Under Windows XP, click "Start > Control Panel > Network Connections". 2. Using the Web-Based Advanced User Interface Setting Up Windows XP Wireless Network Utility to Use WPA-PSK In order to configure my wireless network settings" check box is checked. 74 Right-click on the "Wireless Networks" tab will display the following : 1.
User Manual
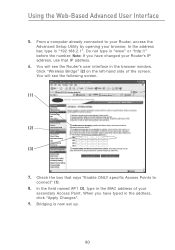
Page 82
... that says "Enable ONLY specific Access Points to your Router, access the Advanced Setup Utility by opening your secondary Access Point. Check the box that IP address. 6. In the field named AP1 (3), type in the browser window. Click "Wireless Bridge" (2) on the left-hand side of your ...browser. From a computer already connected to connect" (1). 8. You will see the Router's user interface in the MAC address of the screen. You will see the...
... that says "Enable ONLY specific Access Points to your Router, access the Advanced Setup Utility by opening your secondary Access Point. Check the box that IP address. 6. In the field named AP1 (3), type in the browser window. Click "Wireless Bridge" (2) on the left-hand side of your ...browser. From a computer already connected to connect" (1). 8. You will see the Router's user interface in the MAC address of the screen. You will see the...


