
F5D5730au User Manual
Page 1
...NN10 6GL United Kingdom Tel: +44 (0) 1933 35 2000 Fax: +44 (0) 1933 31 2000 Belkin Components B.V. All trade names are registered trademarks of respective manufacturers listed. belkin.com Belkin Tech Support Australia: 1800 666 040 New Zealand: 0800 441 913 Singapore: 800 616 1790 US: 310.898....1100 ext 2263 Belkin Corporation 501 West Walnut Street Compton • CA • 90220 &#...
...NN10 6GL United Kingdom Tel: +44 (0) 1933 35 2000 Fax: +44 (0) 1933 31 2000 Belkin Components B.V. All trade names are registered trademarks of respective manufacturers listed. belkin.com Belkin Tech Support Australia: 1800 666 040 New Zealand: 0800 441 913 Singapore: 800 616 1790 US: 310.898....1100 ext 2263 Belkin Corporation 501 West Walnut Street Compton • CA • 90220 &#...
F5D5730au User Manual
Page 2
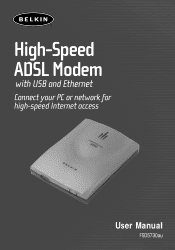
High-Speed ADSL Modem with USB and Ethernet Connect your PC or network for high-speed Internet access User Manual F5D5730au
High-Speed ADSL Modem with USB and Ethernet Connect your PC or network for high-speed Internet access User Manual F5D5730au
F5D5730au User Manual
Page 4
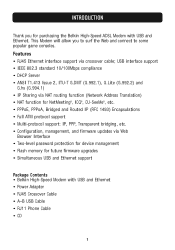
...support • Multi-protocol support: IP, PPP, Transparent bridging, etc. • Configuration, management, and firmware updates via crossover cable; Features • RJ45 Ethernet interface support via Web Browser Interface • Two-level password protection for device management • Flash memory for purchasing the Belkin High-Speed ADSL Modem with USB and Ethernet • Power Adapter • RJ45 Crossover Cable • A-B USB Cable • RJ11 Phone Cable • CD 1 This Modem will allow you for future firmware upgrades • Simultaneous USB and Ethernet support...
...support • Multi-protocol support: IP, PPP, Transparent bridging, etc. • Configuration, management, and firmware updates via crossover cable; Features • RJ45 Ethernet interface support via Web Browser Interface • Two-level password protection for device management • Flash memory for purchasing the Belkin High-Speed ADSL Modem with USB and Ethernet • Power Adapter • RJ45 Crossover Cable • A-B USB Cable • RJ11 Phone Cable • CD 1 This Modem will allow you for future firmware upgrades • Simultaneous USB and Ethernet support...

F5D5730au User Manual
Page 5
INTRODUCTION System Requirements PC running Windows® 98SE , Me, 2000, XP CD-ROM drive (For USB Installation Only) One free USB port (For USB Installation Only) One RJ45 Ethernet port (Ethernet Installation Only) 2
INTRODUCTION System Requirements PC running Windows® 98SE , Me, 2000, XP CD-ROM drive (For USB Installation Only) One free USB port (For USB Installation Only) One RJ45 Ethernet port (Ethernet Installation Only) 2
F5D5730au User Manual
Page 7
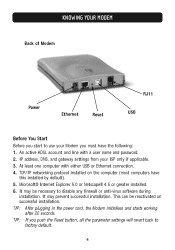
... may be reactivated on the computer (most computers have the following: 1. This can be necessary to factory default. 4 An active ADSL account and line with either USB or Ethernet connection. 4. Microsoft® Internet Explorer 5.0 or Netscape® 4.5 or greater installed. 6. IP address, DNS, and gateway settings from your Modem you push the Reset button, all the parameter settings will revert back to disable any firewall or anti-virus software during installation.
... may be reactivated on the computer (most computers have the following: 1. This can be necessary to factory default. 4 An active ADSL account and line with either USB or Ethernet connection. 4. Microsoft® Internet Explorer 5.0 or Netscape® 4.5 or greater installed. 6. IP address, DNS, and gateway settings from your Modem you push the Reset button, all the parameter settings will revert back to disable any firewall or anti-virus software during installation.
F5D5730au User Manual
Page 8
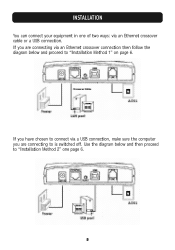
If you have chosen to connect via a USB connection, make sure the computer you are connecting to "Installation Method 2" one of two ways: via an Ethernet crossover connection then follow the diagram below and then proceed to is switched off. Use the diagram below and proceed to "Installation Method 1" on page 6. INSTALLATION You can connect your equipment in one page 6. 5 If you are connecting via an Ethernet crossover cable or a USB connection.
If you have chosen to connect via a USB connection, make sure the computer you are connecting to "Installation Method 2" one of two ways: via an Ethernet crossover connection then follow the diagram below and then proceed to is switched off. Use the diagram below and proceed to "Installation Method 1" on page 6. INSTALLATION You can connect your equipment in one page 6. 5 If you are connecting via an Ethernet crossover cable or a USB connection.
F5D5730au User Manual
Page 9
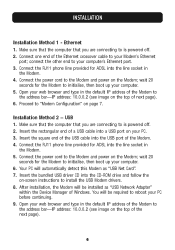
...'s Ethernet port. 3. Connect the RJ11 phone line provided for the Modem to the address bar-IP address: 10.0.0.2 (see image on the top of the next page). 6 You will automatically detect this Modem as "USB Network Adapter" within the Device Manager of the Ethernet crossover cable to is powered off . 2. Make sure that the computer that you are connecting to your computer. 6. connect the other end to install the USB Modem drivers. 8. Proceed to "Modem Configuration" on...
...'s Ethernet port. 3. Connect the RJ11 phone line provided for the Modem to the address bar-IP address: 10.0.0.2 (see image on the top of the next page). 6 You will automatically detect this Modem as "USB Network Adapter" within the Device Manager of the Ethernet crossover cable to is powered off . 2. Make sure that the computer that you are connecting to your computer. 6. connect the other end to install the USB Modem drivers. 8. Proceed to "Modem Configuration" on...
F5D5730au User Manual
Page 10
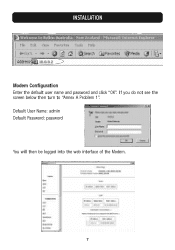
INSTALLATION Modem Configuration Enter the default user name and password and click "OK". If you do not see the screen below then turn to "Annex A Problem 1". Default User Name: admin Default Password: password You will then be logged into the web interface of the Modem. 7
INSTALLATION Modem Configuration Enter the default user name and password and click "OK". If you do not see the screen below then turn to "Annex A Problem 1". Default User Name: admin Default Password: password You will then be logged into the web interface of the Modem. 7

F5D5730au User Manual
Page 12
... by your ADSL provider. f. Use the scroll bar on the right-hand side of an e-mail address, e.g. Username: As given to "100"-by your ISP such as default "1492". Set the "ENCAPSULATION" to 8/35. Service Name: Enter in the form of your ADSL provider, remember that passwords are case-sensitive. For New Zealand users, change the "VPI" to "0" and...
... by your ADSL provider. f. Use the scroll bar on the right-hand side of an e-mail address, e.g. Username: As given to "100"-by your ISP such as default "1492". Set the "ENCAPSULATION" to 8/35. Service Name: Enter in the form of your ADSL provider, remember that passwords are case-sensitive. For New Zealand users, change the "VPI" to "0" and...
F5D5730au User Manual
Page 13
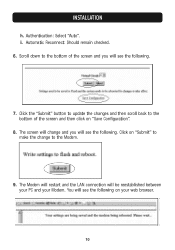
... the screen and you will see the following on your Modem. INSTALLATION h. Click the "Submit" button to update the changes and then scroll back to the Modem. 9. Automatic Reconnect: Should remain checked. 6. Authentication: Select "Auto". i. Click on "Save Configuration". 8. You will be reestablished between your PC and your web browser. 10 The Modem will restart and the LAN connection will see the following.
... the screen and you will see the following on your Modem. INSTALLATION h. Click the "Submit" button to update the changes and then scroll back to the Modem. 9. Automatic Reconnect: Should remain checked. 6. Authentication: Select "Auto". i. Click on "Save Configuration". 8. You will be reestablished between your PC and your web browser. 10 The Modem will restart and the LAN connection will see the following.
F5D5730au User Manual
Page 14
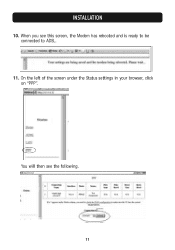
When you see the following. 11 You will then see this screen, the Modem has rebooted and is ready to be connected to ADSL. 11. INSTALLATION 10. On the left of the screen under the Status settings in your browser, click on "PPP".
When you see the following. 11 You will then see this screen, the Modem has rebooted and is ready to be connected to ADSL. 11. INSTALLATION 10. On the left of the screen under the Status settings in your browser, click on "PPP".

F5D5730au User Manual
Page 15
Note that "Connect" is running. 13. The Modem will look similar to your ADSL connection is displayed in the drop-down window and then click on the "Execute" button. Ensure that under the "Status" column it will indicate "connected" once your ADSL provider and the screen shot will initiate the connection to this browser window and open a new browser window and surf the Internet. 12 You can successfully close this one once connected. INSTALLATION 12.
Note that "Connect" is running. 13. The Modem will look similar to your ADSL connection is displayed in the drop-down window and then click on the "Execute" button. Ensure that under the "Status" column it will indicate "connected" once your ADSL provider and the screen shot will initiate the connection to this browser window and open a new browser window and surf the Internet. 12 You can successfully close this one once connected. INSTALLATION 12.
F5D5730au User Manual
Page 16
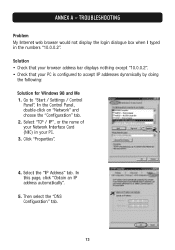
... Select the "IP Address" tab. Go to accept IP addresses dynamically by doing the following: Solution for Windows 98 and Me 1. Select "TCP / IP", or the name of your Network Interface Card (NIC) in the numbers "10.0.0.2". In this page, click "Obtain an IP address automatically". 5. TROUBLESHOOTING Problem My Internet web browser would not display the login dialogue box when I typed in your PC is configured to "Start / Settings / Control Panel".
... Select the "IP Address" tab. Go to accept IP addresses dynamically by doing the following: Solution for Windows 98 and Me 1. Select "TCP / IP", or the name of your Network Interface Card (NIC) in the numbers "10.0.0.2". In this page, click "Obtain an IP address automatically". 5. TROUBLESHOOTING Problem My Internet web browser would not display the login dialogue box when I typed in your PC is configured to "Start / Settings / Control Panel".
F5D5730au User Manual
Page 17
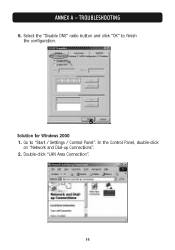
In the Control Panel, double-click on "Network and Dial-up Connections". 2. ANNEX A - Select the "Disable DNS" radio button and click "OK" to "Start / Settings / Control Panel". Go to finish the configuration. Double-click "LAN Area Connection". 14 Solution for Windows 2000 1. TROUBLESHOOTING 6.
In the Control Panel, double-click on "Network and Dial-up Connections". 2. ANNEX A - Select the "Disable DNS" radio button and click "OK" to "Start / Settings / Control Panel". Go to finish the configuration. Double-click "LAN Area Connection". 14 Solution for Windows 2000 1. TROUBLESHOOTING 6.
F5D5730au User Manual
Page 18
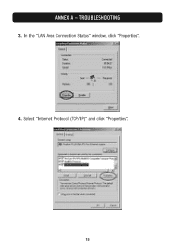
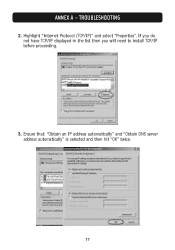
TROUBLESHOOTING 3. Select "Internet Protocol (TCP/IP)" and click "Properties". 15 In the "LAN Area Connection Status" window, click "Properties". 4. ANNEX A -
TROUBLESHOOTING 3. Select "Internet Protocol (TCP/IP)" and click "Properties". 15 In the "LAN Area Connection Status" window, click "Properties". 4. ANNEX A -
F5D5730au User Manual
Page 19
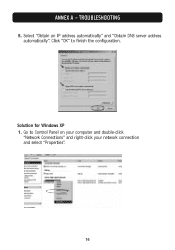
Solution for Windows XP 1. Click "OK" to Control Panel on your computer and double-click "Network Connections" and right-click your network connection and select "Properties". 16 Select "Obtain an IP address automatically" and "Obtain DNS server address automatically". Go to finish the configuration. TROUBLESHOOTING 5. ANNEX A -
Solution for Windows XP 1. Click "OK" to Control Panel on your computer and double-click "Network Connections" and right-click your network connection and select "Properties". 16 Select "Obtain an IP address automatically" and "Obtain DNS server address automatically". Go to finish the configuration. TROUBLESHOOTING 5. ANNEX A -
F5D5730au User Manual
Page 20
If you do not have TCP/IP displayed in the list then you will need to install TCP/IP before proceeding. 3. Ensure that: "Obtain an IP address automatically" and "Obtain DNS server address automatically" is selected and then hit "OK" twice. 17 ANNEX A - TROUBLESHOOTING 2. Highlight "Internet Protocol (TCP/IP)" and select "Properties".
If you do not have TCP/IP displayed in the list then you will need to install TCP/IP before proceeding. 3. Ensure that: "Obtain an IP address automatically" and "Obtain DNS server address automatically" is selected and then hit "OK" twice. 17 ANNEX A - TROUBLESHOOTING 2. Highlight "Internet Protocol (TCP/IP)" and select "Properties".
F5D5730au User Manual
Page 21
... via USB and Ethernet. I connect two computers to my Modem? The Modem will allocate a WAN IP address to your router and then you router to be on your router settings. ANNEX B - Authentication to your ISP needs to the Ethernet port of your PC to the modem using the USB cable and have multiple computers share the Internet at the same time? http://xtra.co.nz/help to connect my modem to create a wireless network. You can configure the IP range that...
... via USB and Ethernet. I connect two computers to my Modem? The Modem will allocate a WAN IP address to your router and then you router to be on your router settings. ANNEX B - Authentication to your ISP needs to the Ethernet port of your PC to the modem using the USB cable and have multiple computers share the Internet at the same time? http://xtra.co.nz/help to connect my modem to create a wireless network. You can configure the IP range that...
F5D5730au User Manual
Page 22
New Zealand - 0800 441 913 Australia - 1800 666 040 Where can access our website at www.belkin.com/anz/modems to learn more information on the following numbers. ANNEX B - Before calling, ensure that you have your ISP settings such as username and password. You can I get more about the setup of PC networks using Belkin networking products. 19 FAQs Where can call our technical support on networking my home or office? You can I get help configuring my modem in New Zealand or Australia?
New Zealand - 0800 441 913 Australia - 1800 666 040 Where can access our website at www.belkin.com/anz/modems to learn more information on the following numbers. ANNEX B - Before calling, ensure that you have your ISP settings such as username and password. You can I get more about the setup of PC networks using Belkin networking products. 19 FAQs Where can call our technical support on networking my home or office? You can I get help configuring my modem in New Zealand or Australia?
F5D5730au User Manual
Page 23
...device may not cause harmful interference, and (2) this device must accept any interference received, including interference that may not apply to this declaration relates, is authorized to make any Belkin serial number has been removed or defaced. If a defect is discovered, Belkin will, at its lifetime. if the product...for its option, repair or replace the product at no charge provided it is returned during the warranty period, with Canadian ICES-003. CE Declaration of Conformity We, Belkin Corporation, declare under our sole responsibility that the product, F5D5730au to which this ...
...device may not cause harmful interference, and (2) this device must accept any interference received, including interference that may not apply to this declaration relates, is authorized to make any Belkin serial number has been removed or defaced. If a defect is discovered, Belkin will, at its lifetime. if the product...for its option, repair or replace the product at no charge provided it is returned during the warranty period, with Canadian ICES-003. CE Declaration of Conformity We, Belkin Corporation, declare under our sole responsibility that the product, F5D5730au to which this ...


