
User Manual
Page 2
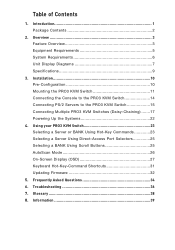
... PRO3 KVM Switch 14 Connecting PS/2 Servers to the PRO3 KVM Switch 15 Connecting Multiple PRO3 KVM Switches (Daisy-Chaining) .......17 Powering Up the Systems 22 4. Information 39 Overview 3 Feature Overview 3 Equipment Requirements 5 System Requirements 6 Unit Display Diagrams 7 Specifications 9 3. Frequently Asked Questions 34 6. Using your PRO3 KVM Switch 23 Selecting a Server or BANK Using Hot-Key Commands 23 Selecting a Server Using Direct-Access Port...
... PRO3 KVM Switch 14 Connecting PS/2 Servers to the PRO3 KVM Switch 15 Connecting Multiple PRO3 KVM Switches (Daisy-Chaining) .......17 Powering Up the Systems 22 4. Information 39 Overview 3 Feature Overview 3 Equipment Requirements 5 System Requirements 6 Unit Display Diagrams 7 Specifications 9 3. Frequently Asked Questions 34 6. Using your PRO3 KVM Switch 23 Selecting a Server or BANK Using Hot-Key Commands 23 Selecting a Server Using Direct-Access Port...

User Manual
Page 3
..., offering intuitive port 5 indicators, direct-access port selectors, high video resolution support, and flash-upgradeable firmware. PRO3 KVM Switches can be daisy-chained together easily to enable 6 management of up to 256 PS/2 servers from ...provide details about your new PRO3 KVM Switch, from a single console. Belkin has designed and developed this Belkin OmniView PRO3 PS/2 1 KVM Switch (the KVM Switch). The PRO3 KVM Switch is a KVM Switch that you for yourself why Belkin is the number-one-selling brand in KVM switches worldwide. 1 section Introduction Congratulations...
..., offering intuitive port 5 indicators, direct-access port selectors, high video resolution support, and flash-upgradeable firmware. PRO3 KVM Switches can be daisy-chained together easily to enable 6 management of up to 256 PS/2 servers from ...provide details about your new PRO3 KVM Switch, from a single console. Belkin has designed and developed this Belkin OmniView PRO3 PS/2 1 KVM Switch (the KVM Switch). The PRO3 KVM Switch is a KVM Switch that you for yourself why Belkin is the number-one-selling brand in KVM switches worldwide. 1 section Introduction Congratulations...

User Manual
Page 5
...one server from as many as your PRO3 KVM Switch to scan and 4 monitor the activities of all connected servers, one by allowing you to select a desired port using a simple hot-key sequence on the front panel of the PRO3 KVM Switch, allow for each connected server throughout ...8226; Video Resolution 6 The PRO3 KVM Switch supports video resolutions of up to 1920x1440@75Hz. 7 • Security Allows you to specify user names and passwords to prevent unauthorized 8 users from accessing the OSD and KVM Switch. • Dedicated Daisy-Chain Port Up to 16 KVM switches can be set up to ...
...one server from as many as your PRO3 KVM Switch to scan and 4 monitor the activities of all connected servers, one by allowing you to select a desired port using a simple hot-key sequence on the front panel of the PRO3 KVM Switch, allow for each connected server throughout ...8226; Video Resolution 6 The PRO3 KVM Switch supports video resolutions of up to 1920x1440@75Hz. 7 • Security Allows you to specify user names and passwords to prevent unauthorized 8 users from accessing the OSD and KVM Switch. • Dedicated Daisy-Chain Port Up to 16 KVM switches can be set up to ...

User Manual
Page 6
...; 7-Segment LED Display When daisy-chaining multiple PRO3 KVM Switches together, the 7-segment LED display serves as a status monitor. As a port selector is no server connected to that the console currently controls the corresponding server. This enables your PRO3 KVM Switch and can be downloaded from Belkin's support website at www.belkin.com/support. 4 Overview • LED Display An...
...; 7-Segment LED Display When daisy-chaining multiple PRO3 KVM Switches together, the 7-segment LED display serves as a status monitor. As a port selector is no server connected to that the console currently controls the corresponding server. This enables your PRO3 KVM Switch and can be downloaded from Belkin's support website at www.belkin.com/support. 4 Overview • LED Display An...

User Manual
Page 7
Belkin Dual-Port Micro-Cable Kits: 3 F1D9400-XX (PS/2-style) 4 5 6 7 8 Belkin PRO3 Daisy-Chain Cable: F1D108-CBL (Available in a 2 feet version) Note: Product codes and availability may vary. 5 section Overview Equipment Requirements 1 Cables: 2 Connecting the PRO3 KVM Switch to a server requires a Belkin Dual-Port Micro-Cable Kit.
Belkin Dual-Port Micro-Cable Kits: 3 F1D9400-XX (PS/2-style) 4 5 6 7 8 Belkin PRO3 Daisy-Chain Cable: F1D108-CBL (Available in a 2 feet version) Note: Product codes and availability may vary. 5 section Overview Equipment Requirements 1 Cables: 2 Connecting the PRO3 KVM Switch to a server requires a Belkin Dual-Port Micro-Cable Kit.
User Manual
Page 11
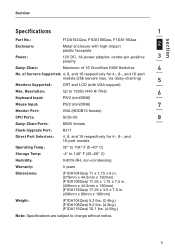
... OmniView KVM Switches 4 No. Resolution: Up to 1920x1440 @ 75Hz 6 Keyboard Input: PS/2 (miniDIN6) Mouse Input: PS/2 (miniDIN6) 7 Monitor Port: VGA (HDDB15 female) CPU Ports: SCSI-50 8 Daisy-Chain Ports: DB25 female Flash-Upgrade Port: RJ11 Direct Port Selectors: 4, 8, and 16 respectively for 4-, 8-, and 16-port models...1A power adapter, center-pin-positive 3 polarity Daisy-Chain: Maximum of Servers Supported: 4, 8, and 16 respectively for 4-, 8-, and 16-port models Operating Temp: 32° to 104° F (0~40° C) Storage Temp: -4° to 140° F (20~...
... OmniView KVM Switches 4 No. Resolution: Up to 1920x1440 @ 75Hz 6 Keyboard Input: PS/2 (miniDIN6) Mouse Input: PS/2 (miniDIN6) 7 Monitor Port: VGA (HDDB15 female) CPU Ports: SCSI-50 8 Daisy-Chain Ports: DB25 female Flash-Upgrade Port: RJ11 Direct Port Selectors: 4, 8, and 16 respectively for 4-, 8-, and 16-port models...1A power adapter, center-pin-positive 3 polarity Daisy-Chain: Maximum of Servers Supported: 4, 8, and 16 respectively for 4-, 8-, and 16-port models Operating Temp: 32° to 104° F (0~40° C) Storage Temp: -4° to 140° F (20~...

User Manual
Page 12
...of the cables between the PRO3 KVM Switch and the connected servers does not exceed 25 feet (7.6m). and 16-Port PRO3 KVM Switches are now ready to begin installation of your servers to the PRO3 KVM Switch Cable-Distance Requirements: For PS/2 Servers: VGA signals transmit ...Belkin recommends that everything is available for use to connect your PRO3 KVM Switch. For this way. An optional OmniView Rack-Mount Kit (F1D005) is powered off. Installation Pre-Configuration Where to Place the PRO3 KVM Switch The enclosure of the PRO3 KVM Switch is included with the 4-Port PRO3 KVM Switch...
...of the cables between the PRO3 KVM Switch and the connected servers does not exceed 25 feet (7.6m). and 16-Port PRO3 KVM Switches are now ready to begin installation of your servers to the PRO3 KVM Switch Cable-Distance Requirements: For PS/2 Servers: VGA signals transmit ...Belkin recommends that everything is available for use to connect your PRO3 KVM Switch. For this way. An optional OmniView Rack-Mount Kit (F1D005) is powered off. Installation Pre-Configuration Where to Place the PRO3 KVM Switch The enclosure of the PRO3 KVM Switch is included with the 4-Port PRO3 KVM Switch...

User Manual
Page 13
... diagram below.) Note: If this User Manual titled "Connecting Multiple PRO3 KVM Switches (Daisy-Chaining)". section Installation Mounting the PRO3 KVM Switch 1 Bracket Installation (F1DA108Qea and F1DA116Qea) 2 Eight- or 16-Port PRO3 KVM Switches include adjustable mounting brackets ideal for installation in this PRO3 KVM Switch will be daisy-chained to another KVM switch, set the PRO3 KVM Switch's face flush with 3 the ends of the rails or...
... diagram below.) Note: If this User Manual titled "Connecting Multiple PRO3 KVM Switches (Daisy-Chaining)". section Installation Mounting the PRO3 KVM Switch 1 Bracket Installation (F1DA108Qea and F1DA116Qea) 2 Eight- or 16-Port PRO3 KVM Switches include adjustable mounting brackets ideal for installation in this PRO3 KVM Switch will be daisy-chained to another KVM switch, set the PRO3 KVM Switch's face flush with 3 the ends of the rails or...

User Manual
Page 14
Installation Optional Bracket Installation (F1DA104Qea) The PRO3 4-Port KVM Switch can be installed into a 19-inch server rack using the Phillips screws provided. (Refer to diagram below.) 12 Step 1 Attach the rack-mount bracket to your 4-Port PRO3 KVM Switch using an optional OmniView Rack-Mount Kit (F1D005).
Installation Optional Bracket Installation (F1DA104Qea) The PRO3 4-Port KVM Switch can be installed into a 19-inch server rack using the Phillips screws provided. (Refer to diagram below.) 12 Step 1 Attach the rack-mount bracket to your 4-Port PRO3 KVM Switch using an optional OmniView Rack-Mount Kit (F1D005).

User Manual
Page 15
... the section titled 8 "Connecting Multiple PRO3 KVM Switches (Daisy-Chaining)" in keyboard or mouse errors, and/or faulty operation. 13 Refer to ensure proper installation. section Installation Step 2 1 Mount the 4-Port PRO3 KVM Switch to the rack-rail assembly. (Refer to diagram below.) 2 3 4 5 6 Note: If this PRO3 KVM Switch will be daisy-chained to another KVM switch, 7 set the BANK address prior...
... the section titled 8 "Connecting Multiple PRO3 KVM Switches (Daisy-Chaining)" in keyboard or mouse errors, and/or faulty operation. 13 Refer to ensure proper installation. section Installation Step 2 1 Mount the 4-Port PRO3 KVM Switch to the rack-rail assembly. (Refer to diagram below.) 2 3 4 5 6 Note: If this PRO3 KVM Switch will be daisy-chained to another KVM switch, 7 set the BANK address prior...

User Manual
Page 16
... .) 14 Installation Connecting the Console to the PRO3 KVM Switch Step 1 Connect the VGA monitor cable to the HDDB15 female port on the back of the PRO3 KVM Switch in the "Console" section. (Refer to diagram below.) Step 2 Connect the PS/2 keyboard cable to the keyboard port on the back of the PRO3 KVM Switch in the "Console" section. (Refer to diagram...
... .) 14 Installation Connecting the Console to the PRO3 KVM Switch Step 1 Connect the VGA monitor cable to the HDDB15 female port on the back of the PRO3 KVM Switch in the "Console" section. (Refer to diagram below.) Step 2 Connect the PS/2 keyboard cable to the keyboard port on the back of the PRO3 KVM Switch in the "Console" section. (Refer to diagram...

User Manual
Page 17
section Installation 1 2 3 Your PRO3 KVM Switch is now installed and you are ready to connect 4 your servers. 5 Connecting PS/2 Servers to the PRO3 KVM Switch 6 Step 1 Make sure your server is powered off. 7 Step 2 Using the Belkin Dual-Port Micro-Cable Kit for PS/2 (F1D9400-XX), connect the 8 VGA connector to the monitor port on your server. (Refer to diagram below.) Step 3 Connect the PS/2 mouse and keyboard connectors to the mouse and keyboard ports on the server. (Refer to diagram below.) 15
section Installation 1 2 3 Your PRO3 KVM Switch is now installed and you are ready to connect 4 your servers. 5 Connecting PS/2 Servers to the PRO3 KVM Switch 6 Step 1 Make sure your server is powered off. 7 Step 2 Using the Belkin Dual-Port Micro-Cable Kit for PS/2 (F1D9400-XX), connect the 8 VGA connector to the monitor port on your server. (Refer to diagram below.) Step 3 Connect the PS/2 mouse and keyboard connectors to the mouse and keyboard ports on the server. (Refer to diagram below.) 15
User Manual
Page 18
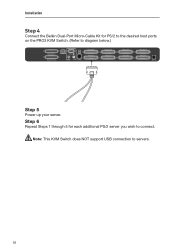
Step 6 Repeat Steps 1 through 5 for PS/2 to the desired host ports on the PRO3 KVM Switch. (Refer to connect. Installation Step 4 Connect the Belkin Dual-Port Micro-Cable Kit for each additional PS/2 server you wish to diagram below.) Step 5 Power up your server. Note: This KVM Switch does NOT support USB connection to servers. 16
Step 6 Repeat Steps 1 through 5 for PS/2 to the desired host ports on the PRO3 KVM Switch. (Refer to connect. Installation Step 4 Connect the Belkin Dual-Port Micro-Cable Kit for each additional PS/2 server you wish to diagram below.) Step 5 Power up your server. Note: This KVM Switch does NOT support USB connection to servers. 16
User Manual
Page 20
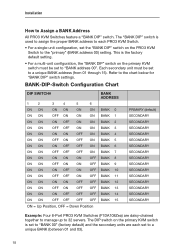
... SECONDARY SECONDARY SECONDARY SECONDARY SECONDARY SECONDARY SECONDARY SECONDARY SECONDARY SECONDARY SECONDARY SECONDARY Example: Four 8-Port PRO3 KVM Switches (F1DA108Zea) are each PRO3 KVM Switch. • For a single-unit configuration, set the "BANK DIP" switch on the PRO3 KVM Switch to the "primary" (BANK address 00) setting. The DIP switch on the primary KVM switch must be set to "BANK address 00". The "BANK DIP...
... SECONDARY SECONDARY SECONDARY SECONDARY SECONDARY SECONDARY SECONDARY SECONDARY SECONDARY SECONDARY SECONDARY SECONDARY Example: Four 8-Port PRO3 KVM Switches (F1DA108Zea) are each PRO3 KVM Switch. • For a single-unit configuration, set the "BANK DIP" switch on the PRO3 KVM Switch to the "primary" (BANK address 00) setting. The DIP switch on the primary KVM switch must be set to "BANK address 00". The "BANK DIP...
User Manual
Page 21
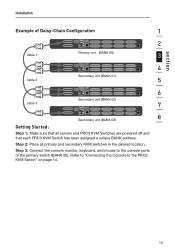
Step 2: Place all servers and PRO3 KVM Switches are powered off and that each PRO3 KVM Switch has been assigned a unique BANK address. Step 3: Connect the console monitor, keyboard, and mouse to the PRO3 KVM Switch" on page 14. 19 Refer to "Connecting the Console to the console ports of Daisy-Chain Configuration 1 2 cable 1 Primary unit (BANK 00) 3 4 Secondary unit (BANK...
Step 2: Place all servers and PRO3 KVM Switches are powered off and that each PRO3 KVM Switch has been assigned a unique BANK address. Step 3: Connect the console monitor, keyboard, and mouse to the PRO3 KVM Switch" on page 14. 19 Refer to "Connecting the Console to the console ports of Daisy-Chain Configuration 1 2 cable 1 Primary unit (BANK 00) 3 4 Secondary unit (BANK...

User Manual
Page 22
Step 4 Repeat Step 3 for example, BANK 02). Note: Your PRO3 KVM Switch is backward-compatible with Belkin OmniView PRO2 KVM Switches with microcabling (F1DA104Zea, F1DA108Zea, F1DA116Zea) must be designated as the primary KVM switch. 20 Step 3 To add secondary units, connect one end to the "Daisy-Chain In" port on the first secondary KVM switch and the other end of the Daisy-Chain...
Step 4 Repeat Step 3 for example, BANK 02). Note: Your PRO3 KVM Switch is backward-compatible with Belkin OmniView PRO2 KVM Switches with microcabling (F1DA104Zea, F1DA108Zea, F1DA116Zea) must be designated as the primary KVM switch. 20 Step 3 To add secondary units, connect one end to the "Daisy-Chain In" port on the first secondary KVM switch and the other end of the Daisy-Chain...

User Manual
Page 24
The server connected to boot normally. Check all occupied ports to the PRO3 KVM Switch are connected and responding correctly. Check that all servers connected to verify that the keyboard, monitor, and mouse are working normally. Installation Powering Up the ... any connected servers have not been powered on the monitor. If the problem persists, please refer to do so at this User Manual. 22 The PRO3 KVM Switch emulates both a mouse and keyboard on each port and allows your cable connections for that all servers are powered on.
The server connected to boot normally. Check all occupied ports to the PRO3 KVM Switch are connected and responding correctly. Check that all servers connected to verify that the keyboard, monitor, and mouse are working normally. Installation Powering Up the ... any connected servers have not been powered on the monitor. If the problem persists, please refer to do so at this User Manual. 22 The PRO3 KVM Switch emulates both a mouse and keyboard on each port and allows your cable connections for that all servers are powered on.

User Manual
Page 25
... press the "Up" arrow key and the PRO3 KVM Switch will 7 switch to your PRO3 KVM 1 Switch, it is 3 established between the console and the connected servers. or by entering the 2-digit number of the port you wish to the server on Port 2 located on the front panel of the ...and servers to the previous port. This is normal operation and ensures that it is ready for the video signal to the PRO3 KVM Switch, the "Scroll Lock" key must be pressed 6 twice within two seconds. Re-synchronization of the PRO3 KVM Switch; The PRO3 KVM Switch will switch to access. through the ...
... press the "Up" arrow key and the PRO3 KVM Switch will 7 switch to your PRO3 KVM 1 Switch, it is 3 established between the console and the connected servers. or by entering the 2-digit number of the port you wish to the server on Port 2 located on the front panel of the ...and servers to the previous port. This is normal operation and ensures that it is ready for the video signal to the PRO3 KVM Switch, the "Scroll Lock" key must be pressed 6 twice within two seconds. Re-synchronization of the PRO3 KVM Switch; The PRO3 KVM Switch will switch to access. through the ...

User Manual
Page 25
... compromising the quality of manual push-button port selection on this unit include: hot key functionality; Standard E Series features include: hot key functionality; Designed for the KVM Switch draws off the keyboard, so that Belkin OmniView products offer the highest resolution without having to control two or four PS/2 computers from one Console. The SOHO Series...
... compromising the quality of manual push-button port selection on this unit include: hot key functionality; Standard E Series features include: hot key functionality; Designed for the KVM Switch draws off the keyboard, so that Belkin OmniView products offer the highest resolution without having to control two or four PS/2 computers from one Console. The SOHO Series...

User Manual
Page 26
... a single Console. include a 12-Volt DC, 1-Amp power supply; BELKIN KVM SWITCHES AND ACCESSORIES F1DS102P SOHO Series 2-Port KVM Switch with Audio PS/2 Only F1DS104P SOHO Series 4-Port KVM Switch with Audio PS/2 Only F1DS102T SOHO Series 2-Port KVM Switch with Audio PS/2 & USB F1DS104T SOHO Series 4-Port KVM Switch with Audio PS/2 & USB OmniView PRO2 Series. The OmniView PRO2 Series KVM Switches deliver reliability, performance, and centralized control necessary for easy installation...
... a single Console. include a 12-Volt DC, 1-Amp power supply; BELKIN KVM SWITCHES AND ACCESSORIES F1DS102P SOHO Series 2-Port KVM Switch with Audio PS/2 Only F1DS104P SOHO Series 4-Port KVM Switch with Audio PS/2 Only F1DS102T SOHO Series 2-Port KVM Switch with Audio PS/2 & USB F1DS104T SOHO Series 4-Port KVM Switch with Audio PS/2 & USB OmniView PRO2 Series. The OmniView PRO2 Series KVM Switches deliver reliability, performance, and centralized control necessary for easy installation...


