
User Manual
Page 2
... (OSD 27 Keyboard Hot-Key-Command Shortcuts 31 Updating Firmware 32 5. Installation 10 Pre-Configuration 10 Mounting the PRO3 KVM Switch 11 Connecting the Console to the PRO3 KVM Switch 14 Connecting PS/2 Servers to the PRO3 KVM Switch 15 Connecting Multiple PRO3 KVM Switches (Daisy-Chaining) .......17 Powering Up the Systems 22 4. Troubleshooting 36 7. Overview 3 Feature Overview 3 Equipment Requirements 5 System Requirements 6 Unit...
... (OSD 27 Keyboard Hot-Key-Command Shortcuts 31 Updating Firmware 32 5. Installation 10 Pre-Configuration 10 Mounting the PRO3 KVM Switch 11 Connecting the Console to the PRO3 KVM Switch 14 Connecting PS/2 Servers to the PRO3 KVM Switch 15 Connecting Multiple PRO3 KVM Switches (Daisy-Chaining) .......17 Powering Up the Systems 22 4. Troubleshooting 36 7. Overview 3 Feature Overview 3 Equipment Requirements 5 System Requirements 6 Unit...

User Manual
Page 3
.... 7 This User Manual will soon see for purchasing the Belkin OmniView PRO3 KVM Switch. The PRO3 KVM Switch is the number-one-selling brand in your new PRO3 KVM Switch, from installation and operation to 256 PS/2 servers from a single console. Belkin has designed and developed this Belkin OmniView PRO3 PS/2 1 KVM Switch (the KVM Switch). Thank you will provide details about your PRO3 KVM Switch packaging. For quick and easy installation, please refer...
.... 7 This User Manual will soon see for purchasing the Belkin OmniView PRO3 KVM Switch. The PRO3 KVM Switch is the number-one-selling brand in your new PRO3 KVM Switch, from installation and operation to 256 PS/2 servers from a single console. Belkin has designed and developed this Belkin OmniView PRO3 PS/2 1 KVM Switch (the KVM Switch). Thank you will provide details about your PRO3 KVM Switch packaging. For quick and easy installation, please refer...

User Manual
Page 5
... management by allowing you to assign individual names to each server can be adjusted through the On-Screen Display 5 (OSD) menu. • Video Resolution 6 The PRO3 KVM Switch supports video resolutions of up to support regional languages. • Front-Panel Push Buttons Direct-access port selectors, located conveniently on the front panel of...
... management by allowing you to assign individual names to each server can be adjusted through the On-Screen Display 5 (OSD) menu. • Video Resolution 6 The PRO3 KVM Switch supports video resolutions of up to support regional languages. • Front-Panel Push Buttons Direct-access port selectors, located conveniently on the front panel of...

User Manual
Page 6
...; LED Display An LED display on the front panel of the PRO3 KVM Switch serves as a quick indicator of your KVM Switch to indicate that the console currently controls the corresponding server. This enables your PRO3 KVM Switch and can be downloaded from Belkin's support website at www.belkin.com/support. 4 A flashing port LED indicates that there is pushed, the... upgrades are free for the life of the selected BANK. • Flash Upgrade Flash-upgradeable firmware allows you to install the latest firmware on your PRO3 KVM Switch.
...; LED Display An LED display on the front panel of the PRO3 KVM Switch serves as a quick indicator of your KVM Switch to indicate that the console currently controls the corresponding server. This enables your PRO3 KVM Switch and can be downloaded from Belkin's support website at www.belkin.com/support. 4 A flashing port LED indicates that there is pushed, the... upgrades are free for the life of the selected BANK. • Flash Upgrade Flash-upgradeable firmware allows you to install the latest firmware on your PRO3 KVM Switch.

User Manual
Page 7
section Overview Equipment Requirements 1 Cables: 2 Connecting the PRO3 KVM Switch to a server requires a Belkin Dual-Port Micro-Cable Kit. Belkin Dual-Port Micro-Cable Kits: 3 F1D9400-XX (PS/2-style) 4 5 6 7 8 Belkin PRO3 Daisy-Chain Cable: F1D108-CBL (Available in a 2 feet version) Note: Product codes and availability may vary. 5
section Overview Equipment Requirements 1 Cables: 2 Connecting the PRO3 KVM Switch to a server requires a Belkin Dual-Port Micro-Cable Kit. Belkin Dual-Port Micro-Cable Kits: 3 F1D9400-XX (PS/2-style) 4 5 6 7 8 Belkin PRO3 Daisy-Chain Cable: F1D108-CBL (Available in a 2 feet version) Note: Product codes and availability may vary. 5
User Manual
Page 8
...PRO3 KVM Switch is compatible with CPUs running on, but not limited to, the following OS platforms: • Windows® NT®, 2000, XP, Server 2003, or VistaTM • Microsoft® DOS 5.x and above • Red Hat® Linux® 8.x and above • Novell® NetWare® 5.x Keyboards • PS.../2-compatible • Supports 101-/102-/104-key keyboards Mice • PS/2-compatible mice (with PS/2 adapter) having 2, 3, 4, or 5 buttons • PS/2-compatible wireless or optical mice Monitors • CRT • LCD...
...PRO3 KVM Switch is compatible with CPUs running on, but not limited to, the following OS platforms: • Windows® NT®, 2000, XP, Server 2003, or VistaTM • Microsoft® DOS 5.x and above • Red Hat® Linux® 8.x and above • Novell® NetWare® 5.x Keyboards • PS.../2-compatible • Supports 101-/102-/104-key keyboards Mice • PS/2-compatible mice (with PS/2 adapter) having 2, 3, 4, or 5 buttons • PS/2-compatible wireless or optical mice Monitors • CRT • LCD...
User Manual
Page 9
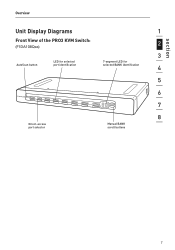
section Overview Unit Display Diagrams 1 Front View of the PRO3 KVM Switch: 2 (F1DA108Qea) 3 4 5 6 7 8 7
section Overview Unit Display Diagrams 1 Front View of the PRO3 KVM Switch: 2 (F1DA108Qea) 3 4 5 6 7 8 7
User Manual
Page 10
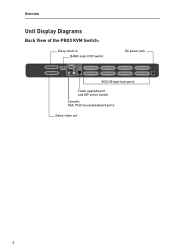
Overview Unit Display Diagrams Back View of the PRO3 KVM Switch: 8
Overview Unit Display Diagrams Back View of the PRO3 KVM Switch: 8
User Manual
Page 11
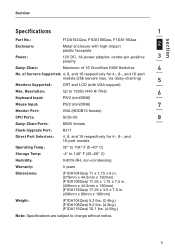
... subject to 1920x1440 @ 75Hz 6 Keyboard Input: PS/2 (miniDIN6) Mouse Input: PS/2 (miniDIN6) 7 Monitor Port: VGA (HDDB15 female) CPU Ports: SCSI-50 8 Daisy-Chain Ports: DB25 female Flash-Upgrade Port: RJ11 Direct Port Selectors: 4, 8, and 16 respectively for 4-, 8-, and 16-port models (256 servers max. of 16 OmniView KVM Switches 4 No. section Overview Specifications 1 Part No...
... subject to 1920x1440 @ 75Hz 6 Keyboard Input: PS/2 (miniDIN6) Mouse Input: PS/2 (miniDIN6) 7 Monitor Port: VGA (HDDB15 female) CPU Ports: SCSI-50 8 Daisy-Chain Ports: DB25 female Flash-Upgrade Port: RJ11 Direct Port Selectors: 4, 8, and 16 respectively for 4-, 8-, and 16-port models (256 servers max. of 16 OmniView KVM Switches 4 No. section Overview Specifications 1 Part No...

User Manual
Page 12
... damage caused in standard, 19-inch server racks. Note: The Belkin OmniView CAT5 Extender (F1D084vea2) may cause irreversible damage of the servers and/or the PRO3 KVM Switches. You are now ready to begin installation of your servers to the PRO3 KVM Switch Cable-Distance Requirements: For PS/2 Servers: VGA signals transmit best up to 300 feet (91m). Beyond...
... damage caused in standard, 19-inch server racks. Note: The Belkin OmniView CAT5 Extender (F1D084vea2) may cause irreversible damage of the servers and/or the PRO3 KVM Switches. You are now ready to begin installation of your servers to the PRO3 KVM Switch Cable-Distance Requirements: For PS/2 Servers: VGA signals transmit best up to 300 feet (91m). Beyond...
User Manual
Page 13
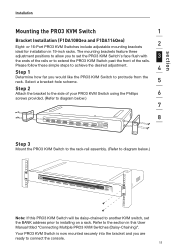
...-rail assembly. (Refer to protrude from the rack. section Installation Mounting the PRO3 KVM Switch 1 Bracket Installation (F1DA108Qea and F1DA116Qea) 2 Eight- or 16-Port PRO3 KVM Switches include adjustable mounting brackets ideal for installation in this PRO3 KVM Switch will be daisy-chained to another KVM switch, set the PRO3 KVM Switch's face flush with 3 the ends of the rails. Refer to extend the...
...-rail assembly. (Refer to protrude from the rack. section Installation Mounting the PRO3 KVM Switch 1 Bracket Installation (F1DA108Qea and F1DA116Qea) 2 Eight- or 16-Port PRO3 KVM Switches include adjustable mounting brackets ideal for installation in this PRO3 KVM Switch will be daisy-chained to another KVM switch, set the PRO3 KVM Switch's face flush with 3 the ends of the rails. Refer to extend the...
User Manual
Page 14
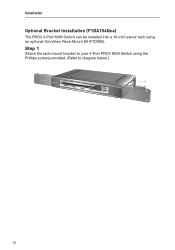
Installation Optional Bracket Installation (F1DA104Qea) The PRO3 4-Port KVM Switch can be installed into a 19-inch server rack using the Phillips screws provided. (Refer to diagram below.) 12 Step 1 Attach the rack-mount bracket to your 4-Port PRO3 KVM Switch using an optional OmniView Rack-Mount Kit (F1D005).
Installation Optional Bracket Installation (F1DA104Qea) The PRO3 4-Port KVM Switch can be installed into a 19-inch server rack using the Phillips screws provided. (Refer to diagram below.) 12 Step 1 Attach the rack-mount bracket to your 4-Port PRO3 KVM Switch using an optional OmniView Rack-Mount Kit (F1D005).

User Manual
Page 15
... so may result in this User Manual. Failure to installing on a rack. Refer to connect the console. Note for Belkin PRO2 Series Owners (F1DA104Tea, F1DA108Tea, and F1DA116Tea): Installation for the PRO2 KVM Switch has changed. Your PRO3 KVM Switch is now mounted securely to the rack and you are ready to the section titled 8 "Connecting Multiple...
... so may result in this User Manual. Failure to installing on a rack. Refer to connect the console. Note for Belkin PRO2 Series Owners (F1DA104Tea, F1DA108Tea, and F1DA116Tea): Installation for the PRO2 KVM Switch has changed. Your PRO3 KVM Switch is now mounted securely to the rack and you are ready to the section titled 8 "Connecting Multiple...

User Manual
Page 16
... the Console to the PRO3 KVM Switch Step 1 Connect the VGA monitor cable to the HDDB15 female port on the back of the PRO3 KVM Switch in the "Console" section. (Refer to diagram below.) Step 2 Connect the PS/2 keyboard cable to the keyboard port on the back of the PRO3 KVM Switch in the "Console" ...section. (Refer to diagram below.) Step 3 Connect the PS/2 mouse cable to diagram below .)...
... the Console to the PRO3 KVM Switch Step 1 Connect the VGA monitor cable to the HDDB15 female port on the back of the PRO3 KVM Switch in the "Console" section. (Refer to diagram below.) Step 2 Connect the PS/2 keyboard cable to the keyboard port on the back of the PRO3 KVM Switch in the "Console" ...section. (Refer to diagram below.) Step 3 Connect the PS/2 mouse cable to diagram below .)...

User Manual
Page 17
section Installation 1 2 3 Your PRO3 KVM Switch is now installed and you are ready to connect 4 your servers. 5 Connecting PS/2 Servers to the PRO3 KVM Switch 6 Step 1 Make sure your server is powered off. 7 Step 2 Using the Belkin Dual-Port Micro-Cable Kit for PS/2 (F1D9400-XX), connect the 8 VGA connector to the monitor port on your server. (Refer to diagram below.) Step 3 Connect the PS/2 mouse and keyboard connectors to the mouse and keyboard ports on the server. (Refer to diagram below.) 15
section Installation 1 2 3 Your PRO3 KVM Switch is now installed and you are ready to connect 4 your servers. 5 Connecting PS/2 Servers to the PRO3 KVM Switch 6 Step 1 Make sure your server is powered off. 7 Step 2 Using the Belkin Dual-Port Micro-Cable Kit for PS/2 (F1D9400-XX), connect the 8 VGA connector to the monitor port on your server. (Refer to diagram below.) Step 3 Connect the PS/2 mouse and keyboard connectors to the mouse and keyboard ports on the server. (Refer to diagram below.) 15
User Manual
Page 18
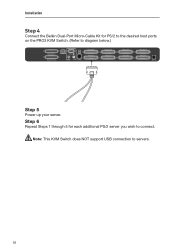
Note: This KVM Switch does NOT support USB connection to connect. Step 6 Repeat Steps 1 through 5 for PS/2 to the desired host ports on the PRO3 KVM Switch. (Refer to diagram below.) Step 5 Power up your server. Installation Step 4 Connect the Belkin Dual-Port Micro-Cable Kit for each additional PS/2 server you wish to servers. 16
Note: This KVM Switch does NOT support USB connection to connect. Step 6 Repeat Steps 1 through 5 for PS/2 to the desired host ports on the PRO3 KVM Switch. (Refer to diagram below.) Step 5 Power up your server. Installation Step 4 Connect the Belkin Dual-Port Micro-Cable Kit for each additional PS/2 server you wish to servers. 16

User Manual
Page 19
... an address. section Installation Connecting Multiple PRO3 KVM Switches 1 (Daisy-Chaining) 2 You can daisy-chain up to 16 PRO3 KVM Switches, allowing a server administrator to manage up to daisy-chain each PRO3 KVM Switch and is backward-compatible with Belkin OmniView PRO2 KVM Switches with micro- cabling (F1DA104Qea, F1DA108Qea, F1DA116Qea) must be designated as the "primary" KVM switch. The PRO3 KVM Switch connected to the console keyboard, mouse...
... an address. section Installation Connecting Multiple PRO3 KVM Switches 1 (Daisy-Chaining) 2 You can daisy-chain up to 16 PRO3 KVM Switches, allowing a server administrator to manage up to daisy-chain each PRO3 KVM Switch and is backward-compatible with Belkin OmniView PRO2 KVM Switches with micro- cabling (F1DA104Qea, F1DA108Qea, F1DA116Qea) must be designated as the "primary" KVM switch. The PRO3 KVM Switch connected to the console keyboard, mouse...
User Manual
Page 20
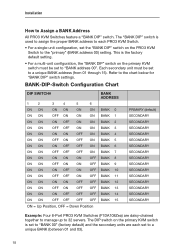
...default) SECONDARY SECONDARY SECONDARY SECONDARY SECONDARY SECONDARY SECONDARY SECONDARY SECONDARY SECONDARY SECONDARY SECONDARY SECONDARY SECONDARY SECONDARY Example: Four 8-Port PRO3 KVM Switches (F1DA108Zea) are each PRO3 KVM Switch. • For a single-unit configuration, set to a unique BANK (between 01 and 03). 18 Each secondary... unit must be set to "BANK address 00". Refer to Assign a BANK Address All PRO3 KVM Switches feature a "BANK DIP" switch. This is used to assign the proper BANK address to each set to the "primary" (BANK address 00) ...
...default) SECONDARY SECONDARY SECONDARY SECONDARY SECONDARY SECONDARY SECONDARY SECONDARY SECONDARY SECONDARY SECONDARY SECONDARY SECONDARY SECONDARY SECONDARY Example: Four 8-Port PRO3 KVM Switches (F1DA108Zea) are each PRO3 KVM Switch. • For a single-unit configuration, set to a unique BANK (between 01 and 03). 18 Each secondary... unit must be set to "BANK address 00". Refer to Assign a BANK Address All PRO3 KVM Switches feature a "BANK DIP" switch. This is used to assign the proper BANK address to each set to the "primary" (BANK address 00) ...
User Manual
Page 21
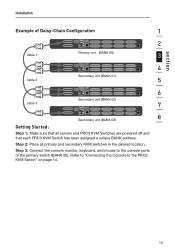
Step 3: Connect the console monitor, keyboard, and mouse to the PRO3 KVM Switch" on page 14. 19 Refer to "Connecting the Console to the console ports of Daisy-Chain Configuration 1 2 cable 1 Primary unit (BANK 00) 3... unit (BANK 01) cable 2 5 6 Secondary unit (BANK 02) cable 3 7 Secondary unit (BANK 03) 8 Getting Started: Step 1: Make sure that each PRO3 KVM Switch has been assigned a unique BANK address. section Installation Example of the primary switch (BANK 00). Step 2: Place all servers and PRO3 KVM Switches are powered off and that all primary and secondary...
Step 3: Connect the console monitor, keyboard, and mouse to the PRO3 KVM Switch" on page 14. 19 Refer to "Connecting the Console to the console ports of Daisy-Chain Configuration 1 2 cable 1 Primary unit (BANK 00) 3... unit (BANK 01) cable 2 5 6 Secondary unit (BANK 02) cable 3 7 Secondary unit (BANK 03) 8 Getting Started: Step 1: Make sure that each PRO3 KVM Switch has been assigned a unique BANK address. section Installation Example of the primary switch (BANK 00). Step 2: Place all servers and PRO3 KVM Switches are powered off and that all primary and secondary...

User Manual
Page 22
... the Daisy-Chain Cable (F1D108-CBL) to the "Daisy-Chain In" port on the primary KVM switch (BANK 00). Note: Your PRO3 KVM Switch is backward-compatible with Belkin OmniView PRO2 KVM Switches with microcabling (F1DA104Zea, F1DA108Zea, F1DA116Zea) must be designated as the primary KVM switch. 20 Step 4 Repeat Step 3 for example, BANK 02). Step 3 To add secondary units, connect one...
... the Daisy-Chain Cable (F1D108-CBL) to the "Daisy-Chain In" port on the primary KVM switch (BANK 00). Note: Your PRO3 KVM Switch is backward-compatible with Belkin OmniView PRO2 KVM Switches with microcabling (F1DA104Zea, F1DA108Zea, F1DA116Zea) must be designated as the primary KVM switch. 20 Step 4 Repeat Step 3 for example, BANK 02). Step 3 To add secondary units, connect one...