
User Manual
Page 2
Glossary 38 8. Frequently Asked Questions 34 6. Troubleshooting 36 7. Using your PRO3 KVM Switch 23 Selecting a Server or BANK Using Hot-Key Commands 23 Selecting a Server Using Direct-...System Requirements 6 Unit Display Diagrams 7 Specifications 9 3. Information 39 Introduction 1 Package Contents 2 2. Installation 10 Pre-Configuration 10 Mounting the PRO3 KVM Switch 11 Connecting the Console to the PRO3 KVM Switch 14 Connecting PS/2 Servers to the PRO3 KVM Switch 15 Connecting Multiple PRO3 KVM Switches (Daisy-Chaining) .......17 Powering Up the Systems 22 4.
Glossary 38 8. Frequently Asked Questions 34 6. Troubleshooting 36 7. Using your PRO3 KVM Switch 23 Selecting a Server or BANK Using Hot-Key Commands 23 Selecting a Server Using Direct-...System Requirements 6 Unit Display Diagrams 7 Specifications 9 3. Information 39 Introduction 1 Package Contents 2 2. Installation 10 Pre-Configuration 10 Mounting the PRO3 KVM Switch 11 Connecting the Console to the PRO3 KVM Switch 14 Connecting PS/2 Servers to the PRO3 KVM Switch 15 Connecting Multiple PRO3 KVM Switches (Daisy-Chaining) .......17 Powering Up the Systems 22 4.

User Manual
Page 3
... Congratulations on your business and have confidence that you for yourself why Belkin is a KVM Switch that surpasses any other 4 switch on the market. Belkin has designed and developed this Belkin OmniView PRO3 PS/2 1 KVM Switch (the KVM Switch). The PRO3 KVM Switch is engineered to the Quick Installation Guide 8 included in mind. The PRO3 KVM Switch also comes with the most advanced server-room and laboratory environments, offering...
... Congratulations on your business and have confidence that you for yourself why Belkin is a KVM Switch that surpasses any other 4 switch on the market. Belkin has designed and developed this Belkin OmniView PRO3 PS/2 1 KVM Switch (the KVM Switch). The PRO3 KVM Switch is engineered to the Quick Installation Guide 8 included in mind. The PRO3 KVM Switch also comes with the most advanced server-room and laboratory environments, offering...

User Manual
Page 5
section Overview Feature Overview 1 • Hot Keys Hot-key functionality allows you to set your PRO3 KVM Switch to scan and 4 monitor the activities of switching between servers and assigning the hot-key scheme. The OSD can also be set up to ... located conveniently on your KVM configuration as 256 servers, instantaneously. 3 • AutoScan The AutoScan feature allows you to 16 KVM switches can be adjusted through the On-Screen Display 5 (OSD) menu. • Video Resolution 6 The PRO3 KVM Switch supports video resolutions of the PRO3 KVM Switch, allow for simple, manual...
section Overview Feature Overview 1 • Hot Keys Hot-key functionality allows you to set your PRO3 KVM Switch to scan and 4 monitor the activities of switching between servers and assigning the hot-key scheme. The OSD can also be set up to ... located conveniently on your KVM configuration as 256 servers, instantaneously. 3 • AutoScan The AutoScan feature allows you to 16 KVM switches can be adjusted through the On-Screen Display 5 (OSD) menu. • Video Resolution 6 The PRO3 KVM Switch supports video resolutions of the PRO3 KVM Switch, allow for simple, manual...

User Manual
Page 6
... LED above each direct-access port selector illuminates to install the latest firmware on the front panel of your PRO3 KVM Switch and can be downloaded from Belkin's support website at www.belkin.com/support. 4 An LED above it will light up. Firmware upgrades are free for the life of the... PRO3 KVM Switch serves as a quick indicator of the selected BANK. • Flash Upgrade Flash-upgradeable firmware allows you to indicate that...
... LED above each direct-access port selector illuminates to install the latest firmware on the front panel of your PRO3 KVM Switch and can be downloaded from Belkin's support website at www.belkin.com/support. 4 An LED above it will light up. Firmware upgrades are free for the life of the... PRO3 KVM Switch serves as a quick indicator of the selected BANK. • Flash Upgrade Flash-upgradeable firmware allows you to indicate that...

User Manual
Page 7
section Overview Equipment Requirements 1 Cables: 2 Connecting the PRO3 KVM Switch to a server requires a Belkin Dual-Port Micro-Cable Kit. Belkin Dual-Port Micro-Cable Kits: 3 F1D9400-XX (PS/2-style) 4 5 6 7 8 Belkin PRO3 Daisy-Chain Cable: F1D108-CBL (Available in a 2 feet version) Note: Product codes and availability may vary. 5
section Overview Equipment Requirements 1 Cables: 2 Connecting the PRO3 KVM Switch to a server requires a Belkin Dual-Port Micro-Cable Kit. Belkin Dual-Port Micro-Cable Kits: 3 F1D9400-XX (PS/2-style) 4 5 6 7 8 Belkin PRO3 Daisy-Chain Cable: F1D108-CBL (Available in a 2 feet version) Note: Product codes and availability may vary. 5
User Manual
Page 8
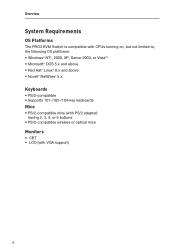
...PRO3 KVM Switch is compatible with CPUs running on, but not limited to, the following OS platforms: • Windows® NT®, 2000, XP, Server 2003, or VistaTM • Microsoft® DOS 5.x and above • Red Hat® Linux® 8.x and above • Novell® NetWare® 5.x Keyboards • PS.../2-compatible • Supports 101-/102-/104-key keyboards Mice • PS/2-compatible mice (with PS/2 adapter) having 2, 3, 4, or 5 buttons • PS/2-compatible wireless or optical mice Monitors • CRT • LCD...
...PRO3 KVM Switch is compatible with CPUs running on, but not limited to, the following OS platforms: • Windows® NT®, 2000, XP, Server 2003, or VistaTM • Microsoft® DOS 5.x and above • Red Hat® Linux® 8.x and above • Novell® NetWare® 5.x Keyboards • PS.../2-compatible • Supports 101-/102-/104-key keyboards Mice • PS/2-compatible mice (with PS/2 adapter) having 2, 3, 4, or 5 buttons • PS/2-compatible wireless or optical mice Monitors • CRT • LCD...
User Manual
Page 9
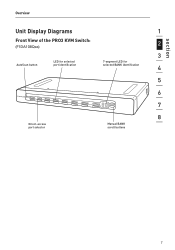
section Overview Unit Display Diagrams 1 Front View of the PRO3 KVM Switch: 2 (F1DA108Qea) 3 4 5 6 7 8 7
section Overview Unit Display Diagrams 1 Front View of the PRO3 KVM Switch: 2 (F1DA108Qea) 3 4 5 6 7 8 7
User Manual
Page 10
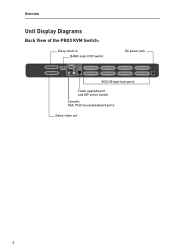
Overview Unit Display Diagrams Back View of the PRO3 KVM Switch: 8
Overview Unit Display Diagrams Back View of the PRO3 KVM Switch: 8
User Manual
Page 11
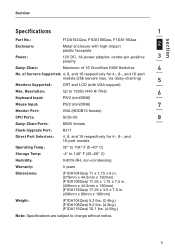
of 16 OmniView KVM Switches 4 No. via daisy-chaining) 5 Monitors Supported: CRT and LCD (with high-impact 2 plastic faceplate 12V DC, 1A power adapter, center-pin-positive 3 polarity ... 89mm x 190mm) Weight: (F1DA104Qea) 5.3 lbs. (2.4kg.) (F1DA108Qea) 9.2 lbs. (4.2kg.) (F1DA116Qea) 10.1 lbs. (4.5kg.) Note: Specifications are subject to 1920x1440 @ 75Hz 6 Keyboard Input: PS/2 (miniDIN6) Mouse Input: PS/2 (miniDIN6) 7 Monitor Port: VGA (HDDB15 female) CPU Ports: SCSI-50 8 Daisy-Chain Ports: DB25 female Flash-Upgrade Port: RJ11 Direct Port Selectors: 4, 8, and 16...
of 16 OmniView KVM Switches 4 No. via daisy-chaining) 5 Monitors Supported: CRT and LCD (with high-impact 2 plastic faceplate 12V DC, 1A power adapter, center-pin-positive 3 polarity ... 89mm x 190mm) Weight: (F1DA104Qea) 5.3 lbs. (2.4kg.) (F1DA108Qea) 9.2 lbs. (4.2kg.) (F1DA116Qea) 10.1 lbs. (4.5kg.) Note: Specifications are subject to 1920x1440 @ 75Hz 6 Keyboard Input: PS/2 (miniDIN6) Mouse Input: PS/2 (miniDIN6) 7 Monitor Port: VGA (HDDB15 female) CPU Ports: SCSI-50 8 Daisy-Chain Ports: DB25 female Flash-Upgrade Port: RJ11 Direct Port Selectors: 4, 8, and 16...

User Manual
Page 12
...a single PRO3 KVM Switch (F1DA104Qea, F1DA108Qea, F1DA116Qea). 10 Note: The Belkin OmniView CAT5 Extender (F1D084vea2) may cause irreversible damage of the servers and/or the PRO3 KVM Switches. Belkin is included with the 4-Port PRO3 KVM Switch. You are natively rack-mountable in relation to your PRO3 KVM Switch. Beyond that... the location of your servers to the PRO3 KVM Switch Cable-Distance Requirements: For PS/2 Servers: VGA signals transmit best up to 300 feet (91m). The following when deciding where to place the PRO3 KVM Switch: • whether or not you intend...
...a single PRO3 KVM Switch (F1DA104Qea, F1DA108Qea, F1DA116Qea). 10 Note: The Belkin OmniView CAT5 Extender (F1D084vea2) may cause irreversible damage of the servers and/or the PRO3 KVM Switches. Belkin is included with the 4-Port PRO3 KVM Switch. You are natively rack-mountable in relation to your PRO3 KVM Switch. Beyond that... the location of your servers to the PRO3 KVM Switch Cable-Distance Requirements: For PS/2 Servers: VGA signals transmit best up to 300 feet (91m). The following when deciding where to place the PRO3 KVM Switch: • whether or not you intend...
User Manual
Page 13
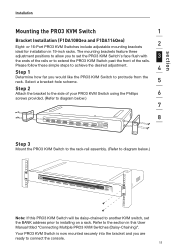
... the rails or to diagram below.) Note: If this User Manual titled "Connecting Multiple PRO3 KVM Switches (Daisy-Chaining)". or 16-Port PRO3 KVM Switches include adjustable mounting brackets ideal for installation in this PRO3 KVM Switch will be daisy-chained to another KVM switch, set the PRO3 KVM Switch's face flush with 3 the ends of the rails. Refer to the section in 19...
... the rails or to diagram below.) Note: If this User Manual titled "Connecting Multiple PRO3 KVM Switches (Daisy-Chaining)". or 16-Port PRO3 KVM Switches include adjustable mounting brackets ideal for installation in this PRO3 KVM Switch will be daisy-chained to another KVM switch, set the PRO3 KVM Switch's face flush with 3 the ends of the rails. Refer to the section in 19...

User Manual
Page 14
Installation Optional Bracket Installation (F1DA104Qea) The PRO3 4-Port KVM Switch can be installed into a 19-inch server rack using the Phillips screws provided. (Refer to your 4-Port PRO3 KVM Switch using an optional OmniView Rack-Mount Kit (F1D005). Step 1 Attach the rack-mount bracket to diagram below.) 12
Installation Optional Bracket Installation (F1DA104Qea) The PRO3 4-Port KVM Switch can be installed into a 19-inch server rack using the Phillips screws provided. (Refer to your 4-Port PRO3 KVM Switch using an optional OmniView Rack-Mount Kit (F1D005). Step 1 Attach the rack-mount bracket to diagram below.) 12

User Manual
Page 15
... for Belkin PRO2 Series Owners (F1DA104Tea, F1DA108Tea, and F1DA116Tea): Installation for the PRO2 KVM Switch has changed. section Installation Step 2 1 Mount the 4-Port PRO3 KVM Switch to the rack-rail assembly. (Refer to diagram below.) 2 3 4 5 6 Note: If this PRO3 KVM Switch will be daisy-chained to another KVM switch, 7 set the BANK address prior to the section titled 8 "Connecting Multiple PRO3 KVM Switches (Daisy...
... for Belkin PRO2 Series Owners (F1DA104Tea, F1DA108Tea, and F1DA116Tea): Installation for the PRO2 KVM Switch has changed. section Installation Step 2 1 Mount the 4-Port PRO3 KVM Switch to the rack-rail assembly. (Refer to diagram below.) 2 3 4 5 6 Note: If this PRO3 KVM Switch will be daisy-chained to another KVM switch, 7 set the BANK address prior to the section titled 8 "Connecting Multiple PRO3 KVM Switches (Daisy...

User Manual
Page 16
Installation Connecting the Console to the PRO3 KVM Switch Step 1 Connect the VGA monitor cable to the HDDB15 female port on the back of the PRO3 KVM Switch in the "Console" section. (Refer to diagram below.) Step 2 Connect the PS/2 keyboard cable to the keyboard port on the back of the PRO3 KVM Switch in the "Console" section. (Refer to diagram...
Installation Connecting the Console to the PRO3 KVM Switch Step 1 Connect the VGA monitor cable to the HDDB15 female port on the back of the PRO3 KVM Switch in the "Console" section. (Refer to diagram below.) Step 2 Connect the PS/2 keyboard cable to the keyboard port on the back of the PRO3 KVM Switch in the "Console" section. (Refer to diagram...

User Manual
Page 17
section Installation 1 2 3 Your PRO3 KVM Switch is now installed and you are ready to connect 4 your servers. 5 Connecting PS/2 Servers to the PRO3 KVM Switch 6 Step 1 Make sure your server is powered off. 7 Step 2 Using the Belkin Dual-Port Micro-Cable Kit for PS/2 (F1D9400-XX), connect the 8 VGA connector to the monitor port on your server. (Refer to diagram below.) Step 3 Connect the PS/2 mouse and keyboard connectors to the mouse and keyboard ports on the server. (Refer to diagram below.) 15
section Installation 1 2 3 Your PRO3 KVM Switch is now installed and you are ready to connect 4 your servers. 5 Connecting PS/2 Servers to the PRO3 KVM Switch 6 Step 1 Make sure your server is powered off. 7 Step 2 Using the Belkin Dual-Port Micro-Cable Kit for PS/2 (F1D9400-XX), connect the 8 VGA connector to the monitor port on your server. (Refer to diagram below.) Step 3 Connect the PS/2 mouse and keyboard connectors to the mouse and keyboard ports on the server. (Refer to diagram below.) 15
User Manual
Page 18
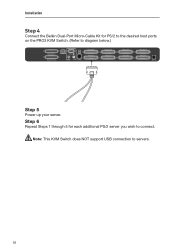
Installation Step 4 Connect the Belkin Dual-Port Micro-Cable Kit for each additional PS/2 server you wish to connect. Note: This KVM Switch does NOT support USB connection to diagram below.) Step 5 Power up your server. Step 6 Repeat Steps 1 through 5 for PS/2 to the desired host ports on the PRO3 KVM Switch. (Refer to servers. 16
Installation Step 4 Connect the Belkin Dual-Port Micro-Cable Kit for each additional PS/2 server you wish to connect. Note: This KVM Switch does NOT support USB connection to diagram below.) Step 5 Power up your server. Step 6 Repeat Steps 1 through 5 for PS/2 to the desired host ports on the PRO3 KVM Switch. (Refer to servers. 16

User Manual
Page 19
... is available through 15 are referred to as "secondary" KVM switches. 4 Note: Your PRO3 KVM Switch is backward-compatible with Belkin OmniView PRO2 KVM Switches with micro- BANKs 01 through your Belkin reseller, or online at www.belkin.com. 17 cabling (F1DA104Qea, F1DA108Qea, F1DA116Qea) must be designated as the "primary" KVM switch. The PRO3 KVM Switch connected to the console keyboard, mouse, and monitor is BANK...
... is available through 15 are referred to as "secondary" KVM switches. 4 Note: Your PRO3 KVM Switch is backward-compatible with Belkin OmniView PRO2 KVM Switches with micro- BANKs 01 through your Belkin reseller, or online at www.belkin.com. 17 cabling (F1DA104Qea, F1DA108Qea, F1DA116Qea) must be designated as the "primary" KVM switch. The PRO3 KVM Switch connected to the console keyboard, mouse, and monitor is BANK...
User Manual
Page 20
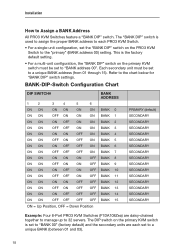
...) SECONDARY SECONDARY SECONDARY SECONDARY SECONDARY SECONDARY SECONDARY SECONDARY SECONDARY SECONDARY SECONDARY SECONDARY SECONDARY SECONDARY SECONDARY Example: Four 8-Port PRO3 KVM Switches (F1DA108Zea) are each PRO3 KVM Switch. • For a single-unit configuration, set the "BANK DIP" switch on the primary KVM switch must be set to "BANK 00" (factory default) and the secondary units are daisy-chained together to...
...) SECONDARY SECONDARY SECONDARY SECONDARY SECONDARY SECONDARY SECONDARY SECONDARY SECONDARY SECONDARY SECONDARY SECONDARY SECONDARY SECONDARY SECONDARY Example: Four 8-Port PRO3 KVM Switches (F1DA108Zea) are each PRO3 KVM Switch. • For a single-unit configuration, set the "BANK DIP" switch on the primary KVM switch must be set to "BANK 00" (factory default) and the secondary units are daisy-chained together to...
User Manual
Page 21
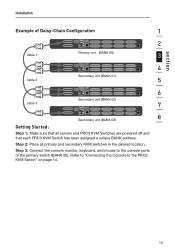
Step 3: Connect the console monitor, keyboard, and mouse to the PRO3 KVM Switch" on page 14. 19 Step 2: Place all servers and PRO3 KVM Switches are powered off and that each PRO3 KVM Switch has been assigned a unique BANK address. section Installation Example of the primary switch (BANK 00). Refer to "Connecting the Console to the console ports of Daisy-Chain...
Step 3: Connect the console monitor, keyboard, and mouse to the PRO3 KVM Switch" on page 14. 19 Step 2: Place all servers and PRO3 KVM Switches are powered off and that each PRO3 KVM Switch has been assigned a unique BANK address. section Installation Example of the primary switch (BANK 00). Refer to "Connecting the Console to the console ports of Daisy-Chain...

User Manual
Page 22
... Step 3 for example, BANK 02). Note: Your PRO3 KVM Switch is backward-compatible with Belkin OmniView PRO2 KVM Switches with microcabling (F1DA104Zea, F1DA108Zea, F1DA116Zea) must be designated as the primary KVM switch. 20 Step 3 To add secondary units, connect one end to the "Daisy-Chain In" port on the first secondary KVM switch and the other end of the Daisy-Chain...
... Step 3 for example, BANK 02). Note: Your PRO3 KVM Switch is backward-compatible with Belkin OmniView PRO2 KVM Switches with microcabling (F1DA104Zea, F1DA108Zea, F1DA116Zea) must be designated as the primary KVM switch. 20 Step 3 To add secondary units, connect one end to the "Daisy-Chain In" port on the first secondary KVM switch and the other end of the Daisy-Chain...


