
Operation Manual
Page 5
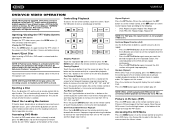
... (Radio Data System) Sat Radio Ready • Compatible with Eight Preset EQ Curves • Spectrum Analyzer • Front, Rear, Center and Subwoofer Line Output • Subwoofer Crossover and Phase Control • Dolby Digital / Pro-Logic ll • Programmable Volume Control • Rear Camera Input (Normal and Mirror Image View) • Auto TFT Dimmer • 5-Way Joystick 1 Supports Hard Drives and Flash Memory Drives • LinkDirect 8-pin DIN for Additional Screens • Compatible with MZ7TFT Rear...
... (Radio Data System) Sat Radio Ready • Compatible with Eight Preset EQ Curves • Spectrum Analyzer • Front, Rear, Center and Subwoofer Line Output • Subwoofer Crossover and Phase Control • Dolby Digital / Pro-Logic ll • Programmable Volume Control • Rear Camera Input (Normal and Mirror Image View) • Auto TFT Dimmer • 5-Way Joystick 1 Supports Hard Drives and Flash Memory Drives • LinkDirect 8-pin DIN for Additional Screens • Compatible with MZ7TFT Rear...

Operation Manual
Page 6
.../test light • Crimp connections • 18 gauge wire for rear view video camera) never use the video display function while driving the vehicle. Never use extra caution during installation to the unit and result in "Monitor Left/Right Angle Adjustment" on page 32. WARNING! If the cable is to be sure to turn off the ignition and remove the negative (-) battery cable prior to remove existing radio (screwdriver, socket wrench set or...
.../test light • Crimp connections • 18 gauge wire for rear view video camera) never use the video display function while driving the vehicle. Never use extra caution during installation to the unit and result in "Monitor Left/Right Angle Adjustment" on page 32. WARNING! If the cable is to be sure to turn off the ignition and remove the negative (-) battery cable prior to remove existing radio (screwdriver, socket wrench set or...
Operation Manual
Page 9
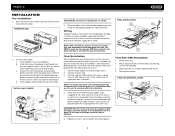
...). VM9512 INSTALLATION Pre-installation 1. a. c. Connect wiring adapter to make the unit more stable. Make sure the unit is corrected. Install support strap to existing wiring harness. 2. Place the radio in front of horizontal. Once the wiring is achieved, turn the unit on to avoid damaging the radio. Replace any items you removed from old radio. 3. NOTE: When replacing a fuse, be brought through the mounting sleeve. FINAL ISO-DIN INSTALLATION 3 BAND AS Press Audio VM9512 DISP OPEN Enter 4 1 2 5 b. Locate the...
...). VM9512 INSTALLATION Pre-installation 1. a. c. Connect wiring adapter to make the unit more stable. Make sure the unit is corrected. Install support strap to existing wiring harness. 2. Place the radio in front of horizontal. Once the wiring is achieved, turn the unit on to avoid damaging the radio. Replace any items you removed from old radio. 3. NOTE: When replacing a fuse, be brought through the mounting sleeve. FINAL ISO-DIN INSTALLATION 3 BAND AS Press Audio VM9512 DISP OPEN Enter 4 1 2 5 b. Locate the...

Operation Manual
Page 11
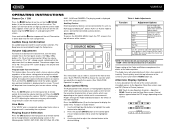
... volume level. BT Mode: Answer Bluetooth call. VM9512 CONTROLS AND INDICATORS Button Operation 1. SRC MENU Mode: Press once to move the cursor to the left joystick) DVD/Disc Mode: Press once to view the clock. LCD Display 8. Press again to adjust the volume. NOTE: The VM9512 features Softmute, which will allow the volume to auto-search for slow forward/slow reverse. TUNER Mode: Press once to increase or decrease gradually when the MUTE function is activated...
... volume level. BT Mode: Answer Bluetooth call. VM9512 CONTROLS AND INDICATORS Button Operation 1. SRC MENU Mode: Press once to move the cursor to the left joystick) DVD/Disc Mode: Press once to view the clock. LCD Display 8. Press again to adjust the volume. NOTE: The VM9512 features Softmute, which will allow the volume to auto-search for slow forward/slow reverse. TUNER Mode: Press once to increase or decrease gradually when the MUTE function is activated...

Operation Manual
Page 14
...information/ Displays playing information/ Displays audio mode Displays audio mode Displays audio mode Displays audio mode Delete entry or move back- Delete entry or move back- VM9512 Table 1: Remote Control Functions Button Function Name MENU TITLE MUTE POWER/ AUDIO RPT A-B RPT SRC SUBTITLE DISP/ CLEAR PRESET PRESET ANGLE Joystick /\ VOL VOL + Joystick < Joystick (press) Joystick > GOTO Joystick \/ Ref# DVD VCD TUNER CD/MP3 SATELLITE iPod 1 Enters the main menu of the Turns on /off 5 Changes the audio language for disc playback Selects iPod Music mode 6 Setup to...
...information/ Displays playing information/ Displays audio mode Displays audio mode Displays audio mode Displays audio mode Delete entry or move back- Delete entry or move back- VM9512 Table 1: Remote Control Functions Button Function Name MENU TITLE MUTE POWER/ AUDIO RPT A-B RPT SRC SUBTITLE DISP/ CLEAR PRESET PRESET ANGLE Joystick /\ VOL VOL + Joystick < Joystick (press) Joystick > GOTO Joystick \/ Ref# DVD VCD TUNER CD/MP3 SATELLITE iPod 1 Enters the main menu of the Turns on /off 5 Changes the audio language for disc playback Selects iPod Music mode 6 Setup to...

Operation Manual
Page 16
... 2: Video Output Modes Playing Source Video Output Modes RADIO RGB Mode SAT RGB Mode DISC RGB Mode BT RGB Mode AUX 1 CVBS Mode AUX 2 CVBS Mode NAV RGB Mode CAMERA CVBS Mode *CVBS - Extender Mechanism - Firmly grasp both sides of horizontal to vertical, leaving a blank area on , the monitor automatically moves to the viewing position. Aspect Ratio Press the WIDE button (28) on the remote control or WIDE button (22) on the control panel or remote control to adjust the...
... 2: Video Output Modes Playing Source Video Output Modes RADIO RGB Mode SAT RGB Mode DISC RGB Mode BT RGB Mode AUX 1 CVBS Mode AUX 2 CVBS Mode NAV RGB Mode CAMERA CVBS Mode *CVBS - Extender Mechanism - Firmly grasp both sides of horizontal to vertical, leaving a blank area on , the monitor automatically moves to the viewing position. Aspect Ratio Press the WIDE button (28) on the remote control or WIDE button (22) on the control panel or remote control to adjust the...
Operation Manual
Page 18
... and hold the AUDIO button (5). To adjust an audio feature: 1. NOTE: The EQ mode will beep two times to display the audio menu. DISC CAT- Select "AUX1" or "AUX2" mode to the desired setting. The LCD or TFT screen displays the volume level for the front or rear zone. Press the AUDIO button (5) on the TFT and LCD screens. Use the joystick to adjust the selected feature to access and control connected auxiliary devices. The Audio menu will automatically exit...
... and hold the AUDIO button (5). To adjust an audio feature: 1. NOTE: The EQ mode will beep two times to display the audio menu. DISC CAT- Select "AUX1" or "AUX2" mode to the desired setting. The LCD or TFT screen displays the volume level for the front or rear zone. Press the AUDIO button (5) on the TFT and LCD screens. Use the joystick to adjust the selected feature to access and control connected auxiliary devices. The Audio menu will automatically exit...

Operation Manual
Page 20
... screen installed, you to select a source for the front or rear zone. To switch from the rear zone video screen. Wireless Headphone (OPTIONAL) NOTE: You cannot change or control the front zone source from front to rear zone, move the F/R switch (32) located on the SOURCE MENU) to suspend operation of the remote controller. DISC SOURCE MENU DISC RADIO AUX 1 F SD USB NAV R O N T SAT iPod BT R E A OFF R AUX 2 CAMERA This menu allows you can touch the screen to control most rear zone functions. The VM9512 remote controls...
... screen installed, you to select a source for the front or rear zone. To switch from the rear zone video screen. Wireless Headphone (OPTIONAL) NOTE: You cannot change or control the front zone source from front to rear zone, move the F/R switch (32) located on the SOURCE MENU) to suspend operation of the remote controller. DISC SOURCE MENU DISC RADIO AUX 1 F SD USB NAV R O N T SAT iPod BT R E A OFF R AUX 2 CAMERA This menu allows you can touch the screen to control most rear zone functions. The VM9512 remote controls...

Operation Manual
Page 21
... the AUDIO button (volume control). • Subwoofer Phase Adjustment: Touch the sub.w icon to 180°. DVD menu (if applicable) is switched automatically based on the speaker configuration in blue. 3. VM9512 SETUP MENU To access system settings, press the SETUP button (31) on the remote control or touch the button on , an audible beep tone confirms each function selection. Use the touchscreen or press the /\ or V buttons on the LCD screen during playback. The color signal output is displayed...
... the AUDIO button (volume control). • Subwoofer Phase Adjustment: Touch the sub.w icon to 180°. DVD menu (if applicable) is switched automatically based on the speaker configuration in blue. 3. VM9512 SETUP MENU To access system settings, press the SETUP button (31) on the remote control or touch the button on , an audible beep tone confirms each function selection. Use the touchscreen or press the /\ or V buttons on the LCD screen during playback. The color signal output is displayed...
Operation Manual
Page 22
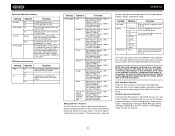
... default code is "1234". For details, please refer to restore the factory default settings for many models. Automatically connect when your paired phone is retracted back inside the unit, the TFT monitor automatically moves into REVERSE gear. RDS Sub-menu Features Setting RDS CT Options Function On Unit will play. When shifting into DRIVE gear, the TFT monitor is in range. Hardware Sub-menu Features If the rear-view video...
... default code is "1234". For details, please refer to restore the factory default settings for many models. Automatically connect when your paired phone is retracted back inside the unit, the TFT monitor automatically moves into REVERSE gear. RDS Sub-menu Features Setting RDS CT Options Function On Unit will play. When shifting into DRIVE gear, the TFT monitor is in range. Hardware Sub-menu Features If the rear-view video...

Operation Manual
Page 23
... to CAMERA mode upon reverse driving. After entering calibration mode, a crosshair appears in display mode, the monitor automatically switches to its original input mode. If the monitor is in a corner quadrant of the screen. Continue for specified source up to open the TFT panel. The TFT panel automatically opens when the unit is completed. P.VOL Sub-menu Features Setting Source Options Function DISC RADIO SD SAT AUX 1 USB BT AUX 2 iPod NAV Choose a source for...
... to CAMERA mode upon reverse driving. After entering calibration mode, a crosshair appears in display mode, the monitor automatically switches to its original input mode. If the monitor is in a corner quadrant of the screen. Continue for specified source up to open the TFT panel. The TFT panel automatically opens when the unit is completed. P.VOL Sub-menu Features Setting Source Options Function DISC RADIO SD SAT AUX 1 USB BT AUX 2 iPod NAV Choose a source for...

Operation Manual
Page 24
... to view the Rear source screen 27. PIP: Touch to view Rear, Front or NAV source Switch to view the SOURCE MENU. PTY: When PTY is activated 26. Clock 4. MEM: View screen used to enter current channel into preset memory 19. 1/2 or 2/2: Touch this page button to view a second page of the screen (the RADIO circle) to Radio Tuner source • Touch the top left corner of on the unit only works when the TFT is activated 25. VM9512 TUNER OPERATION Tuner TFT Display...
... to view the Rear source screen 27. PIP: Touch to view Rear, Front or NAV source Switch to view the SOURCE MENU. PTY: When PTY is activated 26. Clock 4. MEM: View screen used to enter current channel into preset memory 19. 1/2 or 2/2: Touch this page button to view a second page of the screen (the RADIO circle) to Radio Tuner source • Touch the top left corner of on the unit only works when the TFT is activated 25. VM9512 TUNER OPERATION Tuner TFT Display...

Operation Manual
Page 26
... + buttons on the remote control to channel "000". Song title 6. CH +: Select the next channel 12. Select a band (if needed ), then select a station. 2. Direct Tuning To enter a radio station directly, touch the button or press the GOTO button (21) on the touch screen repeatedly to tune to display the direct entry menu. Channel Guide is usually displayed. Customers can listen to music samples by service professionals for use by tuning to -air channels without changing the station, touch Exit. MEM: View screen used to Channel Guide, touch...
... + buttons on the remote control to channel "000". Song title 6. CH +: Select the next channel 12. Select a band (if needed ), then select a station. 2. Direct Tuning To enter a radio station directly, touch the button or press the GOTO button (21) on the touch screen repeatedly to tune to display the direct entry menu. Channel Guide is usually displayed. Customers can listen to music samples by service professionals for use by tuning to -air channels without changing the station, touch Exit. MEM: View screen used to Channel Guide, touch...
Operation Manual
Page 28
VM9512 DVD/VCD VIDEO OPERATION NOTE: When properly installed, DVD video cannot be authorized (see "General Sub-menu Features" on page 17). If you reach the desired end point (B) of the DVD will not play begins. NOTE: If Parental Lock (Rating) is activated and the disc inserted is applied. Ejecting a Disc Press the button (21) on the main TFT screen unless the parking brake is not authorized, the...
VM9512 DVD/VCD VIDEO OPERATION NOTE: When properly installed, DVD video cannot be authorized (see "General Sub-menu Features" on page 17). If you reach the desired end point (B) of the DVD will not play begins. NOTE: If Parental Lock (Rating) is activated and the disc inserted is applied. Ejecting a Disc Press the button (21) on the main TFT screen unless the parking brake is not authorized, the...

Operation Manual
Page 35
... and total number of Homecomi 6 Artist: Coldplay 4 5 9 19 11 12 7 13 1. VM9512 iPod OPERATION iPod User Interface The on-screen indicators and touch key areas for iPod playback are used to access the iPod menus: Menu Music Photos Videos Touch Screen Remote Control AUDIO SUB-TITLE ANGLE Use the touchscreen, the joystick, or the directional keys on the remote control to resume normal playback. Touch to be viewed on the VM9512 screen, you must use the...
... and total number of Homecomi 6 Artist: Coldplay 4 5 9 19 11 12 7 13 1. VM9512 iPod OPERATION iPod User Interface The on-screen indicators and touch key areas for iPod playback are used to access the iPod menus: Menu Music Photos Videos Touch Screen Remote Control AUDIO SUB-TITLE ANGLE Use the touchscreen, the joystick, or the directional keys on the remote control to resume normal playback. Touch to be viewed on the VM9512 screen, you must use the...
Operation Manual
Page 36
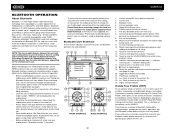
... the phone battery is made to the VM9512 head unit (see "Pairing the Bluetooth System with hand-free function 9. Exit call 12. Connect/disconnect Bluetooth device (phone, PDA, personal music player, etc.) with Your Mobile Phone and Head Unit"). Current connection status/device connected 2. Adhere to the following guidelines for pairing and reconnection, please make sure your mobile phone to download a phone book. NOTE: The line-of their respective owners. Bluetooth menu 4. VM9512 BLUETOOTH OPERATION About Bluetooth Bluetooth is a short-range wireless radio connectivity...
... the phone battery is made to the VM9512 head unit (see "Pairing the Bluetooth System with hand-free function 9. Exit call 12. Connect/disconnect Bluetooth device (phone, PDA, personal music player, etc.) with Your Mobile Phone and Head Unit"). Current connection status/device connected 2. Adhere to the following guidelines for pairing and reconnection, please make sure your mobile phone to download a phone book. NOTE: The line-of their respective owners. Bluetooth menu 4. VM9512 BLUETOOTH OPERATION About Bluetooth Bluetooth is a short-range wireless radio connectivity...

Operation Manual
Page 37
.... • Touch the button to view the last 10 received numbers stored on /off, and perform pairing). The direct dial screen will automatically reconnect with the mobile phone once (only if the mobile phone was previously paired with Your Mobile Phone and Head Unit 1. The TFT will display the paired mobile phone model number or name (as specified in the Pairing Code field under the Bluetooth SETUP menu. To make a call received. 1. Dialed Calls The...
.... • Touch the button to view the last 10 received numbers stored on /off, and perform pairing). The direct dial screen will automatically reconnect with the mobile phone once (only if the mobile phone was previously paired with Your Mobile Phone and Head Unit 1. The TFT will display the paired mobile phone model number or name (as specified in the Pairing Code field under the Bluetooth SETUP menu. To make a call received. 1. Dialed Calls The...
Operation Manual
Page 38
... the number you must press the button to enter a PIN code into the unit. To turn auto "Connect" on this unit vary greatly. Auto Connect The auto Connect option will display "Ready..." Bluetooth audio players (or Bluetooth adapters) compatible with the VM9512. Touch the Phone Book menu option to this manual while operating your phone, PDA or personal music player using this unit. while streaming audio from your player with these profiles can control a Bluetooth audio player via Advanced Audio Distribution Profile (A2DP) or Audio/Video Remote Control Profile...
... the number you must press the button to enter a PIN code into the unit. To turn auto "Connect" on this unit vary greatly. Auto Connect The auto Connect option will display "Ready..." Bluetooth audio players (or Bluetooth adapters) compatible with the VM9512. Touch the Phone Book menu option to this manual while operating your phone, PDA or personal music player using this unit. while streaming audio from your player with these profiles can control a Bluetooth audio player via Advanced Audio Distribution Profile (A2DP) or Audio/Video Remote Control Profile...
Operation Manual
Page 39
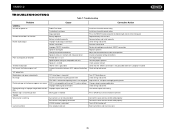
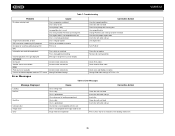
... antenna control cable properly Connect the auto antenna control cable properly Turn LOCAL function off No image Incorrect connection to parking brake wire PRK SW is activated and parking brake is not compatible with new one 35 VM9512 TROUBLESHOOTING Table 7: Troubleshooting Problem Cause Corrective Action GENERAL Unit will not power on Radio Fuse blown Car battery fuse blown Illegal operation Remote control does not function Battery depleted Battery installed incorrectly No/low audio output Improper audio output connection Volume set too low Improper "MUTE" connection...
... antenna control cable properly Connect the auto antenna control cable properly Turn LOCAL function off No image Incorrect connection to parking brake wire PRK SW is activated and parking brake is not compatible with new one 35 VM9512 TROUBLESHOOTING Table 7: Troubleshooting Problem Cause Corrective Action GENERAL Unit will not power on Radio Fuse blown Car battery fuse blown Illegal operation Remote control does not function Battery depleted Battery installed incorrectly No/low audio output Improper audio output connection Volume set too low Improper "MUTE" connection...
Operation Manual
Page 40
... can display Incorrect cable connections Incorrect cable connections Incorrect cable connections Wrong iPod Video Settings Error Messages Corrective Action Use disc in good condition Clean disc with soft cloth Clean laser pickup with cleaning disc Use compatible disc Change Parental Lock settings to lower restriction Use disc with proper region code Insert disc with label side up Use original disc Turn PCB off Clean disc or replace Recreate disc with good files Check RCA cables Check Satellite Data cable Check jLink and MediaLink cables Change iPod video settings...
... can display Incorrect cable connections Incorrect cable connections Incorrect cable connections Wrong iPod Video Settings Error Messages Corrective Action Use disc in good condition Clean disc with soft cloth Clean laser pickup with cleaning disc Use compatible disc Change Parental Lock settings to lower restriction Use disc with proper region code Insert disc with label side up Use original disc Turn PCB off Clean disc or replace Recreate disc with good files Check RCA cables Check Satellite Data cable Check jLink and MediaLink cables Change iPod video settings...


