User Guide
Page 4
... Introduction ...9 CommanderMT System Components ...10 Getting Started ...11 CommanderMT Display Controller Features ...13 Power On/Off ...13 Channel Up/Down Buttons (Remote Control) ...15 CommanderMT Commander Channel Scroll Wheel ...15 Select (XM) Button ...15 Category Search ...16 Jump Button ...16 Preset/Direct (p/d) Button ...16 Display Button ...16 Menu Button ...17 Number (Keypad) Buttons...
... Introduction ...9 CommanderMT System Components ...10 Getting Started ...11 CommanderMT Display Controller Features ...13 Power On/Off ...13 Channel Up/Down Buttons (Remote Control) ...15 CommanderMT Commander Channel Scroll Wheel ...15 Select (XM) Button ...15 Category Search ...16 Jump Button ...16 Preset/Direct (p/d) Button ...16 Display Button ...16 Menu Button ...17 Number (Keypad) Buttons...

User Guide
Page 5
... Set Factory Defaults ...49 Exit Menu ...50 Preset/Direct (p/d) ...50 Numbered Buttons 0-9 ...50 Direct ...50 Preset (A, B, C) ...51 Display Button-Screen Presentation ...52 Jump Button ...55 Remote Control Unit ...55 System Power Down ...58 Warning Display Messages ...58 Notification/Progress Display Messages ...59 Care and Cleaning ...59 Troubleshooting ...60 Specifications ...61 Warranty...
... Set Factory Defaults ...49 Exit Menu ...50 Preset/Direct (p/d) ...50 Numbered Buttons 0-9 ...50 Direct ...50 Preset (A, B, C) ...51 Display Button-Screen Presentation ...52 Jump Button ...55 Remote Control Unit ...55 System Power Down ...58 Warning Display Messages ...58 Notification/Progress Display Messages ...59 Care and Cleaning ...59 Troubleshooting ...60 Specifications ...61 Warranty...

User Guide
Page 8
... and Artist Plus Song Title in Large Font ...54 Channel Number and Name Plus Scrolling Artist and Song Title in Large Font ...54 CommanderMT System Remote Control Unit ...56 System Power Down Display ...58 Warning Display Messages ...58 Notification/Progress Display Messages ...59
... and Artist Plus Song Title in Large Font ...54 Channel Number and Name Plus Scrolling Artist and Song Title in Large Font ...54 CommanderMT System Remote Control Unit ...56 System Power Down Display ...58 Warning Display Messages ...58 Notification/Progress Display Messages ...59

User Guide
Page 9
...Introduction Introduction The Audiovox CommanderMT System processes the XM® satellite signals received by an externally mounted antenna for your radio or other audio output equipment. The CommanderMT System recognizes and decodes the incoming XM® program ...XM signal can be received andprocessed virtually anywhere as long as there are no obvious satellite signal obstructions such as nearby tall buildings, high terrain, parking garages or tunnels. NOTE: When installed in an accessible location of the vehicle (dash area), consistent with line-of-sight operation of the remote...
...Introduction Introduction The Audiovox CommanderMT System processes the XM® satellite signals received by an externally mounted antenna for your radio or other audio output equipment. The CommanderMT System recognizes and decodes the incoming XM® program ...XM signal can be received andprocessed virtually anywhere as long as there are no obvious satellite signal obstructions such as nearby tall buildings, high terrain, parking garages or tunnels. NOTE: When installed in an accessible location of the vehicle (dash area), consistent with line-of-sight operation of the remote...
User Guide
Page 11
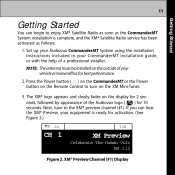
...button on the Remote Control to turn on the display for 2 seconds, followed by appearance of the Audiovox logo ( ) for 10 seconds. If you can begin to the XM® preview channel (#1). The XM® logo appears and slowly fades on the XM Mini-Tuner. 3. XM® Preview ... installed on the outside of a professional installer. Next, tune to enjoy XM® Satellite Radio as soon as the CommanderMT System installation is ready for best performance. 2. Set up your Audiovox CommanderMT System using the installation instructions included in your CommanderMT installation guide, or...
...button on the Remote Control to turn on the display for 2 seconds, followed by appearance of the Audiovox logo ( ) for 10 seconds. If you can begin to the XM® preview channel (#1). The XM® logo appears and slowly fades on the XM Mini-Tuner. 3. XM® Preview ... installed on the outside of a professional installer. Next, tune to enjoy XM® Satellite Radio as soon as the CommanderMT System installation is ready for best performance. 2. Set up your Audiovox CommanderMT System using the installation instructions included in your CommanderMT installation guide, or...

User Guide
Page 12
... ( ∧) or Down ( ∨ ) buttons on the rear of your receiver. To exit the Radio ID screen, tune to double-check your ID code located on the remote control, and press the Select button. To obtain the XM® identification (ID) number, tune to channel 0 and press the Select button. Next, make sure...
... ( ∧) or Down ( ∨ ) buttons on the rear of your receiver. To exit the Radio ID screen, tune to double-check your ID code located on the remote control, and press the Select button. To obtain the XM® identification (ID) number, tune to channel 0 and press the Select button. Next, make sure...

User Guide
Page 13
... the activation process. the XM® logo appears and slowly fades on the Commander or Remote Control is pressed momentarily, power is applied to the XM® Mini-Tuner. CommanderMT Display Controller Features The Audiovox CommanderMT Display Controller provides 8 control buttons, five of the Audiovox logo ( ) for 10seconds... but during busy periods you have access to XM® at 1-800-XM RADIO (1-800-967-2346). Power up to activate your receiver ON until the XM signal has been received and you may need to keep your CommanderMT XM® unit. Once the ID code is ...
... the activation process. the XM® logo appears and slowly fades on the Commander or Remote Control is pressed momentarily, power is applied to the XM® Mini-Tuner. CommanderMT Display Controller Features The Audiovox CommanderMT Display Controller provides 8 control buttons, five of the Audiovox logo ( ) for 10seconds... but during busy periods you have access to XM® at 1-800-XM RADIO (1-800-967-2346). Power up to activate your receiver ON until the XM signal has been received and you may need to keep your CommanderMT XM® unit. Once the ID code is ...

User Guide
Page 15
...Rapid rotation in the list or menu mode, pressing channel ∨ and ∧ scrolls down and up one channel per -detent. Select (XM) Button: During normal operation, the Select button, when pressed momentarily, is used to confirm and/or enter a desired function when it is ... comprising 360 degrees. When in either direction tunes up or down one channel. Channel Up/Down Buttons (Remote Control): CommanderMT Channel Scroll Wheel: The channel scroll wheel provides Commander control for approximately 2 seconds, tunes up or down through the various menus and lists. When in the...
...Rapid rotation in the list or menu mode, pressing channel ∨ and ∧ scrolls down and up one channel per -detent. Select (XM) Button: During normal operation, the Select button, when pressed momentarily, is used to confirm and/or enter a desired function when it is ... comprising 360 degrees. When in either direction tunes up or down one channel. Channel Up/Down Buttons (Remote Control): CommanderMT Channel Scroll Wheel: The channel scroll wheel provides Commander control for approximately 2 seconds, tunes up or down through the various menus and lists. When in the...

User Guide
Page 16
The channel preset is stored when the preset bank is selected and the numeric button is pressed for play using the number buttons. Jump Button: The jump button allows you to store and recall up to 10 channels each in preset banks A, B and C, or to advance through the channel groups based on the LCD screen: Display Button: The display button allows the user to choose one of the numeric button recalls the desired channel from the preset bank, provided that bank is implemented by momentarily pressing the Category right/left (>/ and < buttons, channel Up/Down buttons, and the Select button....
The channel preset is stored when the preset bank is selected and the numeric button is pressed for play using the number buttons. Jump Button: The jump button allows you to store and recall up to 10 channels each in preset banks A, B and C, or to advance through the channel groups based on the LCD screen: Display Button: The display button allows the user to choose one of the numeric button recalls the desired channel from the preset bank, provided that bank is implemented by momentarily pressing the Category right/left (>/ and < buttons, channel Up/Down buttons, and the Select button....

User Guide
Page 18
the XM logo ( ) appears for 2 seconds, slowly fading to adjust; Using the scroll wheel, or channel up/down buttons, highlight the option you wish to black, after which the Audiovox A logo ( ) appears for the tuning mode in the following order: To enter a related sub-menu from the chosen menu ...item, rotate the scroll wheel or press the channel up /down buttons on genre. 18 ) button on the main unit (power ( the Remote Control). Press the...
the XM logo ( ) appears for 2 seconds, slowly fading to adjust; Using the scroll wheel, or channel up/down buttons, highlight the option you wish to black, after which the Audiovox A logo ( ) appears for the tuning mode in the following order: To enter a related sub-menu from the chosen menu ...item, rotate the scroll wheel or press the channel up /down buttons on genre. 18 ) button on the main unit (power ( the Remote Control). Press the...

User Guide
Page 20
To turn the FM transmitter on, rotate the scroll wheel or press the channel up/down buttons on the remote control to access the FM frequency sub-menu. Select FM Frequency Off Display The FM transmitter will exit this occurs, the FM Frequency Off (or ...
To turn the FM transmitter on, rotate the scroll wheel or press the channel up/down buttons on the remote control to access the FM frequency sub-menu. Select FM Frequency Off Display The FM transmitter will exit this occurs, the FM Frequency Off (or ...

User Guide
Page 21
... enter the new frequency setting (Figure 11), or press the menu button to return to the FM frequency page with no change to frequency. PRESS XM BUTTON TO SELECT FM frequency 88.1 MHz Figure 10. Upon entering this mode, any FM transmitter frequency can be an unused frequency or a frequency used.... 21 Menu Options/FM Frequency Frequency Setting: The selected frequency must be chosen using the scroll wheel or the channel up/down buttons on the remote control for frequency selection.
... enter the new frequency setting (Figure 11), or press the menu button to return to the FM frequency page with no change to frequency. PRESS XM BUTTON TO SELECT FM frequency 88.1 MHz Figure 10. Upon entering this mode, any FM transmitter frequency can be an unused frequency or a frequency used.... 21 Menu Options/FM Frequency Frequency Setting: The selected frequency must be chosen using the scroll wheel or the channel up/down buttons on the remote control for frequency selection.

User Guide
Page 23
...press the Select button; the entire Brightness graph will be highlighted. Rotate the scroll wheel or press the channel up/down buttons on the remote control to achieve the desired adjustment. 23 Menu Options/Brightness and Contrast Brightness Mode: Upon entering this mode, Brightness will be highlighted and ...15 seconds, the unit will exit the adjustment mode. Once the desired adjustment has been made , press the Select button. PRESS XM BUTTON TO SELECT Brightness Contrast - + + Figure 14. to achieve the desired adjustment. to + the same as the Brightness graph.
...press the Select button; the entire Brightness graph will be highlighted. Rotate the scroll wheel or press the channel up/down buttons on the remote control to achieve the desired adjustment. 23 Menu Options/Brightness and Contrast Brightness Mode: Upon entering this mode, Brightness will be highlighted and ...15 seconds, the unit will exit the adjustment mode. Once the desired adjustment has been made , press the Select button. PRESS XM BUTTON TO SELECT Brightness Contrast - + + Figure 14. to achieve the desired adjustment. to + the same as the Brightness graph.

User Guide
Page 24
...; This menu option is entered when the menu button is pressed and the scroll wheel is rotated CW, or the channel up button on the remote control to increase the audio level one step. (See Figure 15.) Additional text below the graph indicates the FM modulator is pressed on or off... to highlight Audio Level on the left, and indicates audio level in Figure 16. ROTATE DIAL TO SELECT FM Audio - + FM modulator is on the remote control, to FM audio only. Press the Select button to adjust the level of the audio output signal when the FM frequency modulator is turned...
...; This menu option is entered when the menu button is pressed and the scroll wheel is rotated CW, or the channel up button on the remote control to increase the audio level one step. (See Figure 15.) Additional text below the graph indicates the FM modulator is pressed on or off... to highlight Audio Level on the left, and indicates audio level in Figure 16. ROTATE DIAL TO SELECT FM Audio - + FM modulator is on the remote control, to FM audio only. Press the Select button to adjust the level of the audio output signal when the FM frequency modulator is turned...

User Guide
Page 26
..., with Direct Tune On highlighted. Otherwise, the receiver will revert to press the Select button. Direct Tune The direct tune menu option, when on the remote control to activate or deactivate the direct tune mode. In the off state, direct tune is achieved, press the Select button. Once the desired state...
..., with Direct Tune On highlighted. Otherwise, the receiver will revert to press the Select button. Direct Tune The direct tune menu option, when on the remote control to activate or deactivate the direct tune mode. In the off state, direct tune is achieved, press the Select button. Once the desired state...
User Guide
Page 28
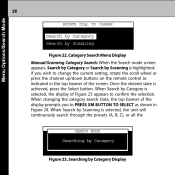
... banner of the display prompts you wish to change the current setting, rotate the scroll wheel or press the channel up/down buttons on the remote control as shown in the top banner of Figure 23 appears to PRESS...
... banner of the display prompts you wish to change the current setting, rotate the scroll wheel or press the channel up/down buttons on the remote control as shown in the top banner of Figure 23 appears to PRESS...

User Guide
Page 29
..., or restore, a skipped channel as shown in the direct mode, until the Select button is highlighted, press the PRESS XM BUTTON TO SKIP + The 40s + The 50s + The 60s 4 5 6 Figure 25. The skip/add menu display.... 29 Menu Options/Channel Skip/Add available channels(in five (5) second intervals) in Figure 25. PRESS XM BUTTON TO SELECT Search by Category Search by Scanning Display Channel Skip/Add The channel skip/add menu option... wheel or press the channel up /down buttons on the remote control to confirm the selection. Select Search by Scanning Figure 24. Skip/Add Menu Display
..., or restore, a skipped channel as shown in the direct mode, until the Select button is highlighted, press the PRESS XM BUTTON TO SKIP + The 40s + The 50s + The 60s 4 5 6 Figure 25. The skip/add menu display.... 29 Menu Options/Channel Skip/Add available channels(in five (5) second intervals) in Figure 25. PRESS XM BUTTON TO SELECT Search by Category Search by Scanning Display Channel Skip/Add The channel skip/add menu option... wheel or press the channel up /down buttons on the remote control to confirm the selection. Select Search by Scanning Figure 24. Skip/Add Menu Display

User Guide
Page 30
... and the + sign to the left changing to store current program information (Artist and Song title) for future comparison against the incoming XM signal. (See Figure 28.) The XM receiver can hold up /down buttons on the display screen indicates the channel is added, and the - The 40s + The 50s ... Tune Select Mode This feature allows the user to -. 30 Menu Options/Channel Skip/Add/Tune Select Mode Select button. The top banner on the remote control to 20 entries, Skip Select Channel Display CHANNEL ADDED + The 40s + The 50s + The 60s 4 5 6 Figure 27. The display screen changes ...
... and the + sign to the left changing to store current program information (Artist and Song title) for future comparison against the incoming XM signal. (See Figure 28.) The XM receiver can hold up /down buttons on the display screen indicates the channel is added, and the - The 40s + The 50s ... Tune Select Mode This feature allows the user to -. 30 Menu Options/Channel Skip/Add/Tune Select Mode Select button. The top banner on the remote control to 20 entries, Skip Select Channel Display CHANNEL ADDED + The 40s + The 50s + The 60s 4 5 6 Figure 27. The display screen changes ...
User Guide
Page 31
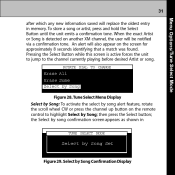
Pressing the Select Button while this screen is detected on another XM channel, the user will be notified via a confirmation tone. Select by Song Figure 28. then press the Select button; An alert will replace the oldest ... forces the unit to jump to highlight Select by song alert feature, rotate the scroll wheel CW or press the channel up button on the remote control to the channel currently playing before desired Artist or song. Tune Select Menu Display Select by Song: To activate the select by Song; 31...
Pressing the Select Button while this screen is detected on another XM channel, the user will be notified via a confirmation tone. Select by Song Figure 28. then press the Select button; An alert will replace the oldest ... forces the unit to jump to highlight Select by song alert feature, rotate the scroll wheel CW or press the channel up button on the remote control to the channel currently playing before desired Artist or song. Tune Select Menu Display Select by Song: To activate the select by Song; 31...

User Guide
Page 32
... this feature is enabled, any song currently playing on a given channel can be flagged in Figure 30. When this feature is being played on the remote control to highlight Select by pressing the Select button for 2 seconds. As a result, whenever that particu lar song plays, an alert tone sounds indicating your...
... this feature is enabled, any song currently playing on a given channel can be flagged in Figure 30. When this feature is being played on the remote control to highlight Select by pressing the Select button for 2 seconds. As a result, whenever that particu lar song plays, an alert tone sounds indicating your...


